1. はじめに
This manual provides detailed instructions for the installation, operation, and maintenance of the OOYCYOO 60A MPPT Solar Charge Controller, Model EC60A. This device is designed to efficiently manage power flow from solar panels to various battery types, including 12V, 24V, 36V, and 48V systems.
適切な機能と安全性を確保するために、設置および操作の前にこのマニュアルをよくお読みください。
2. 主な特徴
- 60A MPPT Charging: Utilizes Maximum Power Point Tracking technology for efficient solar energy conversion.
- マルチStage 充電: 4sの特徴tage battery charging algorithm (Bulk Charge, Boost Charge, Float Charge, Equalization) for optimal battery health.
- ワイドVoltageサポート: 12V、24V、36V、48V のバッテリー システムを自動的に検出し、サポートします。
- 高PV入力: Supports solar panel open circuit voltage up to 160VDC and input power up to 2800W (for 48V systems).
- バッテリー互換性: Compatible with various battery types including AGM, Gel, Flooded, and Lithium (LFP), with pre-set and user-defined charging parameters.
- 高効率: Tracking efficiency not less than 98.1% and peak conversion efficiency up to 98%.
- 高度な保護: Includes PV over current/power, PV short circuit, PV reverse polarity, night reverse charging, battery reverse polarity, over voltage, over discharge, overheating, lithium battery low temperature, load short circuit, load overload, and TVS high voltageトランジェント。
- LCDディスプレイ: Integrated blacklight LCD for monitoring system status, including KWH charge amount.
- 効率的な冷却: Die-cast aluminum construction with built-in cooling fan for effective heat dissipation.
3. 安全に関する注意事項
設置および操作中は、次の安全上の注意事項を守ってください。
- 電源を入れる前に、すべての接続が正しく安全であることを確認してください。
- 必ず最初にバッテリー、次にソーラーパネル、最後に負荷を接続してください。取り外しは逆の順序で行ってください。
- コントローラーをご自身で分解したり修理したりしないでください。修理が必要な場合は、資格のある担当者にご連絡ください。
- コントローラーは、可燃性物質や直射日光を避け、換気の良い場所に設置してください。
- 電気システムを扱うときは、適切な個人用保護具 (PPE) を着用してください。
- システムボリュームを確認するtageはコントローラの最大入力電圧を超えないtage(160VDC)。
4.製品オーバーview
The OOYCYOO 60A MPPT Solar Charge Controller features a robust design with an intuitive LCD display and clearly labeled terminals for easy connection.

図4.1: 前面 view of the OOYCYOO 60A MPPT Solar Charge Controller, showing the LCD display, control buttons, and terminal connections.

図4.2:詳細 view of the controller highlighting the LCD display, control buttons (SET, A, B, C, D), 5-second reset function, and clearly marked Solar Panel, Battery, and Load terminals.
4.1. コンポーネントとインターフェース
- LCDディスプレイ: Shows real-time system parameters such as PV input voltage、バッテリーvoltage, load output, and charging status.
- Control Buttons (A, B, C, D, SET): Used for navigating menus, adjusting settings, and confirming selections.
- ソーラーパネル端子: Connect positive and negative leads from the solar array.
- バッテリー端子: Connect positive and negative leads to the battery bank.
- 負荷端末: Connect positive and negative leads to DC loads.
5. インストールとセットアップ
5.1. コントローラの取り付け
Mount the controller vertically on a wall or a stable surface in a dry, well-ventilated indoor location. Ensure adequate clearance around the unit for proper airflow and heat dissipation. Avoid direct sunlight, high temperatures, and humid environments.
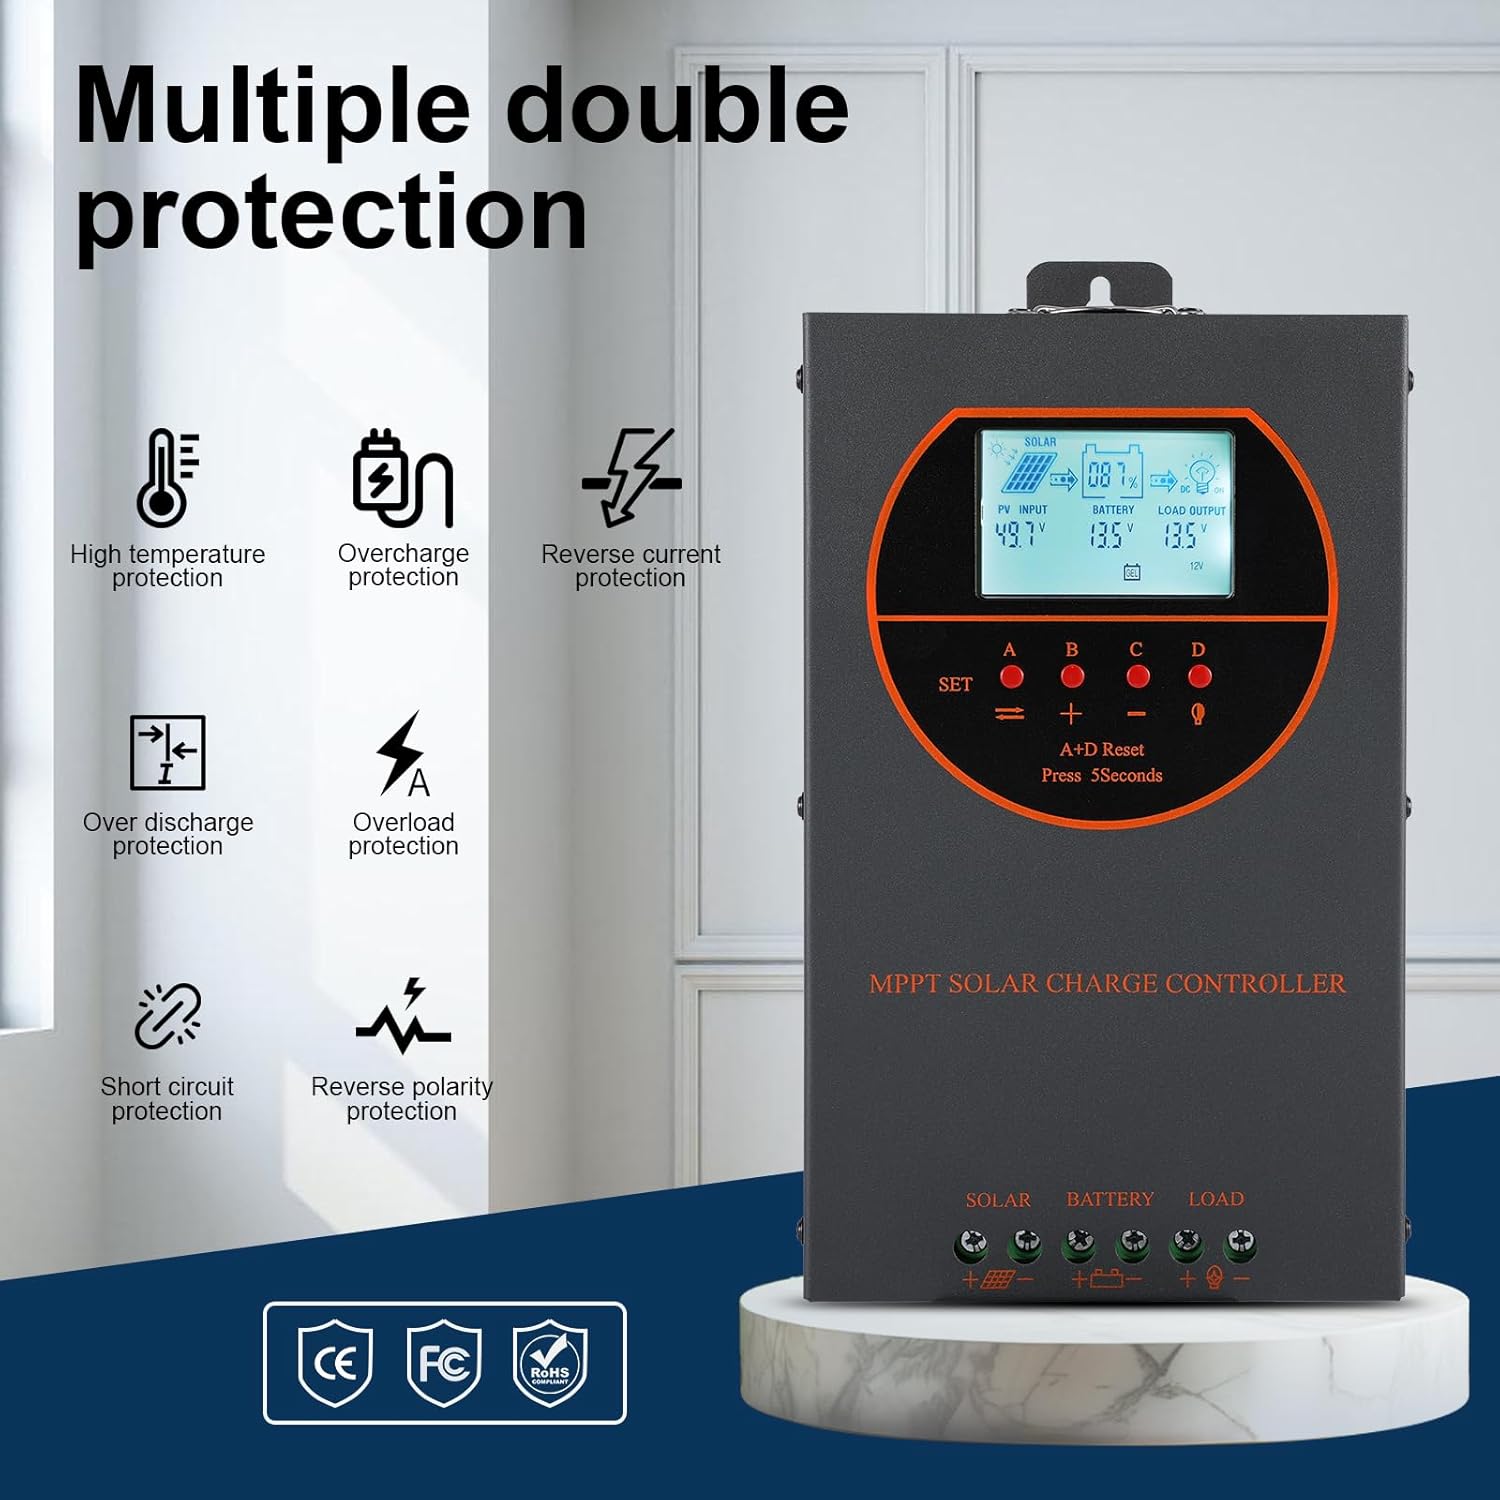
Figure 5.1: Dimensions of the OOYCYOO 60A MPPT Solar Charge Controller, showing approximate measurements of 14cm (5.5in) width, 5.5cm (2.2in) depth, and 23cm (9.1in) length.
5.2. 配線手順
Follow this wiring sequence carefully to prevent damage to the controller or other components:
- バッテリーを接続します。 Connect the positive and negative terminals of the battery to the corresponding battery terminals on the controller. Ensure correct polarity. The controller will automatically detect the battery voltage(12V / 24V / 36V / 48V)。
- ソーラーパネルを接続します。 Connect the positive and negative leads from the solar panel array to the corresponding PV input terminals on the controller. Ensure correct polarity.
- DC負荷を接続する(オプション): Connect the positive and negative leads of your DC load to the corresponding load terminals on the controller.
重要: Always connect the battery first and disconnect the solar panel first when disassembling the system.

Figure 5.2: Illustrative wiring diagram showing connections from solar panels to the controller, then to the battery, and finally to DC and AC loads via an inverter. This diagram also shows the possibility of connecting two 60A controllers in parallel for increased capacity.
5.3.システムボリュームtage and Power Configuration
The controller automatically identifies the battery system voltage. Ensure your solar panel array's open circuit voltage (Voc) and maximum input power are within the specified limits for your battery system:
| バッテリーシステム | 最大。 PV開回路Voltage(Voc) | 最大PV入力電力 |
|---|---|---|
| 12V | ≤72V | 720W |
| 24V | ≤108V | 1440W |
| 36V | ≤144V | 2100W |
| 48V | ≤160V | 2800W |

Figure 5.3: Diagram illustrating the connection of multiple PV modules in series to the controller, with a table detailing recommended system parameters for 12V, 24V, and 48V systems, including battery float voltage、volの下tage保護、回復voltage, and maximum input power.
6. 操作
6.1. LCDディスプレイとインジケータ
The LCD display provides real-time information about the solar charging system. Key indicators include:
- PV 入力: 現在のボリュームを表示しますtage and power from the solar panels.
- バッテリー: 現在のバッテリー容量を表示しますtageと充電状態。
- 負荷出力: DC 負荷出力の状態を示します。
- KWH: Displays the total accumulated charge in kilowatt-hours.
6.2. 電池タイプの選択
The controller is compatible with various battery types. You can select the appropriate battery type through the controller's settings menu to ensure optimal charging. Supported types include:
- ゲル
- 年次総会
- USER (user-defined parameters)
- SEL(密封)
- FLD(浸水)
- LI(リチウム)
- リン酸鉄リチウム

Figure 6.1: Diagram illustrating the controller's strong adaptability to various battery types (GEL, AGM, USER, SEL, FLD, LI, LiFePO4) and a graph showing the 4-stage charging process: Bulk Charge, Constant Charging (Boost), and Float Charge.
6.3. Charging Algorithm
コントローラーは4秒を採用tage charging algorithm to maximize battery life and performance:
- バルクチャージ: 最大電流を供給し、バッテリーを約 80% の容量まで急速充電します。
- ブーストチャージ: Charges the battery at a higher voltage to ensure full charge and equalization.
- フロートチャージ: バッテリーを安全な電圧に維持しますtage to prevent self-discharge and overcharging.
- イコライゼーション: 定期的に浸水型バッテリーを過充電してセル容量のバランスをとるtages and prevent sulfation. (Applicable to flooded batteries only, if enabled).
7. メンテナンス
定期的なメンテナンスにより、ソーラー充電コントローラーの寿命が長くなり、最適なパフォーマンスが確保されます。
- 接続を確認してください: すべての配線接続部の締め付け具合と腐食を定期的に点検してください。
- クリーンコントローラー: コントローラーは清潔に保ち、ほこりを取り除いてください。乾いた布で表面を拭いてください。通気口が塞がれていないことを確認してください。
- パフォーマンスを監視: Regularly check the LCD display for normal operating parameters. Note any unusual readings.
- バッテリーの検査: Inspect batteries for any signs of damage, leakage, or corrosion. Clean battery terminals as needed.
8。 トラブルシューティング
This section addresses common issues you might encounter with the OOYCYOO 60A MPPT Solar Charge Controller.
8.1. よくある問題と解決策
| 問題 | 考えられる原因 | 解決 |
|---|---|---|
| ディスプレイが表示されない/コントローラーの電源が入らない | バッテリーが接続されていないか、電圧が低いtage; 逆極性。 | バッテリーの接続と容量を確認してくださいtage. 極性が正しいことを確認してください。電圧が足りない場合はバッテリーを充電してください。tageが低すぎます。 |
| 太陽光充電なし | Solar panel not connected; reverse polarity; low sunlight; PV over-voltage / current。 | ソーラーパネルの接続と極性を確認してください。十分な日光を確保してください。PVボリュームを確認してください。tage and current are within limits. |
| ロードが機能しない | Load not connected; load short circuit; overload; battery low voltage. | Check load connections. Inspect for short circuits or overloads. Ensure battery has sufficient charge. |
| コントローラーの過熱 | Poor ventilation; excessive load/PV input. | Ensure adequate airflow around the controller. Reduce load or PV input if consistently overheating. |
8.2. 保護機能
The controller includes multiple protection features to safeguard the system:
- PV過電流/電力
- PV短絡
- PV逆極性
- ナイトリバースチャージ
- バッテリーの逆極性
- バッテリーオーバーボリュームtage
- バッテリーの過放電
- Battery Overheating, Controller Overheating
- リチウム電池低温
- 負荷短絡
- 負荷過負荷
- TVS ハイボリュームtageトランジェント

Figure 8.3: Visual representation of the multiple protection features integrated into the controller, including low voltage, overheat, short circuit, reverse protection, overload, and overcurrent protection.

図8.4:内部 view of the controller, highlighting key components such as copper coil transformers and capacitors, which contribute to its robust performance and protection features.
9. 技術仕様
| パラメータ | 仕様 |
|---|---|
| 定格充電電流 | 60A |
| システム公称容量tage | 12V/24V/36V/48V DC Auto Identifying |
| バッテリー巻tage範囲 | 9V〜55V |
| 最大。 PV開回路Voltage | 160VDC |
| 最大PV入力電力(12Vシステム) | 720W |
| 最大PV入力電力(24Vシステム) | 1440W |
| 最大PV入力電力(36Vシステム) | 2100W |
| 最大PV入力電力(48Vシステム) | 2800W |
| パワーターミナル | 6-12 AWG |
| 寸法(長さ×幅×高さ) | 11 x 6 x 2.5インチ(約27.9 x 15.2 x 6.3 cm) |
| 重さ | 4.07ポンド(約1.8kg) |
| 追跡効率 | ≥98.1% |
| ピーク変換効率 | 最大98% |
| 冷却 | Die-cast aluminum housing, built-in cooling fan |
| サポートされているバッテリーの種類 | AGM, Gel, Flooded, Lithium (LFP), Sealed, User-defined |
| 材料 | アルミニウム |
| 商品型番 | EC60A |
| 欧州連合 | 750864834470 |
10. サポートとお問い合わせ
For technical support, warranty claims, or further assistance, please contact OOYCYOO customer service through the retailer where the product was purchased or visit the official OOYCYOO store on Amazon:

