1. はじめに
This manual provides detailed instructions for the installation, operation, and maintenance of your Thermalright TL-M12Q 120mm case fan. The TL-M12Q series fans are designed to provide efficient cooling and customizable ARGB lighting for your computer system.
2 製品の特徴
- Positive Air Outlet Design: Fan blades rotate clockwise, providing 2000RPM for case exhaust.
- Silent Fan Parameters: 124x120x25mm size, 2000RPM±10% speed, ≤28.2DB(A) noise, 68.9CFM air volume, 2.21mm H2O wind pressure.
- PWM Intelligent Temperature Control: Automatic speed adjustment based on motherboard temperature.
- Detail Optimization: Constructed from UL CLASSA insulation grade PBT+PC material, supporting PWM series control and 3-pin ARGB lighting.
- ワイヤレス接続: New power chip module simplifies cable management by transmitting signal and power between fans via contacts.
- インフィニティミラー ARGB 照明: Customizable lighting effects for aesthetic enhancement.
- S-FDBベアリング: Fluid Dynamic Bearing with magnetic design for stable, low-friction, and low-noise operation.
3. 箱の中身
- Thermalright TL-M12Q Case Fan
- 取り付けネジ
- 接続ケーブル(PWM、ARGB)
4.インストールガイド
Follow these steps to properly install your Thermalright TL-M12Q case fan. For a visual guide, please refer to the installation tutorial video below.
ビデオの説明: This video provides a step-by-step installation tutorial for the Thermalright TL-M12Q series CPU fan, demonstrating how to connect multiple fans and wire them to the motherboard.
Step 1: Connecting Multiple Fans (Wireless Splicing)
The TL-M12Q fans feature a wireless splicing design, allowing multiple fans to be connected directly to each other without individual cables between them. This simplifies cable management.
- Align the fan clip of one fan to the wide side of the install slot on another fan.
- Gently push the fans together to attach them.
- Slide the fans to lock them securely in place. Ensure they are well connected before proceeding.
- To unlock, slide the fans in the opposite direction.

画像の説明: Two Thermalright TL-M12Q case fans are shown connected side-by-side, demonstrating the wireless splicing mechanism. This connection method simplifies wiring by allowing power and signal to pass directly between fans.
Step 2: Connecting Cables to Motherboard
After connecting your fans together, you will need to connect the main fan cable to your motherboard for power, speed control (PWM), and ARGB lighting.
- Connect the fan cable to the side of the fan with pins. Ensure the cable is fully inserted and locked.
- Connect the 4-pin PWM cable from the fan assembly to an available 4-pin chassis fan header on your motherboard. This enables intelligent speed control.
- Connect the 3-pin ARGB cable from the fan assembly to an available 3-pin 5V ARGB header on your motherboard. This allows for synchronized lighting effects.
- If you are not using the 3-pin ARGB connectors, please keep the pin lid on to avoid short circuits.

画像の説明: クローズアップ view of the wireless splicing power chip module, which integrates power and signal transmission for multiple fans, reducing cable clutter.
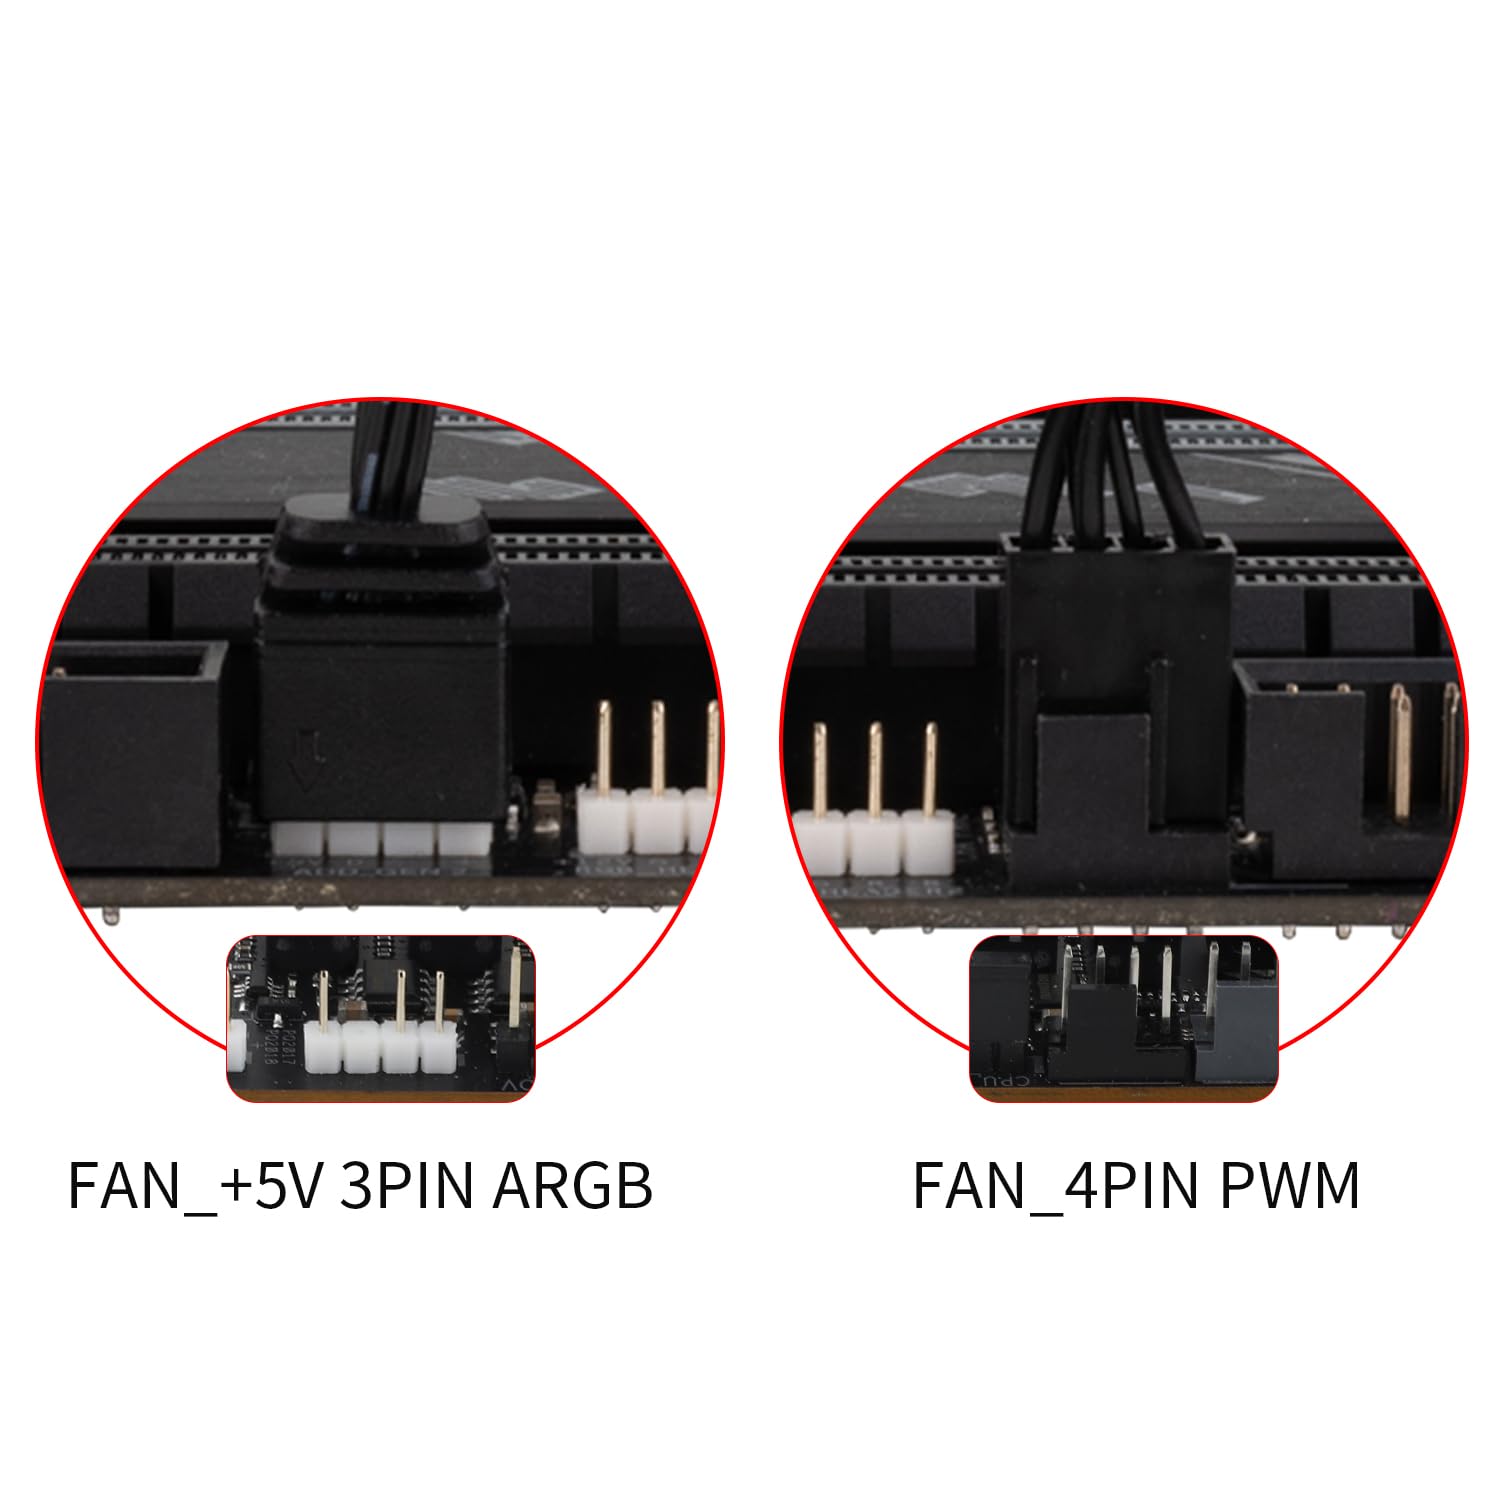
画像の説明: This image shows the typical motherboard headers for connecting the fan: a 5V 3-pin ARGB header for lighting control and a 4-pin PWM header for fan speed control.
5. 操作手順
ファン速度制御(PWM)
The TL-M12Q fan utilizes PWM (Pulse Width Modulation) technology for intelligent speed control. Once connected to a 4-pin PWM header on your motherboard, the fan speed will automatically adjust based on your system's temperature, optimizing cooling performance and noise levels. You can typically configure PWM settings through your motherboard's BIOS/UEFI or dedicated software.
ARGB照明制御
The fan's Addressable RGB (ARGB) lighting provides customizable visual effects. Connect the 3-pin ARGB cable to a compatible 5V ARGB header on your motherboard. You can then control the lighting patterns, colors, and brightness using your motherboard's RGB software (e.g., ASUS Aura Sync, MSI Mystic Light Sync, Gigabyte RGB Fusion, ASRock Polychrome Sync). Ensure your motherboard software is up-to-date for the best experience.

画像の説明: The Thermalright TL-M12Q fan showcasing its infinity mirror ARGB lighting, highlighting its aesthetic appeal and customizable illumination.
6. メンテナンス
定期的なメンテナンスを行うことで、ファンの最適なパフォーマンスと寿命が確保されます。
- クリーニング: ファンの羽根とフレームにたまった埃を取り除くため、定期的に清掃してください。柔らかいブラシまたは圧縮空気をご使用ください。清掃前にファンの電源を切ってください。
- ベアリング: The S-FDB (Fluid Dynamic Bearing) is designed for long-lasting, maintenance-free operation. Do not attempt to disassemble the fan for bearing maintenance.
- 検査: ケーブルに摩耗や損傷がないか確認してください。すべての接続が確実に行われていることを確認してください。
7。 トラブルシューティング
If you encounter issues with your Thermalright TL-M12Q fan, refer to the following common troubleshooting steps:
- ファンが回転しない:
- 4 ピン PWM ケーブルがマザーボードのファンのヘッダーにしっかりと接続されていることを確認します。
- Check BIOS/UEFI settings to ensure the fan header is enabled and configured correctly (e.g., not set to 0% PWM duty cycle).
- 電源が正しく機能していることを確認します。
- ARGB照明なし:
- Ensure the 3-pin ARGB cable is securely connected to a 5V ARGB header on the motherboard. Note: Do not connect to a 12V RGB header, as this can damage the LEDs.
- Check your motherboard's RGB software to ensure lighting is enabled and configured.
- If multiple fans are connected, ensure the wireless splicing connections are firm.
- 過度の騒音:
- Ensure the fan is securely mounted and not vibrating against the case or other components. The rubber pads should help absorb vibrations.
- ファンブレードに蓄積したほこりを取り除きます。
- Check fan speed settings in BIOS/UEFI or software; higher speeds generate more noise.
- Fans Not Splicing Correctly:
- Ensure the fan clips are correctly aligned with the wide side of the installation slot.
- Apply firm, even pressure when attaching and sliding to lock the fans.
8. 仕様
| 製品寸法 | 長さ4.88インチ x 幅4.72インチ x 高さ0.98インチ (124mm x 120mm x 25mm) |
| ブランド | サーマルライト |
| 電源コネクタタイプ | 4ピンPWM |
| 巻tage | 12 ボルト (DC) |
| 冷却方法 | 空気 |
| 対応デバイス | デスクトップ |
| 騒音レベル | 28.2デシベル(最大) |
| 材料 | PBT+PC Plastic |
| 最高回転数 | 2000 回転 |
| 風量 | 68.9 立方フィート/分 (CFM) |
| アイテム重量 | 9.1オンス |
| 商品型番 | TL-M12Q |
| GTIN/UPC | 753873530807 |
9. 保証とサポート
保証情報とテクニカルサポートについては、Thermalrightの公式ウェブサイトをご覧ください。 web当サイトをご覧いただくか、販売店にお問い合わせください。保証請求のために購入時の領収書を保管してください。


