1. はじめに
This manual provides essential instructions for setting up, operating, and maintaining your CONSUMER CELLULAR Iris Connect smartphone. The Iris Connect is designed for reliable performance, featuring a 6.5-inch display, 32GB of storage, and running on Android 13. Please read this manual thoroughly to ensure proper use and to maximize your device's capabilities.
2. 箱の中身
Upon unboxing your CONSUMER CELLULAR Iris Connect, verify that all the following items are included:
- CONSUMER CELLULAR Iris Connect Smartphone
- USBケーブル
- クイックスタートガイド
3.デバイスオーバーview
Familiarize yourself with the physical components of your Iris Connect smartphone.

図3.1: 前面と背面 view of the Iris Connect smartphone, highlighting its sleek design and camera placement.

図3.2: フロント view of the Iris Connect, showcasing the 6.5-inch display and front-facing camera.
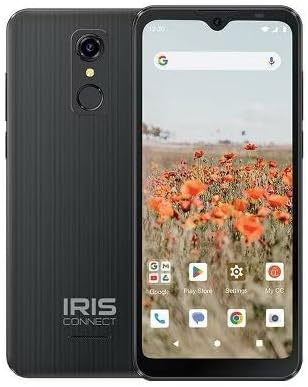
図3.3: 戻る view of the Iris Connect, showing the main camera, flash, and fingerprint sensor.
主要コンポーネント:
- 6.5インチディスプレイ: High Definition+ screen for clear visuals.
- フロントカメラ(8MP): Located at the top of the display for selfies and video calls.
- メインカメラ(13MP): Located on the rear, for high-resolution photos and videos.
- 指紋スキャナー: Integrated on the rear for secure unlocking.
- 電源ボタン: Typically on the right side, used to turn the device on/off or wake/sleep the screen.
- 音量ボタン: 電源ボタンの横にあり、オーディオレベルを調整します。
- USB-Cポート: 下部は充電とデータ転送用です。
- 3.5mmオーディオジャック: ヘッドホン接続用。
4. セットアップ
4.1. SIMカードとMicroSDカードの挿入
- デバイスの側面にある SIM トレイを見つけます。
- Insert the SIM ejector tool (not included, use a thin paperclip) into the small hole next to the tray and press gently until the tray pops out.
- 金色の接点を下にして、Nano-SIM カードを指定されたスロットに挿入します。
- If desired, insert a microSD card (up to 256GB) into its dedicated slot for expanded storage.
- カチッと音がするまでトレイを慎重にデバイスに再挿入します。
4.2. 初回電源投入とセットアップウィザード
- を押し続けます 電源ボタン 画面が点灯するまで。
- 画面上の指示に従って言語を選択し、Wi-Fi ネットワークに接続し、Google アカウントを設定します。
- You may be prompted to transfer data from an old device or set up security features like the fingerprint scanner.
4.3. デバイスの充電
Before first use, it is recommended to fully charge your device. The Iris Connect features a 3500 mAh battery with an approximate charging time of 2.5 hours.
- USB ケーブルを携帯電話の下部にある USB-C ポートに接続します。
- Connect the other end of the USB cable to a compatible power adapter (not included) and plug it into a wall outlet.
- 充電インジケーターが画面に表示されます。
5. 操作手順
5.1. 基本的なナビゲーション
- 触る: アイコンをタップしてアプリを開いたり、項目を選択したりします。
- スワイプ: 画面上で指をドラッグして、画面をスクロールしたり、画面間を移動したりします。
- ピンチ: 2本の指を使って写真を拡大または縮小し、 web ページ。
- ホーム画面: アプリとウィジェットの中心ハブ。
- アプリドロワー: ホーム画面から上にスワイプすると、インストールされているすべてのアプリケーションにアクセスできます。
5.2.電話をかける
- タップして 電話 ホーム画面またはアプリドロワーのアイコン。
- ダイヤルパッドを使用して電話番号を入力するか、アドレス帳から連絡先を選択します。
- タップして 電話 通話を開始するボタン。
5.3. メッセージの送信
- 開く メッセージ アプリ。
- タップして チャットを開始 or 新しいメッセージ アイコン。
- 受信者の番号を入力するか、連絡先から選択して、メッセージを入力します。
- タップして 送信 ボタン。
5.4.Wi-Fiへの接続
- へ移動 設定 > ネットワークとインターネット > インターネット.
- Wi-Fiの切り替え On.
- リストから希望の Wi-Fi ネットワークを選択し、プロンプトが表示されたらパスワードを入力します。
5.5.Bluetoothペアリング
- へ移動 設定 > 接続されたデバイス > 接続設定 > ブルートゥース.
- Bluetoothを切り替える On.
- 選択 新しいデバイスをペアリングする and choose your desired device from the list. Follow any on-screen prompts to complete pairing.
5.6. カメラの使用
The Iris Connect features a 13MP main camera and an 8MP front-facing camera.
- 開く カメラ アプリ。
- タップして シャッター 写真を撮るためのボタン。
- Switch between photo and video modes, or front and rear cameras, using the on-screen icons.
5.7.指紋スキャナー
To set up the fingerprint scanner for secure unlocking:
- へ移動 設定 > セキュリティとプライバシー > デバイスのロック解除 > 指紋.
- 画面上の指示に従って指紋を登録します。
6. メンテナンス
6.1.デバイスのクリーニング
To keep your device clean and functional:
- 柔らかく糸くずの出ない布を使用して、画面と本体を拭いてください。
- 強力な化学薬品、研磨剤入りの洗剤、エアゾールスプレーの使用は避けてください。
- ポートにほこりやごみがないことを確認してください。
6.2. バッテリーのお手入れ
To optimize your battery life (up to 26 hours of use):
- 極端な温度を避けてください。
- 充電が完了したら、デバイスを長時間充電したまま放置しないでください。
- Adjust screen brightness and close unused apps to conserve power.
6.3. ソフトウェアの更新
ソフトウェア アップデートを定期的に確認し、デバイスに最新の機能とセキュリティ パッチが適用されていることを確認してください。
- へ移動 設定 > システム > システムアップデート.
- 画面上の指示に従って、利用可能なアップデートをダウンロードしてインストールします。
7。 トラブルシューティング
This section addresses common issues you might encounter with your Iris Connect smartphone.
- デバイスの電源が入らない: バッテリーが充電されていることを確認してください。充電器を接続し、数分待ってから再度電源を入れてください。
- ネットワーク信号なし: Check if your SIM card is correctly inserted. Verify that Airplane Mode is off (swipe down from the top of the screen to check quick settings). Contact your service provider if the issue persists.
- アプリがクラッシュまたはフリーズする: Try restarting the app. If the issue continues, restart the phone. You may also clear the app's cache or data via 設定 > アプリ > [アプリ名] > ストレージとキャッシュ.
- パフォーマンスが遅い: Close unused apps, clear cache, or consider uninstalling rarely used applications to free up storage.
- Unable to connect to Wi-Fi/Bluetooth: Ensure Wi-Fi/Bluetooth is enabled in settings. Try forgetting the network/device and reconnecting. Restart your phone and the router/Bluetooth device.
- Forgot screen lock password/pattern: Googleアカウントをリンクしている場合は、リセットできる可能性があります。そうでない場合は、工場出荷時の状態にリセットする必要があるかもしれません(これによりすべてのデータが消去されます)。
For more complex issues, please refer to the official CONSUMER CELLULAR support resources or contact their customer service.
8. 仕様
Detailed technical specifications for the CONSUMER CELLULAR Iris Connect smartphone (Model: SH4650).
| 特徴 | 仕様 |
|---|---|
| モデル名 | アイリスコネクト |
| モデル番号 | SH4650 |
| オペレーティング·システム | アンドロイド13.0 |
| 表示サイズ | 6.5インチ |
| ディスプレイ解像度 | 1440×810 |
| CPUモデル | スナップドラゴン710 |
| CPU速度 | 2GHz帯 |
| RAMメモリインストールサイズ | 3ギガバイト |
| 内部ストレージ | 32ギガバイト |
| 拡張可能なストレージ | microSD経由で最大256GB |
| メインカメラ | 13 MP |
| フロントカメラ | 8 MP |
| バッテリー容量 | 3500ミリamp 営業時間 |
| バッテリー電力定格 | 3600 (likely Wh or similar unit, as mAh is 3500) |
| 充電時間 | 2.5時間 |
| 接続性 | 4G LTE、Bluetooth、Wi-Fi |
| 特集 | Dual Camera, Expandable Storage, Fingerprint Scanner, Long Battery Life |
| オーディオジャック | 3.5 ミリメートル |
| 寸法 | 8 x 6 x 3インチ |
| アイテム重量 | 6.5オンス |
9. 保証とサポート
For information regarding your product's warranty, please refer to the warranty card included with your purchase or visit the official CONSUMER CELLULAR website. For technical assistance, troubleshooting beyond this manual, or customer service inquiries, please contact CONSUMER CELLULAR support directly.
CONSUMER CELLULAR Official Webサイト: www.consumercellular.com


