1. 安全情報
本製品を設置または操作する前に、必ずすべての指示をよく読んで理解してください。指示に従わない場合、感電、火災、その他の危険が発生し、物的損害や人身傷害につながる可能性があります。
- 設置または保守作業を行う前に、必ず回路ブレーカーで電源をオフにしてください。
- 設置手順が不明な場合は、資格のある電気技師にご相談ください。
- すべての電気接続が安全であり、地域の規則や条例に準拠していることを確認してください。
- Do not install on a dimmer switch.
- この器具は屋外使用に適しており、耐水性があります。
2. パッケージ内容
インストールを開始する前に、すべてのコンポーネントが揃っていることを確認してください。
- LED Outdoor Flood Wall Light (1 unit)
- 取り付けハードウェア(ネジ、ワイヤコネクタ)
- ガスケット
- 取扱説明書

Figure 2.1: Product components and adjustable parts.
3 製品の特徴
The Maxxima LED Outdoor Flood Wall Light is designed for reliable outdoor security and illumination.
- 強力な照明: Delivers 950 lumens of 3000K warm white light with an energy-efficient 13W design.
- 高度なモーション検出: PIR motion sensor with up to a 70 ft range.
- 調整可能なタイマー: Choose from 1, 5, or 10 minutes for how long the light stays on after motion detection.
- 夕暮れから夜明けまでのセンサー: Photocell sensor automatically operates at night and conserves energy during the day.
- 調整可能なヘッド: Easily direct the light beam with a 180° vertical tilt.
- Adjustable Arm and Sensor: 90° vertical arm tilt and 180° vertical tilt & horizontal swivel for the motion sensor, with 360° sensor rotation.
- 耐久性のある構造: Built with aluminum, rated for 50,000 lifetime hours, ETL listed.
ビデオ3.1: 終了view of Maxxima LED Outdoor Flood Light features and adjustability.
4. インストール
4.1 治具の取り付け
- 設置を開始する前に、回路ブレーカーの電源を切ってください。
- Remove the existing fixture (if any) and disconnect wiring.
- Attach the mounting plate to the junction box using the provided screws. Ensure the gasket is properly seated between the fixture and the mounting surface for a weather-tight seal.
- Feed the electrical wires from the junction box through the center hole of the mounting plate.
4.2配線接続
次のようにワイヤを接続します。
- 接続する 黒 器具から 黒 (Live/Hot) wire from the junction box.
- 接続する 白 器具から 白 ジャンクションボックスからの(中性)線。
- 接続する 緑 (Ground) wire from the fixture to the 緑 or bare copper (Ground) wire from the junction box.
- 付属のワイヤコネクタを使用してすべての接続を固定します。

Figure 4.1: Wiring connections for the flood light.
4.3最終組み立て
- すべての配線を慎重に接続ボックスに押し込みます。
- Align the fixture with the mounting plate and secure it with the remaining screws.
- 回路ブレーカーで電源を復旧します。
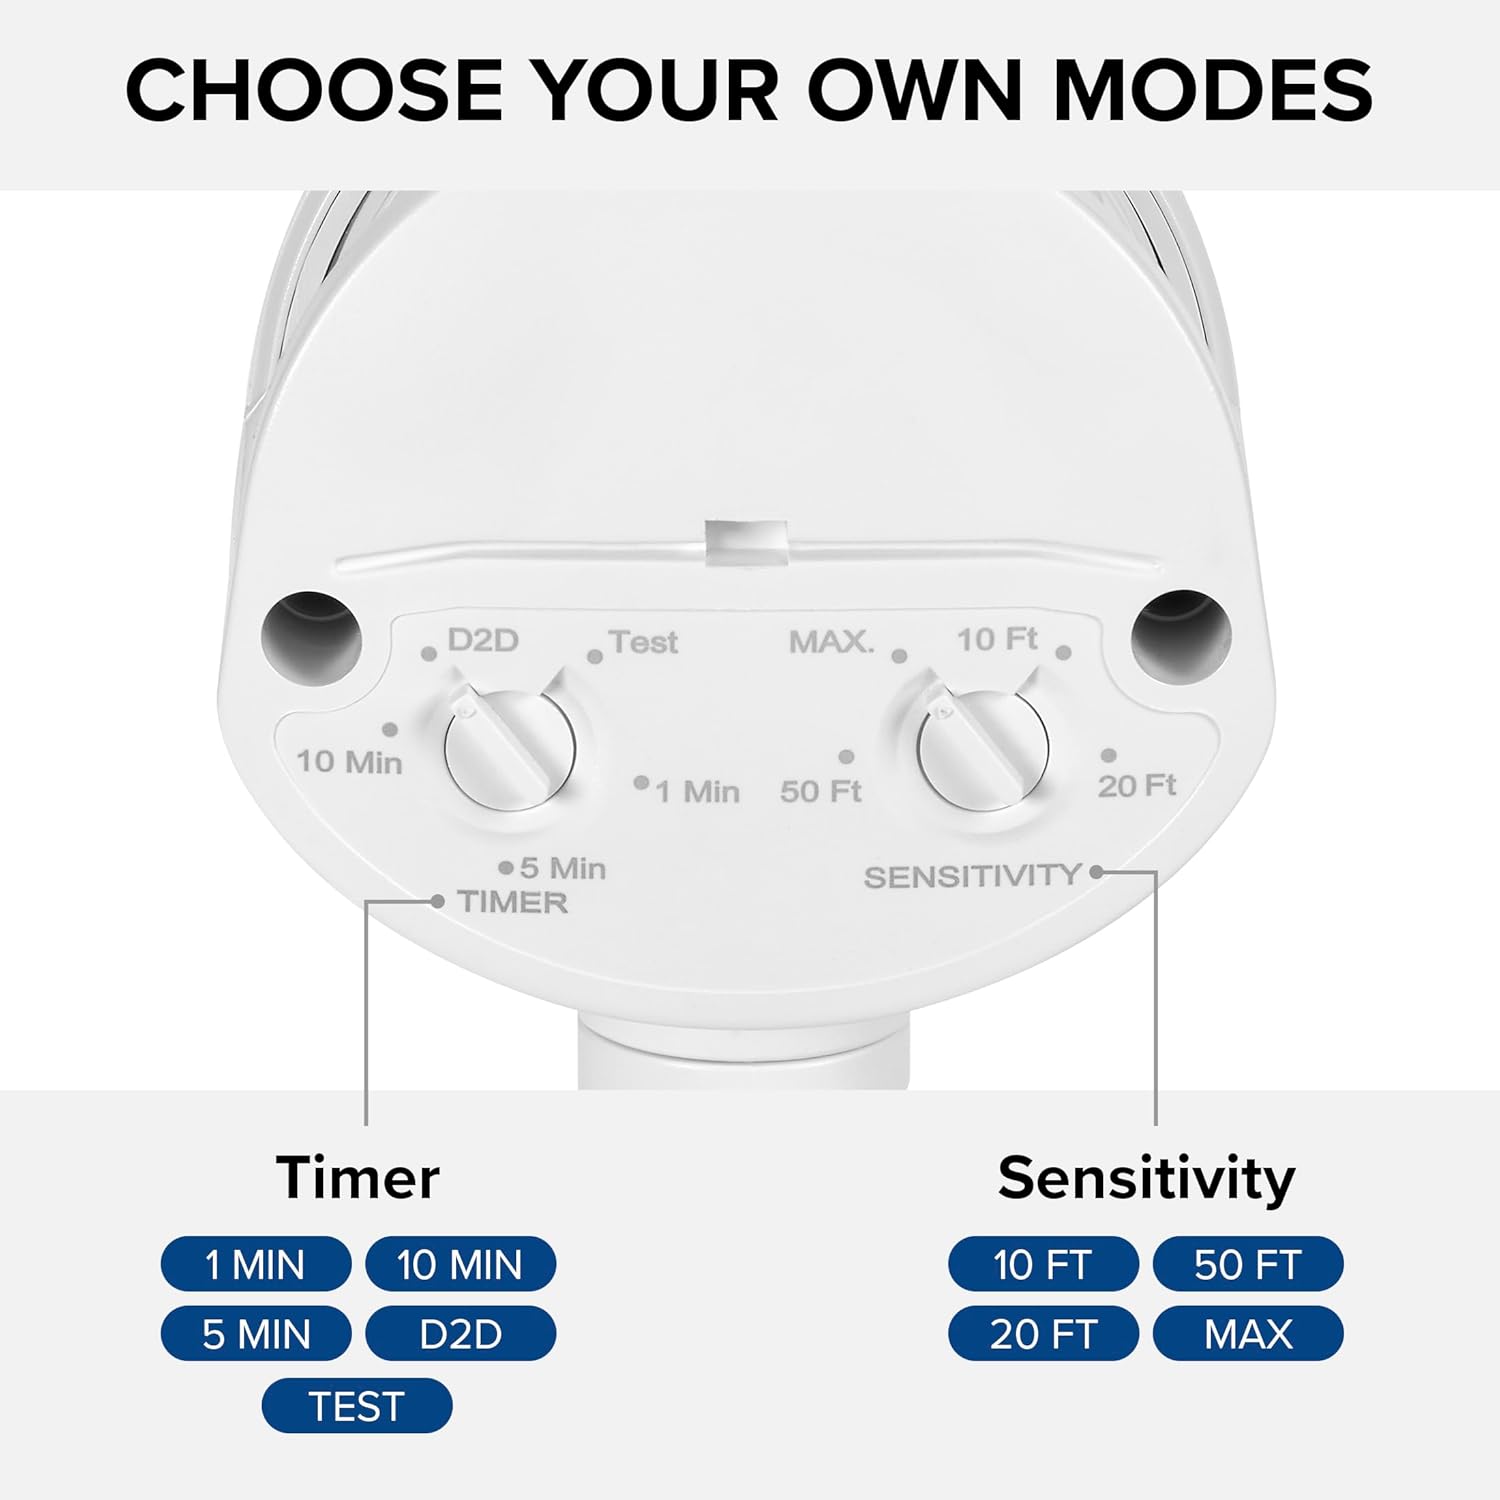
Figure 4.2: Installed flood light on an exterior wall.
5. セットアップと調整
The flood light features adjustable settings for the motion sensor and timer.
5.1 Adjusting the Sensor and Timer
The sensor unit has two adjustable dials located on its underside:
- TIMER Dial: Controls how long the light stays on after motion is detected. Options include 1 minute, 5 minutes, 10 minutes, or Dusk-to-Dawn (D2D).
- 感度ダイヤル: Adjusts the motion detection range. Options include 10 ft, 20 ft, 50 ft, or MAX (up to 70 ft).
To adjust, gently rotate the dials to your desired setting. The 'Test' mode on the TIMER dial allows for quick testing of motion detection during daylight hours.
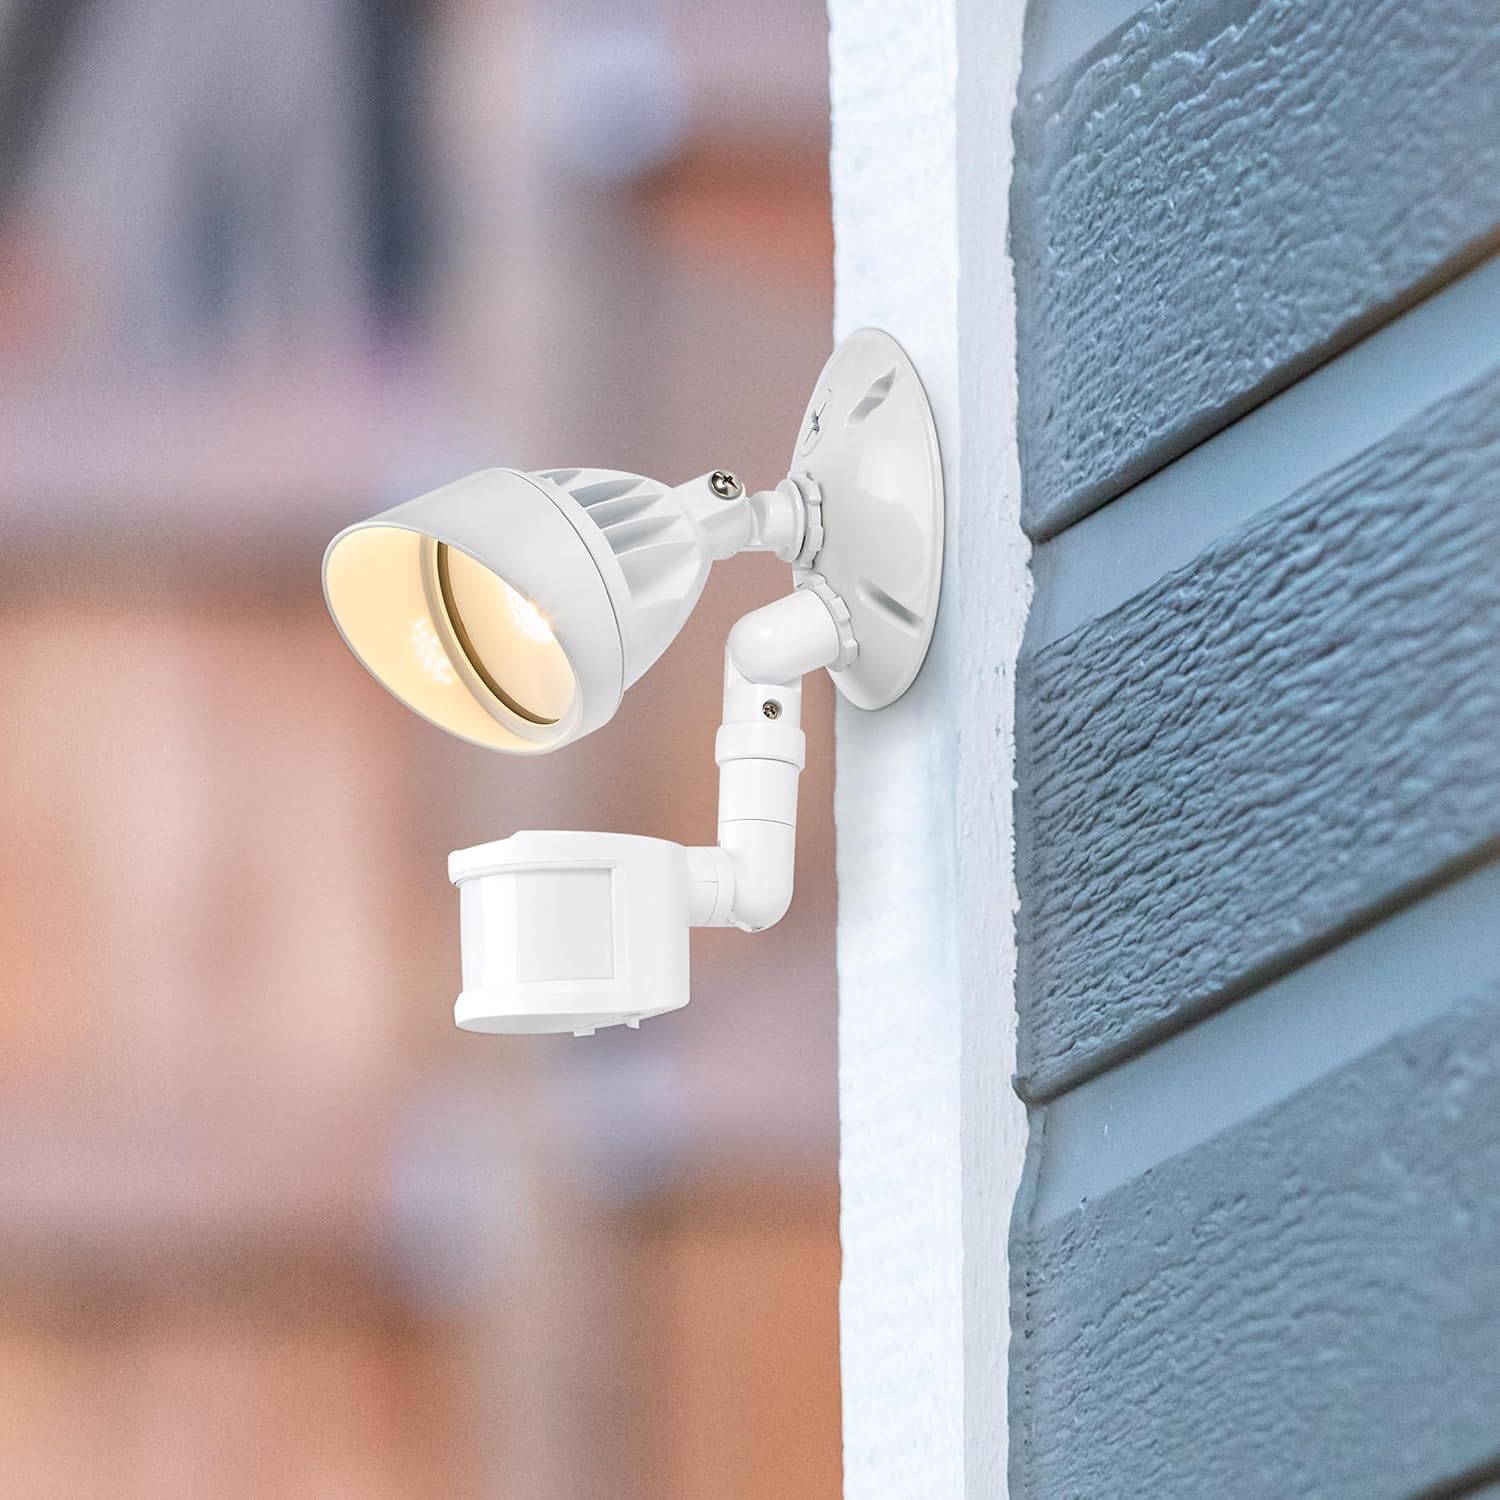
Figure 5.1: Timer and Sensitivity adjustment dials.
5.2 Adjusting Light Head and Sensor Position
The light head and motion sensor can be adjusted to cover specific areas:
- The light head can be tilted up to 180° vertically.
- The arm connecting the sensor to the base can tilt 90° vertically.
- The motion sensor itself can tilt 180° vertically and swivel 180° horizontally, with a full 360° rotation capability.

Figure 5.2: Adjustable light head and motion sensor.
6. 操作手順
Once installed and configured, the Maxxima LED Outdoor Flood Wall Light operates automatically based on its sensor settings.
- Dusk-to-Dawn Mode (D2D): When the TIMER dial is set to D2D, the light will automatically turn on at dusk and remain on until dawn, regardless of motion.
- モーションセンサーモード: When the TIMER dial is set to 1, 5, or 10 minutes, the light will activate when motion is detected within the set sensitivity range and ambient light conditions (typically at night). The light will remain on for the selected duration after the last motion is detected, then turn off.
- テストモード: Setting the TIMER dial to 'Test' allows you to verify motion detection during daylight. The light will turn on for a few seconds when motion is detected, then turn off. This mode is useful for positioning the sensor.
7. メンテナンス
This LED flood light requires minimal maintenance.
- クリーニング: 定期的に柔らかい布で器具を拭いてください。amp 布で汚れやゴミを拭き取ってください。研磨剤入りの洗剤や溶剤は使用しないでください。
- 検査: Regularly check for any loose connections or damage to the wiring or housing.
- 内蔵 LED 光源はユーザーが交換することはできません。
8。 トラブルシューティング
If you experience issues with your flood light, refer to the following table for common problems and solutions.
| 問題 | 考えられる原因 | 解決 |
|---|---|---|
| ライトが点灯しません。 | 電源が入っていない、配線が間違っている、センサーの設定が間違っている。 | Check circuit breaker. Verify wiring connections. Adjust sensor to 'Test' mode to confirm functionality. Ensure ambient light is low enough for operation (if not in D2D). |
| ライトは継続的に点灯します。 | Sensor in D2D mode; constant motion detected; faulty sensor. | Check if TIMER dial is set to D2D. Ensure no objects are causing continuous motion detection. If problem persists, contact support. |
| Light turns on too frequently or not enough. | Sensitivity setting; sensor obstruction. | Adjust SENSITIVITY dial. Clear any obstructions from the sensor's field of view. |
| 軽いちらつき。 | 配線の緩み、電力の変動。 | Turn off power and check all wiring connections. Consult an electrician if power fluctuations are suspected. |
9. 仕様
| 属性 | 価値 |
|---|---|
| モデル名 | MEL-S1013100W |
| ブランド | マキシマ |
| 光出力 | 950ルーメン |
| ワットtage | 13ワット |
| 色温度 | 3000ケルビン(温白色) |
| 巻tage | 120ボルト |
| 材料 | アルミニウム |
| 仕上げタイプ | 塗装済み |
| モーションセンサー範囲 | 最大70フィート |
| ビームスプレッド | 220° |
| 生涯評価 | 50,000時間 |
| 認証 | ETL 登録済み |
| 製品寸法 | 長さ4.4インチ x 幅6インチ x 高さ6インチ |
| アイテム重量 | 11.2オンス(0.7ポンド) |
10. 保証
This Maxxima LED Outdoor Flood Wall Light is backed by a 3年間保証 ご購入日から1年間有効です。本保証は、通常の使用状況における材料および製造上の欠陥を対象としています。保証請求の際は、購入証明書を保管してください。
11. サポート
For technical assistance, troubleshooting, or warranty inquiries, please contact Maxxima customer service.
Visit the Maxxima Store: MaxximaLEDLighting on Amazon
Maxxima is an American company with USA-based offices and customer service.


