1. はじめに
The ESX DRDS14 is a 4-channel smart remote switch designed to optimize the turn-on and turn-off sequence of car audio amplifiers and other components. It effectively eliminates the common 'PLOPP' noise often heard from speakers or subwoofers when amplifiers are activated or deactivated. This device provides variable turn-on and turn-off delays for up to four remote outputs, ensuring a smooth power transition and protecting your high-quality audio components. Additionally, it features a digital voltage indicator and integrated overvoltage / undervoltage保護。
2. 安全情報
Please read and understand all safety instructions before installing or operating the ESX DRDS14. Failure to follow these instructions may result in injury or damage to the device or vehicle.
- ショートを防ぐため、電気設備の設置を始める前に必ず車両のバッテリーのマイナス端子を外してください。
- 最適なパフォーマンスと安全性を確保するには、専門家による設置をお勧めします。
- Ensure all wiring is correctly connected and insulated to prevent electrical hazards.
- デバイスを湿気、水、または極端な温度にさらさないでください。
- Mount the device securely in a dry, well-ventilated area away from heat sources.
- Verify that the total current draw of connected remote devices does not exceed 500 mA per output.
3.製品オーバーview および機能
The ESX DRDS14 offers advanced control and protection for your car audio system.
主な特徴:
- 4-channel smart remote switch for sequential ampライファイアーの活性化。
- Variable turn-on delays (0-30 seconds) for each output.
- Variable turn-off delays (0-30 seconds) for each output.
- デジタルvoltage indicator, calibratable for accuracy.
- Automatic output shutdown in case of overvoltageまたはundervoltage.
- Compact design with removable mounting feet.
- Connections: 1 remote input, 4 remote outputs (up to 500 mA/output).
箱の中身:
- 1 x ESX DRDS14 Smart Remote Delay Switch
4. セットアップとインストール
Follow these steps for proper installation of your ESX DRDS14.
4.1物理的な設置
Choose a suitable, dry location in your vehicle for mounting the DRDS14. The device features removable mounting feet for flexible installation. Secure the unit firmly to prevent movement.
4.2配線接続
The DRDS14 has a terminal block for power and remote connections. Ensure all connections are secure and correctly polarized.
- GND: 車両内のしっかりとしたシャーシ接地点に接続します。
- レムイン: Connect to the remote output of your head unit or DSP. This is the trigger signal for the DRDS14.
- + 12V: Connect to a constant +12V power source (fused, if not already).
- 出力1〜4: Connect these to the remote inputs of your amplifiers or other components. Each output can supply up to 500 mA.
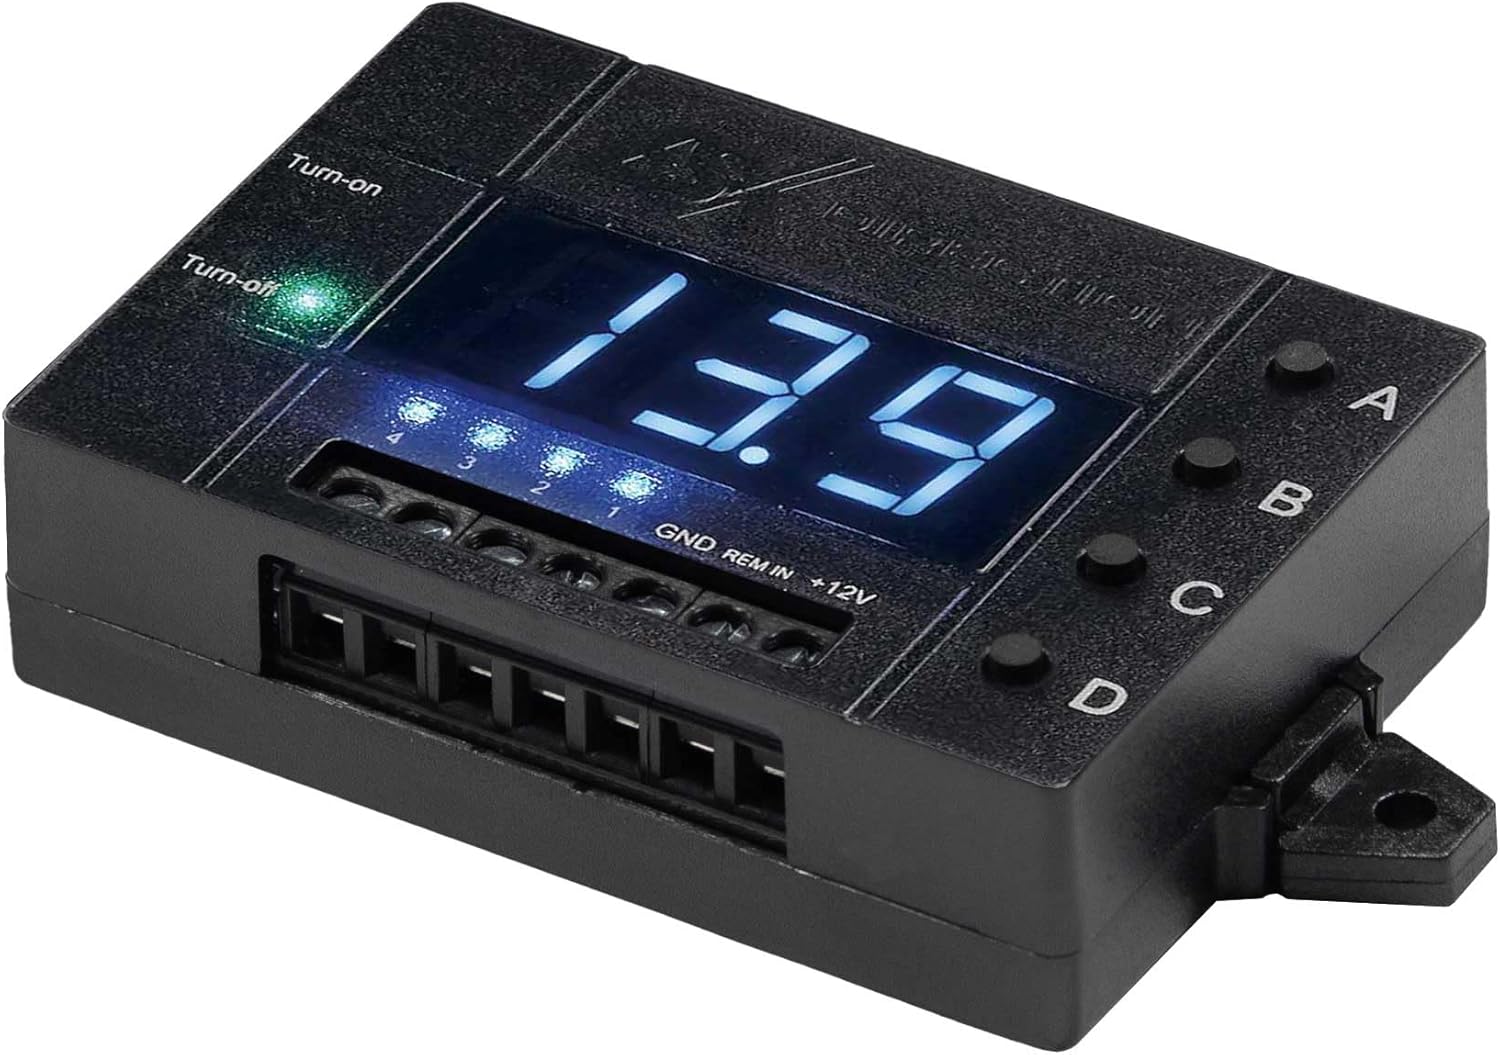
図1: トップダウン view of the ESX DRDS14 showing the digital display, control buttons (A, B, C, D), and wiring terminals (GND, REM IN, +12V, and four remote outputs).
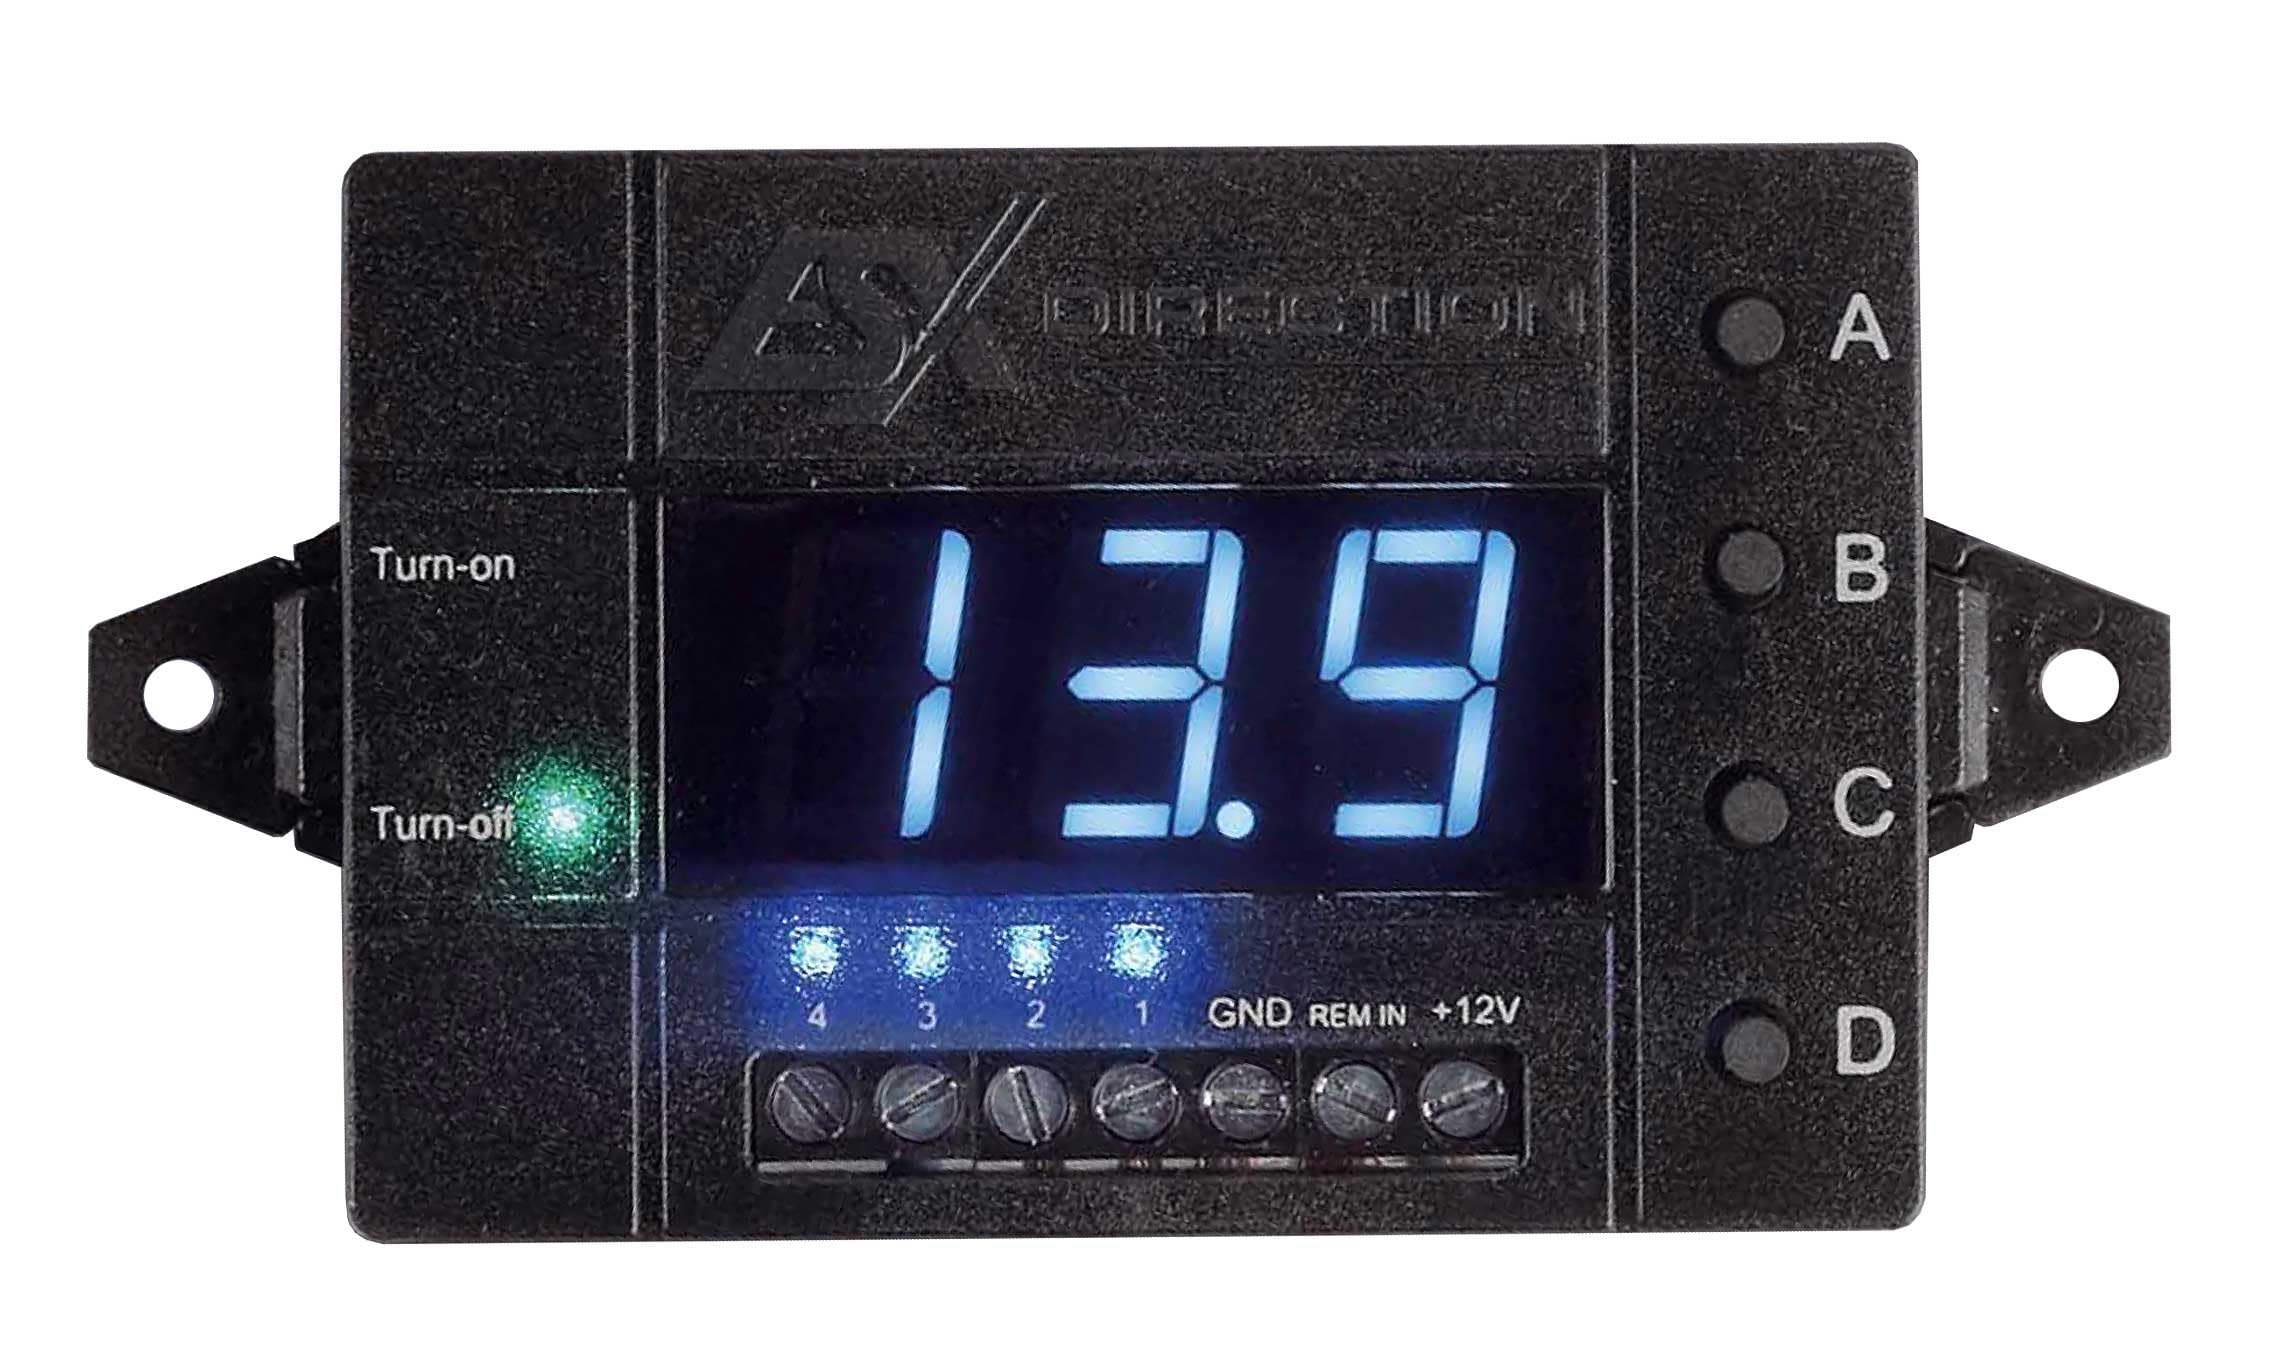
図2: 角度付き view of the ESX DRDS14, highlighting the 'Turn-on' and 'Turn-off' indicator LEDs, the digital voltage display showing '13.9', and the four channel indicator LEDs (1, 2, 3, 4) below the display.
5. 操作手順
The DRDS14 allows for precise control over your system's power sequencing.
5.1 Setting Turn-on and Turn-off Delays
The four buttons labeled A, B, C, and D correspond to the four remote outputs. Each button allows individual programming of turn-on and turn-off delays from 0 to 30 seconds.
- To set Turn-on Delay: With the unit powered on, press and hold the desired channel button (A, B, C, or D) until the digital display shows 'ON' followed by a number. Use short presses of the same button to cycle through delay times (0-30 seconds). Release the button to save the setting.
- To set Turn-off Delay: With the unit powered on, press the desired channel button (A, B, C, or D) briefly. The display will show 'OFF' followed by a number. Use short presses of the same button to cycle through delay times (0-30 seconds). Release the button to save the setting.
- The 'Turn-on' and 'Turn-off' indicator LEDs will illuminate to show the current state of the remote input signal.
5.2 デジタル巻tageインジケーター
The DRDS14 features a digital display that shows the current system voltage. This can be calibrated to match other voltage meters in your vehicle.
- 較正: Refer to the detailed calibration procedure in the full user manual (not provided in this summary) or contact ESX support for instructions.
5.3オーバーボルtageとUndervoltag保護
The DRDS14 includes a protection function that automatically shuts off connected components if the vehicle's voltage exceeds or falls below user-defined limits. This prevents damage to sensitive equipment.
- 制限の設定: オーバーボルtageとアンダーボリュームtage limits can be set individually. Consult the full user manual for the specific steps to configure these protection thresholds.
6. メンテナンス
The ESX DRDS14 requires minimal maintenance.
- デバイスを清潔に保ち、ほこりやゴミを取り除いてください。清掃には柔らかく乾いた布を使用してください。
- 刺激の強い化学薬品や溶剤の使用は避けてください。
- すべての配線接続がしっかりと締められており、腐食がないことを確認してください。
7。 トラブルシューティング
If you encounter issues with your ESX DRDS14, refer to the following common problems and solutions.
- No Power to DRDS14:
- Check the +12V and GND connections for proper contact and polarity.
- Ensure the remote input (REM IN) from your head unit/DSP is active.
- インラインヒューズが損傷していないことを確認します。
- Amplifiers Not Turning On/Off Correctly:
- Check the remote output connections from the DRDS14 to the amplifiers。
- Verify the turn-on and turn-off delay settings for each channel (A, B, C, D).
- Ensure the total current draw of connected devices does not exceed 500 mA per output.
- 'PLOPP' Noise Still Present:
- Adjust the turn-on and turn-off delays to ensure proper sequencing. Experiment with different delay times.
- Ensure all ground connections in your audio system are solid and free from interference.
- Digital Display Shows Error or Incorrect Voltage:
- Check the +12V and GND connections.
- パフォームvoltage calibration if necessary (refer to the full manual).
- オーバーボリュームの場合tage / undervoltage protection is active, check the vehicle's battery voltage.
If problems persist, contact your ESX dealer or technical support.
8. 仕様
| ブランド | ESX |
| モデル | DRDS14 |
| 商品型番 | DRDS14 |
| 製品寸法 | 5 x 7.3 x 2 cm |
| 含まれるコンポーネント | 1 remote delay switch |
| アイテム数 | 1 |
| 電池付属 | いいえ |
| 電池が必要 | いいえ |
9. 保証とサポート
For warranty information, please refer to the documentation provided with your purchase or contact your authorized ESX dealer. For technical support or further assistance, please visit the official ESX webサイトまたは顧客サービス部門に連絡してください。


