1. はじめに
This manual provides detailed instructions for the setup, operation, and maintenance of your Radiomaster TX16S MKII MAX Radio Control System. Please read this manual thoroughly before using the device to ensure safe and optimal performance.
2.製品オーバーview および機能
The Radiomaster TX16S MKII MAX is an advanced radio control system designed for precision and reliability. It features AG01 CNC Hall Gimbals and supports both ExpressLRS and Multi-Protocol 4in1 modules.
主な特徴:
- 内部回路の改良と電源の最適化。
- 逆極性保護機能を統合した新しい充電回路。
- Optimized charge IC allowing up to 2.2A internal USB-C charge current.
- ヘッドフォン出力用の背面オーディオジャック。
- V4.0 ジンバルでは、センタリングと温度安定性が向上しました (AG01 と同じ回路)。
- Optional high/low rear grips for improved ergonomics.
- 明確な中央デテントを備えた改良された S1/S2 ノブ。
- よりスムーズな感触とより優れたセンターデテントを備えた改良された LS/RS スライダー。
- バッテリー カバーを再設計し、バッテリーへのアクセスを改善しました。
- フィット感と仕上がりが改善されたボディシェルを改良しました。
- トレーナーソケットが標準のTRS 3.5mmソケットに変更されました。
- パーソナライズされた改造のためにリア DIY ソケットを追加しました。
- 内部プラスチックを改良し、耐久性を向上しました。
- ExpressLRSバックパックと4in1バージョンを内蔵。
- Support for EdgeTX and OpenTX (EdgeTX installed by default, touch screen enabled).
- AG01 Gimbals: Fully CNC milled for ultimate precision with quad ball bearings, featuring front-accessible tension and travel adjustment.
- External Module Bay: Natively supports Team Black Sheep MicroTX modules in CRSFmode with LUA scripts. Internal 4-in-1 Multi-protocol module allows switching between internal RF and Crossfire via software.
The TX16S MKII MAX is available in 4in1 and ELRS versions.
製品ビデオ終了view:
ビデオ: 終了view of the TX15 Max V5.0 16CH 2.4G RC Transmitter, highlighting its advanced features and capabilities.
3. コンポーネントとコントロール
Familiarize yourself with the various components and controls of your Radiomaster TX16S MKII MAX radio controller.
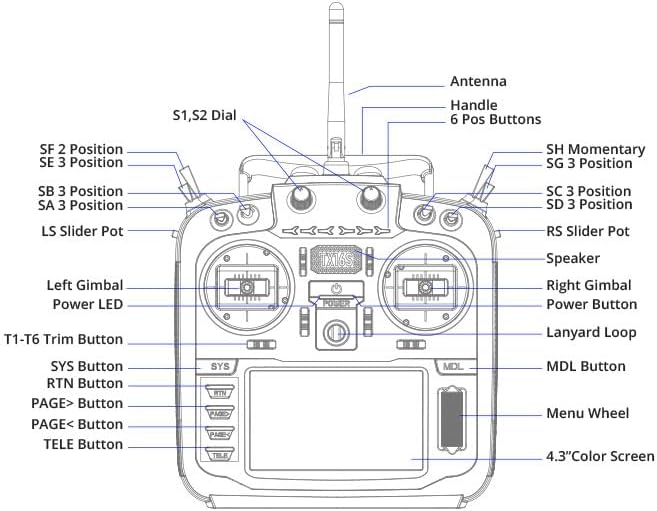
Image: Front panel diagram of the Radiomaster TX16S MKII MAX, illustrating the location and labels of its various switches, gimbals, buttons, and screen.
- アンテナ: 信号伝達用。
- ハンドル: 送信機の持ち運び用。
- S1、S2ダイヤル: さまざまな機能のための回転ダイヤル。
- 6 Pos Buttons: Six programmable position buttons.
- SF 2 Position, SE 3 Position, SB 3 Position, SA 3 Position, SH Momentary, SG 3 Position, SC 3 Position, SD 3 Position: Various 2- and 3-position switches for control.
- LS Slider Pot, RS Slider Pot: Left and Right slider potentiometers.
- Left Gimbal, Right Gimbal: Precision control sticks.
- 電源LED: 電源の状態を示します。
- 電源ボタン: デバイスの電源をオン/オフにします。
- ストラップループ: ネックストラップを取り付けるポイント。
- T1-T6トリムボタン: Trim buttons for fine-tuning controls.
- SYS Button, RTN Button, PAGE> Button, PAGE< Button, TELE Button, MDL Button: ナビゲーションと機能ボタン。
- メニューホイール: Rotary wheel for menu navigation.
- 4.3インチカラースクリーン: TFT full-color touch display for interface and settings.
- スピーカー: 音声フィードバック用。
4. セットアップ
4.1. バッテリーの取り付け
The TX16S MKII MAX uses a 7.4V Li-Ion or Li-Po battery. Ensure the battery is fully charged before installation.
- 送信機の背面にある電池ケースのカバーを開きます。
- Connect the battery's balance lead (JST-XH) and power lead (XT30) to the corresponding ports inside the compartment.
- Carefully place the battery into the compartment, ensuring wires are not pinched.
- 電池カバーをしっかりと閉じてください。
Video: Demonstration of installing a 6200mAh battery into a Radiomaster TX16S transmitter, showing the connection of the battery leads and securing the compartment cover.
Video: A detailed look at the Radiomaster 5000mAh battery, its connectors (JST-XH and XT30), and its compatibility with TX12, TX16S, and TX15 MAX transmitters, including installation steps.
4.2. 初回電源投入
After installing the battery, press and hold the power button until the screen illuminates and the system boots up. Follow any on-screen prompts for initial setup.
5. 操作手順
5.1. Gimbal Adjustments
The AG01 CNC Hall Gimbals offer precise control. Tension and travel adjustments are front-accessible for easy fine-tuning to your preference. Refer to the diagram for gimbal locations.
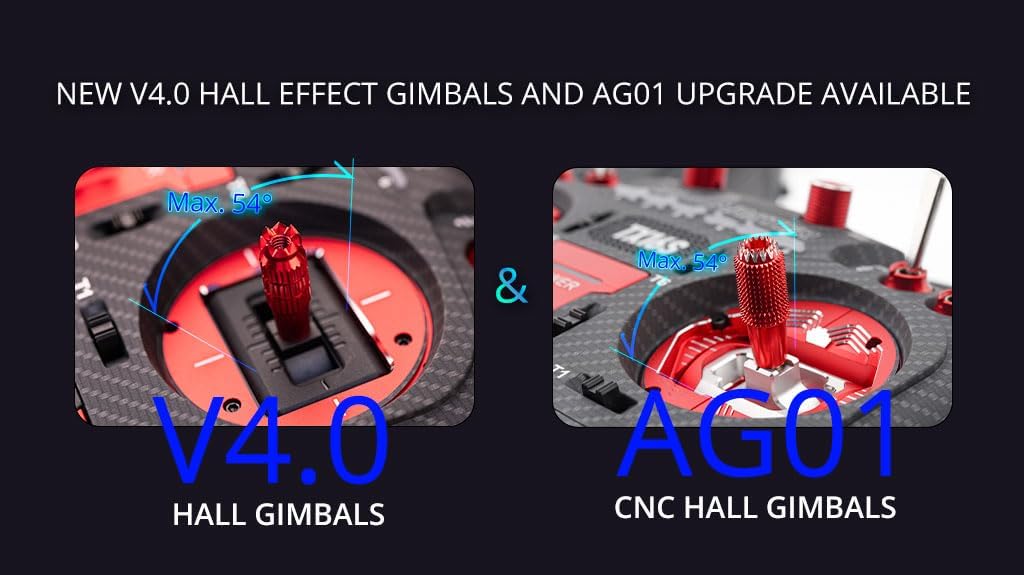
Image: A visual comparison highlighting the V4.0 Hall Gimbals and the upgraded AG01 CNC Hall Gimbals, emphasizing their precision and adjustable features.
5.2. 画面ナビゲーション
The 4.3-inch TFT full-color touch display allows for intuitive navigation through menus and settings. Use the touch screen or the Menu Wheel and associated buttons (SYS, RTN, PAGE>, PAGE<, TELE, MDL) to access and modify parameters.

Image: Close-up of the Radiomaster TX16S MKII MAX's 4.3-inch IPS color display and the improved S1/S2 knobs with clear center detents, demonstrating ease of programming.
5.3. Module Bay Usage
The JR compatible module bay allows for external RF module expansion. The internal 4-in-1 Multi-protocol module enables seamless switching between internal RF and external modules like Crossfire via software settings.
5.4. 接続性
The TX16S MKII MAX features a USB-C port for charging, simulator connectivity, and firmware updates. An SD card slot is also available for storing models, scripts, sounds, and themes.

画像: サイド view of the Radiomaster TX16S MKII MAX, highlighting the UART Port, Charging Port, and SD Card Slot for various connectivity options.
5.5. 人間工学
The radio controller is designed for comfort and control. It includes optional high/low rear grips for improved ergonomics and features improved S1/S2 knobs and LS/RS Sliders for a smoother feel and better center detents.

Image: A visual comparison of raised and flat grips for the Radiomaster TX16S MKII MAX, demonstrating options for improved ergonomic comfort during use.
6. メンテナンス
- 送信機は清潔に保ち、ほこりやゴミが付かないようにしてください。清掃には柔らかく乾いた布を使用してください。
- 送信機は直射日光や極端な温度を避け、涼しく乾燥した場所に保管してください。
- すべてのスイッチ、ジンバル、ボタンが正しく機能しているか定期的に確認してください。
- アンテナがしっかりと取り付けられており、損傷がないことを確認してください。
- 最適なパフォーマンスと新機能へのアクセスを確保するために、ファームウェアのアップデートを定期的に確認してインストールしてください。
- Always charge the battery using appropriate charging devices and follow safety guidelines.
7。 トラブルシューティング
- 送信機の電源が入らない: Check battery connection and charge level. Ensure the power button is pressed correctly.
- 受信機への信号なし: Verify that the transmitter and receiver are properly bound. Check the RF module settings (internal 4in1 or external). Ensure the antenna is correctly positioned.
- ジンバルまたはスイッチの問題: Check physical connections and ensure no debris is obstructing movement. Calibrate gimbals if necessary through the system settings.
- 画面が応答しません: Perform a soft reset by powering off and on. If issues persist, check for firmware updates.
- ファームウェア更新の問題: Ensure a stable USB connection and sufficient battery charge. Follow the specific firmware update instructions provided by Radiomaster.
8. 仕様
| アイテム | 仕様 |
|---|---|
| サイズ | 287x129x184mm |
| 重さ | 750g(電池含まず) |
| 送信周波数 | 2.400GHz-2.480GHz |
| 送信機モジュール | Internal 4-in-1 multi-protocol module (CC2500 CYRF6936 A7105 NRF2401) OR Internal ELRS (SX1280) |
| SDカード | デフォルトでは256MB、最大8GB |
| アンテナ利得 | 2db(送信電力調整可能) |
| 動作電流 | 400mA |
| ワーキングvoltage | 6.6~8.4V DC |
| 無線ファームウェア | エッジTX |
| モジュールファームウェア | Multiprotocol-Module (4IN1) -OR- ExpressLRS (ELRS) |
| チャンネル | 最大16チャンネル(受信機によって異なります) |
| 画面 | 4.3インチTFTフルカラータッチディスプレイ、解像度480×272 |
| ジンバル | V4.0 Hall sensor with Aluminium fascia; Option 2: AG01 CNC Hall sensor |
| モジュールベイ | JR互換モジュールベイ |
| アップグレード方法 | USB-Cオンライン/SDカードオフラインアップグレードをサポート |
9. 箱の中身
The Radiomaster TX16S Mark II Max package includes:
- TX16S Mark II Max無線コントローラー x 1
- 1 * 18650トレイ
- USB-Cケーブル1本
- スクリーンプロテクター1枚
- フラットグリップ1組
- 1 * TX16S Key Chain
10. 保証とサポート
保証情報および技術サポートについては、ラジオマスターの公式ウェブサイトをご覧ください。 web当サイトをご覧いただくか、販売店にお問い合わせください。保証請求の際に必要となりますので、購入証明書を保管してください。
訪問する ラジオマスターストア 詳しい製品と情報については、こちらをご覧ください。


