1. はじめに
This manual provides detailed instructions for the installation, operation, and maintenance of your STINGER Audio MT20001 Monoblock Class D Car Amplifier. The MT20001 is designed to deliver high-efficiency power for subwoofer systems in car audio applications, ensuring optimal sound quality. Please read this manual thoroughly before installation and use to ensure proper function and safety.
2. 安全情報
怪我や機器の損傷を防ぐために、以下の安全上の注意事項を必ず守ってください。 amp運搬車または車両:
- 車両バッテリーを外す: Before beginning any installation, disconnect the vehicle's negative battery terminal to prevent electrical shorts.
- 専門家による取り付けを推奨: If you are unsure about the installation process, consult a qualified car audio professional.
- 適切な配線: Use appropriate gauge wiring as specified in this manual. Incorrect wiring can lead to overheating, fire, or damage to components.
- 換気: 確実に amplifier is mounted in a location with adequate airflow to prevent overheating. Do not block cooling fins.
- 安全な取り付け: マウント amp車両の運転中に緩んで怪我や損傷の原因となることのないよう、固定具をしっかりと締めてください。
- 湿気を避ける: 露出させないでください amplifier to moisture or water. This product is not waterproof.
- ヒューズ保護: Always use the correct fuse rating as specified. Never replace a fuse with one of a higher rating.
3. パッケージ内容
パッケージにすべてのアイテムが含まれていることを確認します。
- STINGER Audio MT20001 Monoblock Class D Ampリファイアー
- Remote Subwoofer Level Control with cable
- STINGER 4-Gauge Copper Amplifier Wiring Kit, including:
- 17FT Translucent Blue Power Wire
- 3FT Translucent Silver Ground Wire
- 17FT Translucent Blue Twisted Pair RCA interconnects
- 16FT Blue Remote Turn-on Wire
- 20FT Translucent Speaker Wire
- 3FT Black flex loom tubing
- 1pc Mini-ANL/AFS Fuseholder & Fuse
- 取り付け金具(ネジ)
- ユーザーマニュアル(このドキュメント)

Image: STINGER 1200W Amplifier Wiring Kit packaging, showing the various cables and fuse holder included.
4 製品の特徴
STINGERオーディオ MT20001 amplifier incorporates advanced design and technology for superior performance:
- Digital Class-D Monoblock Design: High efficiency with a compact footprint, optimized for subwoofer applications.
- 堅牢な非安定化電源: Utilizes advanced pulse width modulator integrated circuits for improved performance and efficiency.
- Direct Insert Terminals: Features 0/1 Gauge Power and 8 Gauge Speaker direct insert terminals for secure connections.
- 広い周波数応答: 10Hz-180Hz, suitable for deep bass reproduction.
- リモートサブウーファーレベルコントロール: Included for convenient bass level adjustments.
- Precision Metal Potentiometers: For accurate tuning of audio settings.
- Designed for 1 Ohm Load: Capable of driving demanding subwoofer configurations.

画像: 上 view of the STINGER MT-2000.1 amplifier, with text overlays indicating features such as small footprint, 2000W @ 1 Ohm, direct insert terminals, 0/1 gauge power, 8 gauge speaker, 10Hz-180Hz frequency response, and included bass knob.

Image: STINGER MT-2000.1 amplifier, labeled as Class-D Mono Block, with icons and text indicating it's designed for 1 Ohm load, has a small and compact design, features 0/1 Gauge Power Terminal, has a Bridged RMS Rating of 3,800W / 2 Ohm Minimum, and an Operating voltag9V~16V。
5. セットアップとインストール
Careful installation is crucial for optimal performance and safety. Follow these steps for proper setup.
5.1 コンポーネントの識別
よく理解しておいてください amplifier's input and output terminals and control panel:

画像: 背面 view of the STINGER MT-2000.1 amplifier showing the control panel. Labels include PRT (Protection Indicator), PWR (Power Indicator), REMOTE port (for bass knob), INPUT RCA (L/R), BRIDGE IN RCA, GAIN knob (Min/Max), LPF knob (40Hz-180Hz), SUBSONIC knob (OFF/50Hz), FREQ knob (30Hz/80Hz), BOOST knob (0dB/12dB), and INPUT BRIDGE OUT RCA.
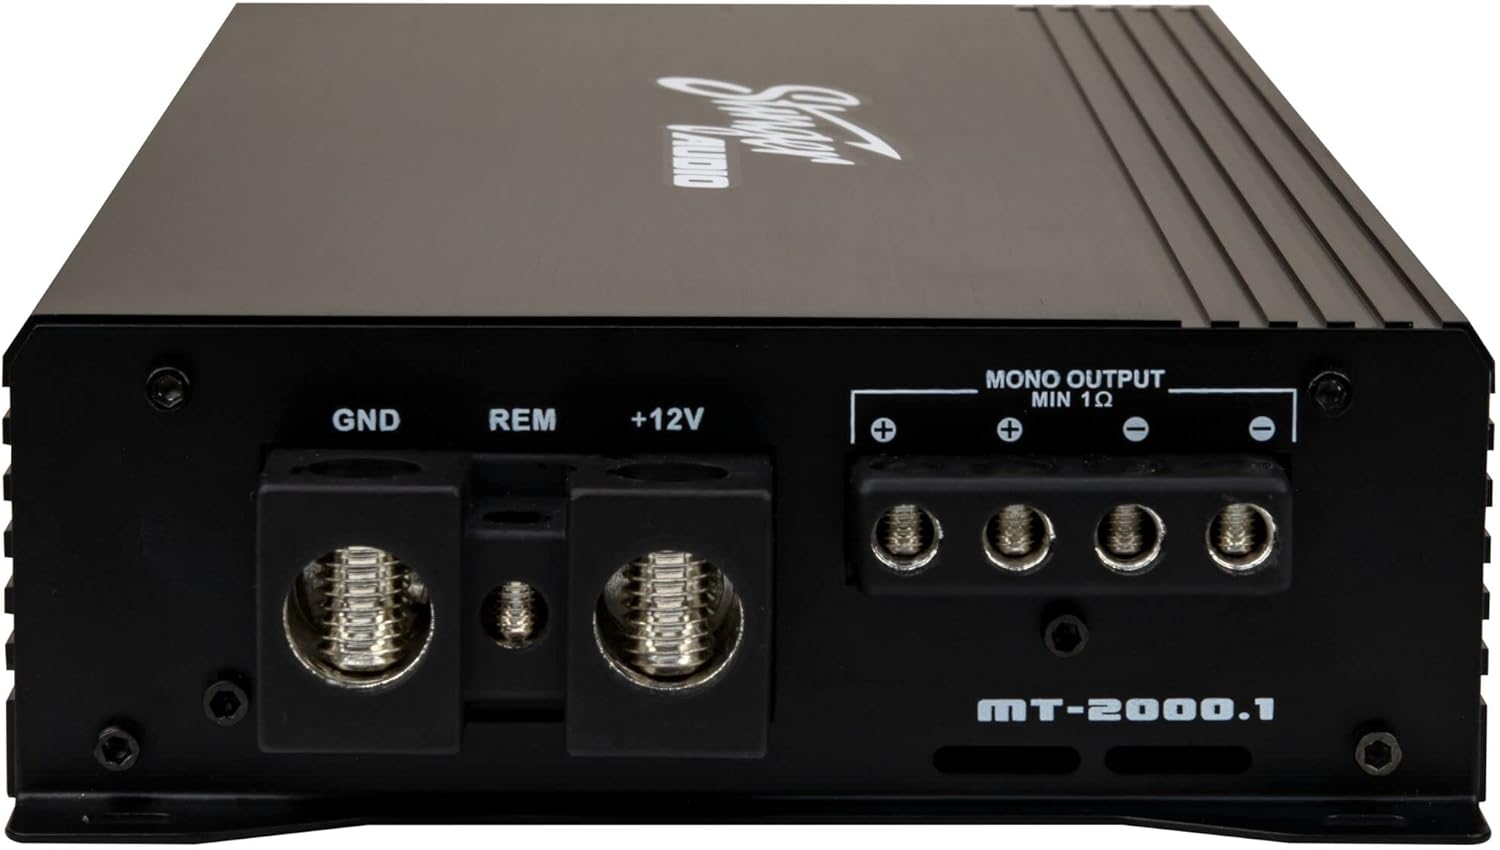
画像: 背面 view of the STINGER MT-2000.1 amplifier showing the power and speaker terminals. Labels include GND (Ground), REM (Remote Turn-on), +12V (Power), and MONO OUTPUT MIN 1 Ohm speaker terminals (+ and -).
5.2配線接続
Follow these steps for secure and correct wiring:
- 電源線(+12V): Connect the 17FT Translucent Blue Power Wire from the vehicle's positive battery terminal (via the Mini-ANL/AFS Fuseholder & Fuse, installed within 18 inches of the battery) to the +12V terminal on the amplifier. Ensure a secure, crimped connection.
- アース線(GND): Connect the 3FT Translucent Silver Ground Wire from the GND terminal on the amplifier to a clean, unpainted metal surface on the vehicle chassis. Ensure a solid, low-resistance connection.
- Remote Turn-on Wire (REM): Connect the 16FT Blue Remote Turn-on Wire from the REM terminal on the amplifier to the remote output of your head unit or other switched 12V source. This wire turns the ampヘッドユニットで電源のオン/オフを切り替えます。
- RCA入力: Connect the 17FT Translucent Blue Twisted Pair RCA interconnects from the RCA output of your head unit to the INPUT RCA terminals (L/R) on the amplifier. For bridged input, use the BRIDGE IN RCA terminal.
- スピーカー出力: Connect your subwoofer(s) to the MONO OUTPUT MIN 1 Ohm terminals on the amplifier using the 20FT Translucent Speaker Wire. Observe correct polarity (+ to + and - to -). Ensure the total impedance of your subwoofer(s) is 1 Ohm or higher.
- リモートサブウーファーレベルコントロール: Plug the included remote bass knob into the REMOTE port on the amplifier。
5.3 取り付け
Choose a mounting location that provides adequate ventilation and is secure. Avoid mounting the amplifier directly to carpet or in enclosed spaces without airflow. Use the provided mounting hardware to firmly attach the amp車内の固い表面に付着します。
6. 操作手順
インストールしたら、 amp最適なサウンドパフォーマンスを得るための設定。
6.1 コントロールの調整
- ゲイン(入力レベル): このコントロールは、 amplifier's input sensitivity to the output of your head unit. Start with the gain at minimum (fully counter-clockwise). Play a familiar track at about 75% of your head unit's maximum volume. Slowly increase the gain until you hear distortion, then back off slightly.
- LPF (ローパスフィルター): This filter allows only frequencies below the set point to pass through to the subwoofer. Adjust this knob (40Hz-180Hz) to blend the subwoofer's output with your main speakers. A common starting point is 80Hz.
- 亜音速: This high-pass filter removes extremely low frequencies that are below the audible range or harmful to your subwoofer. Set it to OFF or 50Hz, depending on your subwoofer's capabilities and enclosure tuning.
- FREQ (Bass EQ Frequency): This knob (30Hz/80Hz) selects the center frequency for the Bass BOOST.
- BOOST (Bass EQ Level): This control (0dB/12dB) increases the output at the selected FREQ. Use sparingly to avoid distortion and potential damage to your subwoofer.
6.2 リモートサブウーファーレベルコントロール
The included remote level control allows you to conveniently adjust the subwoofer output level from your driving position. This control only adjusts the output level and does not affect the ampライファイアのゲイン設定。

Image: The STINGER remote subwoofer level control, a small black box with a rotary knob labeled 'MIN' to 'MAX', connected by a cable.
7. メンテナンス
The STINGER MT20001 amp長期的なパフォーマンスを確保するために、lifier には最小限のメンテナンスが必要です。
- クリーニング: 定期的に拭き取ってください amp本体の外側は柔らかく乾いた布で拭いてください。刺激の強い化学薬品や研磨剤入りの洗剤は使用しないでください。
- 接続を確認してください: Annually, inspect all power, ground, remote, RCA, and speaker connections to ensure they are secure and free from corrosion. Loose connections can cause performance issues or damage.
- 換気: 確実に amplifier's cooling fins remain clear of obstructions to maintain proper heat dissipation.
8。 トラブルシューティング
問題が発生した場合 amplifier, refer to the following table for common issues and solutions:
| 問題 | 考えられる原因 | 解決 |
|---|---|---|
| 電源なし(PWR LED オフ) | Blown fuse, loose power/ground/remote wire, no 12V at battery. | Check fuse, verify all power connections, test battery voltage. |
| 保護モード(PRT LED オン) | Overheating, speaker short circuit, low impedance load. | Ensure proper ventilation, check speaker wiring for shorts, verify speaker impedance is 1 Ohm or higher. Allow amp冷却するためのリファイアー。 |
| 音が出ない | No RCA signal, gain too low, speaker wires disconnected, head unit off. | Check RCA connections, adjust gain, verify speaker wiring, ensure head unit is on and playing audio. |
| 歪んだ音 | Gain set too high, poor ground connection, damaged speaker, incorrect LPF/BOOST settings. | Reduce gain, check ground connection, inspect speaker, adjust LPF/BOOST settings. |
| Ampライターが過熱する | 換気が不十分、インピーダンスが低すぎる、ゲインが高すぎる。 | 移転 amplifier for better airflow, verify speaker impedance, reduce gain. |
9. 仕様
Detailed technical specifications for the STINGER Audio MT20001 Monoblock Class D Car Amplifier:
| 仕様 | 価値 |
|---|---|
| モデル名 | MT20001 |
| 材料 | 金属 |
| スピーカータイプ | サブウーファー |
| スピーカー最大出力 | 2000ワット |
| オーディオ出力モード | 単核症 |
| 接続技術 | RCA |
| サブウーファー接続技術 | 有線 |
| 制御方法 | リモート |
| 電源 | コード式電気 |
| 営業巻tage | 9V~16V |
| 最小インピーダンス | 1オーム |
| 取り付けタイプ | フラッシュマウント |
| 防水です | 間違い |
| 商品型番 | MT20001 |
| 初回利用可能日 | 20年2024月XNUMX日 |

Image: STINGER MT-2000.1 amplifier with dimensions indicated: 12.16 inches (309 mm) length, 6.1 inches (155 mm) width, and 2.09 inches (53 mm) height.
10. 保証とサポート
STINGER products are designed for reliability and performance. For specific warranty information, please refer to the warranty card included with your product or visit the official STINGER website. If you encounter any issues not covered in this manual or require technical assistance, please contact STINGER customer support through their official channels.
STINGER Customer Support: Refer to your product packaging or the official STINGER web最新の連絡先情報については、サイトをご覧ください。


