1. はじめに
The Mastech MS8233B is a compact, handheld digital multimeter designed for measuring AC/DC voltage, DC current, resistance, diode, continuity, and temperature. It features a 2000-count display, data hold function, and low battery indication, making it suitable for various electrical testing applications in domestic and electronics environments.
2. 安全情報
To ensure safe operation and service of the meter, please read this manual thoroughly before use. Failure to observe safety warnings can result in severe injury or death.
- 使用する前に必ずメーターが良好な動作状態であることを確認してください。
- 定格容量を超えて塗布しないでくださいtage, which is 600V CAT III.
- ボリュームを扱うときは注意してくださいtag30V AC RMS、42V ピーク、または 60V DC を超える電圧では感電の危険がありますので、使用しないでください。
- 機能を変更する前に、必ずテスト リード線を回路から外してください。
- 電池残量低下インジケーターが表示されたら、すぐに電池を交換してください。
- Do not operate the meter if the battery cover is not properly closed.
- 地域および国の安全規定を遵守してください。
3.製品オーバーview
The Mastech MS8233B Digital Multimeter features a clear display, a rotary function switch, and dedicated input jacks for various measurements.

図3.1: フロント view of the Mastech MS8233B Digital Multimeter. This image displays the LCD screen, rotary function switch, input jacks, and control buttons.
3.1 コンポーネント
- LCDディスプレイ: 測定値、単位、機能インジケーターを表示します。
- 機能ロータリースイッチ: Used to select the desired measurement function (e.g., V~, V-, A-, Ω, Diode, Continuity, Temp).
- ホールドボタン: ディスプレイ上の現在の読み取り値を固定します。
- バックライトボタン: ディスプレイのバックライトをアクティブにして、暗い場所での視認性を向上させます。
- VΩmA Input Jack: ボリュームのプラス入力tage, resistance, diode, continuity, and current measurements up to 200mA.
- COM入力ジャック: すべての測定に対する共通(負)入力。
- 10A入力ジャック: Positive input for high current measurements (up to 10A).
4. セットアップ
4.1 バッテリーの取り付け
The MS8233B requires 2 LR44 batteries for operation. Ensure the batteries are installed correctly before first use or when replacing them.
- マルチメーターの電源をオフにし、すべてのテストリードを外します。
- メーターの背面にある電池ボックスを見つけます。
- ドライバーを使用して電池ボックスのカバーを開きます。
- 正しい極性 (+ と -) に注意して、LR44 電池 2 個を挿入します。
- 電池カバーを取り付けて、ネジで固定します。
5. 操作手順
測定を行う前に、テスト リードがメーターとテスト対象の回路に正しく接続されていることを確認してください。
5.1 一般的な操作
- Turn the rotary switch from the "OFF" position to the desired measurement function.
- Connect the test leads to the appropriate input jacks and the circuit.
- LCDディスプレイで測定値を読み取ります。
- To turn off the meter, rotate the switch back to the "OFF" position.
5.2 DCVol。tage測定(V-)
- ロータリースイッチを希望のDC Volに設定しますtag範囲(例:200mV、2V、20V、200V、600V)。
- 赤いテストリードをVΩmAジャックに接続し、黒いテストリードをCOMジャックに接続します。
- 測定対象のコンポーネントまたは回路にテスト リード線を接続します。
5.3 AC ボリュームtage 測定 (V~)
- ロータリースイッチを希望のACボリュームに設定しますtag範囲(例:200V、600V)。
- 赤いテストリードをVΩmAジャックに接続し、黒いテストリードをCOMジャックに接続します。
- テストリード線をAC電圧に接続しますtag電子ソース。
5.4 DC Current Measurement (A-)
- Set the rotary switch to the desired DC Current range (e.g., 200µA, 2mA, 20mA, 200mA, 10A).
- For currents up to 200mA, connect the red test lead to the VΩmA jack. For currents up to 10A, connect the red test lead to the 10A jack. Always connect the black test lead to the COM jack.
- Connect the meter in series with the circuit to measure the current.
- 注意: Do not attempt to measure currents exceeding 200mA through the VΩmA jack or 10A through the 10A jack.
5.5 Resistance Measurement (Ω)
- ロータリー スイッチを希望の抵抗範囲 (例: 200Ω、2kΩ、20kΩ、200kΩ、2MΩ) に設定します。
- 赤いテストリードをVΩmAジャックに接続し、黒いテストリードをCOMジャックに接続します。
- Connect the test leads across the resistor or component to be measured. Ensure the circuit is de-energized.
5.6ダイオードテスト
- ロータリースイッチをダイオード記号に設定します。
- 赤いテストリードをVΩmAジャックに接続し、黒いテストリードをCOMジャックに接続します。
- 赤いテストリードをダイオードのアノードに、黒いテストリードをカソードに接続します。ディスプレイには順方向電圧が表示されます。tageドロップ。
- Reverse the leads. An open circuit (OL) reading indicates a good diode. A reading in both directions or no reading indicates a faulty diode.
5.7導通テスト
- ロータリースイッチを連続性シンボルに設定します。
- 赤いテストリードをVΩmAジャックに接続し、黒いテストリードをCOMジャックに接続します。
- Connect the test leads across the circuit or component. If the resistance is less than approximately 60Ω, the buzzer will sound, indicating continuity.
5.8温度測定
While the product title mentions temperature, the MS8233B model's detailed specifications do not explicitly list a temperature function. If your specific unit includes this feature, typically you would:
- Set the rotary switch to the Temperature function (usually marked with °C or °F).
- Connect a K-type thermocouple (if included) to the VΩmA and COM jacks, observing polarity.
- Place the thermocouple probe at the point where temperature needs to be measured.
5.9データ保持機能
- 「HOLD」ボタンを押すと、ディスプレイ上の現在の読み取り値が固定されます。
- Press the "HOLD" button again to release the reading and resume live measurements.
5.10 バックライト機能
- Press the backlight button (often marked with a sun symbol) to turn on the display backlight.
- Press the button again to turn off the backlight.
6. メンテナンス
6.1 電池の交換
When the low battery indicator appears on the display, replace the batteries as described in Section 4.1. Always use 2 new LR44 batteries.
6.2 クリーニング
広告でケースを拭くamp 布と中性洗剤を使用してください。研磨剤や溶剤は使用しないでください。使用前にメーターが完全に乾いていることを確認してください。
7。 トラブルシューティング
- 表示なし/かすかな表示: バッテリーの取り付けと充電を確認してください。必要に応じてバッテリーを交換してください。
- "OL" or "1" on Display: 範囲外または断線状態を示します。より高い範囲を選択するか、接続を確認してください。
- 間違った読み方: Ensure correct function selection, proper lead connection, and that the circuit is de-energized for resistance/diode tests.
- 導通ブザーなし: Check if the resistance is above 60Ω or if the function is correctly selected.
8. 仕様
The following table outlines the technical specifications for the Mastech MS8233B Digital Multimeter.
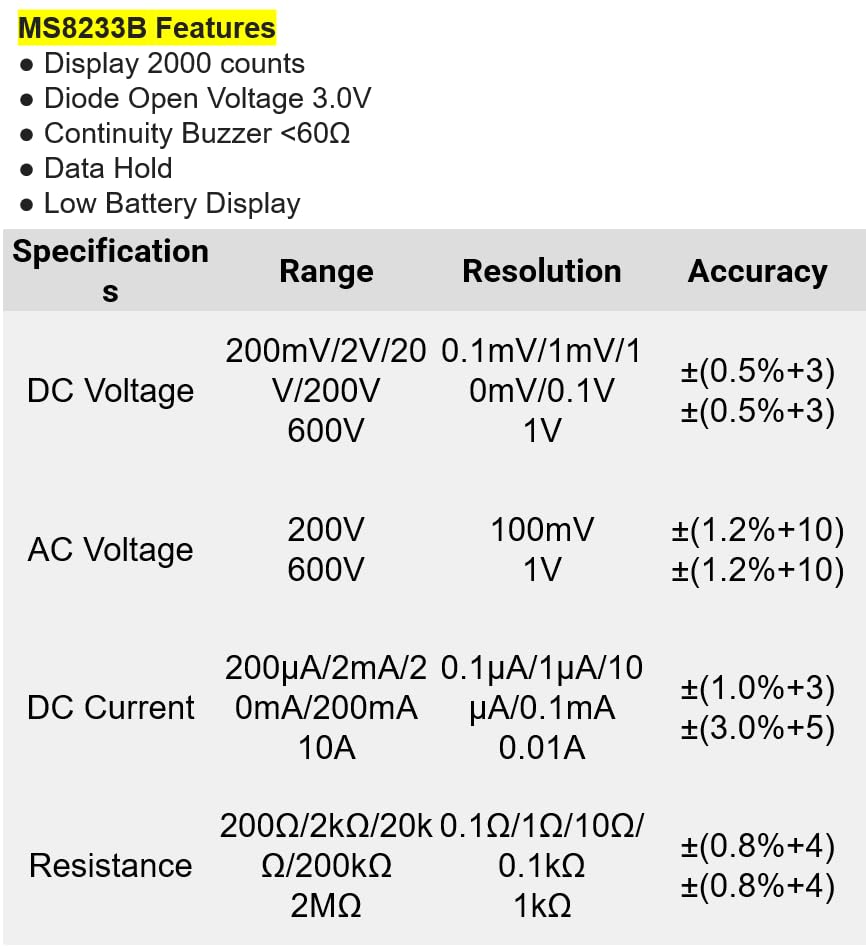
図8.1: Detailed specifications for the Mastech MS8233B, including ranges, resolutions, and accuracies for various measurements.
| 仕様 | 価値 |
|---|---|
| 画面 | 2000カウント |
| ダイオードオープンボリュームtage | 3.0V |
| 連続ブザー | <60Ω |
| データ保持 | はい |
| 低バッテリ表示 | はい |
| DCVol。tage範囲 | 200mV、2V、20V、200V、600V |
| ACVol。tage範囲 | 200V、600V |
| DC電流範囲 | 200µA、2mA、20mA、200mA、10A |
| 抵抗範囲 | 200Ω, 2kΩ, 20kΩ, 200kΩ, 2MΩ |
| 安全性評価 | CATIII 600V |
| 電源 | LR44電池2個(付属) |
| 製品寸法 | 20 x 15 x 25 cm |
| アイテム重量 | 1キログラム |
| メーカー | マステック |
| 商品型番 | YQ-MS8233B |
| 原産国 | 台湾 |

図8.2: A comparison table showing features across various Mastech digital multimeter models, including the MS8233B.
9. 保証とサポート
For warranty information, technical support, or service inquiries, please refer to the documentation provided with your purchase or contact your retailer. Keep your purchase receipt as proof of purchase for any warranty claims.


