導入
Thank you for choosing the RAINPOINT 2-Outlet Water Timer. This digital sprinkler timer is designed to simplify your watering routine, offering precise control over your garden and lawn irrigation. With its dual-zone programming, rain delay, and manual watering options, you can ensure efficient and effective watering while conserving water.
This manual provides detailed instructions for installation, operation, maintenance, and troubleshooting to help you get the most out of your new water timer.
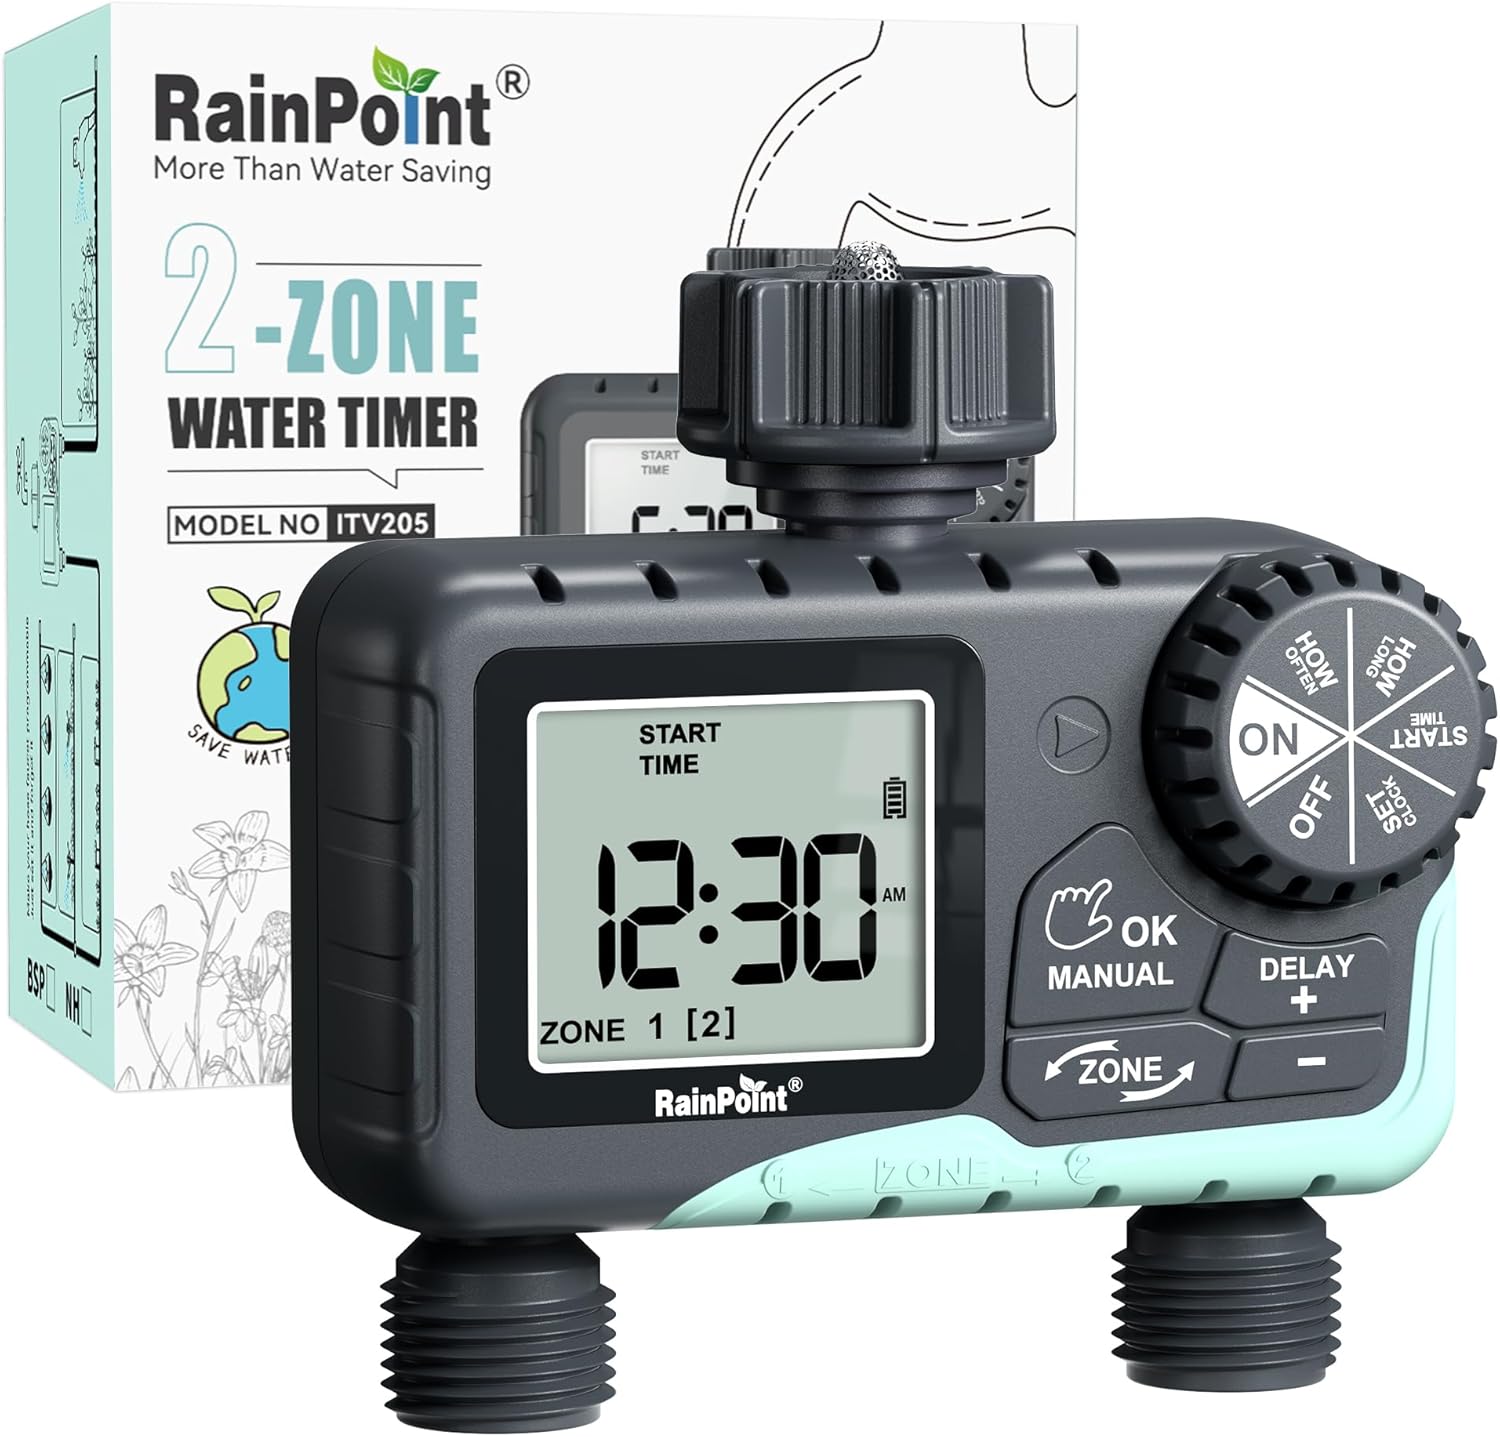
Image: The RAINPOINT 2-Outlet Water Timer, showing the device and its retail packaging. This timer features a digital display and intuitive controls for managing two separate watering zones.
主な特徴
- デュアルゾーン制御: Independently program two separate watering zones for customized irrigation.
- 柔軟なプログラミング: Set start times, watering duration (1 minute to 3 hours 59 minutes), and frequency (hourly to weekly).
- 手動散水モード: Instantly water for a specified duration (1 minute to 8 hours) for Zone 1, Zone 2, or both.
- 雨天遅延機能: Skip watering for 24, 48, or 72 hours to conserve water during rainy periods.
- 大型LCDディスプレイ: Easy-to-read 2.5-inch screen shows watering time, next irrigation plans, and power status.
- Low Power Auto Shutoff: Alerts when battery is below 5% and automatically closes the valve to prevent water wastage.
- 耐久性のある構造: Made from IP54 high-impact plastic with a built-in metal filter and 2-generation valve diaphragm for longevity.
- 360° Rotatable Interface: Designed for easy installation and access.

Image: Illustration demonstrating the independent programming capabilities of Zone 1 and Zone 2, allowing for different start times and durations for each watering area.
パッケージ内容
パッケージの内容をチェックして、すべてのアイテムが揃っていることを確認してください。
- 1 x RAINPOINT 2-Outlet Water Timer (Model: G-ITV205NH)
- ユーザーマニュアル x 1
- (Batteries not included - requires 2 x AA batteries)
セットアップガイド
1. バッテリーの取り付け
- タイマーの背面にある電池ボックスを見つけます。
- 電池カバーを下方向にスライドさせて開きます。
- Insert two (2) new AA alkaline batteries, ensuring correct polarity (+/-).
- Close the battery cover securely. The added seal ring helps prevent water leaks.
重要: Replace batteries when the low battery indicator appears on the LCD screen. The valve will automatically close to prevent water wastage when power is critically low.

Image: The water timer display showing a low battery warning, indicating the need for battery replacement to ensure continuous operation.
2. 蛇口への接続
- 屋外の蛇口が閉まっていることを確認してください。
- Screw the timer's top connector (with the 3/4" internal thread and built-in filter) onto your standard outdoor faucet. Hand-tighten only. Do not overtighten.
- The 360° rotatable interface allows for easy positioning of the timer.
3. ホースの接続
- Attach your garden hoses to the two NH3/4" outlet fittings at the bottom of the timer.
- Ensure a tight connection to prevent leaks.

Image: The RAINPOINT 2-Outlet Water Timer installed on an outdoor faucet, with two hoses connected to its independent outlets, demonstrating its dual-zone capability.

Image: A detailed diagram labeling the various parts of the RAINPOINT water timer, including the 3/4" internal thread, 2.5" LCD screen, control dial, buttons, and outlet fittings.
操作手順
The RAINPOINT water timer features a large dial for mode selection and several buttons for setting parameters. The dial has positions for ON, OFF, HOW OFTEN, HOW LONG, START TIME, and SET CLOCK.
1. 時計の設定
- ダイヤルを回して 時計を設定する.
- 使用 + そして - 現在の時刻を調整するためのボタン。
- プレス OK/手動 確認して次の設定(AM/PMなど)に移動します。
- 時間を設定したら、ダイヤルを回して ON 保存して終了します。
2. Programming Watering Schedules (Automatic Mode)
You can program independent schedules for Zone 1 and Zone 2. Use the ゾーン button to switch between zones.
a. Set Start Time
- ダイヤルを回して 開始時間.
- を押す ゾーン button to select either Zone 1 or Zone 2.
- 使用 + そして - to set the desired start time for the selected zone.
- プレス OK/手動 確認します。
b. Set How Long (Watering Duration)
- ダイヤルを回して どのぐらいの間.
- を押す ゾーン button to select either Zone 1 or Zone 2.
- 使用 + そして - to set the watering duration (from 1 minute to 3 hours 59 minutes).
- プレス OK/手動 確認します。
c. Set How Often (Watering Frequency)
- ダイヤルを回して どのくらいの頻度で.
- を押す ゾーン button to select either Zone 1 or Zone 2.
- 使用 + そして - to set the watering frequency (e.g., every 12 hours, every 2 days, etc.).
- プレス OK/手動 確認します。
Note: After setting all parameters, turn the dial to ON to activate the programmed schedule.

Image: The water timer display showing options for setting watering duration (1 min - 3h 59m) and frequency (1 hour - 7 days), illustrating the flexibility of automatic scheduling.
3. 手動散水モード
This mode allows for immediate, temporary watering without affecting your programmed schedule.
- Ensure the dial is in the ON 位置。
- を押す OK/手動 button. The display will show "MANUAL".
- を押す ゾーン button to cycle through watering options: Zone 1, Zone 2, or BOTH ZONE.
- 使用 + そして - to set the desired manual watering duration (from 1 minute to 8 hours).
- プレス OK/手動 again to start watering. The timer will count down the duration.
- 手動散水を停止するには、 OK/手動 again or turn the dial to オフ そしてまた ON.
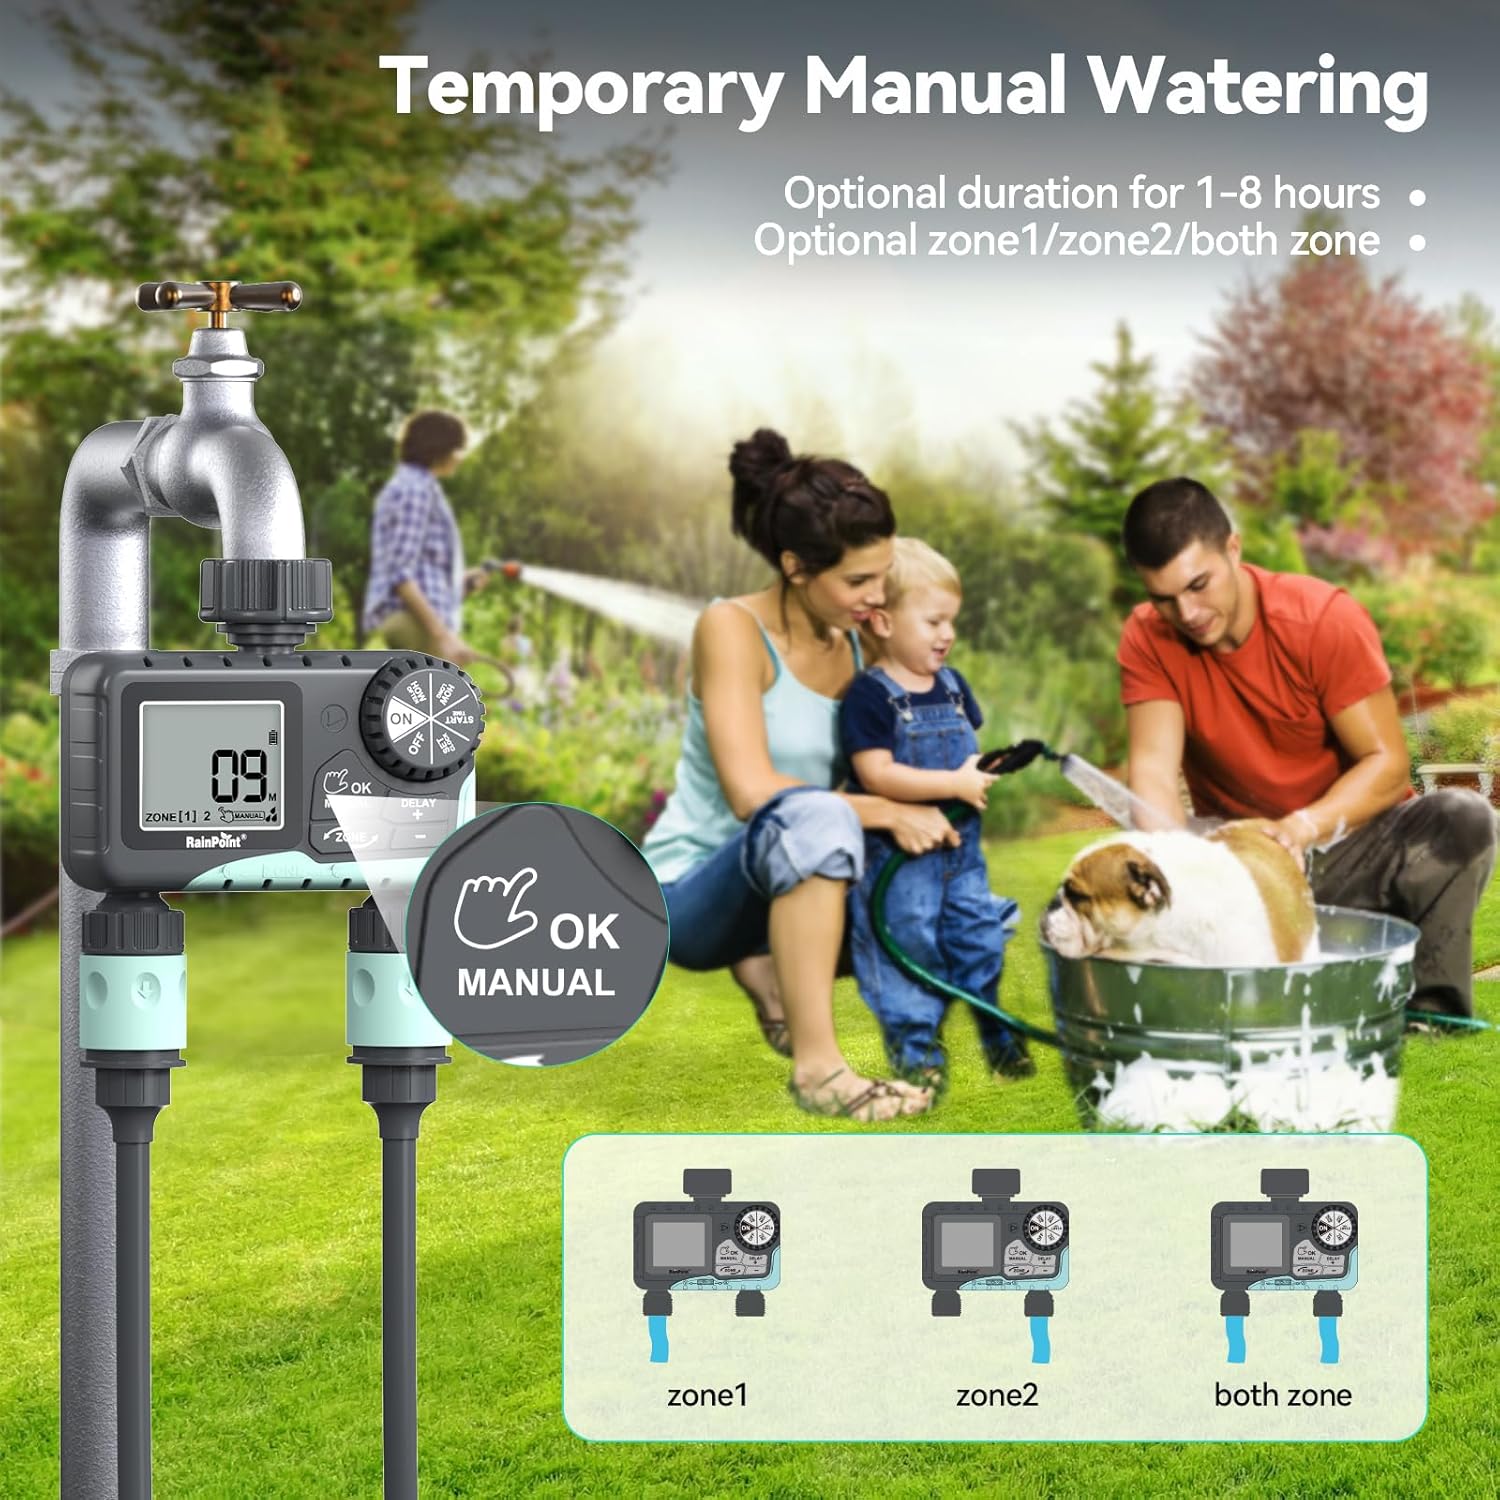
Image: The water timer display showing the manual watering mode, with options to select Zone 1, Zone 2, or both zones for immediate watering, and setting the duration.
4. 降雨遅延機能
The rain delay function allows you to pause your watering schedule for a set period, preventing overwatering during rainfall.
- Ensure the dial is in the ON 位置。
- を押し続けます DELAY + button for approximately 3 seconds until "DELAY" appears on the screen.
- 使用 + そして - buttons to select the delay duration: 24 hours, 48 hours, or 72 hours.
- プレス OK/手動 to confirm the rain delay. The timer will resume its schedule automatically after the delay period.
- To cancel the rain delay, press and hold the DELAY + もう一度ボタンを3秒間押します。
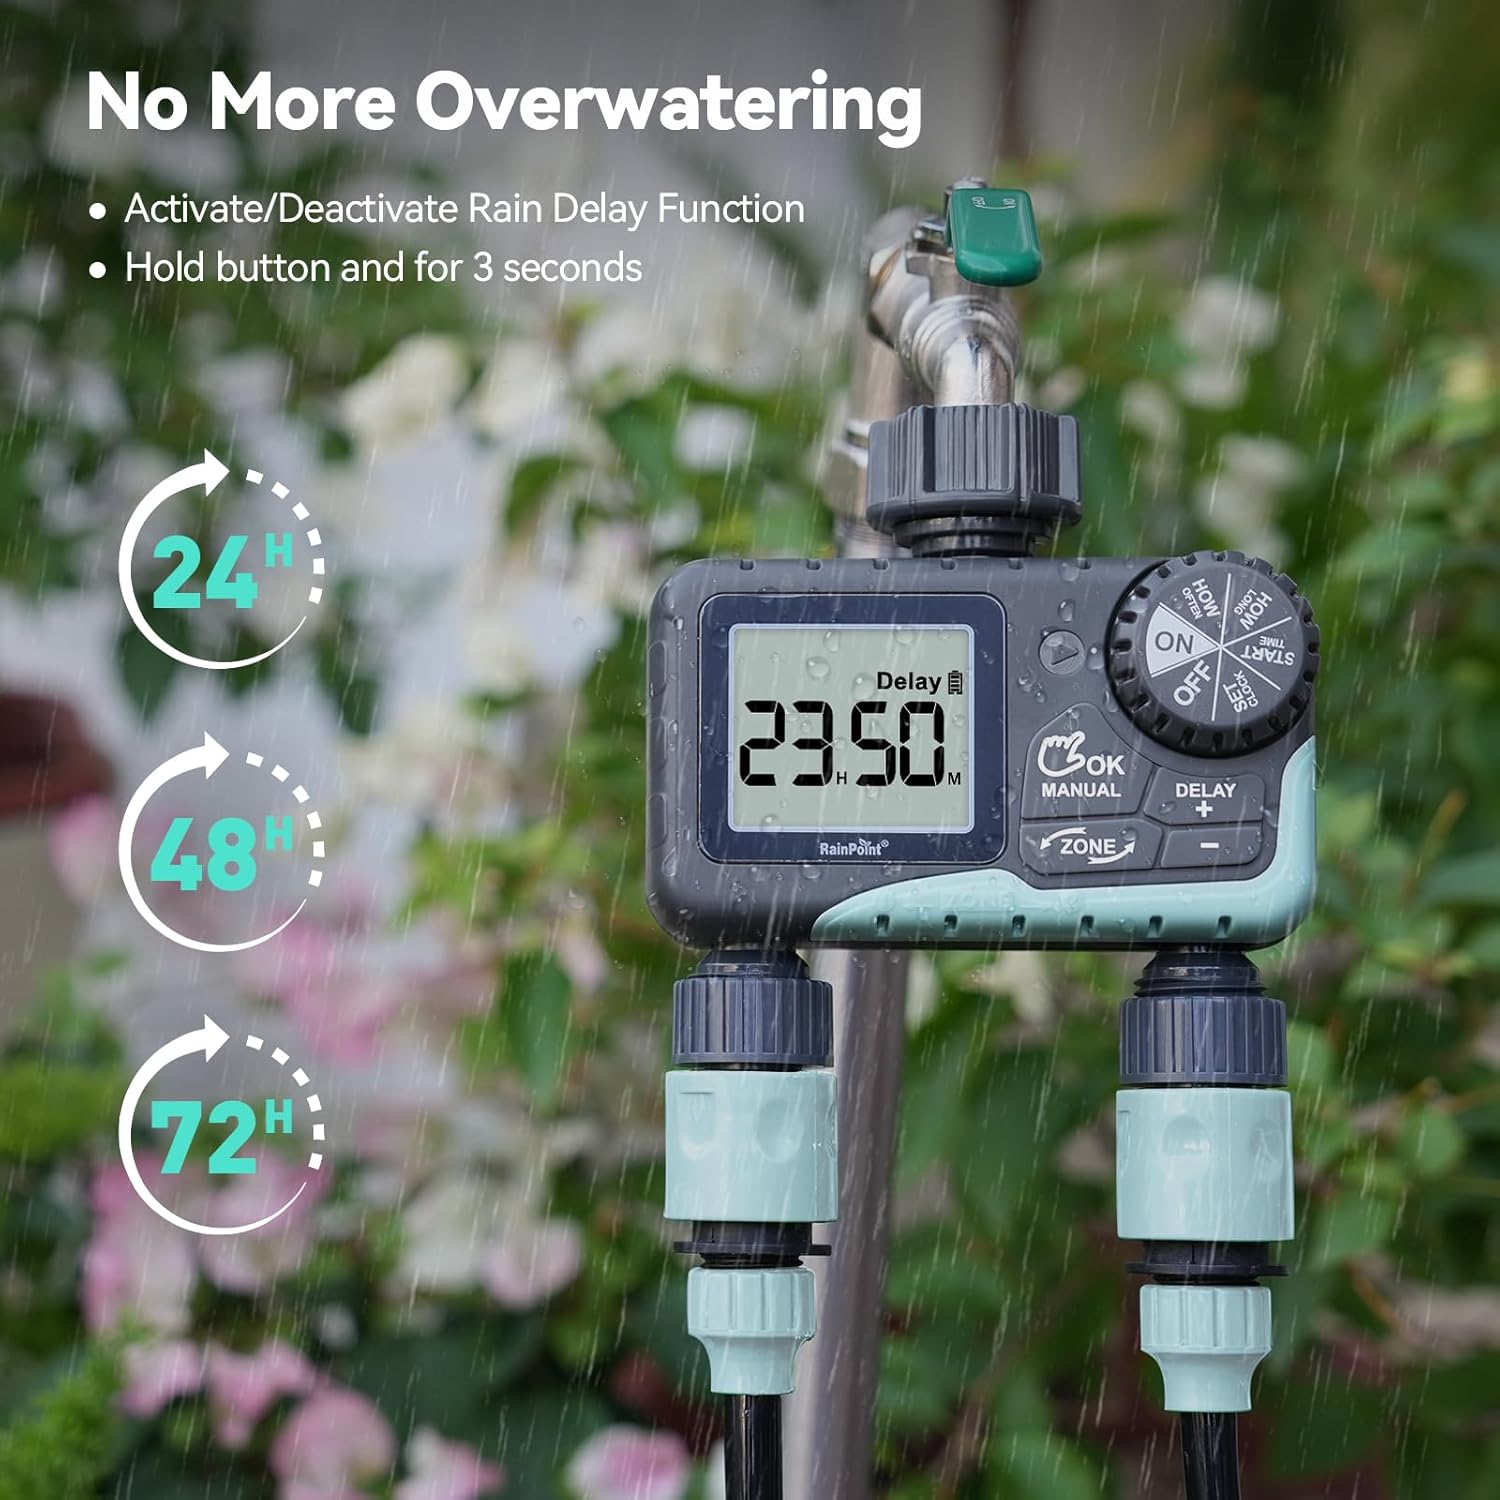
Image: The water timer display showing the rain delay function activated, with options for 24, 48, or 72-hour delays to prevent overwatering during rainy conditions.
5. タイマーをオフにする
To stop all watering and programming, turn the dial to オフ. All active programs will be paused.
メンテナンス
1.フィルターの清掃
The timer has a built-in metal filter to prevent debris from entering the unit. Periodically check and clean this filter to ensure optimal water flow and prevent blockages.
- Unscrew the timer from the faucet.
- Remove the filter screen from the top connector.
- フィルターを流水で洗い流し、蓄積したゴミを取り除きます。
- 清潔なフィルターを再度挿入し、タイマーを蛇口に再度取り付けます。
2. バッテリーの交換
液晶画面に電池残量低下のインジケーターが表示されたら、電池を交換してください。必ず新しい単3アルカリ電池をご使用ください。
- ダイヤルを回して オフ.
- 電池ケースを開けます。
- Remove old batteries and insert new ones, observing polarity.
- 電池ケースをしっかりと閉めてください。
- The timer will retain your programming for a short period during battery replacement.
3. 冬季対策
To prevent damage from freezing temperatures, remove the water timer from the faucet before the first frost.
- Disconnect the timer from the faucet and hoses.
- 電池を取り外します。
- タイマーは乾燥した、霜が降りない屋内に保管してください。
トラブルシューティング
| 問題 | 考えられる原因 | 解決 |
|---|---|---|
| Timer not turning on/display blank. | 電池が切れているか、正しく取り付けられていない。 | 極性が正しいことを確認して、新しい単3アルカリ電池と交換してください。 |
| 水が流れません。 | Faucet is off; timer is in OFF mode; low battery; clogged filter; incorrect programming. | Turn on faucet; turn dial to ON; replace batteries; clean filter; check programming (start time, duration, frequency). |
| 接続部から水が漏れています。 | 接続が緩んでいる、ワッシャーが摩耗している。 | Ensure all connections are hand-tight; check and replace rubber washers if damaged. |
| Timer not watering at scheduled time. | Incorrect clock setting; incorrect program settings; rain delay active. | Verify current time; re-check start time, duration, and frequency for each zone; check if rain delay is active. |
| ディスプレイに「LOW BATT」と表示されます。 | 電池残量が少なくなっています。 | Replace batteries immediately to prevent valve closure and program loss. |
仕様
| モデル番号 | G-ITV205NH |
| 製品寸法 | 奥行き5.36インチ x 幅5.92インチ x 高さ5.55インチ |
| 材料 | High-impact Plastic, Metal |
| 色 | 黒と青 |
| 電源 | 単3アルカリ電池2本(別売) |
| 水圧範囲 | Up to 35 kg (approx. 500 PSI) |
| 流量 | 5~35L/分 |
| 散水時間 | 1分~3時間59分 |
| 散水頻度 | Hourly (up to 12 hours) or Daily (up to 7 days) |
| 手動散水時間 | 1分~8時間 |
| 雨天延期オプション | 24、48、72時間 |
| 防水等級 | IP54 |
保証とサポート
RAINPOINT products are designed for durability and performance. For warranty information and customer support, please refer to the official RAINPOINT webサイトをご覧いただくか、カスタマー サービスに直接お問い合わせください。
さらにサポートが必要な場合は、次のサイトをご覧ください。 www.rainpointonline.com
Or contact customer support via email: support@rainpointonline.com


