導入
This manual provides comprehensive instructions for the setup, operation, and maintenance of your Zalman i4 Airflow Full Mesh Mid Tower ATX Desktop PC Case. Designed for optimal cooling performance, the i4 case features a full mesh construction and pre-installed fans to ensure efficient airflow for your components. Please read this manual thoroughly before beginning assembly to ensure proper installation and safe operation.

Figure 1: The Zalman i4 Airflow Full Mesh Mid Tower ATX Desktop PC Case, showcasing its sleek black design and included 120mm fans.
主な特徴
- Full Mesh Design: Engineered with a full mesh design on the front, top, and side panels for optimized ventilation and superior cooling performance.
- プレインストールされたファン: Comes with six (6) pre-installed 120mm ultra-quiet high-airflow case fans for immediate cooling capability.
- GPU Support Bracket: Includes a height-adjustable anti-sag GPU support bracket (Zalman VS-1) to prevent graphics card sag.
- Vertical GPU Mount Support: Features two (2) vertical PCI slot brackets to support vertical GPU mounting (riser cable not included).
- Top-Mounted I/O Panel: Conveniently located I/O panel with audio-in/out, two USB 3.0 ports, and one USB 2.0 port.
- ツール不要の設計: Facilitates quick and easy component installation.
- 磁気ダストフィルター: Full-size magnetic dust filters on the front, top, and bottom (for PSU) ensure clean airflow and easy maintenance.

図 2: 分解 view illustrating the modular design and components of the Zalman i4 case, including the removable panels and fan locations.
仕様
| 特徴 | 詳細 |
|---|---|
| ブランド | ザルマン |
| モデル名 | i4 |
| ケースタイプ | ミッドタワー |
| マザーボードの互換性 | ATTX |
| 寸法(長さx幅x高さ) | 15.59 x 8.6 x 19.06インチ |
| アイテム重量 | 12.8ポンド |
| 色 | 黒 |
| 材料 | 金属、プラスチック |
| プレインストールされたファン | 6 x 120mm (Front: 3, Top: 2, Rear: 1) |
| ラジエーターサポート | 最大360mm(フロント) |
| I/O ポート | 2x USB 3.0, 1x USB 2.0, Audio In/Out, Power Button, Reset Button, LED Button |
| 電源の取り付け | ボトムマウント |
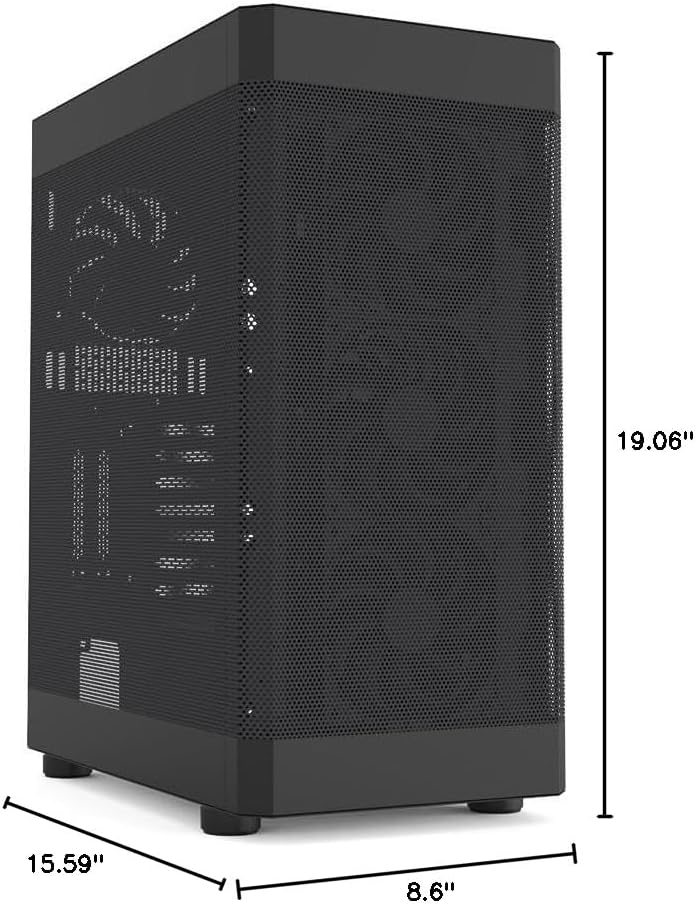
Figure 3: Detailed dimensions of the Zalman i4 PC case, providing measurements for planning your build.
セットアップとインストール
Follow these steps for proper installation of your PC components into the Zalman i4 case.
1. ケースの準備
- ケースを安定した平らな面に置きます。
- Remove the side panels. The main side panel (left side when facing the front) is typically secured with thumbscrews at the rear. The right side panel is a full mesh sliding panel, secured with two screws.
- 内部の梱包材をすべて取り除きます。

Figure 4: The full mesh sliding side panel of the Zalman i4 case, secured by two screws for durability and easy access.
2. マザーボードの取り付け
- I/O シールドをケース背面のマザーボードの切り欠きに取り付けます。
- Align your ATX motherboard with the pre-installed standoffs inside the case.
- 適切なネジを使用してマザーボードを固定します。
3. 電源ユニット(PSU)の取り付け
- ケースの背面下部にある PSU 取り付け領域を見つけます。
- ケースの背面から PSU を所定の位置にスライドさせます。
- Secure the PSU with screws from the exterior rear of the case.
4. ストレージドライブのインストール
The Zalman i4 supports various storage configurations:
- 2.5インチSSD/HDD: Mount directly to the dedicated 2.5" drive trays located behind the motherboard tray.
- 3.5インチHDD: Utilize the drive cage located beneath the PSU shroud.
付属のネジまたは工具不要のメカニズムを使用してドライブを固定します。
5. グラフィックカード(GPU)のインストール
The case supports both horizontal and vertical GPU mounting.
- 水平マウント: Remove the necessary PCI-E slot covers at the rear of the case. Insert the graphics card into the motherboard's PCI-E slot and secure it with screws.
- 垂直マウント: Use the two included vertical PCI slot brackets. Install your graphics card vertically using a compatible riser cable (not included).
- GPU Support Bracket: Install the height-adjustable anti-sag GPU support bracket (Zalman VS-1) beneath your graphics card to provide additional stability. Adjust its height to firmly support the GPU.

Figure 5: The included height-adjustable GPU support bracket (Zalman VS-1) installed within the case, designed to prevent graphics card sag.

Figure 6: Illustration of the vertical graphics card holder in the Zalman i4 case. Note that a riser cable is required and sold separately.
6.ケーブル管理
マザーボードトレイ背面のケーブル配線用カットアウトと結束ポイントを活用して、ケーブルをすっきりと整理しましょう。これにより、エアフローと美観が向上します。

図7: 内部 view of the Zalman i4 case, highlighting the ample space for cable routing and management behind the motherboard tray.
PCケースの操作
Once all components are installed and secured, replace the side panels. Connect your peripherals and power cable.
Front I/O Panel Usage
The top-mounted I/O panel provides convenient access to essential ports and controls:
- 電源ボタン: 押すとシステムの電源がオンまたはオフになります。
- リセットボタン: 押すとシステムが再起動します。
- USB 3.0 ポート (x2): 対応デバイスとの高速データ転送を実現します。
- USB 2.0 ポート (x1): 標準的なデータ転送および周辺機器の接続用。
- マイクジャック: マイクを接続します。
- ヘッドフォンジャック: ヘッドホンまたはスピーカーを接続します。
- LEDボタン: Controls the lighting effects of compatible RGB components (if connected).

図 8: 拡大図 view of the easily accessible top I/O ports on the Zalman i4 case, including USB, audio, and control buttons.
メンテナンス
定期的なメンテナンスにより、PC コンポーネントの最適なパフォーマンスと寿命が確保されます。
ダストフィルターの清掃
The Zalman i4 case is equipped with full-size magnetic dust filters on the front, top, and bottom (for the PSU intake). These filters are designed to prevent dust accumulation inside your system while maintaining excellent airflow.
- 上部フィルター: Gently lift the magnetic dust filter from the top panel.
- フロントフィルター: The front panel can be carefully pulled off to access the magnetic dust filter behind it.
- 下部フィルター: Slide out the magnetic dust filter located beneath the PSU intake.
- Clean the filters using compressed air, a soft brush, or by rinsing with water (ensure completely dry before re-installation).
- Re-attach the magnetic filters to their respective positions.

Figure 9: The full-size magnetic dust filters on the Zalman i4 case, designed for easy removal and cleaning to safeguard internal components.
トラブルシューティング
This section addresses common issues you might encounter during or after building your PC in the Zalman i4 case.
Issue: System does not power on.
- Ensure the power supply is properly connected to the wall outlet and the PSU switch is in the "ON" position.
- Verify all power cables from the PSU are securely connected to the motherboard (24-pin ATX, 8-pin CPU) and graphics card (if applicable).
- Check that the front panel power switch cable is correctly connected to the motherboard's front panel header. Refer to your motherboard manual for correct pin alignment.
Issue: Fans are not spinning or RGB is not working.
- Confirm that the fan power cables are correctly connected to the motherboard fan headers or a fan controller.
- For RGB lighting, ensure the RGB cables are connected to the appropriate RGB headers on your motherboard or a dedicated RGB controller.
- Check the LED button on the top I/O panel to cycle through lighting modes or turn RGB on/off.
Issue: USB ports or audio jacks on the front panel are not working.
- Verify that the USB 3.0, USB 2.0, and HD Audio cables from the front I/O panel are securely connected to the corresponding headers on your motherboard.
- マザーボードのドライバーが最新であることを確認してください。
保証とサポート
Zalman products are manufactured with high-quality materials and undergo rigorous testing to ensure durability and performance. For specific warranty details, including duration and coverage, please refer to the warranty card included with your product or visit the official Zalman webサイト。
For technical support, troubleshooting assistance, or inquiries regarding replacement parts, please contact Zalman customer service. Contact information can typically be found on the Zalman webサイトまたは製品パッケージに記載されています。
オンラインリソース:


