導入
This manual provides detailed instructions for the installation, operation, and maintenance of your Sygonix SY-5470190 Wireless Thermostat. This device is designed to control your heating system efficiently, offering features such as weekly programming and a holiday function. Please read this manual thoroughly before using the product to ensure correct operation and to prevent damage.
安全情報
- 不明な場合は、すべての電気接続が資格のある電気技師によって行われていることを確認してください。
- 設置またはメンテナンスを行う前に、暖房システムの電源を切ってください。
- サーモスタットまたはレシーバーを湿気、極端な温度、直射日光にさらさないでください。
- Use only the specified battery type for the thermostat unit.
- デバイスを子供の手の届かない場所に保管してください。
- ご自身でデバイスの修理を試みないでください。資格のあるサービス担当者にご連絡ください。
パッケージ内容
すべての品目が揃っていて、損傷がないことを確認してください。
- Wireless Thermostat Unit (with display)
- Receiver Unit (for connection to heating system)
- 取扱説明書(本書)
- Mounting accessories (screws, wall plugs - typically included)
製品終了view
The Sygonix SY-5470190 system consists of two main components: the wireless thermostat unit and the receiver unit.
サーモスタットユニット
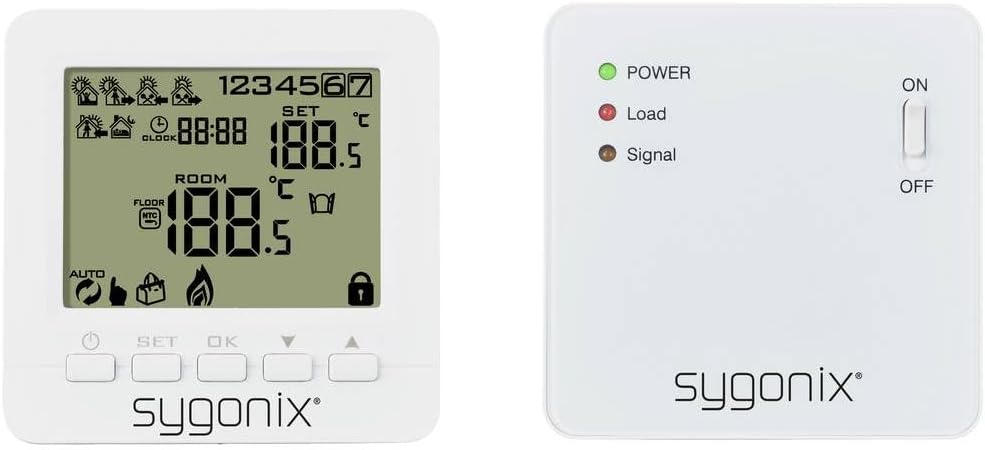
画像: フロント view of the Sygonix SY-5470190 wireless thermostat unit, showing its LCD display with temperature, time, and various icons, along with control buttons below the screen.
The thermostat unit features an LCD display showing current room temperature, set temperature, time, and various operational icons (e.g., heating active, battery low, programming mode). It has buttons for setting the temperature, navigating menus, and confirming selections. This unit is battery-powered and communicates wirelessly with the receiver.
受信ユニット

画像: フロント view of the Sygonix SY-5470190 receiver unit, displaying three LED indicators (Power, Load, Signal) and an ON/OFF toggle switch on the right side.
The receiver unit connects directly to your heating system. It has LED indicators for Power (green), Load (red, indicating heating is active), and Signal (amber, indicating wireless communication). An ON/OFF switch controls the power to the receiver. This unit is typically rack-mounted or wall-mounted near the heating appliance.

画像: Both the Sygonix SY-5470190 wireless thermostat unit (right) and its receiver unit (left) are shown side-by-side, illustrating their relative sizes and designs.
設定
1. バッテリーの取り付け(サーモスタットユニット)

画像: 後方 view of the Sygonix SY-5470190 thermostat unit, showing the open battery compartment designed for multiple AA or AAA batteries, and the back of the receiver unit with mounting points.
- Gently remove the back cover of the thermostat unit.
- Insert the required batteries (e.g., AA or AAA, typically 2 or 3 depending on model) into the battery compartment, observing the correct polarity (+/-).
- Replace the back cover securely. The display should now power on.
2. 受信機ユニットの取り付け
- The receiver unit is designed for rack or wall mounting. Choose a location near your heating system (e.g., boiler, electric heater) that is free from obstructions and within wireless range of the thermostat unit.
- 重要: Ensure the main power supply to your heating system is switched off before proceeding with electrical connections.
- Connect the receiver unit to your heating system according to the wiring diagram provided in the full product manual (not included here). This typically involves connecting live, neutral, and switched live wires.
- Secure the receiver unit to the wall or rack using the provided mounting accessories.
- Once wired, switch on the main power supply to the heating system. The green POWER LED on the receiver should illuminate.
3. ユニットのペアリング
The thermostat and receiver units typically come pre-paired. If they do not communicate or if you are replacing a unit, follow these general pairing steps (refer to your full manual for specific button sequences):
- On the receiver unit, press and hold the pairing button (location varies by model, often a small recessed button) until the Signal LED starts flashing.
- On the thermostat unit, enter pairing mode (usually by pressing a combination of buttons like SET and OK, or a dedicated pairing option in the menu).
- Once pairing is successful, the Signal LED on the receiver will stop flashing and remain solid, and the thermostat display may show a confirmation icon.
- Test the connection by adjusting the set temperature on the thermostat and observing if the Load LED on the receiver responds (turns red when heating is requested).
操作手順
時間と曜日の設定
Access the time/day setting mode (usually by pressing a 'CLOCK' or 'SET' button) and use the arrow buttons to adjust the current time and day of the week. Confirm each setting with 'OK' or 'SET'.
温度調整
- 通常の動作モードでは、 Up そして 下 arrow buttons to increase or decrease the desired set temperature.
- The new set temperature will be displayed, and the thermostat will automatically adjust the heating to reach and maintain this temperature.
週間番組
The thermostat supports weekly programming, allowing you to set different temperatures for various times of the day across the week. This feature helps optimize energy consumption.
- Enter programming mode (refer to your full manual for the specific button, often 'PROG' or holding 'SET').
- Select the day or group of days you wish to program (e.g., weekdays, weekends, or individual days).
- Set the desired time periods and corresponding temperatures for each period.
- 設定を保存し、プログラミング モードを終了します。
休日の機能
The holiday function allows you to set a constant, energy-saving temperature for an extended period when you are away. This prevents the heating from running unnecessarily while protecting your home from freezing temperatures.
- Activate the holiday mode (usually via a dedicated button or menu option).
- Set the desired constant temperature for the holiday period.
- Specify the duration of the holiday period (e.g., number of days).
- The thermostat will revert to its normal programming after the set duration.
バックライト
The thermostat display features a backlight for improved visibility in low-light conditions. It typically activates automatically when a button is pressed and turns off after a short period of inactivity to conserve battery life.
メンテナンス
- クリーニング: サーモスタットとレシーバーユニットは、柔らかく乾いた布で拭いてください。研磨剤入りの洗剤や溶剤は使用しないでください。
- バッテリー交換: When the low battery indicator appears on the thermostat display, replace the batteries promptly to ensure continuous operation. Refer to the "Battery Installation" section for instructions.
- 定期点検: Periodically check the wireless connection and ensure the receiver's LEDs are functioning as expected.
トラブルシューティング
| 問題 | 考えられる原因 | 解決 |
|---|---|---|
| サーモスタットのディスプレイが空白です。 | 電池が切れているか、正しく挿入されていない。 | 正しい極性を確認して電池を交換してください。 |
| 暖房システムがサーモスタットに反応しません。 |
|
|
| 温度の読み取りが正しくありません。 | Thermostat placed near heat source/draft, or sensor malfunction. | Relocate thermostat to a central area away from direct heat/cold sources. If problem persists, contact support. |
| Cannot program weekly schedule or holiday function. | Incorrect mode or user error. | Refer to the "Operating Instructions" section and your full product manual for detailed programming steps. Ensure you are in the correct programming mode. |
仕様
| ブランド | シゴニックス |
| モデル番号 | SY-5470190 |
| 製品寸法(長さ x 幅 x 高さ) | 3 x 8.6 x 8.6 cm |
| アイテム重量 | 290グラム |
| 巻tage | 230ボルト |
| 力 | 280 (Unit not specified, typically Watts for heating load) |
| 制御方法 | Remote Control (Wireless Thermostat) |
| バックライト | はい |
| 騒音レベル | 1 Decibel (Receiver operation) |
保証とサポート
Warranty information is typically provided with your purchase documentation or on the product packaging. For specific warranty terms and conditions, please refer to these documents.
For technical support, troubleshooting assistance beyond this manual, or spare parts inquiries, please contact Sygonix customer service. Contact details can usually be found on the manufacturer's webサイトまたは購入領収書をご覧ください。


