導入
Thank you for choosing the Epson EB-L210SF projector. This manual provides essential information for the safe and efficient use of your projector. Please read it thoroughly before operating the device and keep it for future reference.
The Epson EB-L210SF is a 3LCD Full-HD projector designed for clear and vibrant image projection. It features a laser light source for long-lasting performance.
重要な安全情報
- レーザーの安全性: Do not look directly into the projector lens when the laser light source is active. Avoid direct eye exposure to the laser beam.
- 換気: Ensure adequate ventilation around the projector. Do not block ventilation openings. Overheating can cause damage.
- 電源: このプロジェクターに指定された電源のみを使用してください。
- 取り扱い: プロジェクターは丁寧に取り扱ってください。落としたり、強い衝撃を与えたりしないでください。
- クリーニング: 清掃する前に電源コードを抜いてください。柔らかく乾いた布を使用してください。液体洗剤やエアゾール洗剤は使用しないでください。
設定
1. 開梱と設置
Carefully remove the projector and all accessories from the packaging. Place the projector on a stable, level surface. Ensure there is sufficient space around the projector for proper ventilation.

図1: 前面と側面 view of the Epson EB-L210SF projector, showing the lens and ventilation grilles.
2. 電源の接続
- 付属の電源コードをプロジェクターの AC 入力に接続します。
- 電源コードのもう一方の端を接地されたコンセントに差し込みます。
3. 入力ソースの接続
The projector supports various input sources. Connect your device (computer, Blu-ray player, etc.) to the appropriate port on the projector's rear panel.

Figure 2: Rear panel of the projector, displaying various input and output ports including HDMI, Computer (VGA), Video, USB, and Audio connections.
- HDMI: Connect an HDMI cable from your device to one of the HDMI ports (HDMI 1 or HDMI 2).
- コンピューター(VGA): Connect a VGA cable from your computer to the Computer 1 or Computer 2 port. For audio, connect a separate audio cable to Audio 1 or Audio 2.
- ビデオ: Connect composite video and audio cables to the Video and Audio (R/L) ports.
- USB: Use the USB-A port for connecting USB storage devices or the USB-B port for display over USB.
- LAN: ネットワークの制御と監視のためにイーサネット ケーブルを接続します。
4. 初回電源投入と画像調整
- Press the power button on the projector or remote control to turn on the device. The power indicator will illuminate.
- 調整する フォーカスリング 画像が鮮明になるまでレンズの周りを回します。
- 使用 ズームレバー (if available) to adjust the image size.
- 画像が台形になる場合は、 キーストーン補正 feature (manual or automatic) to square the image. Refer to the Operating section for details on menu navigation.
プロジェクターの操作
1.コントロールパネルオーバーview
The control panel on top of the projector allows access to various functions and settings.
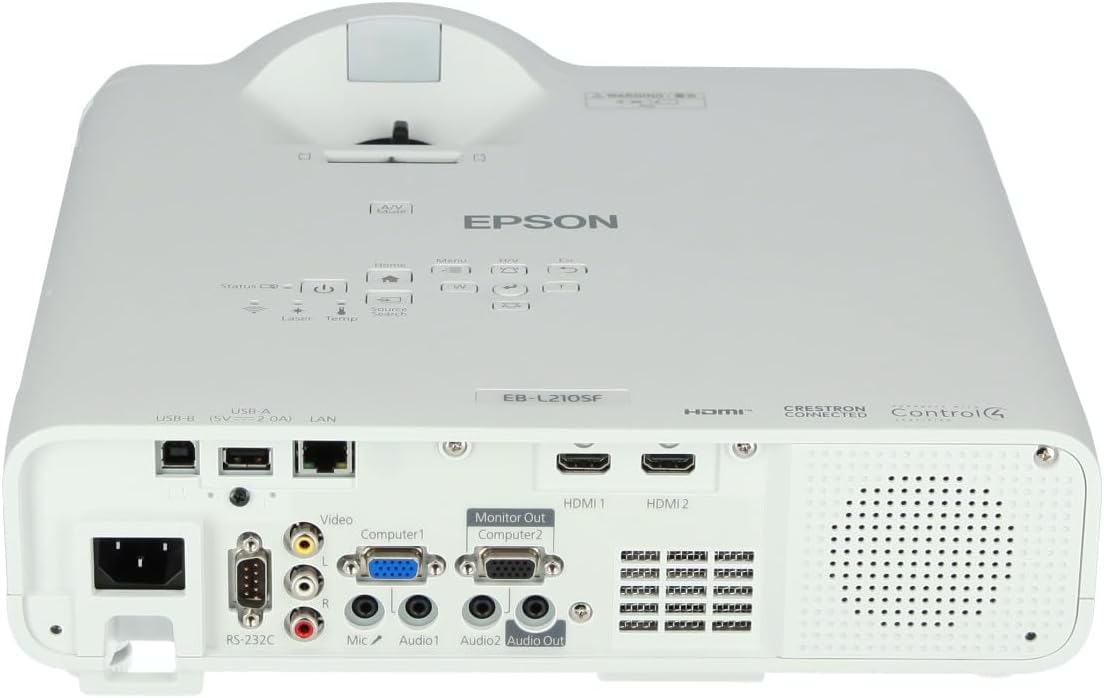
図3:上 view of the projector, highlighting the control panel with buttons for power, menu, source selection, and navigation.
- 電源ボタン: プロジェクターの電源をオンまたはオフにします。
- ソース検索: 利用可能な入力ソースを切り替えます。
- メニューボタン: オンスクリーン ディスプレイ (OSD) メニューを開きます。
- Navigation Buttons (Arrow keys): メニュー オプションを移動するために使用されます。
- 入力ボタン: メニューの選択を確定します。
- Escボタン: 現在のメニューを終了するか、前の画面に戻ります。
- ホームボタン: Accesses the home screen or quick settings.
- A/Vミュート: 一時的に音声をミュートし、画面を空白にします。
2. 入力ソースの選択
を押す ソース検索 button on the control panel or remote control to cycle through the connected input sources (e.g., HDMI 1, HDMI 2, Computer 1, Video). The projector will automatically detect and display the active source.
3. Adjusting Image and Audio Settings
を押す メニュー button to access the projector's on-screen display (OSD) menu. Use the navigation buttons to browse categories such as:
- 画像: 明るさ、コントラスト、色、色合い、シャープネス、色温度を調整します。
- 信号: Configure input signal settings, aspect ratio, and overscan.
- 設定: General projector settings like language, display options, and power management.
- オーディオ: Adjust volume, mute, and audio input selection.
オプションを選択して を押します 入力 to modify its value. Press ESC メニューを終了します。
メンテナンス
1. プロジェクターのクリーニング
- 外観: Wipe the projector's exterior with a soft, dry, lint-free cloth. For stubborn dirt, dampen the cloth slightly with water, then wipe dry.
- レンズ: Gently wipe the lens with a lens cleaning cloth or lens paper. Avoid using abrasive materials or excessive force.
- エアフィルター: Regularly check and clean the air filter to prevent dust buildup, which can affect performance and cause overheating. Refer to the projector's on-screen menu for filter maintenance reminders.
2. レーザー光源
The Epson EB-L210SF uses a laser light source, which offers a long operational life and does not require lamp replacement. No user maintenance is typically required for the laser light source itself.
トラブルシューティング
プロジェクターで問題が発生した場合は、次の一般的な問題と解決策を参照してください。
| 問題 | 考えられる原因 / 解決策 |
|---|---|
| 画像が投影されない |
|
| 画像がぼやけている、または焦点が合っていない |
|
| 画像が歪んでいる(台形) |
|
| 音が出ない |
|
| Projector is not wireless | The Epson EB-L210SF is not inherently a wireless projector. Wireless functionality typically requires an optional external wireless adapter, which is sold separately. Please consult Epson's official website or your retailer for compatible wireless adapters. |
| Overheating warning (Temp indicator) |
|
仕様
| 特徴 | 詳細 |
|---|---|
| モデル番号 | V11HA75080 |
| ディスプレイ解像度 | 1920 x 1080 (フルHD) |
| 接続技術 | HDMI、VGA、USB、LAN |
| 製品寸法 | 11.81 x 11.81 x 11.81インチ |
| アイテム重量 | 10.14ポンド |
| 光源 | レーザ |
| メーカー | エプソン |
| 推奨用途 | 監視 |
| 特集 | 軽量 |
| 電池が必要 | 1 AAAA (for remote control, not included with projector unit) |
| 初回利用可能日 | 14年2023月XNUMX日 |
保証とサポート
保証の詳細については、製品に付属の保証書を参照するか、エプソンの公式ウェブサイトをご覧ください。 webサイトをご覧ください。保証条件は地域によって異なる場合があります。
技術サポート、製品登録、最新のドライバーやソフトウェアのダウンロードについては、エプソンの公式サポートサイトをご覧ください。 website or contact Epson customer service in your region. Contact information can typically be found on the Epson webサイト。


