1. はじめに
This manual provides detailed instructions for the setup, operation, and maintenance of your VYSER F2 Projector. Please read this manual thoroughly before using the projector to ensure proper functionality and to maximize your viewing experience. The VYSER F2 Projector is a versatile device designed for various entertainment and presentation needs, offering high-definition projection with multiple connectivity options.
2. 箱の中身
Upon unboxing your VYSER F2 Projector, please verify that all the following items are included:
- VYSER F2 Projector
- リモートコントロール
- ユーザーマニュアル(このドキュメント)
- HDMIケーブル
- 電源ケーブル
3.製品オーバーview
Familiarize yourself with the components and ports of your VYSER F2 Projector.

Figure 3.1: VYSER F2 Projector with key features highlighted.
3.1フロント View
- フォーカスレンズ: 投影された画像の鮮明さを調整します。
- IRレシーバー: リモコンから信号を受信します。
3.2 側面と背面 View(ポートとコントロール)
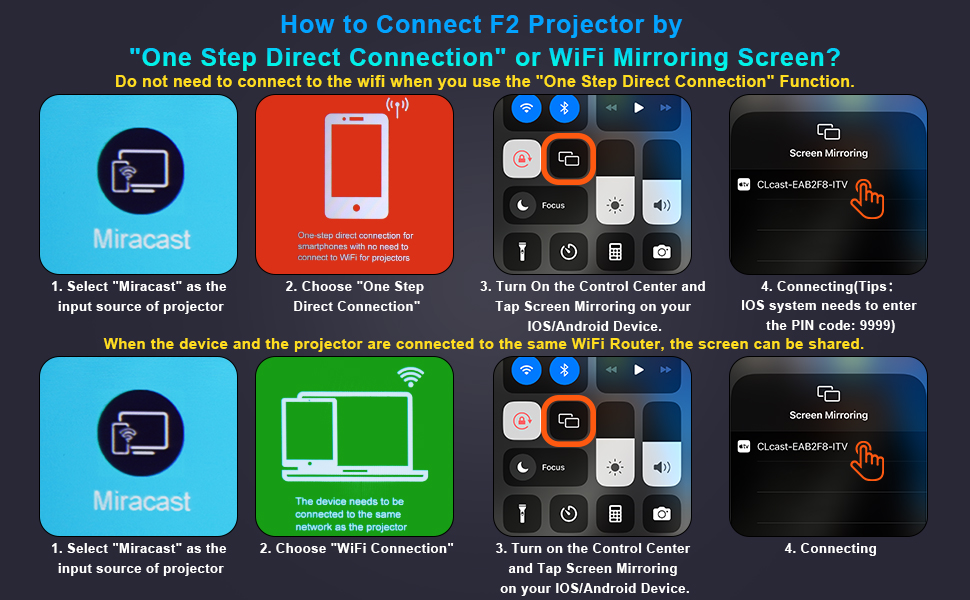
Figure 3.2: Multiple connection options on the VYSER F2 Projector.
- HDMIポート(x2): Connect to devices like laptops, TV sticks, gaming consoles (e.g., PS5/Xbox).
- USBポート(x2): メディアを再生するには USB ドライブを接続します。
- AVポート: AV ケーブルを使用して古いデバイスに接続します。
- 3.5mm オーディオ出力: 外部スピーカーまたはヘッドフォンを接続します。
- 電源入力: 電源ケーブルを接続します。
- Cooling Windows: 熱を放散するために適切な換気を確保してください。
- オンボードコントロール: Buttons for power, menu, input source, and navigation.
3.3 360 Degree View プロジェクターの
Video 3.1: A comprehensive 360-degree view of the VYSER F2 Projector, showcasing its design and various ports from all angles.
4. セットアップ
Follow these steps to set up your VYSER F2 Projector for the first time.
4.1 配置
Place the projector on a stable, flat surface. Ensure there is adequate ventilation around the projector to prevent overheating. The projection distance can range from 5-15 feet, allowing for an adjustable screen size of 50-300 inches.
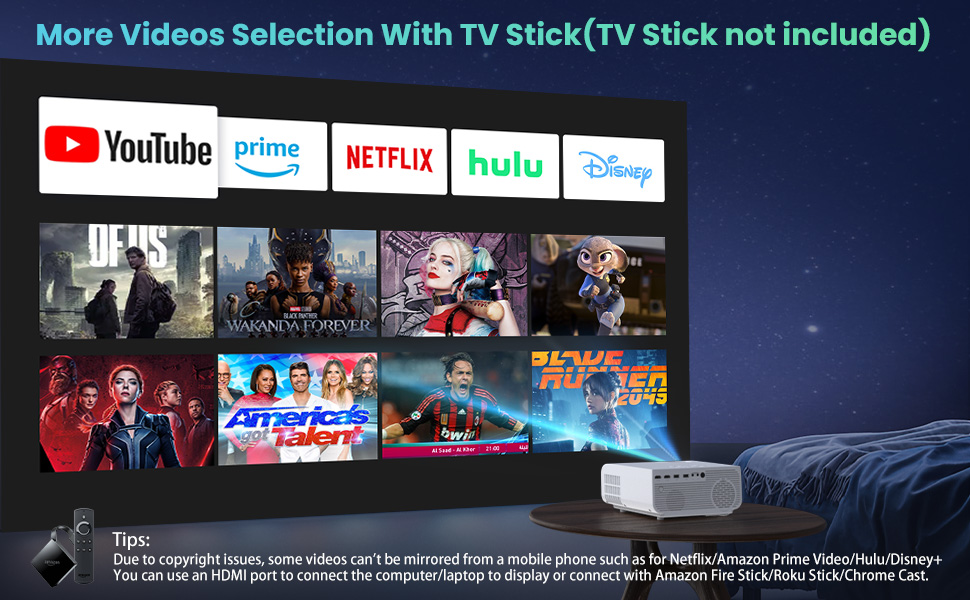
Figure 4.1: Adjustable display size from 50 to 300 inches.
The projector can be placed on a table, mounted on a tripod, or ceiling-mounted. Use the adjustable foot at the bottom of the projector to fine-tune the projection angle if needed.
4.2電源接続
- 電源ケーブルをプロジェクターの電源入力ポートに接続します。
- 電源ケーブルのもう一方の端を電源コンセントに差し込みます。
- プロジェクターまたはリモコンの電源ボタンを押して電源を入れます。
4.3 フォーカスとキーストーン補正
- フォーカス調整: Rotate the focus lens ring on the front of the projector until the image appears clear and sharp.
- キーストーン補正: Use the keystone correction dial (usually on top or side) to adjust the image shape if it appears trapezoidal. The projector supports ±15° keystone correction.
5. 操作手順
Learn how to connect your devices and utilize the various features of your projector.
5.1 デバイスの接続
The VYSER F2 Projector offers multiple ways to connect your devices:
- HDMI: For high-definition video and audio from laptops, gaming consoles, TV boxes, etc.
- USB: メディアを再生する場合 fileUSB フラッシュドライブから直接。
- AV: For connecting older devices with AV output.
5.2 Wireless Connectivity (Screen Mirroring)
The projector supports 5G/2.4G WiFi for seamless screen mirroring from your smartphone or tablet.
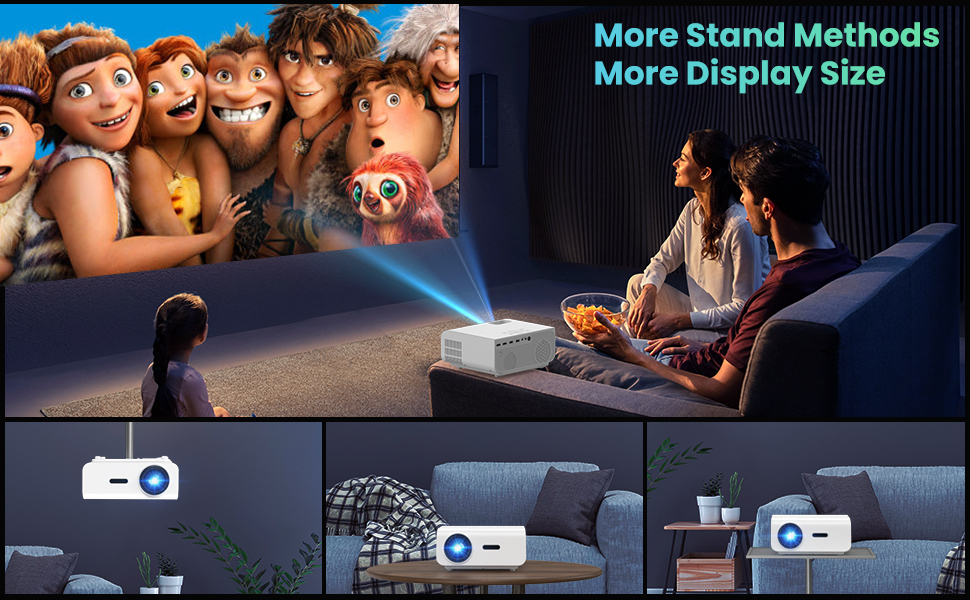
Figure 5.1: 5G/2.4G WiFi Screen Mirroring for various devices.
One-Step Direct Connection: This feature allows direct connection to your phone without needing a WiFi network. Ideal for outdoor use or when a router is unavailable.
Video 5.1: Demonstration of the F2 Projector's One-Step Direct Connection with WiFi and Bluetooth, showing quick setup for phone mirroring.
For detailed steps on screen mirroring, refer to the on-screen instructions by selecting "Miracast" from the input source menu.
Note: Due to copyright restrictions, some streaming services (e.g., Netflix, Amazon Prime Video, Hulu, Disney+) may block screen mirroring. For these services, it is recommended to use an HDMI connection with a compatible device like a Fire TV Stick, Roku Stick, or laptop.
5.3 Bluetooth接続
The projector features Bluetooth 5.1 for connecting to external Bluetooth speakers or headphones, enhancing your audio experience.

Figure 5.2: Bluetooth connection for external audio devices.
To connect: Navigate to the Bluetooth settings on the projector, enable Bluetooth, and select your desired audio device from the list of available devices. (Note: The projector connects to Bluetooth speakers, not directly to smartphones/tablets via Bluetooth for audio input).
5.4メニューナビゲーション
Use the remote control or the on-board buttons to navigate the projector's menu. Options typically include input source selection, picture settings (brightness, contrast, color), sound settings, and system settings.
6. メンテナンス
適切なメンテナンスを行うことで、プロジェクターの寿命が長くなり、最適なパフォーマンスが確保されます。
- レンズクリーニング: プロジェクターレンズを清掃する際は、光学レンズ専用の柔らかく糸くずの出ない布をご使用ください。研磨剤や刺激の強い化学薬品の使用は避けてください。
- ほこりの除去: Regularly clean the cooling vents to prevent dust buildup, which can affect performance and lifespan. Use a soft brush or compressed air.
- ストレージ: 長期間使用しない場合は、プロジェクターを涼しく乾燥した場所に保管してください。元の梱包または保護ケースに入れるのが理想的です。
- 電源を適切にオフにします: プロジェクターを取り外したり移動したりする前に、必ず電源ボタンを使用して電源をオフにし、プロジェクターが冷めるまで待ってください。
7。 トラブルシューティング
プロジェクターで問題が発生した場合は、次の一般的なトラブルシューティング手順を参照してください。
| 問題 | 考えられる原因 / 解決策 |
|---|---|
| 画像が表示されないか、「信号なし」というメッセージが表示される |
|
| ぼやけた画像 |
|
| 台形画像 |
|
| 音が出ない、または低音 |
|
| Screen mirroring issues (e.g., Netflix not working) |
|
| Projector overheating or shutting down |
|
8. 仕様
Key technical specifications for the VYSER F2 Projector:
| 特徴 | 詳細 |
|---|---|
| ブランド | バイザー |
| モデル | F2プロジェクター |
| ネイティブ解像度 | 1920 x 1080 (ネイティブ 1080P) |
| 輝度 | 12000ルクス(350 ANSIルーメン) |
| コントラスト比 | 10000:1 (implied from image comparison) |
| 投影サイズ | 50~300インチ |
| 投影距離 | 5-15フィート |
| 接続技術 | Wireless (5G/2.4G WiFi), Bluetooth 5.1, HDMI (x2), USB (x2), AV, 3.5mm Audio Out |
| キーストーン補正 | ±15° 手動 |
| アイテム重量 | 4.11ポンド |
| 色 | White-White |
9. 保証とサポート
VYSER is committed to providing excellent customer service and technical support for your projector.
- 生涯カスタマーサービス: Enjoy lifetime customer service and technical support for your VYSER F2 Projector.
- For any inquiries, technical assistance, or warranty claims, please contact VYSER customer support through the platform where you purchased the product or refer to the official VYSER web連絡先情報のサイト。