1. はじめに
The Elna eXcellence 710 is a computerized sewing and quilting machine designed for precision and ease of use. It features a large sewing area, an Advanced Dual Feed system, and a variety of built-in stitches and functions to support diverse sewing projects. This manual provides essential information for setting up, operating, maintaining, and troubleshooting your machine.

図1: 前面 view of the Elna eXcellence 710 Sewing and Quilting Machine.
2. 主な特徴
- 170 Stitches: Includes alphabet and 10 automatic buttonholes, with a 9 mm stitch width.
- 便利な機能: Button-operated automatic thread cutter, one-step needle plate conversion, and lock stitch.
- タッチコントロールパネル: For easy selection of stitches and settings.
- High Sewing Speed: 1分間に最大1000ステッチ。
- Advanced Dual Feed System: Evenly moves fabric from top and bottom for precision, ideal for multiple layers and pattern matching. Includes a removable Dual Feed foot wide.
- 15 Presser Feet: For various sewing functions, including a Dual Feed wide and convertible free-motion quilting kit.
- 統合ストレージ: Top compartment for presser feet and two compartments in the free arm.
- Knee Lifter: Allows lifting the presser foot with your leg, keeping hands on your project.
- LED照明: 5 built-in white LED lights in 3 areas for enhanced visibility.
3. セットアップ
3.1開梱と配置
Carefully remove the machine from its packaging. Place the machine on a stable, flat surface. Ensure adequate space around the machine for comfortable operation.

図2:側面 view of the Elna eXcellence 710, showing its compact design.
3.2電源接続
Connect the power cord to the machine and then to a suitable electrical outlet. Ensure the machine's power switch is in the 'Off' position before connecting.
3.3 伸長テーブルの取り付け
The extension table provides an expanded workspace, particularly useful for quilting and larger projects. Slide the extension table onto the free arm until it clicks securely into place.

Figure 3: Elna eXcellence 710 with the extension table providing an expanded work surface.
3.4 ボビン巻き
Place a spool of thread on the spool pin. Guide the thread through the bobbin winding tension disc and then around the empty bobbin. Place the bobbin onto the bobbin winder shaft and push it to the right. Press the start/stop button to begin winding. The machine will automatically stop when the bobbin is full.
3.5 上糸通し
Raise the presser foot and the needle to its highest position. Follow the numbered threading path indicated on the machine, ensuring the thread is securely seated in all guides and tension discs. Use the built-in needle threader for easy threading of the needle eye.

図4:上 view illustrating the threading path and stitch selection chart.
3.6 ボビンの挿入
Open the bobbin cover. Insert the wound bobbin into the bobbin case, ensuring the thread unwinds in the correct direction (usually counter-clockwise). Guide the thread through the tension spring and cutter. Close the bobbin cover.
4. 操作手順
4.1 ステッチの選択
Use the touch control panel to select your desired stitch. The machine offers 170 built-in stitches, including utility, decorative, and buttonhole stitches. Refer to the stitch chart located on the machine's top cover for visual reference.

図5: 前面 view with storage compartments open, revealing accessories and stitch chart.
4.2 ステッチ設定の調整
After selecting a stitch, the touch control panel will display recommended stitch length and width. These can be adjusted using the dedicated buttons on the panel to suit your fabric and project requirements.

Figure 6: Close-up of the touch control panel for stitch and setting adjustments.
4.3 縫い始める
Place your fabric under the presser foot. Lower the presser foot. Use the start/stop button or the foot controller to begin sewing. Adjust the sewing speed using the speed control slider.
5. メンテナンス
5.1 機械の清掃
Regularly clean the bobbin area and feed dogs to remove lint and dust. Use the provided lint brush. Disconnect the machine from power before cleaning. Do not use liquid cleaners or solvents.
5.2 針の交換
Replace the needle frequently, especially when sewing different fabric types or if the needle becomes dull or bent. Always use the correct needle type and size for your fabric.
6。 トラブルシューティング
6.1 よくある問題
- スキップされたステッチ: Check if the needle is inserted correctly, if it's bent or dull, or if the correct needle type is being used for the fabric.
- 糸切れ: Ensure the machine is threaded correctly, the tension is appropriate, and the thread is not old or damaged.
- 生地の詰まり: Verify that the presser foot is lowered before sewing and that the correct presser foot is used for the task.
- 不均一なステッチ: Check upper and bobbin thread tension. Ensure the machine is clean and free of lint.
7. 仕様
| 特徴 | 詳細 |
|---|---|
| 製品寸法 | 9 x 20.4 x 12.4インチ (奥行き9インチ x 幅20.4インチ x 高さ12.4インチ) |
| アイテム重量 | 26.9ポンド |
| メーカー | エルナ |
| 商品型番 | EL710 |
| 電源 | コード式電気 |
| 材料 | 金属、プラスチック |
| 色 | 白/赤 |
| 組み立てが必要 | いいえ |
| 電池が必要 | いいえ |

Figure 7: Dimensions of the Elna eXcellence 710 Sewing Machine.
8. 付属品
The Elna eXcellence 710 comes with a comprehensive set of accessories to get you started immediately:
- Standard foot A
- 巻き裾足D
- ジッパーフット E
- サテンステッチ押え F
- オープントゥサテンステッチ押え F2
- ブラインドヘムフットG
- Overlock foot M
- XNUMX/XNUMX インチの縫い目 O
- かがり足 PD-H
- Convertible free-motion quilting kit QB-S (including: closed-toe foot, open-toe foot, clear-view 足)
- Automatic buttonhole foot R with stabilizer plate
- ボタン付け足 T
- Dual Feed foot AD wide system
- 直線針板
- ニーリフター
- キルティングガイドバー
- ボビン
- 縫い目リッパー
- 針セット
- 糸くずブラシ
- Spool holder small x2
- Spool holder large x2
- Spool holder special x2
- スプールレスト
- Felt cushion
- 追加の糸立てピン
- ドライバー
- タッチパネルスタイラス
- フットコントローラー
- セミハードカバー
- エクセレンス 710 ミシン
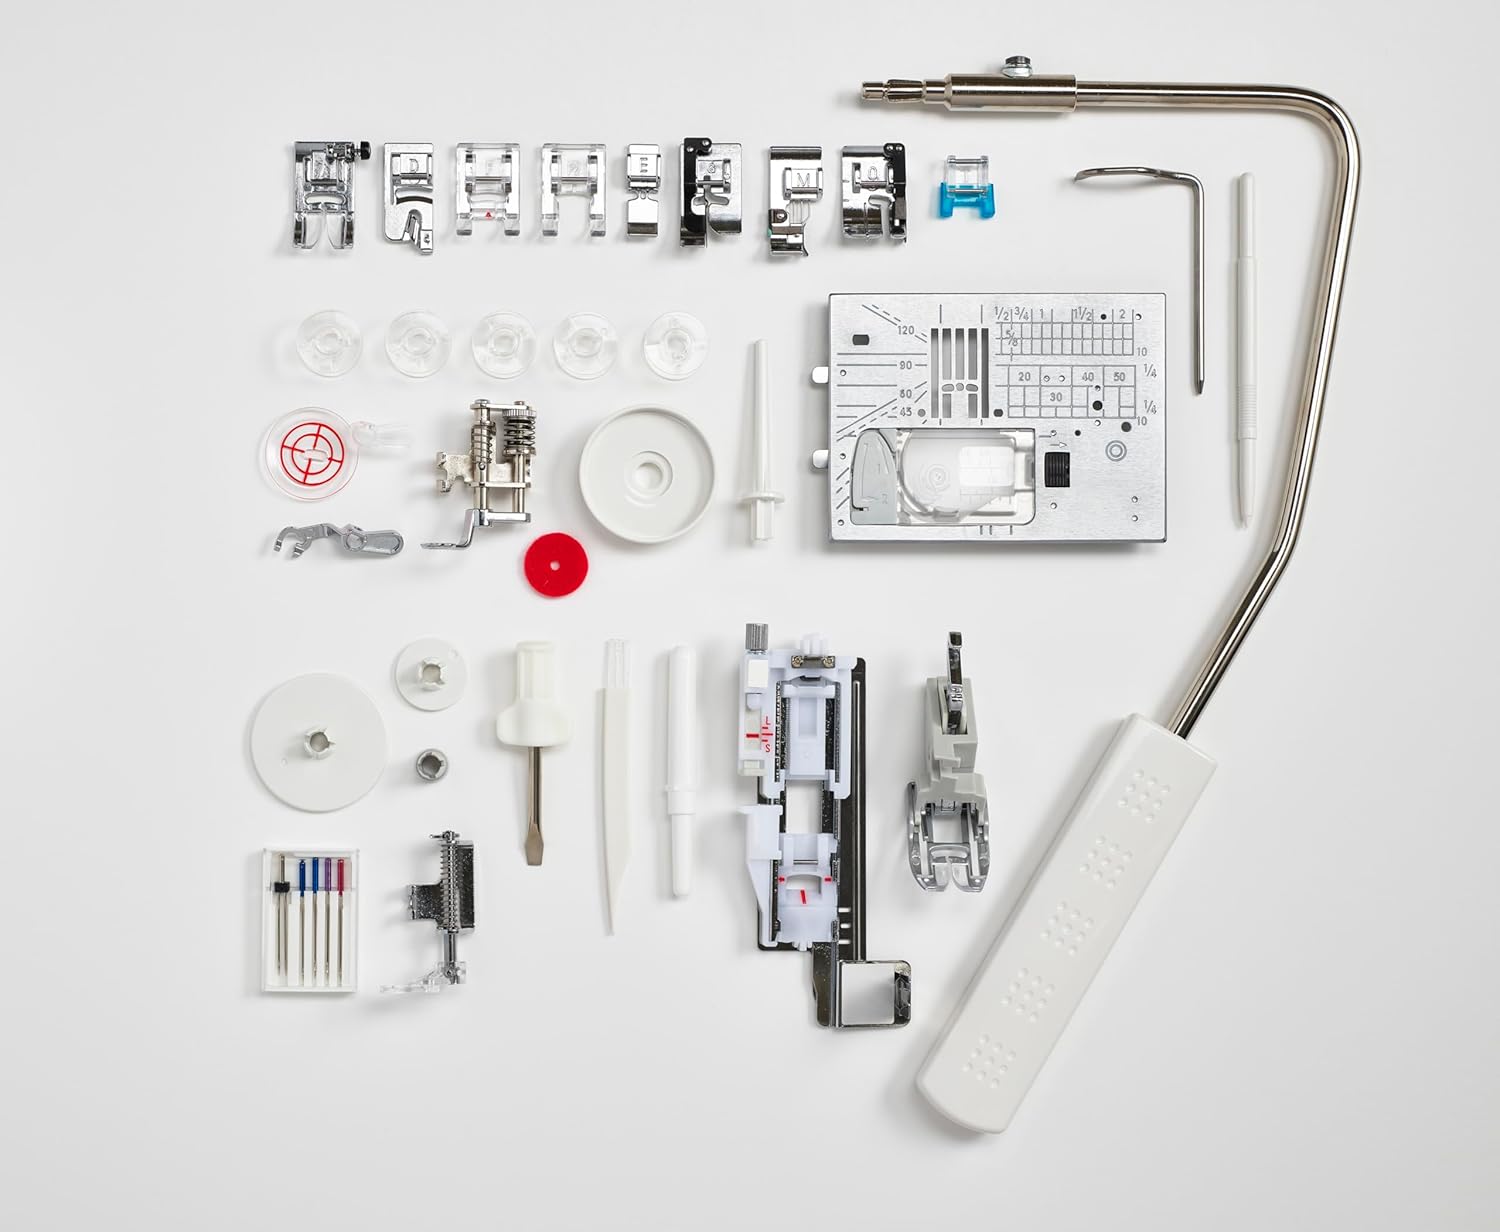
Figure 8: All included accessories, including various presser feet and tools.
9. 保証とサポート
For warranty information and customer support, please refer to the documentation included with your product or visit the official Elna webサイトでご確認ください。保証請求に備えて購入証明書を保管してください。
10. 製品ビデオ
No official product videos from the seller were found for this specific model in the provided data. Please refer to the written instructions or the manufacturer's website for visual guides.


