1. はじめに
This manual provides detailed instructions for the proper installation, operation, and maintenance of your DROK Class AB Amplifier 2.1 Channel Audio Amplifier Board. This amplifier is designed to deliver 2x80W stereo output and 1x120W pure bass output, operating within a DC 9-18V power supply range. Please read this manual thoroughly before using the product to ensure optimal performance and safety.
2. 安全情報
- 電源のボリュームを確認してくださいtage is within the specified range of DC 9-18V. Exceeding this range may damage the device.
- Observe correct polarity when connecting the power supply to prevent reverse-connect damage. The board includes input anti reverse-connect protection, but caution is still advised.
- Avoid short-circuiting the output terminals. The amplifier features output short circuit protection.
- 操作しないでください amplifier in excessively hot or humid environments. The device has over temperature protection (OTP).
- デバイスを水やその他の液体から遠ざけてください。
- 分解したり改造したりしないでください。 amplifier board. Unauthorized modifications void the warranty and can lead to malfunction or injury.
- Ensure proper ventilation around the heatsink during operation to prevent overheating.
3 製品の特徴
- ワーキングVoltage: DC 9-18V
- 出力: Max 2x80W Stereo (18V/4Ω), 1x120W Pure Bass (18V/2Ω)
- チャンネル: 2.1 Channels (Stereo + Subwoofer)
- 推奨講演者: 2/4/6/8Ω
- 入力方法: 3.5mm Audio Input or 3P_2.54mm Terminal Input
- 保護機能: Input Anti Reverse-Connect Protection, Output Short Circuit Protection, Over Current Protection (OCP), Over Temperature Protection (OTP).
- オーディオ品質: Designed to eliminate background noise for clear sound.
- コンポーネント: Features four 3300UF professional audio filter capacitors, a vehicle-level amplifier chip, gold-plated audio input terminal, and a pure black sealing potentiometer.
4. 仕様
| パラメータ | 価値 |
|---|---|
| ワーキングVoltage | DC 9 - 18V |
| Maximum Output Power (Stereo) | 2x80W (18V/4Ω) |
| Maximum Output Power (Pure Bass) | 1x120W (18V/2Ω) |
| 推奨スピーカーインピーダンス | 2/4/6/8Ω |
| 入力方法 | 3.5mm Audio Input or 3P_2.54mm Terminal Input |
| 保護機能 | Input Anti Reverse-Connect, Output Short Circuit, Over Current (OCP), Over Temperature (OTP) |
| PCB Size (Length*Width) | 72.36mm×66.65mm |
| Overall Size (Radiator Included) | 72.36mm×96mm×27mm |
| Potentiometer Rotating Handle Opening | 7mm |
| Installing Hole Spacing | 25.4mm * 48.26mm (compatible for Bluetooth module spacing) |
| Installing Hole Size | M3 |
| 商品型番 | 200540 |
5.コンポーネントの識別
以下の画像を参照して、 amplifier board's components and connection points.

図5.1: 全体 view of the DROK Class AB Amplifier board, showing the main components, heatsink, and the included connection cable.
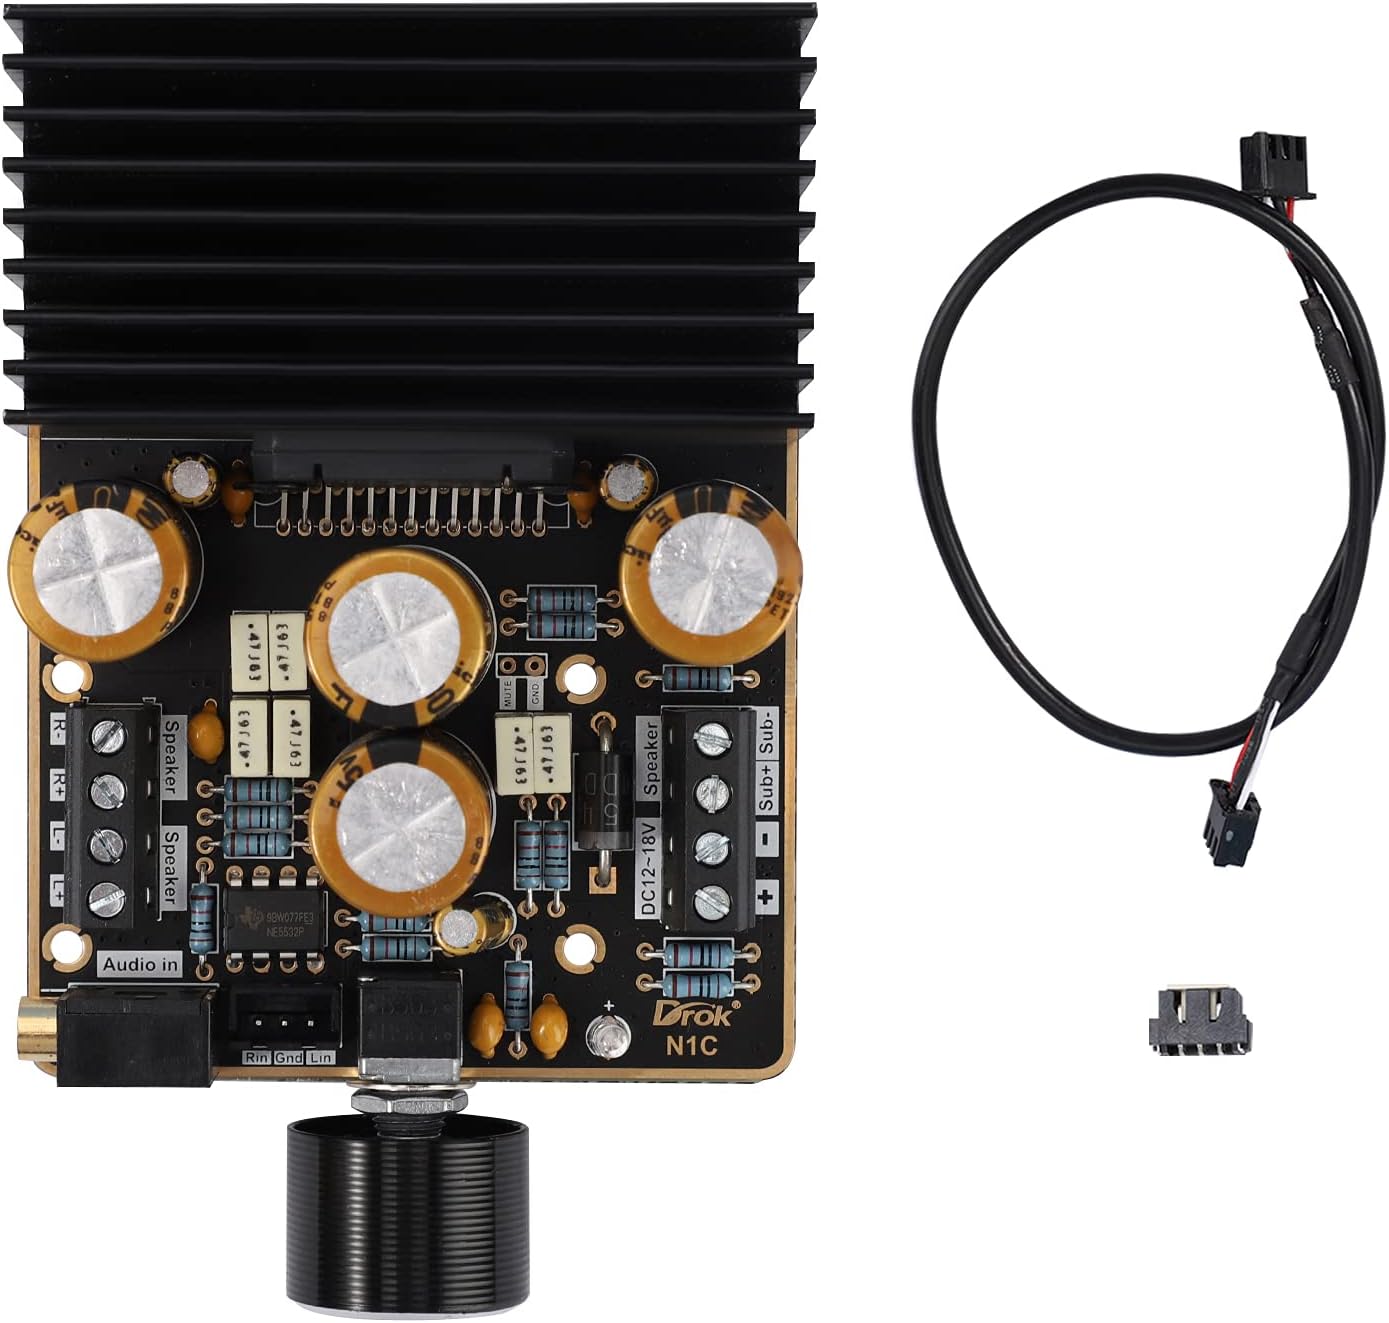
図5.2: 詳細 view の amplifier board, highlighting the 3.5mm audio input, 3P_2.54mm terminal input, speaker output terminals (L/R), and subwoofer output terminals.

図5.3: 側 view with dimensions of the amplifier board, including the heatsink, showing its length, width, and height.

図5.4: トップダウン view の amplifier board with detailed measurements for PCB dimensions and mounting hole spacing.
6. セットアップ手順
- 電源接続: Connect a DC 9-18V power supply to the "DC12-18V" terminals on the board. Ensure correct polarity: '+' to positive, '-' to negative.
- スピーカー接続:
- Connect your stereo speakers (Left and Right) to the "Speaker" terminals. Ensure correct polarity for each speaker.
- Connect your subwoofer to the "Sub+ Sub-" terminals.
- Recommended speaker impedance is 2/4/6/8Ω.
- オーディオ入力接続: 次のいずれかの方法を選択します。
- 3.5mmオーディオ入力: Connect your audio source (e.g., smartphone, MP3 player, computer) to the 3.5mm audio jack on the board.
- 3P_2.54mm Terminal Input: Alternatively, use the 3P_2.54mm terminal for audio input, connecting Left, Right, and Ground signals from your source.
- 初回電源オン: After all connections are secure, apply power to the amplifier. A green LED may illuminate, indicating power.
ビデオ6.1: An instructional video demonstrating the connection process for the amplifier board. This video shows how to connect power, audio input, and speakers to the DROK Class AB Amplifier. If the video does not load, please ensure your browser supports HLS streaming.
7. 操作手順
- 音量コントロール: の amplifier features a single potentiometer for volume control. Rotate the knob clockwise to increase volume and counter-clockwise to decrease volume.
- オーディオ再生: Start playing audio from your connected source. Adjust the volume to your desired listening level.
- サウンドバランス: の amplifier provides a balanced mix for stereo and subwoofer outputs. There are no independent controls for subwoofer or stereo channels on this board.
8. メンテナンス
- クリーニング: 柔らかく乾いた布で拭いてください。 ampライフボード。液体洗剤や溶剤は使用しないでください。
- 換気: Ensure the heatsink remains free of dust and obstructions to maintain proper cooling. Periodically check for dust buildup and gently remove it with compressed air if necessary.
- 接続: Periodically check all connections (power, audio, speakers) to ensure they are secure and free from corrosion.
- ストレージ: 保管する場合は、 amplifier for an extended period, disconnect it from the power supply and store it in a dry, dust-free environment.
9。 トラブルシューティング
| 問題 | 考えられる原因 | 解決 |
|---|---|---|
| 音声出力なし |
|
|
| 歪んだ音 |
|
|
| Ampライファイアーが熱くなる |
|
|
10. 保証とサポート
DROKは 1年間の長期保証 guarantee from the date of purchase for this product. This warranty covers manufacturing defects and malfunctions under normal use.
For technical support, warranty claims, or any questions regarding your DROK Class AB Amplifier, please contact DROK customer service through the retailer where the product was purchased or visit the official DROK web連絡先情報のサイト。
保証を有効にするために購入証明書を保管してください。


