1. はじめに
The Orbit Pocket Star Ultimate 6-Station Indoor Irrigation Programmer (Model 94886) is designed to provide efficient and reliable control over your automatic sprinkler system. Featuring Easy-Set Logic programming and a large LCD display, this programmer simplifies the management of up to six independent watering zones. It offers flexible scheduling options, including multiple start times, adjustable watering durations, and rain delay functionality. This manual will guide you through the setup, programming, and operation of your new irrigation programmer.

図1.1: フロント view of the Orbit Pocket Star Ultimate 6-station indoor irrigation programmer. This image displays the unit's LCD screen, the central control panel with directional buttons and 'Enter', 'Manual', 'Clear', 'Rain Delay', and 'Program A-B' buttons, and the rotary dial for selecting various programming modes.
2. 箱の中身
パッケージを開封したら、すべてのコンポーネントが揃っていることを確認してください。
- Orbit Pocket Star Ultimate 6-Station Indoor Irrigation Programmer
- External Transformer (for power supply)
- CR2032 Lithium Battery (pre-installed for program memory backup)
- 取扱説明書(本書)

図2.1: Retail packaging of the Orbit Pocket Star Ultimate programmer. The box displays the product name, key features, and an image of the programmer, indicating its indoor use and 6-station capability.
3. 安全情報
Please read and understand all safety instructions before installing and operating this device. Failure to do so may result in injury or property damage.
- This programmer is designed for indoor use only. Do not install it outdoors or in areas exposed to direct moisture.
- Use only the provided external transformer. Using an incorrect power supply may damage the unit and void the warranty.
- 電気による危険を防ぐために、すべての配線接続が安全かつ適切に絶縁されていることを確認してください。
- Disconnect power before performing any maintenance or wiring adjustments.
- ユニットを子供の手の届かない場所に保管してください。
4. インストール
4.1 Mounting the Programmer
- Choose a suitable indoor location near a standard electrical outlet and away from direct sunlight or extreme temperatures.
- Mark the desired mounting screw locations on the wall.
- Install mounting screws (not included) into the wall, leaving a small gap between the screw head and the wall.
- Hang the programmer onto the screws using the keyhole slots on the back of the unit.
- Secure the programmer by tightening the screws.

図4.1: Diagram showing the recommended indoor installation of the Orbit programmer. The unit is mounted on a wall, with wiring extending to an outdoor valve box, emphasizing its indoor-only placement.
4.2電源の接続
Connect the external transformer to the 24VAC terminals on the programmer. Then, plug the transformer into a standard electrical outlet. The programmer's display should illuminate.
5.配線
The Orbit Pocket Star Ultimate features tool-free wire connection terminals for easy installation.
5.1 Connecting Valve Wires
- Identify the common wire from your irrigation valves. Insert it into the terminal labeled "COM".
- Connect each individual valve wire to its corresponding station terminal (1 through 6). For example, connect the wire for Zone 1 to terminal 1, Zone 2 to terminal 2, and so on.
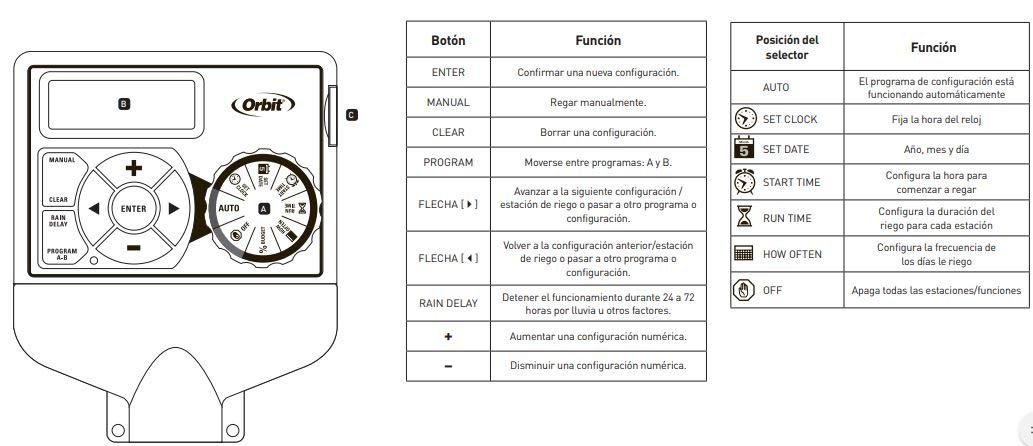
図5.1: Close-up of the wiring terminal block. This image clearly shows the labeled terminals for 24VAC (power), SENSOR, COM (common), stations 1 through 6, and PUMP, along with the push-in connectors for tool-free wiring.
5.2 Connecting a Rain Sensor (Optional)
If you are installing a rain sensor (sold separately), connect its wires to the terminals labeled "SENSOR". Refer to your rain sensor's manual for specific wiring instructions. Ensure the rain sensor bypass switch on the programmer is set correctly.
5.3 Connecting a Pump Start Relay (Optional)
If your system requires a pump start relay (sold separately), connect its control wires to the terminal labeled "PUMP" and the common terminal. Consult the pump start relay's manual for detailed wiring instructions.

図5.2: Example irrigation zone layout. This diagram illustrates how a property can be divided into six distinct watering zones, each controlled by a separate station on the programmer, optimizing water distribution.
6. プログラミング
The programmer uses Easy-Set Logic for straightforward programming. Use the rotary dial to select a programming mode and the directional buttons (+, -, arrows, ENTER) to adjust settings.

図6.1: コントロールパネル終了view with button and dial functions. This diagram labels each button and rotary dial position, explaining its specific function for programming and manual operation.
6.1 ボタンの機能
| ボタン | 関数 |
|---|---|
| 入力 | Confirm a new setting. |
| マニュアル | Water manually. |
| クリア | Clear a setting. |
| プログラムAB | Move between programs A and B. |
| Arrows (Left/Right) | Advance to the next setting/watering station or move to another program/setting. |
| Arrows (Up/Down) | Return to the previous setting/watering station or move to another program/setting. |
| 雨天延期 | Stop operation for 24 to 72 hours due to rain or other factors. |
| + | Increase a numeric setting. |
| - | Decrease a numeric setting. |
6.2 Rotary Dial Positions
| セレクターの位置 | 関数 |
|---|---|
| オート | The configured program is running automatically. |
| 時計を設定する | 時計の時刻を設定します。 |
| 日付を設定 | Sets the year, month, and day. |
| 開始時間 | Sets the start time for watering. Up to 8 daily starts are available. |
| 実行時間 | Sets the watering duration for each station (1 to 240 minutes). |
| どのくらいの頻度で | Sets the frequency of watering days (e.g., specific days of the week, intervals of 1 to 28 days, or even/odd days). |
| オフ | Turns off all stations/functions. |
6.3 基本的なプログラミング手順
- 時計を設定する: Turn the dial to SET CLOCK. Use the + and - buttons to adjust the time, then ENTER to confirm.
- 設定日: Turn the dial to SET DATE. Use the + and - buttons to adjust the year, month, and day, then ENTER to confirm each.
- 開始時間の設定: Turn the dial to START TIME. Use the + and - buttons to set the desired start time(s) for watering. Press ENTER to confirm each start time. You can set up to 8 start times per program.
- 実行時間の設定: Turn the dial to RUN TIME. Use the arrow buttons to select the station (1-6). Use the + and - buttons to set the watering duration for that station (1 to 240 minutes). Press ENTER to confirm. Repeat for all active stations.
- 頻度を設定します: Turn the dial to HOW OFTEN. Select your desired watering frequency: specific days of the week, interval days (1-28 days), or even/odd days. Use the + and - buttons and arrow buttons to make your selections, then ENTER to confirm.
- プログラムを有効化: Turn the dial to AUTO. Your programmer will now operate according to your set schedule.
The programmer supports two independent programs (A and B). Use the PROGRAM A-B button to switch between and configure them separately.
7. 操作
7.1自動操作
Once programmed and the dial is set to AUTO, the programmer will automatically execute the watering schedules at the specified start times and durations.
7.2 手動散水
To manually water a station or all stations:
- MANUALボタンを押します。
- Use the arrow buttons to select the desired station or 'ALL' for all stations.
- Use the + and - buttons to set the manual watering duration.
- Press ENTER to start manual watering. The programmer will return to AUTO mode after the manual cycle is complete.
7.3 雨天延期
If rain is expected or has occurred, you can temporarily suspend watering:
- レインディレイボタンを押します。
- Use the + or - buttons to select a delay of 24, 48, or 72 hours.
- Press ENTER to activate the rain delay. The programmer will resume its schedule automatically after the delay period.
7.4 Turning Off the System
To completely stop all watering and programming, turn the rotary dial to the OFF position.
8. メンテナンス
8.1 電池の交換
The programmer uses a CR2032 lithium battery to maintain program memory during power outages. It is recommended to replace this battery annually.
- Locate the battery compartment on the back of the programmer.
- Open the compartment and remove the old CR2032 battery.
- 正しい極性を確認して、新しい CR2032 電池を挿入します。
- 電池ケースを閉じます。
8.2 クリーニング
Wipe the programmer's exterior with a soft, damp 布で拭いてください。研磨剤入りの洗剤を使用したり、本体を水に浸したりしないでください。
9。 トラブルシューティング
| 問題 | 考えられる原因 | 解決 |
|---|---|---|
| 表示が空白です。 | ユニットに電源が供給されていません。 | Check if the transformer is plugged into a live outlet. Ensure the transformer is properly connected to the programmer's 24VAC terminals. |
| Stations do not water. | Program not set or dial is in OFF position. Wiring issue. Rain sensor activated. | Ensure the dial is set to AUTO. Verify programming (start times, run times, how often). Check all wiring connections, especially common and station wires. Check if the rain sensor is wet or activated; bypass it if necessary. |
| Only some stations water. | Faulty valve or wiring to specific station. | Check wiring for the non-watering stations. Test the solenoid valve for the affected station. |
| Program lost after power outage. | CR2032 バックアップ電池が切れているか、またはありません。 | CR2032リチウム電池を交換してください。 |
| Watering runs continuously. | Stuck valve or electrical short. | Turn the dial to OFF. Inspect the valve for debris or damage. Check for shorts in the wiring. |
10. 仕様
- モデル番号: 94886
- ブランド: 軌道
- タイプ: Indoor Irrigation Programmer
- 駅数: 6
- 電源入力: 120V AC, 60Hz (via external transformer)
- Power Output to Valves: 24V 交流
- バックアップバッテリー: CR2032リチウム電池1個(付属)
- 水やり時間: 1 to 240 minutes per station
- 開始時間: Up to 8 per day, per program
- 水やり頻度: Specific days of the week, 1-28 day intervals, even/odd days
- 雨による遅れ: 24、48、または72時間
- 材料: プラスチック
- 色: グレー
- 製品寸法: Approximately 5.75" L x 2.44" W x 9.25" H (14.6 cm L x 6.2 cm W x 23.5 cm H)
- 重さ: 約1.54ポンド(0.7 kg)
- 特徴: Easy-Set Logic, Large LCD Display, Automatic Circuit Breaker (no fuse), Tool-free wire terminals, Connection for rain sensor and pump start relay (accessories sold separately).
11. 保証とサポート
保証情報およびテクニカルサポートについては、Orbitの公式ウェブサイトをご覧ください。 web当サイトをご覧いただくか、Orbitカスタマーサービスまで直接お問い合わせください。保証請求の際は、購入証明としてレシートを保管してください。
Orbitカスタマーサービス: ぜひご覧ください www.orbitonline.com/support 連絡先の詳細とさらなるサポートについては、こちらをご覧ください。


