1. はじめに
This manual provides detailed instructions for installing, configuring, and operating your TP-Link AC1900 Smart WiFi Router, model Archer A8. Please read this guide thoroughly to ensure proper setup and optimal performance of your device.
2. パッケージ内容
パッケージにすべてのアイテムが含まれていることを確認します。
- TP-Link AC1900 Smart WiFi Router (Archer A8)
- 電源アダプター
- RJ45イーサネットケーブル
- クイックインストールガイド
3. フィジカルオーバーview
ルーターのコンポーネントとインジケータについて理解しておいてください。
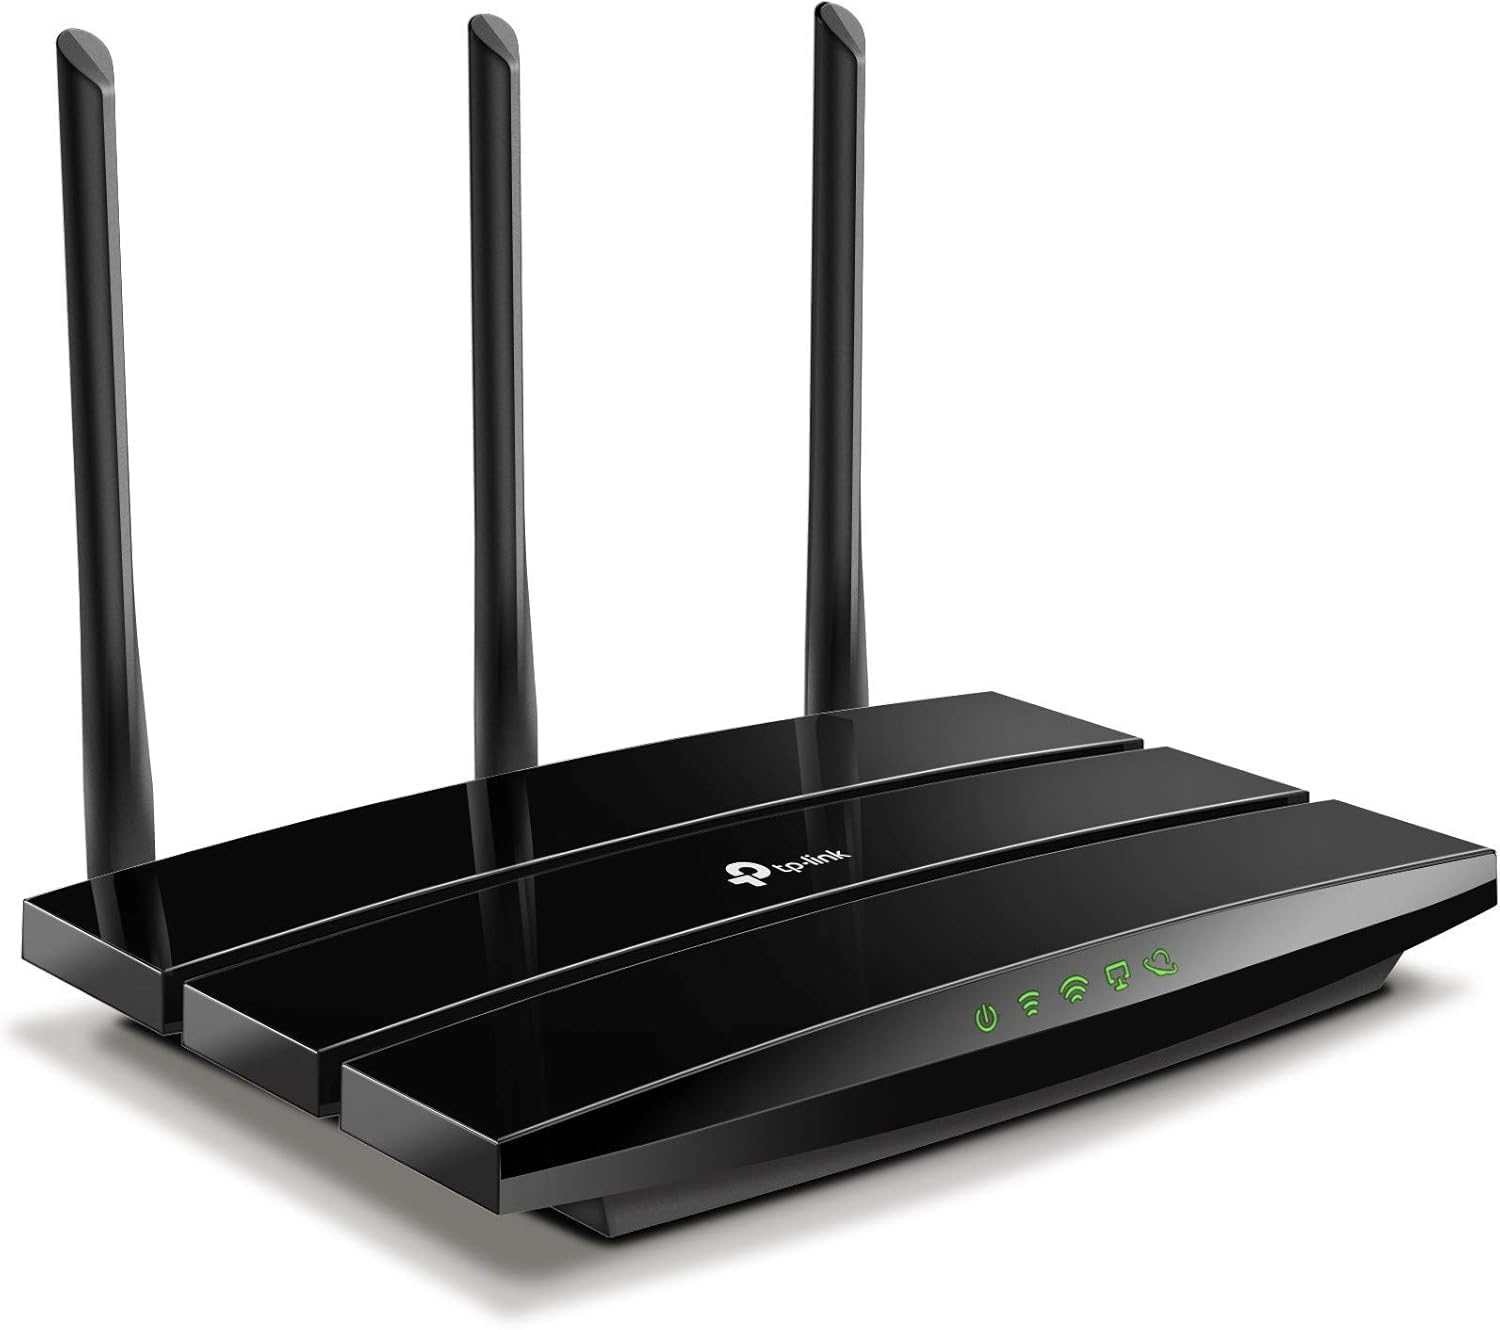
図3.1: 前面 View of TP-Link Archer A8 Router. この画像はトップダウン表示です view of the TP-Link Archer A8 router, featuring its sleek black design and three external antennas. The front panel includes LED indicators for power, internet connectivity, Wi-Fi status, and Ethernet port activity.
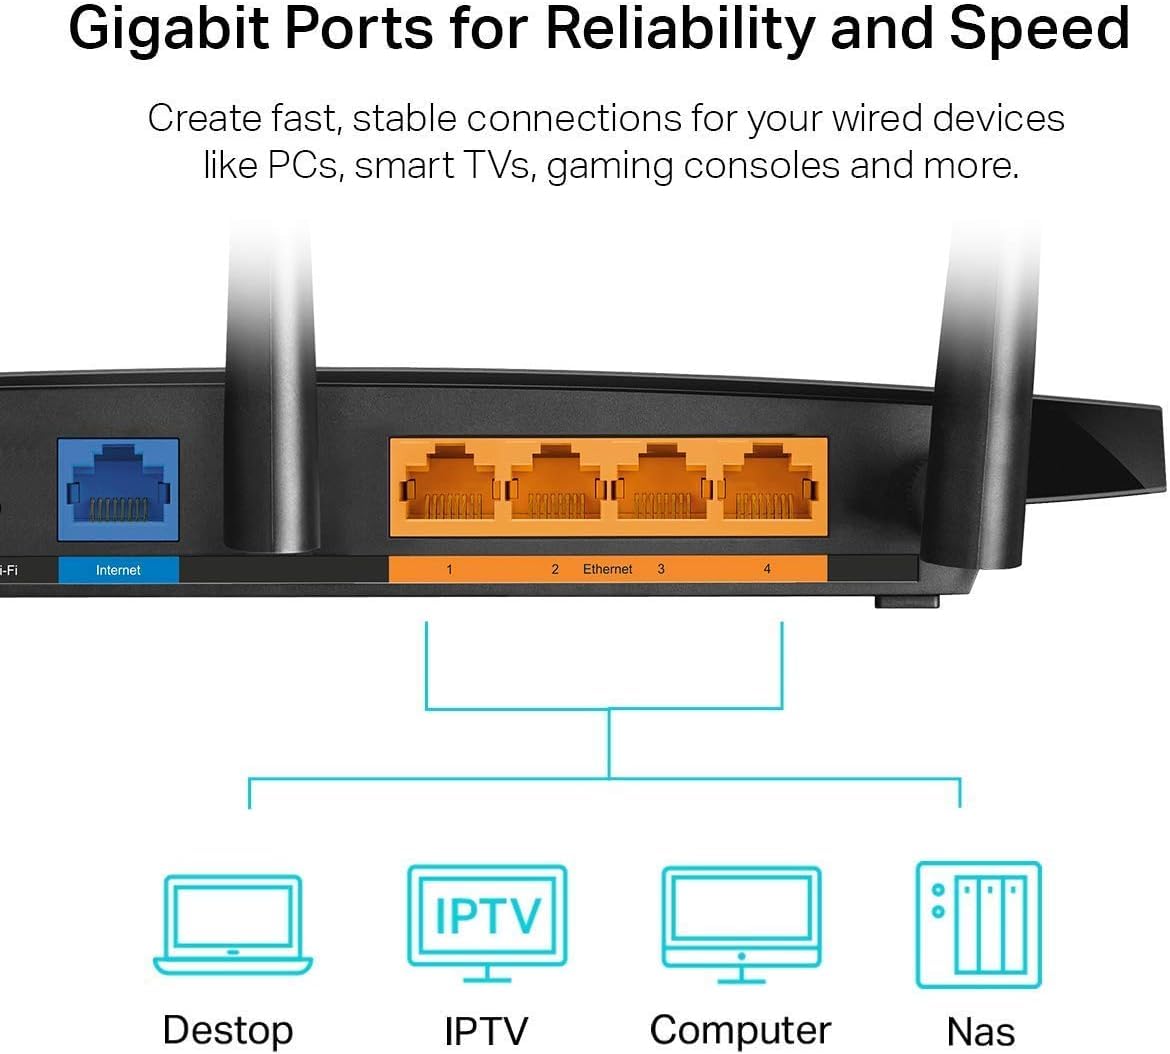
Figure 3.2: Rear Panel of TP-Link Archer A8 Router. This image shows the rear panel of the router, highlighting the Gigabit WAN port (blue) and four Gigabit LAN ports (orange). These ports are used for wired connections to your modem and other network devices.
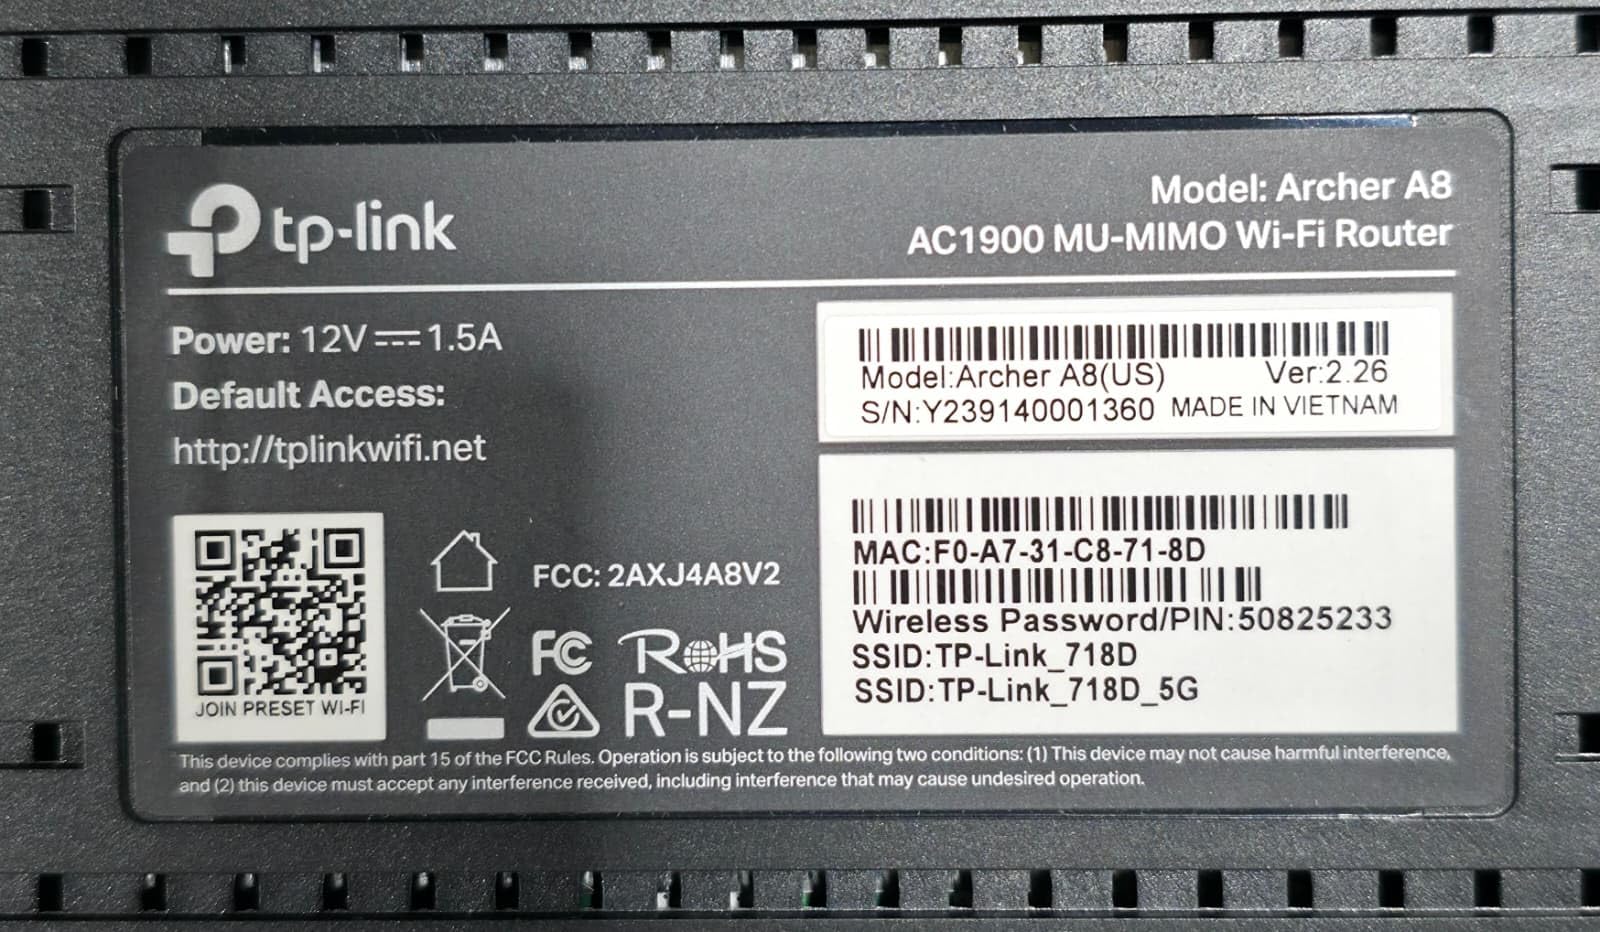
Figure 3.3: Router Bottom Label. This label provides essential information including the model (Archer A8, AC1900 MU-MIMO Wi-Fi Router), power specifications (12V===1.5A), default access URL (http://tplinkwifi.net), MAC address (F0:A7:31:C8:71:8D), serial number (Y239140001360), and default Wi-Fi network names (SSID: TP-Link_718D, TP-Link_718D_5G) with the default wireless password (50825233). It also includes FCC and RoHS compliance marks.
4. セットアップ手順
- モデムの電源をオフにします。 既存のモデムの電源を外します。
- ルーターを接続します:
- モデムのイーサネットケーブルを WANポート (blue) on the Archer A8 router.
- 電源アダプターをルーターに接続し、電源コンセントに差し込みます。
- モデムの電源を入れ、次にルーターの電源を入れます。LEDインジケーターが安定するまでお待ちください。
- ルーターに接続します。
- ワイヤレス接続: Connect your computer or mobile device to the router's default Wi-Fi network. The default SSIDs (e.g., TP-Link_718D, TP-Link_718D_5G) and Wireless Password (e.g., 50825233) are printed on the router's bottom label (refer to Figure 3.3).
- 有線接続: Connect your computer to one of the router's LANポート (orange) using an Ethernet cable.
- ルーターを設定します。
- 開く web browser and enter the default access URL: http://tplinkwifi.net.
- Follow the on-screen instructions in the Quick Setup wizard to configure your internet connection and Wi-Fi settings. You will be prompted to create a new login password for the router.
- Alternatively, use the TP-Link Tether App for mobile-based setup.
5. 操作手順
5.1.デバイスの接続
ルーターのセットアップが完了したら、デバイスを接続できます。
- ワイヤレスデバイス: 検索する デバイスの Wi-Fi ネットワーク名 (SSID) にアクセスし、セットアップ時に設定したパスワードを入力します。
- 有線デバイス: Connect devices like PCs, Smart TVs, or gaming consoles to the router's Gigabit LAN ports using Ethernet cables.
5.2. デュアルバンドWi-Fi
The Archer A8 operates on two frequency bands:
- 2.4GHz帯: Provides wider coverage and better penetration through walls, ideal for general internet use and older devices. Offers speeds up to 600Mbps.
- 5GHz帯: Offers faster speeds (up to 1300Mbps) and lower latency, suitable for bandwidth-intensive activities like 4K streaming and online gaming. Has a shorter range and is more susceptible to obstacles.
The router supports Smart Connect, which automatically assigns devices to the best available band for optimal performance.
5.3. MU-MIMOテクノロジー
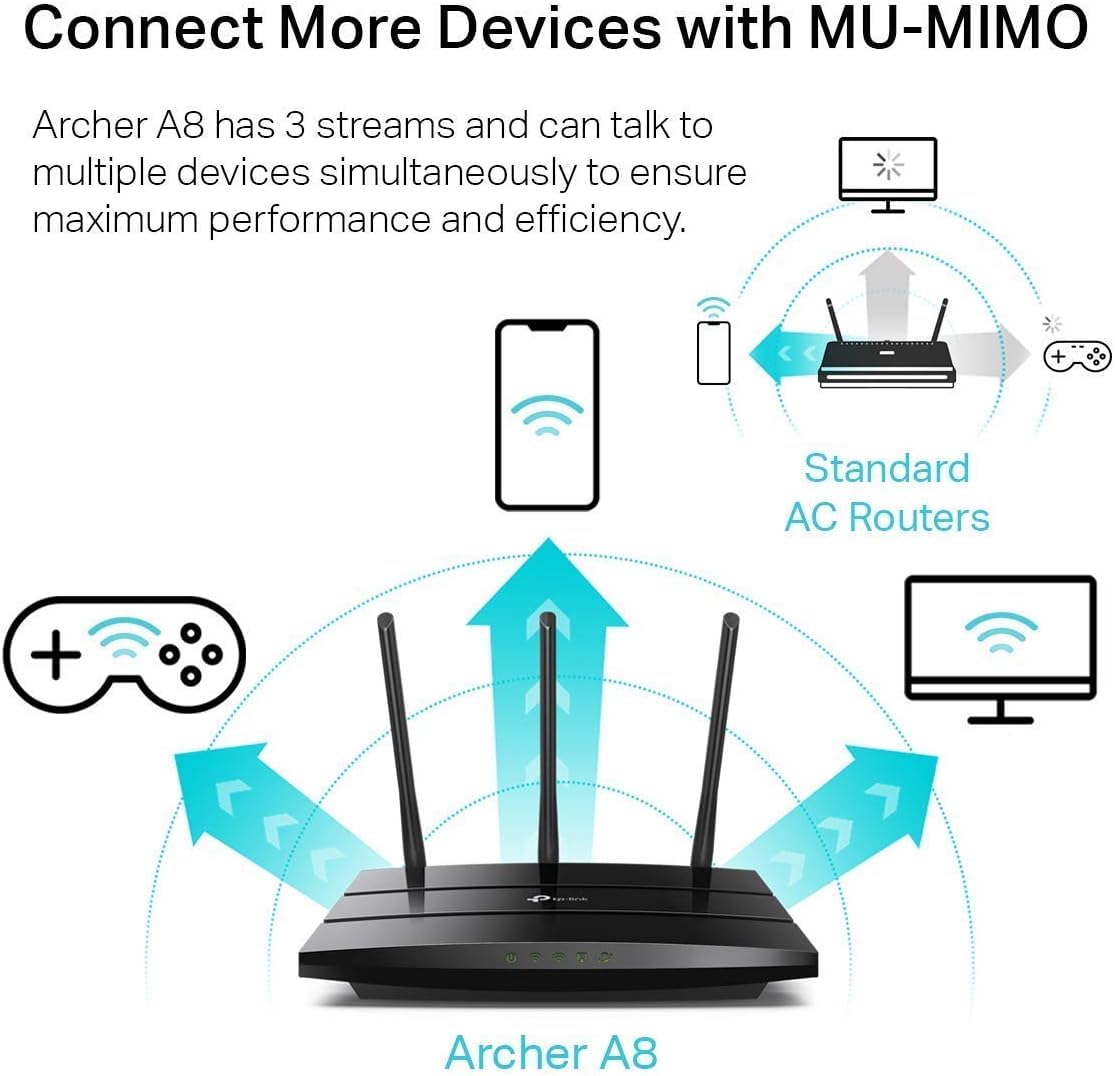
Figure 5.1: MU-MIMO Operation. This diagram illustrates how the Archer A8 router, equipped with MU-MIMO technology, can communicate with multiple devices simultaneously, unlike standard AC routers that communicate with one device at a time. This improves network efficiency and performance for all connected devices.
MU-MIMO (Multi-User, Multiple-Input, Multiple-Output) allows the Archer A8 to communicate with multiple devices simultaneously, rather than sequentially. This significantly improves network efficiency and throughput, especially in environments with many connected devices. For MU-MIMO to function, client devices must also support MU-MIMO.
5.4. ビームフォーミング技術
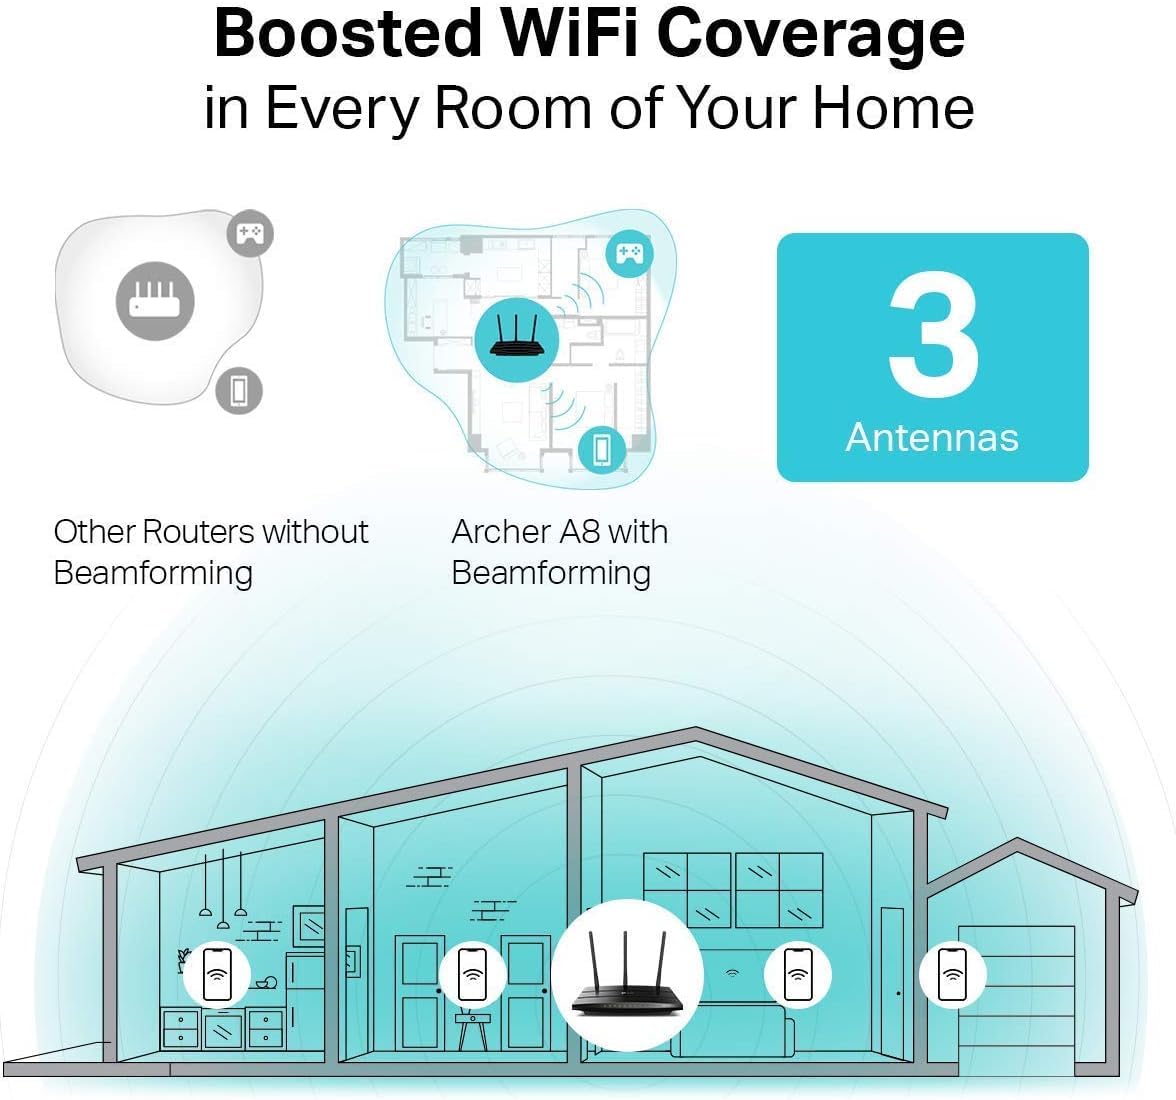
Figure 5.2: Beamforming Coverage. This image compares Wi-Fi coverage between a router without Beamforming and the Archer A8 with Beamforming. The Archer A8 directs stronger, more focused Wi-Fi signals towards connected devices, extending coverage and improving signal strength throughout your home.
Beamforming technology detects the location of your connected devices and concentrates the Wi-Fi signal directly towards them. This results in a more efficient and stronger wireless connection, extending Wi-Fi coverage and improving reliability, particularly for long-range connections.
5.5. Guest Wi-Fi Network
The router allows you to create a separate guest network, providing internet access to visitors without granting them access to your main network resources. This enhances security for your primary network.
5.6. ペアレンタルコントロール
Utilize the Parental Controls feature to manage internet access for children. You can block inappropriate content and set daily time limits for online activity.
6. メンテナンス
- ファームウェアの更新: ルーターのファームウェアアップデートを定期的に確認し、インストールしてください。 web management interface or the TP-Link Tether App. Updates often include performance improvements, security patches, and new features.
- ルーターの配置: Place the router in a central location, away from obstructions and devices that emit electromagnetic interference (e.g., microwaves, cordless phones) to maximize Wi-Fi coverage.
- 再起動中: 定期的にルーターを再起動して(電源アダプターを抜き差しして)、メモリをクリアし、ネットワーク接続を更新すると、軽微なパフォーマンスの問題が解決される場合があります。
- 安全: Use strong, unique passwords for your Wi-Fi network and router administration. Enable WPA2/WPA3 encryption for your wireless network.
7。 トラブルシューティング
If you encounter issues with your router, consider the following steps:
- インターネットアクセスなし:
- モデムが正しく動作しているかどうかを確認してください。
- Ensure all cables are securely connected to the correct ports (WAN port to modem, LAN ports to devices).
- モデムとルーターの両方を再起動します。
- ルーターのインターネット設定を確認してください web 管理インターフェース。
- Weak Wi-Fi Signal or Dropouts:
- ルーターを障害物や干渉源から離れた、より中央の位置に移動します。
- 最適な信号方向になるようにルーターのアンテナを調整します。
- Consider using a Wi-Fi analyzer app to identify channel interference and switch to a less congested channel.
- ルーター管理ページにアクセスできません:
- デバイスがルーターのネットワーク (有線または無線) に接続されていることを確認します。
- Verify you are using the correct access URL (http://tplinkwifi.net) または IP アドレス。
- ブラウザのキャッシュをクリアするか、別のブラウザを試してください。
- ルーターのログインパスワードを忘れた場合:
- Perform a factory reset on the router. This will revert all settings to default, including the login password (which you will then set up again via the Quick Setup wizard). To factory reset, press and hold the reset button on the router (usually a small pinhole button) for about 10 seconds while the router is powered on.
8. 仕様
| 特徴 | 詳細 |
|---|---|
| モデル名 | TP-Link AC1900 (Archer A8) |
| ワイヤレス標準 | IEEE 802.11ac/n/a 5GHz、IEEE 802.11n/b/g 2.4GHz |
| Wi-Fiの速度 | AC1900 (5GHzで1300Mbps、2.4GHzで600Mbps) |
| アンテナ | 3本の固定外部アンテナ |
| イーサネットポート | ギガビット WAN ポート x 1、ギガビット LAN ポート x 4 |
| 特集 | MU-MIMO, Beamforming, Smart Connect, Guest Wi-Fi, Parental Controls, WPS |
| 寸法(幅×奥行き×高さ) | 9.57 x 6.32 x 1.28インチ |
| アイテム重量 | 14.6オンス |
| 電源入力 | 12V===1.5A |
| 対応デバイス | Gaming Console, Personal Computer, Smart Television |
注記: Maximum wireless transmission rates are physical rates derived from IEEE 802.11 specifications. Actual wireless data throughput and wireless coverage are not guaranteed and will vary due to network conditions, environmental factors, and client limitations. Use of MU-MIMO requires client devices to also support MU-MIMO.
9. 保証とサポート
TP-Link provides an industry-leading 2-year warranty for this product. For technical assistance, please contact TP-Link's 24/7 technical support.
For the most up-to-date information, support resources, and contact details, please visit the official TP-Link webサイト。
法的免責事項:
1. Maximum wireless transmission rates are the physical rates derived from IEEE Standard 802.11 specifications. Range and coverage specifications are based upon test results under normal usage conditions. Actual wireless transmission rate and wireless coverage are not guaranteed and will vary as a result of 1) environmental factors, including building materials, physical objects, and obstacles, 2) network conditions, including local interference, volume and density of traffic, product location, network complexity, and network overhead and 3) client limitations, including rated performance, location, connection quality, and client condition. 2. Use of MU-MIMO requires clients to also support MU-MIMO.


