1. はじめに
Welcome to the Artillery Hornet 3D Printer User Manual. This guide provides comprehensive instructions for setting up, operating, maintaining, and troubleshooting your new 3D printer. The Artillery Hornet is designed for ease of use and high-quality printing, featuring a highly pre-assembled structure and advanced components for reliable performance.
2. 安全情報
- プリンターは常に換気の良い場所で操作してください。
- 操作中は可動部分に手を近づけないでください。
- Do not touch the hotend or heated bed during or immediately after printing, as they can reach high temperatures.
- 電源が正しく接続され、接地されていることを確認してください。
- メンテナンスやクリーニングを行う前に、プリンターの電源プラグを抜いてください。
- Keep the printer away from flammable materials and direct sunlight.
- Supervise children and pets when the printer is in operation.
3. パッケージ内容
開梱したら、すべてのコンポーネントが揃っていることを確認してください。
- Artillery Hornet 3D Printer (95% pre-assembled)
- フィラメントスプールホルダー
- 電源ケーブル
- USBケーブル
- Tool Kit (wrenches, screwdrivers, etc.)
- SD Card with Test Files and Software
- ユーザーマニュアル(このドキュメント)
- Sampルフィラメント
4.製品オーバーview
The Artillery Hornet features a robust metal integrated structure and a sleek design. Key components include:

図 4.1: 全体 view of the Artillery Hornet 3D Printer.
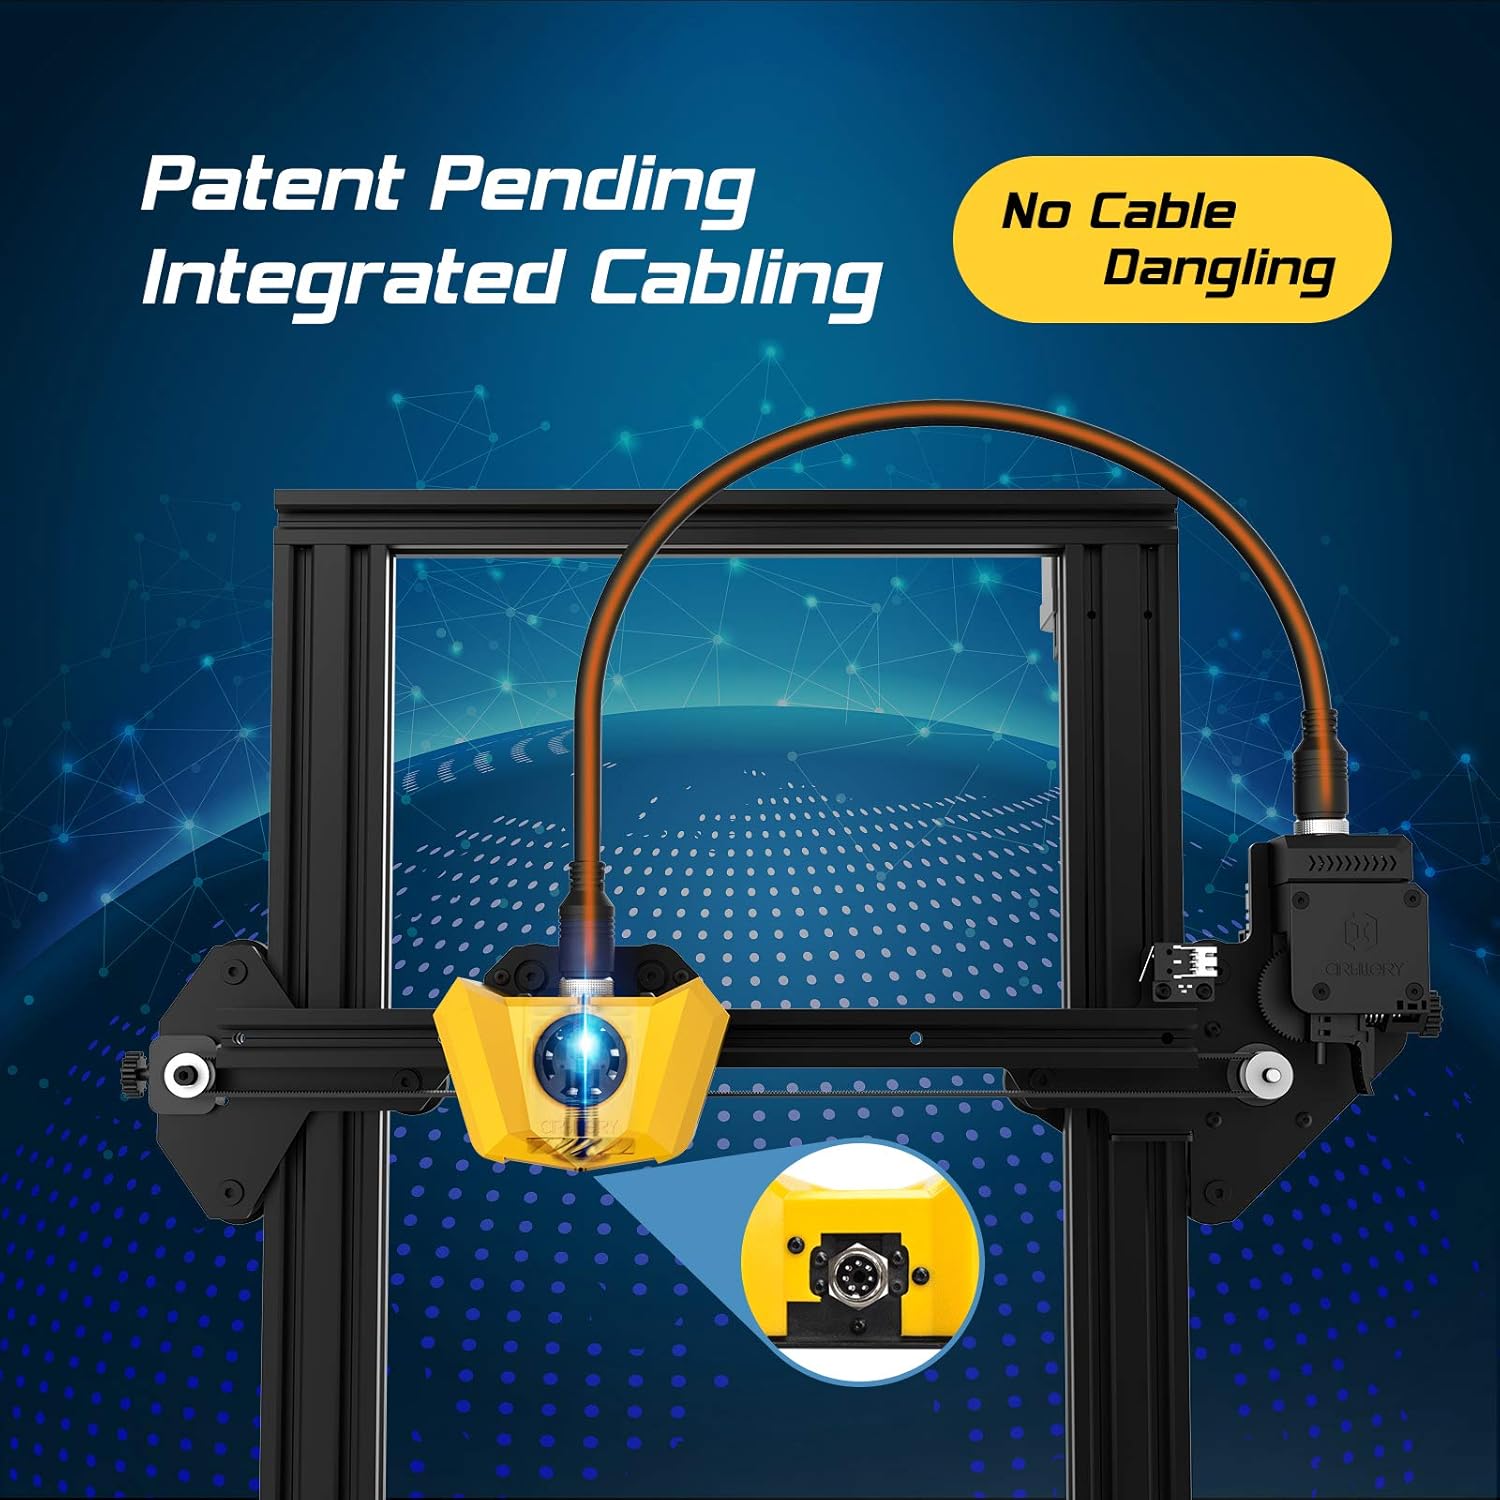
Figure 4.2: Close-up of the innovative integrated cabling system, designed to prevent cable dangling and ensure a neat setup.

Figure 4.3: Details of the New Titan Extruder and Modular Hotend, crucial for stable and precise filament feeding and melting.

Figure 4.4: The self-developed 32-bit motherboard with replaceable drivers, enabling ultra-silent printing and enhanced performance.

Figure 4.5: The user-friendly one-key knob integrated switch for easy operation and the adjustable filament holder designed to maintain a low center of gravity.
5.セットアップガイド
The Artillery Hornet is designed for quick and easy assembly, being 95% pre-assembled. Follow these steps to complete the setup:

Figure 5.1: The printer arrives 95% pre-assembled, requiring only a few minutes for final setup.
- 開梱: パッケージからすべてのコンポーネントを慎重に取り出します。
- Attach Gantry: Secure the pre-assembled gantry to the base unit using the provided screws. The integrated cabling simplifies this connection.
- フィラメントホルダーを取り付けます。 Mount the adjustable filament holder to the designated slot on the side of the printer.
- 接続電源: Plug the power cable into the printer and then into a grounded electrical outlet.
- 電源オン: Flip the power switch located at the rear of the base unit.
- ベッドレベリング: Perform manual bed leveling as instructed on the printer's display or in the detailed guide on the included SD card. Proper bed leveling is crucial for successful prints.
6. 操作手順
Operating the Artillery Hornet is intuitive, thanks to its one-key knob integrated switch and efficient design.
6.1. フィラメントの装填
- Place your filament spool onto the adjustable filament holder.
- Feed the filament through the filament sensor and into the Titan Extruder.
- Heat the hotend to the appropriate temperature for your filament type (e.g., 200°C for PLA).
- Use the one-key knob to select the 'Load Filament' option. The extruder will automatically pull the filament through the hotend until it extrudes smoothly.
6.2. 印刷を開始する
- Prepare your 3D model using a slicing software (e.g., Cura, PrusaSlicer) and save it as a G-code file SDカードに。
- Insert the SD card into the printer's SD card slot.
- Navigate the menu using the one-key knob to 'Print from SD' and select your desired G-code file.
- The printer will automatically heat up the bed and hotend, then begin printing. The self-developed 32-bit motherboard ensures ultra-silent operation during printing.
ビデオ6.1: 審判員がview of the Artillery Hornet 3D Printer, showcasing its features and printing capabilities.
7. メンテナンス
Regular maintenance ensures optimal performance and longevity of your Artillery Hornet 3D Printer.
- プリントベッドをクリーニングする: After each print, clean the print bed with isopropyl alcohol to ensure good adhesion for future prints.
- ノズルのクリーニング: Periodically clean the nozzle to prevent clogs. Use a brass brush or needle to clear any residue.
- Lubricate Z-axis Rod: Apply a small amount of lithium grease or similar lubricant to the Z-axis lead screw every few months to ensure smooth vertical movement.
- ベルトをチェックする: Inspect the X and Y axis belts for proper tension and wear. Adjust if too loose or replace if damaged.
- ファンのクリーニング: Ensure cooling fans (for hotend, part cooling, and power supply) are free from dust and debris to prevent overheating.
8。 トラブルシューティング
以下に、一般的な問題とその潜在的な解決策をいくつか示します。
| 問題 | 考えられる原因 | 解決 |
|---|---|---|
| Filament not feeding | Nozzle clog, tangled filament, incorrect loading. | Clear nozzle, untangle filament, re-load filament carefully ensuring it enters the Bowden tube correctly. |
| Poor print adhesion / Prints lifting | ベッドが水平でない、印刷面が汚れている、ベッドの温度が正しくない。 | Re-level the print bed, clean the print surface with isopropyl alcohol, adjust bed temperature in slicing software. |
| Layering problems / Poor print quality | Loose belts, Z-axis wobble, incorrect print settings. | Check and tighten X/Y belts, ensure Z-coupler is secure, adjust print speed and temperature settings. |
| プリンターの音がうるさい | Loose components, worn bearings. | Check all screws and connections. The 32-bit motherboard is designed for silent operation, but external factors can cause noise. |
| 過熱の問題 | Blocked cooling fans. | Ensure all cooling fans are clear of obstructions and functioning correctly. |
9. 仕様
| 特徴 | 仕様 |
|---|---|
| ボリュームを構築する | 220 x 220 x 250 ミリメートル |
| プリンタの寸法 | 奥行き17.1インチ x 幅16.1インチ x 高さ18.5インチ |
| アイテム重量 | 17.6 ポンド (8 キログラム) |
| 材料 | アルミニウム |
| 色 | 黄色 |
| 押出機タイプ | New Titan Extruder |
| ホットエンドタイプ | Modular Hotend |
| マザーボード | 32-bit with replaceable drivers |
| 組み立て | 95%組み立て済み |

Figure 9.1: Dimensions of the Artillery Hornet 3D Printer.
10. 保証とサポート
For warranty information and technical support, please refer to the documentation included with your product or visit the official Artillery webサイトでご確認ください。保証請求の際は購入証明として領収書を保管してください。


