1. はじめに
The LiteBee Flysky FS-GR3E is a compact and reliable 3-channel 2.4Ghz AFHDS receiver designed for use with various Flysky transmitters in RC car and boat applications. This manual provides essential information for proper setup, operation, and maintenance of your receiver.
2. 安全情報
- Always ensure correct polarity when connecting power to avoid damage to the receiver or other components.
- Operate your RC model in open areas, away from people, vehicles, and obstacles to prevent accidents.
- Regularly check all connections for security and proper seating before each operation.
- Keep the receiver away from moisture, water, and extreme temperatures to ensure optimal performance and longevity.
- Do not attempt to modify the receiver. Unauthorized modifications may void the warranty and lead to malfunction or damage.
3. パッケージ内容
- 1 x LiteBee Flysky FS-GR3E 2.4Ghz 3CH Receiver
4. 仕様
| チャンネル | 3 |
| モデルタイプ | RC Car / RC Boat |
| RF受信感度 | -105dBm |
| 変調 | GFSK |
| システムタイプ | AFHDS(自動周波数ホッピングデジタルシステム) |
| 感度 | 1024 |
| フェイルセーフ | Yes (on Channel 2) |
| Binding Port | Yes (on Channel 3) |
| 電源ポート | はい(VCC) |
| 電源入力 | 4-11V DC |
| 重さ | 5g |
| アンテナ長 | 26mm |
| 寸法 | 37.6mm x 22.3mm x 13mm |
| 色 | 黒 |
| 互換性のある送信機 | Flysky FS-GT2, FS-GT2B, FS-GT3B, FS-GT3C |

Figure 1: Dimensions of the FS-GR3E receiver.
5. セットアップ
5.1. 物理的な接続
This section details the physical connection of the FS-GR3E receiver to your RC model's components.
- Connect the steering servo to チャンネル1 受信機で。
- Connect the Electronic Speed Controller (ESC) or throttle servo to チャンネル2 受信機で。
- Connect any auxiliary functions (e.g., lights, additional servos) to チャンネル3. This port is also used for binding.
- Ensure the power input (4-11V DC) is supplied to the receiver, typically through the ESC or a dedicated battery connected to the VCC port.

Figure 2: LiteBee Flysky FS-GR3E 3CH RC Receiver with labeled ports for connection.
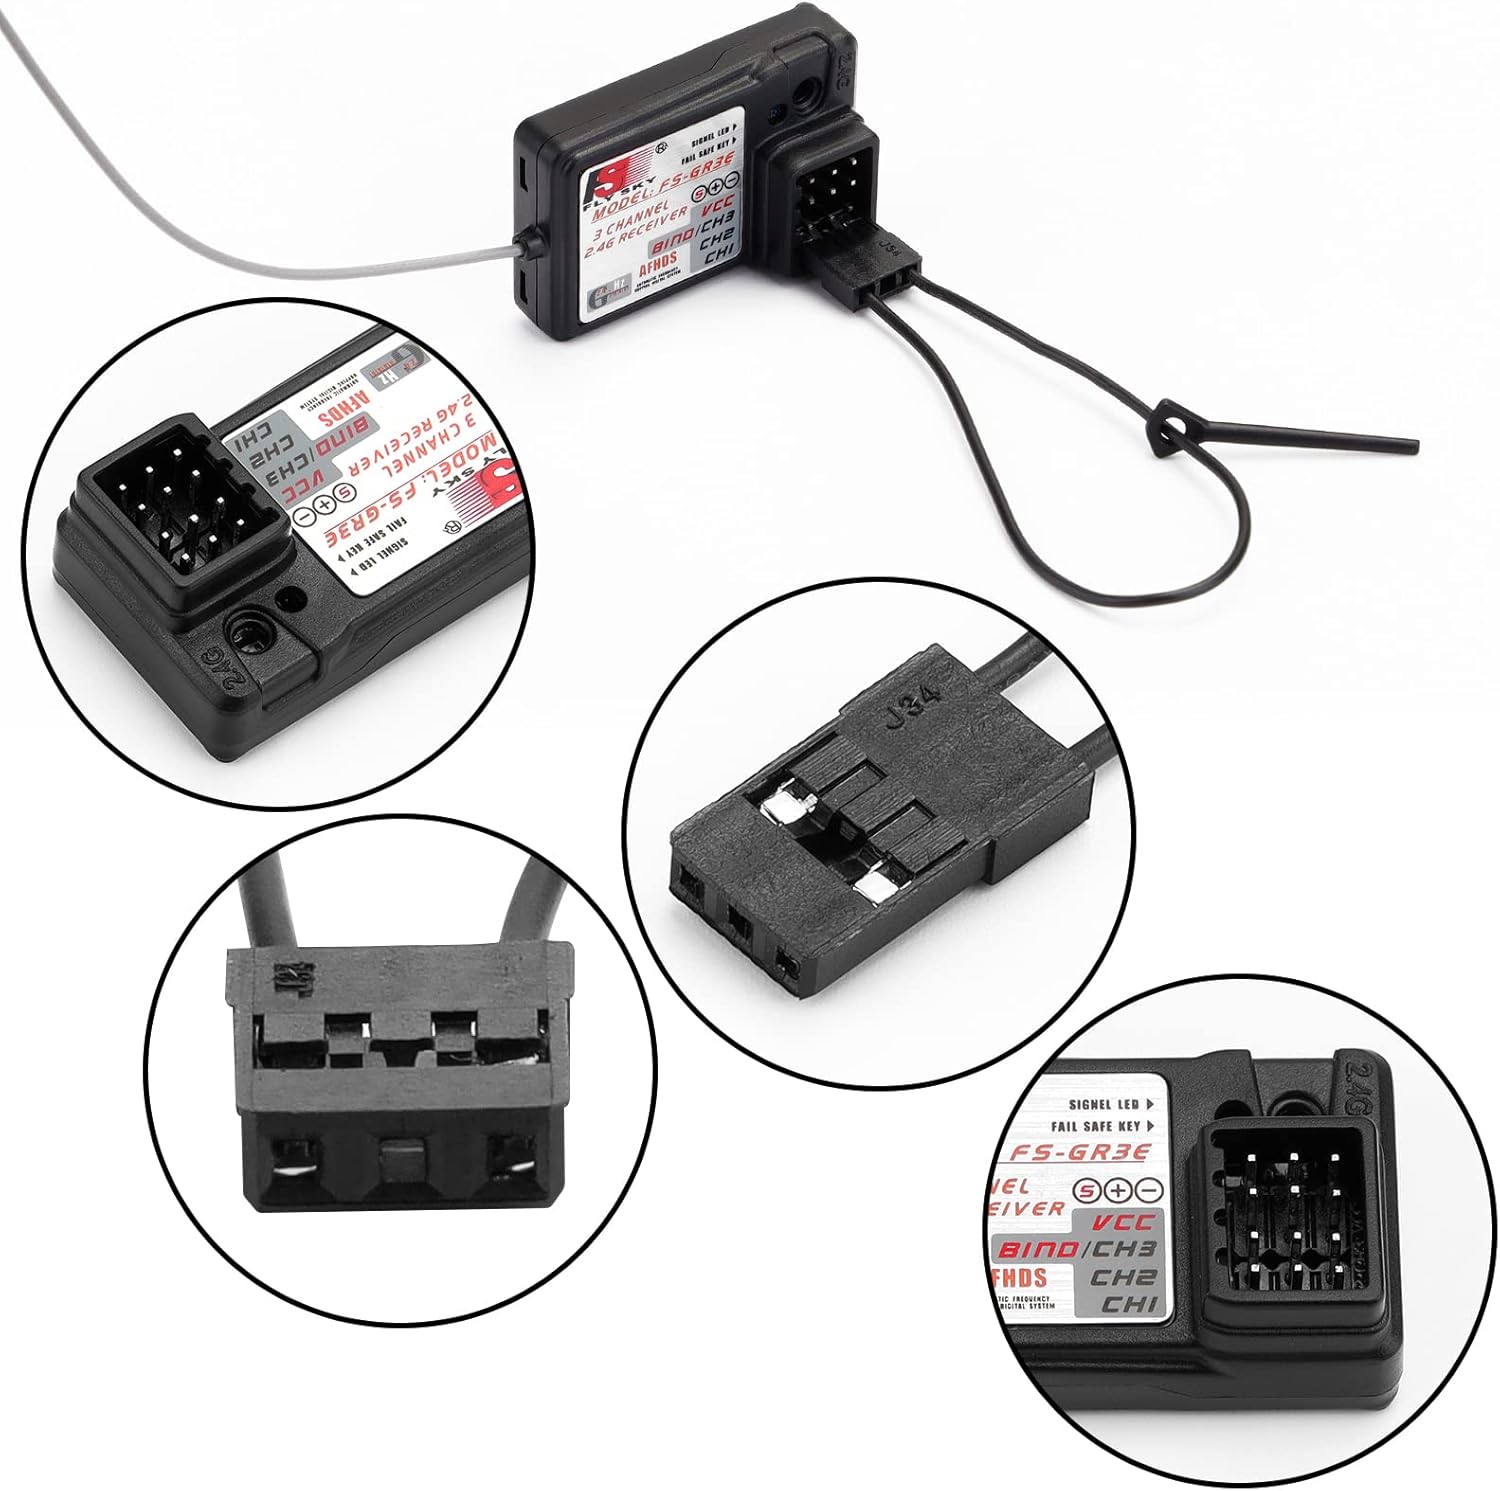
図3:詳細 view of the receiver's connection ports, including the BIND/CH3 port.

図4:例ample of the FS-GR3E receiver connected within an RC car setup.
5.2. 製本プロセス
The binding process links your FS-GR3E receiver to your Flysky transmitter, establishing a unique communication link. This process ensures that your receiver only responds to commands from your specific transmitter.
- Flysky 送信機の電源がオフになっていることを確認してください。
- Insert the binding plug (a small jumper wire or dedicated plug, often included with your transmitter or receiver) into the 結合/CH3 FS-GR3E 受信機のポート。
- 受信機の電源を入れます。受信機のLEDが高速点滅し、バインドモードになっていることを示します。
- 保持しながら バインド button on your Flysky transmitter (if available, or follow your transmitter's specific binding procedure), power on the transmitter.
- 受信機の LED が点滅を停止して点灯状態になり、バインドが成功したことを示します。
- 送信機のBINDボタンを放します。
- 受信機と送信機の両方の電源をオフにします。
- レシーバーからバインディングプラグを取り外します。
- Power on the transmitter first, then the receiver. The receiver's LED should illuminate solid, confirming the connection.
- Test all channels (steering, throttle, etc.) to ensure proper operation before using the model.
ビデオ1: 例ample of a Flysky receiver binding process. While the video shows an FS-IA6B receiver, the binding steps are generally similar for Flysky AFHDS receivers like the FS-GR3E.
5.3. 互換性
The FS-GR3E receiver is compatible with Flysky transmitters utilizing the AFHDS protocol. Refer to the compatibility chart below for specific models.

Figure 5: Flysky receiver compatibility chart, indicating which transmitters work with various receivers, including the GR3E.
6. 操作手順
- パワーオンシーケンス: Always power on your transmitter first, then power on your RC model (receiver). This ensures the transmitter is broadcasting a signal before the receiver attempts to connect.
- 電源オフシーケンス: Always power off your RC model (receiver) first, then power off your transmitter. This prevents unintended movements due to loss of signal while the model is still powered.
- フェイルセーフ機能: The FS-GR3E features a failsafe on Channel 2 (throttle). In case of signal loss or low battery, the failsafe will automatically set the throttle to a pre-programmed position (usually neutral or brake) to prevent the model from running away. Refer to your transmitter's manual for instructions on setting failsafe values.
- After powering on, observe the receiver's LED. A solid LED indicates a successful connection to the transmitter.
7. メンテナンス
- クリーニング: 受信機は清潔に保ち、ほこり、汚れ、湿気を避けてください。清掃には柔らかく乾いた布をご使用ください。溶剤や刺激の強い化学薬品の使用は避けてください。
- 接続: Periodically check all wiring and connections for wear, damage, or looseness. Secure any loose connections.
- アンテナ: Ensure the antenna is properly positioned and not damaged. Avoid bending, coiling, or cutting the antenna wire, as this can significantly reduce range and signal quality.
- ストレージ: Store the receiver in a dry, cool place when not in use. Protect it from physical impact and static electricity.
8。 トラブルシューティング
- 受信機に電源が供給されていません:
- バッテリーの接続を確認し、バッテリーが充電されていることを確認します。
- Verify correct polarity of power connections to the receiver.
- Ensure the Electronic Speed Controller (ESC) or external power source is functioning correctly.
- 受信者がバインドされていません:
- Confirm the binding plug is correctly inserted into the BIND/CH3 port.
- Ensure the transmitter is in binding mode according to its manual.
- Verify that the transmitter and receiver are compatible (both use the Flysky AFHDS system).
- Try binding in a location away from other 2.4GHz devices that might cause interference.
- Intermittent Signal / Short Range:
- 送信機と受信機の間に物理的な障害物がないか確認してください。
- Ensure the receiver antenna is not damaged, coiled, or shielded by carbon fiber or metal parts within the model.
- Avoid operating near strong electromagnetic interference sources (e.g., power lines, large metal structures).
- 送信機の電池レベルを確認してください。
- Servos/ESC Not Responding:
- 受信機が送信機に正常にバインドされていることを確認します (LED が点灯)。
- Check servo/ESC connections to the correct receiver channels.
- Ensure servos/ESC are powered and functioning independently.
9. 保証とサポート
For warranty claims or technical support regarding your LiteBee Flysky FS-GR3E receiver, please contact your original retailer or the manufacturer directly. It is recommended to retain your proof of purchase for warranty validation.


