1. はじめに
The Centralite Pearl Thermostat is designed to provide precise temperature control with an intuitive touch interface. It integrates seamlessly with various smart home platforms using ZigBee connectivity, offering efficient management of residential HVAC systems. This manual provides essential information for installation, operation, and maintenance of your Pearl Thermostat.
2. 主な特徴
- Compatible with SmartThings, Spectrum, Cox, Time Warner Cable, Vera, and ZigBee platforms.
- Supports up to 2-stageヒートと2-stage cool HVAC systems.
- Designed for quick installation, typically within 15 minutes.
- 内蔵電源を搭載 amplifier for extended wireless range.
- Equipped with responsive touch controls for user interaction.
3. パッケージ内容
パッケージにすべてのアイテムが含まれていることを確認します。
- Pearl Thermostat
- 取り付けネジ(4)
- 単三電池(4)
- クイックスタートガイド
- 配線ラベル
4. インストール
設置を始める前に、感電を防ぐために、回路ブレーカーで HVAC システムの電源がオフになっていることを確認してください。
4.1 Mounting the Backplate
- Carefully remove your old thermostat from the wall. Note the wiring connections before disconnecting.
- Mount the Pearl Thermostat backplate to the wall using the provided mounting screws. Ensure it is level.
4.2配線
The Pearl Thermostat features quick-connect terminals for tool-free wiring. Match the wires from your HVAC system to the corresponding terminals on the thermostat backplate. Use the included wiring labels for identification.

図1:背面 view of the Pearl Thermostat backplate, illustrating battery compartments and quick-connect wiring terminals for HVAC system connection.
Common wiring configurations include:
- R/Rc/Rh: 24V AC power (usually red wire)
- C: Common wire (for continuous 24V power, often blue or black)
- W/W1: Heat (usually white wire)
- Y/Y1: Cool (usually yellow wire)
- G: Fan (usually green wire)
- O / B: ヒートポンプ用逆止弁
Insert each stripped wire end into its corresponding terminal until it is securely held.
4.3 バッテリーの取り付け
Insert the four AA batteries into the designated compartments on the back of the thermostat unit. Ensure correct polarity.
4.4 Attaching the Thermostat
Align the thermostat unit with the mounted backplate and gently push until it clicks into place. Restore power to your HVAC system at the circuit breaker.
5. 操作手順
The Pearl Thermostat features a clear LCD display and intuitive touch controls for easy operation.

図2: 前面 view of the Pearl Thermostat, highlighting the digital display and touch-sensitive buttons for Mode, Hold, and Fan functions.
5.1 温度調整
使用 + そして - touch areas on the right side of the thermostat to increase or decrease the desired temperature set point.
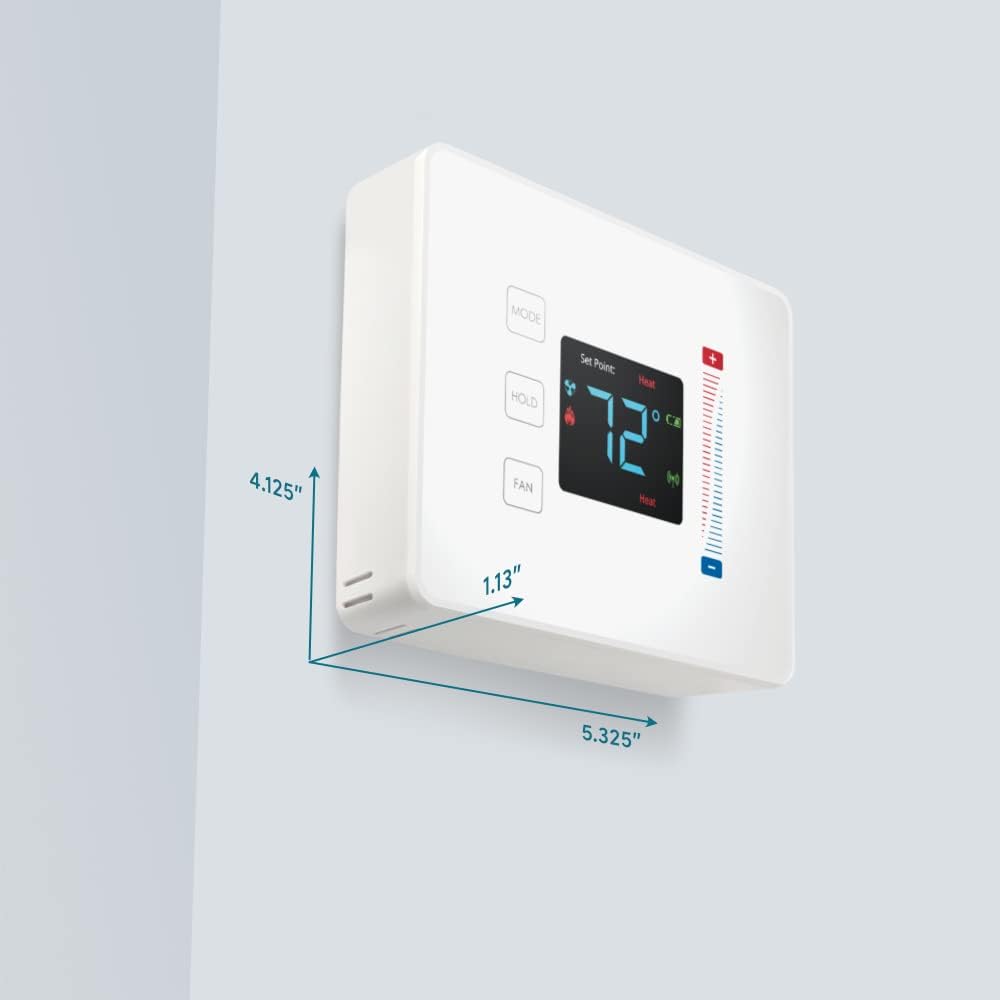
Figure 3: User interaction with the Pearl Thermostat's touch screen to modify temperature settings.
5.2 モード選択
を押す モード button to cycle through available operating modes: Heat, Cool, Auto, Off.
5.3 ホールド機能
を押す 所有 button to maintain the current temperature setting indefinitely, overriding any programmed schedules. Press again to release the hold and resume the schedule.
5.4 ファンコントロール
を押す FAN button to cycle through fan settings: Auto (fan runs only when heating or cooling) or On (fan runs continuously).
6. メンテナンス
6.1 電池の交換
The Pearl Thermostat is powered by four AA batteries. When the battery level is low, a low battery indicator will appear on the display. To replace batteries:
- Gently pull the thermostat unit off its backplate.
- Remove the old AA batteries and dispose of them properly.
- 極性が正しいことを確認して、新しい単3アルカリ電池4本を挿入します。
- Reattach the thermostat unit to the backplate.
Regular battery replacement ensures uninterrupted operation and maintains ZigBee connectivity.
6.2 クリーニング
サーモスタットの表面を柔らかくて乾いた布で拭いてください。amp cloth. Avoid using abrasive cleaners or solvents, as these can damage the display and finish.
7。 トラブルシューティング
If you encounter issues with your Pearl Thermostat, refer to the following common troubleshooting steps:
- ディスプレイ/電源なし: Check if the AA batteries are correctly installed and fully charged. Ensure power to the HVAC system is on at the circuit breaker.
- HVAC システムが応答しません: Verify that the wiring connections to the backplate are secure. Confirm the thermostat is in the correct operating mode (Heat/Cool/Auto).
- Connectivity Issues (ZigBee): Ensure your smart home hub is powered on and within range. Refer to your smart home hub's instructions for device pairing. You may need to initiate a re-pairing process.
- 温度の読み取りが不正確: サーモスタットが、内部センサーに影響を及ぼす可能性のある直射日光、隙間風、熱源にさらされていないことを確認してください。
- Thermostat Not Responding to Touch: Gently clean the screen surface. If the issue persists, try removing the thermostat from its backplate, waiting 30 seconds, and reattaching it to perform a soft reset.
8. 仕様

Figure 4: Dimensions of the Centralite Pearl Thermostat.
| 仕様 | 詳細 |
|---|---|
| ブランド | セントラライト |
| モデル名 | Centralite Pearl Thermostat |
| モデル番号 | 3000-wC |
| コントローラータイプ | スマートシングス、ベラ |
| 色 | 白 |
| 温度制御タイプ | プログラム可能、デジタル |
| 接続技術 | ジグビー |
| 電源 | Battery Powered (4 AA batteries, included) |
| アイテム重量 | 0.97ポンド(約15.5オンス) |
| 巻tage | 230 Volts (HVAC system) |
| 材料 | パール |
| 表示タイプ | 液晶 |
| 仕上げタイプ | サテン |
| コントロールタイプ | タッチパッドコントロール |
| 制御方法 | アプリ |
| 取り付けタイプ | 壁掛け |
| バックライト | はい |
| 製品寸法(長さ x 幅 x 高さ) | 5.33 x 1.13 x 4.13インチ |
| 欧州連合 | 812489022264 |
9. 保証とサポート
For warranty information and technical support, please refer to the documentation included with your product or visit the official Centralite webサイトでご確認ください。購入証明として購入レシートを保管してください。


