1. はじめに
This manual provides detailed instructions for the installation, operation, and maintenance of your Advance Darkside 8303B30 Micro ATX PC Case. Please read this manual thoroughly before beginning installation to ensure proper setup and to maximize the performance and longevity of your system components.
The Advance Darkside ATX Mid-Tower PC case features a top panel with a 2.5/3.5 inch SATA HDD docking station, 2 USB 3.0 ports, and 1 USB 2.0 port. It is designed to accommodate Micro ATX motherboards and offers efficient cooling solutions.
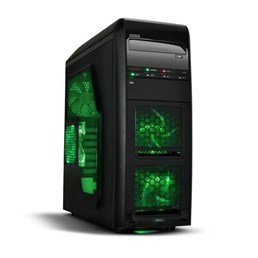
図1: 前面 view of the Advance Darkside 8303B30 PC Case, showcasing its design and front panel features.
2 製品の特徴
- モデル: Advance Darkside 8303B30
- シャーシ材質: SGCC Steel
- 色: Black (interior and exterior)
- マザーボードの互換性: マイクロATX
- フロントパネルの接続: 2 x USB 3.0, 1 x USB 2.0, Audio Jacks
- ストレージ機能: Top panel 2.5/3.5 inch SATA HDD docking station
- 冷却システム: Five 120mm fans included (two LED fans at the front, one LED fan on the side, one fan at the rear, and one fan at the top). Water cooling ready.
- グラフィックカードのサポート: Designed for King Size graphics cards
- サイドパネル: Plexiglass window
3. セットアップ手順
3.1. ケースの準備
- Unpack the PC case carefully and remove all packaging materials.
- ケースを安定した平らな面に置きます。
- ケース背面の蝶ネジを外し、パネルを後方にスライドさせてサイドパネルを取り外します。
3.2.電源装置の設置
- Locate the power supply mounting area at the rear bottom of the case.
- Secure the power supply unit (PSU) using the provided screws. Ensure the PSU fan faces the bottom or top, depending on your PSU and case design for optimal airflow.
3.3. マザーボードの取り付け
- I/O シールドをケース背面の切り欠きに取り付けます。
- Align the motherboard with the standoffs inside the case. Ensure all standoffs match the motherboard's screw holes.
- 適切なネジでマザーボードを固定します。
3.4. ストレージドライブのインストール
- For 3.5-inch HDDs, slide the drive into the drive bay trays. The trays are designed to flex slightly to accommodate the drive without screws in some configurations.
- For 2.5-inch SSDs/HDDs, secure them to the designated mounting points or use adapters if necessary.
- Utilize the top panel SATA docking station for quick access to 2.5/3.5 inch SATA drives. Simply insert the drive into the slot until it clicks into place.
3.5. グラフィックカードと拡張カードの取り付け
- ケース背面にある必要な拡張スロットカバーを取り外します。
- Insert the graphics card or other expansion cards into the appropriate PCIe slots on the motherboard.
- Secure the cards with screws or retention clips.
3.6.ケーブル管理
Route all cables (power, SATA, front panel connectors) through the designated cutouts and tie-down points behind the motherboard tray to ensure clean airflow and an organized interior.
4. 操作手順
4.1. システムの電源を入れる
- すべてのコンポーネントが正しくインストールされ、ケーブルがしっかりと接続されていることを確認します。
- 電源ケーブルを PSU と壁のコンセントに接続します。
- ケースの前面パネルにある電源ボタンを押します。
4.2. Using Front Panel Ports
- USB 3.0/2.0 ポート: Connect USB devices such as keyboards, mice, external drives, or flash drives.
- オーディオジャック: Connect headphones, microphones, or speakers.
- HDD Docking Station: Insert a 2.5-inch or 3.5-inch SATA HDD/SSD into the top docking slot for quick data access. Ensure the drive is properly seated.
5. メンテナンス
5.1. ケースのクリーニング
- ケースの外側は定期的に柔らかくて乾いた布で拭いてください。amp 布。 研磨剤入りクリーナーは避けてください。
- 圧縮空気を使用して、ファン フィルターおよび内部コンポーネントからほこりを取り除きます。
5.2. ファンのメンテナンス
- Periodically check the case fans for dust buildup. Clean them gently with compressed air or a soft brush.
- ケーブルがファンブレードを妨害していないことを確認します。
6。 トラブルシューティング
6.1. システムが電源を入れない
- 電源ケーブルが PSU と壁のコンセントの両方にしっかりと接続されているかどうかを確認します。
- PSU スイッチが「オン」の位置にあることを確認します。
- フロントパネルの電源ボタンケーブルがマザーボードに正しく接続されていることを確認します。
6.2. 過熱の問題
- Ensure all case fans are spinning correctly and are not obstructed.
- Check for excessive dust buildup on fans and heatsinks.
- Verify proper cable management to allow for unobstructed airflow.
6.3. フロントパネルのUSB/オーディオが動作しない
- Confirm that the front panel USB and audio cables are correctly connected to the corresponding headers on the motherboard.
- USB およびオーディオのマザーボード ドライバーを確認します。
7. 仕様
| 特徴 | 詳細 |
|---|---|
| ブランド | 前進 |
| モデル番号 | 8303B30 |
| 色 | 黒 |
| シャーシ材質 | Alloy Steel (SGCC Steel) |
| マザーボードの互換性 | マイクロATX |
| 寸法(長さ×幅×高さ) | 48 x 19.5 x 48.2 cm |
| 製品重量 | 5.8キロ |
| フロントパネルポート | 2 x USB 3.0, 1 x USB 2.0, Audio Jacks |
| ストレージドック | Top panel 2.5/3.5 inch SATA HDD docking station |
| 付属ファン | 5 x 120mm (2 front LED, 1 side LED, 1 rear, 1 top) |
| 冷却サポート | Water cooling ready |
| サイドパネル | プレキシガラス |
| 推奨用途 | ゲーム |
8. 保証とサポート
8.1. メーカー保証
This product comes with a manufacturer's warranty of 1 year from the date of purchase. Please retain your proof of purchase for warranty claims. The warranty covers defects in materials and workmanship under normal use.
8.2. カスタマーサポート
For technical assistance, troubleshooting, or warranty inquiries, please contact Advance customer support. Refer to the official Advance web最新の連絡先情報とサポート リソースについては、こちらのサイトをご覧ください。


