1. はじめに
The Focusrite Forte is a professional 2-input, 4-output portable USB audio interface designed for high-quality audio recording and playback on Mac and Windows computers. It features premium microphone preamplifiers derived from Focusrite's RedNet range and high-resolution 24-bit/192kHz analog-to-digital and digital-to-analog conversion. This manual provides essential information for setting up, operating, and maintaining your Forte interface.
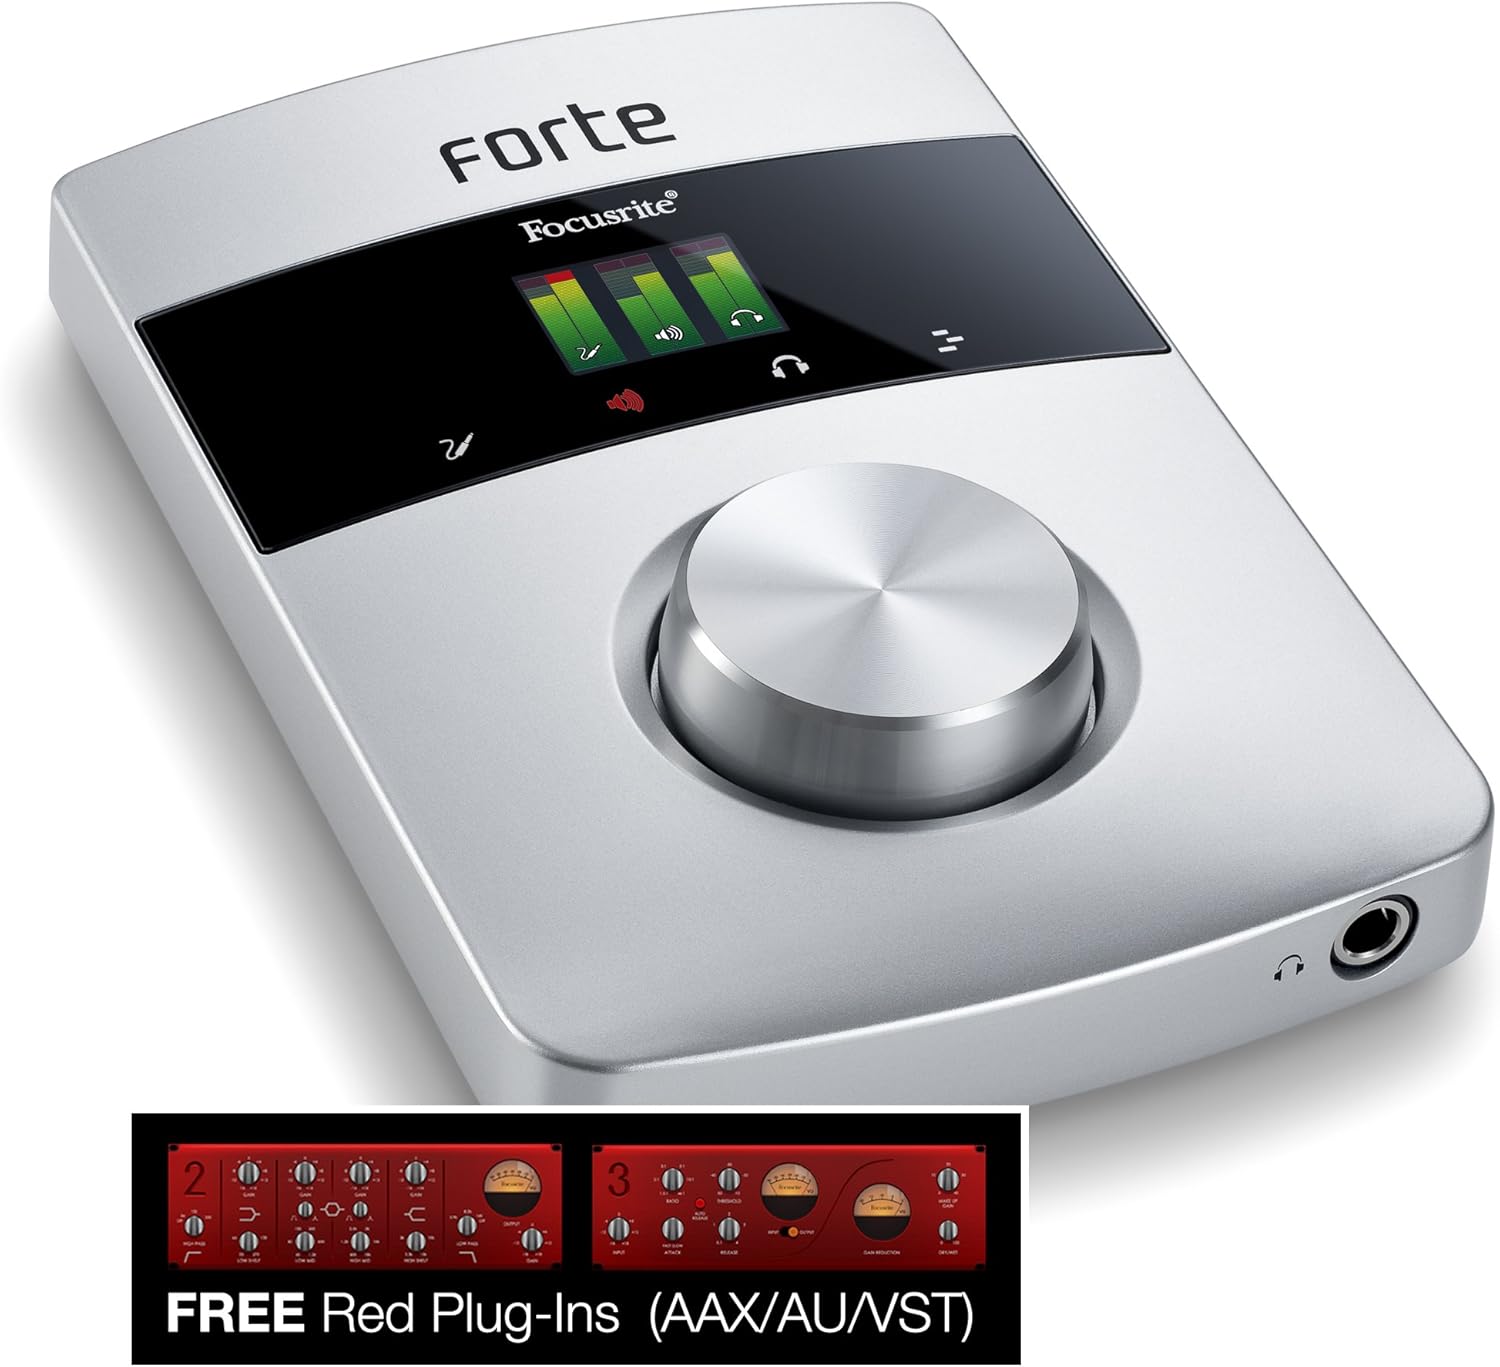
画像1.1:正面 view of the Focusrite Forte Premium USB Audio Interface, showcasing its sleek design, OLED display, and large control knob.
2. 主な特徴
- Two Focusrite remote-controlled microphone preamplifiers, derived from the RedNet range.
- Ultra-high quality A-D / D-A conversion at up to 24-bit/192kHz resolution.
- +48V phantom power, High-Pass Filter (HPF), and polarity reverse functions.
- Compatible with both Mac and Windows operating systems.
- Durable premium aluminum enclosure.
- Color OLED display and touch controls for intuitive operation.
- Includes Forte Control software for low-latency monitoring and mic pre adjustment.
- Bundled with the classic Focusrite Midnight plugin suite.
3. パッケージ内容
Ensure all the following items are present in your Focusrite Forte package:
- Focusrite Forte USB Audio Interface
- 外部電源ユニット(PSU)
- Breakout Cable for microphone and line/instrument inputs
- USB 2.0ケーブル
- ドキュメント(クイックスタートガイド、保証情報)
- Software download instructions for Forte Control and Midnight Plugin Suite
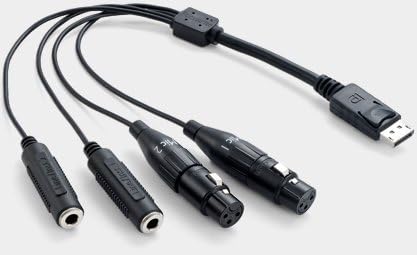
Image 3.1: The breakout cable for the Focusrite Forte, featuring XLR connectors for microphones and TRS connectors for line/instrument inputs.
4.セットアップガイド
4.1. ハードウェア接続
- USB ケーブルを接続します。 Connect the Forte to your computer using the supplied USB 2.0 cable. Ensure it is connected directly to a USB 2.0 port on your computer. Avoid using unpowered USB hubs.
- Connect the Power Supply (Optional/Required for Phantom Power): The Forte can operate on USB bus power. However, if you intend to use +48V phantom power for condenser microphones, you must connect the external power supply unit to the Forte and a power outlet.
- 入力を接続: Use the breakout cable to connect microphones (via XLR) or line/instrument sources (via TRS) to the Forte's input port. The breakout cable features a locking connector for secure attachment to the Forte.
- 出力を接続: Connect your studio monitors to the balanced line outputs (L and R) on the rear of the Forte. Connect headphones to the dedicated headphone output on the front panel.
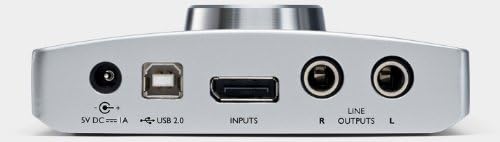
Image 4.1: Rear panel of the Focusrite Forte, showing the 5V DC power input, USB 2.0 port, Inputs port for the breakout cable, and balanced Line Outputs (R and L).

Image 4.2: Rear panel of the Focusrite Forte with the USB cable, power adapter, and breakout cable connected, illustrating a typical setup.
4.2. ソフトウェアのインストール
Before connecting the Forte to your computer, it is recommended to download and install the latest drivers and the Forte Control software from the official Focusrite webサイトにアクセスしてください。画面の指示に従ってインストールしてください。
- ドライバー: Essential for your computer to recognize and communicate with the Forte.
- Forte Control: This application allows you to manage settings such as input gain, phantom power, monitoring mixes, and routing.
- Midnight Plugin Suite: Install these plugins into your Digital Audio Workstation (DAW) for additional audio processing capabilities.
4.3. System Optimization (Mac Specific Recommendations)
For optimal performance, especially on Mac systems, consider the following adjustments:
- Energy Saver Settings: Deactivate power-saving options. Go to System Preferences > Energy Saver. Set "Computer sleep" and "Display sleep" to "Never." Untick "Put hard disk(s) to sleep when possible."
- USB ポートの選択: Connect the Forte directly to a USB 2.0 port on your Mac. Some Mac models may have specific USB ports that perform better for audio devices. Use Apple's System Profiler (Applications > Utilities) to identify the internal USB configuration and avoid sharing the Forte's port with the iSight camera or other high-bandwidth devices.
- USBケーブルの長さ: Use a USB cable no longer than five meters; three meters is generally recommended for stability.
5. Operating the Forte
5.1. フロントパネルコントロール
- OLEDディスプレイ: Provides visual feedback on input levels, output levels, and current settings.
- 大型コントロールノブ: Used for adjusting input gain, output volume, and navigating menus on the OLED display.
- タッチコントロール: Capacitive touch buttons surrounding the OLED display allow for quick access to functions like phantom power, input selection, and monitoring options.
5.2. Input and Output Configuration
Use the Forte Control software to configure your inputs and outputs. This includes:
- Adjusting input gain for microphones and line/instrument sources.
- Activating +48V phantom power for condenser microphones.
- Enabling High-Pass Filters (HPF) to reduce low-frequency rumble.
- Setting up direct monitoring mixes to hear your input with minimal latency.
- Controlling the main monitor output and headphone output levels.
Refer to the Forte Control software manual for detailed instructions on its features.
6. メンテナンス
- クリーニング: Use a soft, dry cloth to clean the exterior of the Forte. Avoid abrasive cleaners or solvents.
- ストレージ: 直射日光や極端な温度を避け、涼しく乾燥した場所に保管してください。
- ケーブルのお手入れ: Handle the breakout cable and USB cable with care to prevent damage to connectors and wiring.
- ファームウェアの更新: Focusriteを定期的にチェックする website for firmware updates for your Forte, as these can improve performance and add features.
7。 トラブルシューティング
7.1. ユニットがコンピュータに認識されない
- Ensure the USB cable is securely connected to both the Forte and a direct USB 2.0 port on your computer.
- コンピュータの別のUSBポートを試してください。
- Verify that the latest drivers for the Forte are installed.
- If the unit has been connected for a while and stops being recognized, try disconnecting both the USB and AC adapter cables from the Forte, wait for a minute, then reconnect the AC adapter first (if using), followed by the USB cable.
- コンピュータを再起動します。
7.2. No Sound or Distorted Audio
- Check all cable connections (inputs, outputs, headphones).
- Verify input gain levels in Forte Control and your DAW.
- Ensure the correct audio device (Focusrite Forte) is selected in your computer's sound settings and your DAW.
- Check monitoring settings in Forte Control to ensure inputs are routed to outputs correctly.
- If using phantom power, ensure the external power supply is connected.
7.3. High Latency
- Adjust the buffer size in your DAW's audio settings. Smaller buffer sizes reduce latency but require more CPU power.
- Ensure your computer meets the minimum system requirements for your DAW and the Forte.
- Review system optimization steps (Section 4.3) for Mac users.
7.4. Unit Gets Warm
It is normal for the Forte to become slightly warm during operation. If it becomes excessively hot or exhibits unusual behavior, disconnect it immediately and contact support.
8. 仕様
| アイテム重量 | 3ポンド |
| 製品寸法 | 7.48 x 9.92 x 4.37インチ |
| モデル番号 | フォルテ |
| ハードウェアインターフェイス | USB2.0 について |
| 対応デバイス | Personal Computer (Mac and Windows) |
| オペレーティング·システム | Windows (also Mac compatible) |
| A/D & D/A Conversion | 最大24ビット/192kHz |
| ファントムパワー | +48V (requires external PSU) |
9. 保証とサポート
For warranty information, technical support, and service inquiries, please refer to the documentation included with your product or visit the official Focusrite webサイトでご確認ください。保証請求に備えて購入証明書を保管してください。
オンラインリソース:
- 製品登録
- ドライバーとソフトウェアのダウンロード
- Knowledge base and FAQs
- サポートに問い合わせる


