1. はじめに
This manual provides comprehensive instructions for the setup, operation, and maintenance of your Geemarc CL100 Amplified Big Button Corded Phone. Please read this manual carefully to ensure proper use and to maximize the benefits of your new telephone.
The Geemarc CL100 is designed for ease of use, featuring large buttons, adjustable amplification, and visual indicators, making it suitable for individuals with hearing or visual impairments. This telephone is line-powered and does not require an external power source.
重要な注意: This telephone does not include a built-in answering machine, speakerphone, caller display, talking caller ID, talking keypad, or voice assist functionality.
2.製品オーバーview
2.1 パッケージ内容
- Geemarc CL100 Corded Telephone Base
- ハンドセット
- コイル状受話器コード
- 電話回線コード
- ユーザーマニュアル(このドキュメント)
2.2 Telephone Layout
Familiarize yourself with the key components and controls of your Geemarc CL100 phone.

図1: トップダウン view of the Geemarc CL100 phone, illustrating the large numeric keypad, function buttons, and memory slots.
- 携帯電話: For speaking and listening during calls.
- テンキー: Large, easy-to-read buttons for dialing numbers.
- P1, P2, P3 Buttons: Priority memory buttons for frequently called numbers.
- M1-M9ボタン: One-touch memory buttons for storing additional numbers.
- リダイヤルボタン: 最後にかけた番号をダイヤルします。
- フラッシュボタン: Used for network services (e.g., call waiting).
- 保存ボタン: Used for programming memory numbers.
- 消音ボタン: 通話中にマイクを一時的にミュートします。
- Tone Control Switch: Adjusts the audio tone for clearer conversations.
- 音量調節スイッチ: Adjusts the receiving volume during a call.
- Visual Ringer Indicator: Flashes when an incoming call is received.
- Memory Index Card: Pull-out card for noting stored memory numbers.

図2: 側 view of the phone, illustrating the ringer ON/OFF switch and the telephone line connection port.
3. セットアップ
3.1 電話の接続
- ハンドセットを接続します: Plug one end of the coiled handset cord into the handset and the other end into the handset jack on the side of the telephone base.
- 電話回線を接続します。 Plug one end of the telephone line cord into the jack labeled with a telephone icon on the back or side of the phone base. Plug the other end into your wall telephone jack.
- 電源: The Geemarc CL100 is powered by the telephone line and does not require an external power adapter.
- Ringer Switch: Ensure the ringer switch (located on the side) is set to "Low" or "High" for audible ringing.
3.2 初期チェック
- 受話器を上げて発信音を確認します。発信音が聞こえない場合は、すべての接続を確認してください。
- Make a test call to ensure proper functionality.
4. 操作手順
4.1電話をかける
- 受話器を持ち上げます。
- 発信音を待ちます。
- Dial the required number using the numeric keypad.
- Upon completion of the call, carefully replace the handset in the cradle to disconnect.
4.2 電話に出る
When an incoming call is received, the phone will ring and the visual indicator will flash.
- 受話器を持ち上げて電話に出ます。
- Upon completion of the call, carefully replace the handset in the cradle.
4.3 最後にかけた番号のリダイヤル
- 受話器を持ち上げます。
- 発信音を待ちます。
- を押す リダイヤルする button. The previously dialed number will be automatically redialed.
- Note: This function does not apply to numbers dialed from memory buttons.
4.4 ミュート機能
The Mute button allows you to speak privately without your caller overhearing.
- 通話中に を押す ミュート button. You will still hear the caller, but they will not hear you.
- を押す ミュート button again to resume normal conversation.
4.5 Storing Telephone Numbers (Memory Dialing)
Your telephone can store 12 direct memory numbers: 3 priority numbers (P1, P2, P3) and 9 standard memory numbers (M1-M9). Priority memories can store up to 24 digits, and M1-M9 can store up to 32 digits.
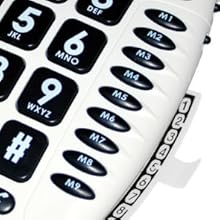
図3: Detail of the memory buttons (M1-M9) and the integrated memory index card.
- 受話器を持ち上げます。
- を押す 店 ボタン。
- 保存したい電話番号をダイヤルします。
- を押す 店 もう一度ボタンを押します。
- Press the desired memory button (P1, P2, P3, or M1-M9) where you want to save the number.
- 受話器を交換してください。
- Note: Use the index card located under the base to record your stored numbers for easy reference. Stored memories are protected even if the phone line is unplugged.
4.6 Dialing Stored Numbers
- 受話器を持ち上げます。
- 発信音を待ちます。
- Press the appropriate memory button (P1, P2, P3, or M1-M9). The stored number will be dialed automatically.
4.7 Recall (R), * & # Buttons
These buttons are used in conjunction with new services provided on digital exchanges. For specific details on their use, please contact your network operator.
4.8 補聴器の互換性
If you are using this telephone with a hearing aid, set your hearing aid to the "T" (Telecoil) setting for optimal audio quality.
5. メンテナンス
- クリーニング: 電話機を柔らかくて清潔な布で拭いてくださいamp 布で拭いてください。研磨剤や溶剤は使用しないでください。
- ストレージ: 携帯電話は直射日光や極端な温度を避け、涼しく乾燥した場所に保管してください。
- 液体を避ける: Do not expose the telephone to water or other liquids.
- コードのケア: Ensure the handset and line cords are not tangled or pinched to prevent damage.
6。 トラブルシューティング
| 問題 | 考えられる原因 | 解決 |
|---|---|---|
| 発信音なし | 電話回線コードが正しく接続されていません。 | Check that both ends of the telephone line cord are securely plugged in. |
| 発信者の声が聞こえない / 発信者は私の声が聞こえない | Volume settings are too low or Mute is active. | Adjust the Volume control. Ensure the Mute button is not pressed. |
| 電話が鳴らない | Ringer switch is set to "Off". | Set the ringer switch (on the side) to "Low" or "High". |
| Stored memory numbers are lost | This phone protects stored memories even if the phone line is unplugged. If numbers are lost, they may not have been stored correctly. | Re-store the numbers following the instructions in Section 4.5. |
| Difficulty dialing quickly | Some older phone systems may require a slower dialing pace. | Try dialing at a slightly slower pace. Consider using the memory dial function for frequently called numbers. |
7. 仕様
- モデル: ジーマーク CL100
- タイプ: コード付き電話
- Amplification: Up to 30 dB receiving volume
- 着信音量: 最大85dBまで調整可能
- メモリ: 3 Priority (P1-P3), 9 One-touch (M1-M9)
- 電源: Line-powered (no external adapter required)
- 補聴器の互換性: Yes (T-coil setting)
- 寸法: 約7.5 x 8 x 3インチ(19 x 20.3 x 7.6 cm)
- 重さ: 約2.25ポンド(1.02kg)
- 色: 白
8. 保証とサポート
8.1 保証情報
For information regarding the warranty period and terms for your Geemarc CL100 telephone, please refer to the warranty card included with your purchase or visit the official Geemarc webサイトでご確認ください。保証請求に備えて購入証明書を保管してください。
8.2 カスタマーサポート
If you encounter any issues not covered in the troubleshooting section or require further assistance, please contact Geemarc customer support. Contact details can typically be found on the Geemarc webサイトまたは製品パッケージに記載されています。
オンラインリソースについては、次のサイトをご覧ください。 www.geemarc.com


