1. はじめに
The Velleman DVM810 is a compact and economical 3 1/2 digit digital multimeter designed for measuring DC and AC voltages, DC currents, resistance, and for performing diode and transistor (hFE) tests. It features overload protection and automatic polarity indication, making it suitable for hobbyists, field use, and workshops. This manual provides essential information for the safe and effective operation of your DVM810 multimeter.
2 製品の特徴
- Automatic polarity indication
- 巻tage measurements: AC 500V and DC 500V maximum
- Current measurements: DC 10A maximum (0.2A fused, 10A unfused)
- Resistance measurements: Up to 2MΩ
- Diode and transistor (hFE) test functions
- 過負荷保護
- Compact design with 3 1/2 digit LCD display
3. パッケージ内容
パッケージの内容をチェックして、すべてのアイテムが揃っていることを確認してください。
- ベルマン DVM810 デジタル マルチメーター
- テストリード(赤1本、黒1本)
- 取扱説明書
4. 重要な安全情報
本製品をご使用になる前に、すべての安全に関する警告と指示をよくお読みください。これらの指示に従わない場合、感電、火災、または重傷を負う可能性があります。
- 測定を行う前に、マルチメーターが正しい機能と範囲に設定されていることを必ず確認してください。
- Never exceed the maximum input limits for any range. The maximum voltage for AC/DC is 500V.
- Do not attempt to measure current on circuits with voltagesは250Vを超えています。
- Inspect test leads for damaged insulation or exposed metal before each use. Replace damaged leads immediately.
- マルチメーターが破損しているように見える場合、またはケースが開いている場合は、マルチメーターを使用しないでください。
- Exercise extreme caution when working with live circuits. Use appropriate personal protective equipment.
- 必ず回路の電源を切り、高電圧を放電してください。tage capacitors before measuring resistance or performing diode/transistor tests.
- 正確な測定を行うために、ディスプレイに電池残量低下インジケーターが表示されたら電池を交換してください。
5.製品オーバーview
Familiarize yourself with the components of your Velleman DVM810 multimeter:
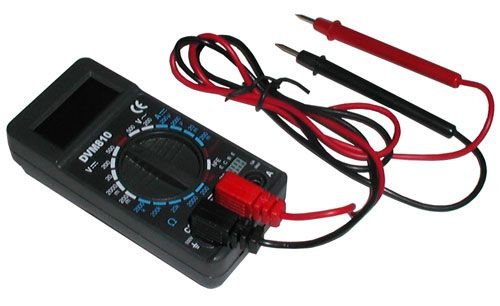
Figure 1: Velleman DVM810 Digital Multimeter. This image displays the front view of the compact multimeter, highlighting its liquid crystal display (LCD), the central rotary function switch, and the input jacks for test leads at the bottom.
- LCDディスプレイ: Shows measurement readings, units, and polarity.
- ロータリースイッチ: 必要な測定機能と範囲を選択するために使用します。
- 入力ジャック:
- COMジャック: Common (negative) input for all measurements. Connect the black test lead here.
- VΩmAジャック: ボリュームのプラス入力tage, resistance, and current measurements up to 200mA. Connect the red test lead here.
- 10Aジャック: Positive input for high current measurements (up to 10A). Connect the red test lead here for 10A measurements.
- テストリード: マルチメーターをテスト対象の回路に接続するために使用される赤と黒のリード線。
6. セットアップ
6.1 バッテリーの取り付け
The DVM810 multimeter requires a 9V battery (not always included). To install or replace the battery:
- Ensure the multimeter is turned OFF (rotary switch set to OFF).
- ユニットの背面にある電池ボックスのカバーを見つけます。
- カバーを固定しているネジを外し、慎重に持ち上げて取り外します。
- 正しい極性に注意しながら、新しい 9V バッテリーをバッテリー クリップに接続します。
- バッテリーをコンパートメントに配置し、カバーを元に戻してネジで固定します。
6.2 テストリードの接続
正確で安全な測定を行うには、必ずテスト リードを正しく接続してください。
- 黒のテストリードをに挿入します コム (一般的な)ジャック。
- ほとんどの測定(体積tage, resistance, diode, hFE, and current up to 200mA), insert the red test lead into the VΩmA ジャック。
- 高電流測定(最大10A)の場合は、赤いテストリードを 10A ジャック。
7. 操作手順
Before making any measurement, ensure the test leads are correctly connected and the rotary switch is set to the appropriate function and range.
7.1 DC電圧の測定tage (V=)
- 赤いリード線を VΩmA jack and the black lead into the コム ジャック。
- ロータリースイッチを希望のDC Volに設定しますtage (V=) range. Start with the highest range if the voltageは不明です。
- Connect the test leads across the component or circuit to be measured (in parallel).
- 巻を読むtage value on the LCD display. The display will show the correct polarity.
7.2 AC電圧の測定tage(V〜)
- 赤いリード線を VΩmA jack and the black lead into the コム ジャック。
- ロータリースイッチを希望のACボリュームに設定しますtage (V~) range. Start with the highest range if the voltageは不明です。
- Connect the test leads across the component or circuit to be measured (in parallel).
- 巻を読むtagLCDディスプレイのe値。
7.3 直流電流の測定(A=)
Caution: Never connect the multimeter in parallel with a voltag電流を測定するときは電源を切断しないでください。ヒューズが切れたり、メーターが損傷する可能性があります。
- Determine the expected current. For currents up to 200mA, insert the red lead into the VΩmA jack. For currents up to 10A, insert the red lead into the 10A jack. Always insert the black lead into the コム ジャック。
- Set the rotary switch to the appropriate DC Current (A=) range. Start with the highest range if the current is unknown.
- Turn off power to the circuit. Open the circuit where the current is to be measured.
- マルチメーターを回路に直列に接続します。
- Restore power to the circuit and read the current value on the LCD display.
7.4 抵抗(Ω)の測定
Caution: Ensure the circuit is completely de-energized and all capacitors are discharged before measuring resistance.
- 赤いリード線を VΩmA jack and the black lead into the コム ジャック。
- Set the rotary switch to the desired Resistance (Ω) range. Start with a higher range if the resistance is unknown.
- 測定するコンポーネントにテスト リード線を接続します。
- LCD ディスプレイで抵抗値を読み取ります。
7.5ダイオードテスト
Caution: Ensure the diode is disconnected from the circuit or the circuit is de-energized before testing.
- 赤いリード線を VΩmA jack and the black lead into the コム ジャック。
- Set the rotary switch to the Diode symbol (→|).
- 赤いリード線をダイオードのアノードに、黒いリード線をカソードに接続します。ディスプレイには順方向電圧が表示されます。tag電圧降下(シリコンダイオードでは通常 0.5V ~ 0.8V)。
- Reverse the leads. The display should show 'OL' (Overload) for a good diode. If it shows a reading in both directions or 'OL' in both directions, the diode may be faulty.
7.6 トランジスタ(hFE)テスト
Caution: Ensure the transistor is disconnected from the circuit before testing.
- 赤いリード線を VΩmA jack and the black lead into the コム ジャック。
- ロータリースイッチをhFEの位置に設定します。
- Identify if the transistor is NPN or PNP. Insert the transistor's emitter, base, and collector leads into the corresponding holes in the hFE socket on the multimeter.
- Read the hFE (DC current gain) value on the LCD display.
8. 仕様
| パラメータ | 価値 |
|---|---|
| ブランド | Velleman |
| モデル番号 | DVM810 |
| 測定タイプ | マルチメーター |
| DCVol。tage範囲 | 最大500V |
| ACVol。tage範囲 | 最大500V |
| DC電流範囲 | Up to 10A (0.2A fused, 10A unfused) |
| 抵抗範囲 | 最大2MΩ |
| ダイオード試験 | はい |
| トランジスタ(hFE)テスト | はい |
| 画面 | 3 1/2 Digit LCD |
| 電源 | 9V電池(別売) |
| 寸法 | 約3.70インチ×1.81インチ×1.03インチ |
| アイテム重量 | 約3.2オンス(0.2ポンド) |
| 欧州連合 | 836479002272 |
9. メンテナンス
9.1 電池の交換
When the low battery indicator appears on the LCD, replace the 9V battery as described in Section 6.1. A weak battery can lead to inaccurate readings.
9.2 クリーニング
マルチメーターを掃除するには、ケースを水で拭いてください。amp 布と中性洗剤を使用してください。研磨剤や溶剤は使用しないでください。ご使用前に、本体が完全に乾いていることを確認してください。
9.3 テストリード検査
テストリードに損傷の兆候(絶縁体のひび割れ、露出した配線、接続部の緩みなど)がないか定期的に点検してください。感電の危険を防ぐため、損傷したリードは直ちに交換してください。
10。 トラブルシューティング
- 表示されない、またはかすかに表示される場合: バッテリーを確認してください。必要であれば交換してください。
- 誤った読み方:
- ロータリースイッチが正しい機能と範囲に設定されていることを確認します。
- バッテリー容量を確認するtage; replace if low.
- テストリードが正しく接続されており、損傷がないことを確認します。
- For resistance measurements, ensure the circuit is de-energized.
- 「OL」(オーバーロード)が表示されます: 測定値が選択した範囲を超えています。より高い範囲を選択するか、回路がメーターの能力範囲内であることを確認してください。
- Fuse blown (during current measurement): If the meter stops measuring current, the internal fuse may have blown. Refer to a qualified technician for fuse replacement.
11. 保証とサポート
Warranty information for the Velleman DVM810 Digital Multimeter is typically provided with your purchase documentation or can be found on the official Velleman website. For technical support, service, or further inquiries, please refer to the contact information provided by your retailer or the manufacturer's official support channels.