1. はじめに
The SPL 2Control is a compact and user-friendly stereo monitor controller designed to provide comprehensive control over your digital audio workstation's (DAW) monitoring functions. It ensures high-quality audio reproduction through both studio monitors and headphones, allowing you to hear every detail of your mix. Key features include a precise speaker volume potentiometer, active circuitry for sound integrity, and a unique Crossfeed control for accurate headphone monitoring that simulates a stereo speaker image.
2. 安全に関する注意事項
- デバイスを操作する前に、これらの手順をよくお読みください。
- このマニュアルは将来の参照用に保管してください。
- 火災や感電を防ぐため、ユニットを雨や湿気にさらさないでください。
- 適切な換気を確保し、換気口を塞がないようにしてください。
- メーカー指定のアタッチメント/アクセサリのみを使用してください。
- 雷雨のときや長期間使用しない場合は、電源コードを抜いてください。
- すべてのメンテナンスは資格のあるサービス担当者に依頼してください。
- ラジエーター、暖房口、ストーブ、その他の機器(電気を含む)などの熱源の近くにユニットを置かないでください。 amp熱を発生する装置。
3. パッケージ内容
開梱したら、次の品目が含まれていることを確認してください。
- 1 x SPL 2Control Module
- 1 x電源コード
- このユーザーマニュアル
4.製品オーバーview
4.1 フロントパネルのコントロールとインジケータ
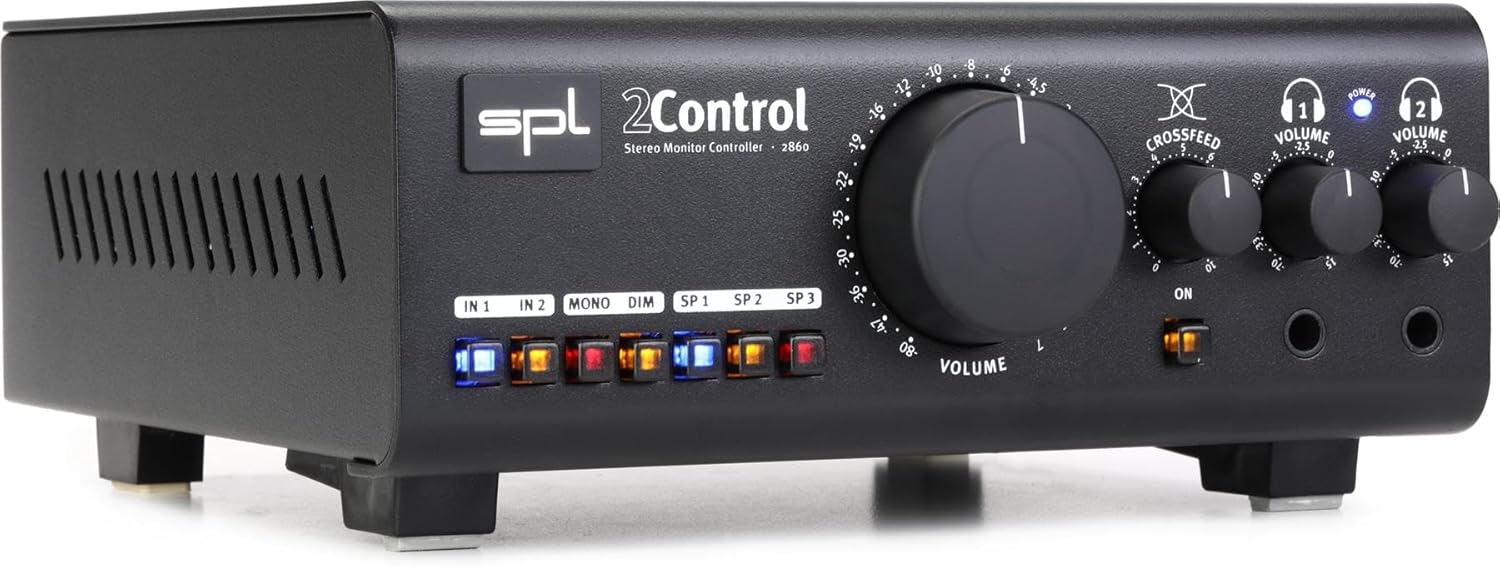
図1: Front Panel of the SPL 2Control Stereo Monitor Controller.
This image displays the front panel of the SPL 2Control. From left to right, it features input selection buttons (IN 1, IN 2), function buttons (MONO, DIM), speaker output selection buttons (SP 1, SP 2, SP 3), a large central master VOLUME knob, a CROSSFEED knob, and two individual headphone VOLUME knobs with corresponding headphone output jacks. A power indicator LED is visible above the headphone controls.
- IN 1 / IN 2 Buttons: Selects the active stereo input source.
- MONOボタン: Sums the stereo signal to mono for compatibility checking.
- DIMボタン: Reduces the output volume by a fixed amount (e.g., -20dB) for temporary level reduction.
- SP 1 / SP 2 / SP 3 Buttons: Selects the active stereo speaker output pair.
- ボリュームノブ: Master volume control for selected speaker outputs.
- CROSSFEED Knob: Adjusts the stereo panorama for headphone monitoring to simulate a speaker listening environment.
- HEADPHONE VOLUME 1 / 2 Knobs: Independent volume controls for the two headphone outputs.
- HEADPHONE 1 / 2 Jacks: 1/4-inch stereo headphone outputs.
- 電源LED: ユニットの電源がオンになっていることを示します。
4.2 背面パネルの接続(推定)
The rear panel typically houses the audio input and output connections, as well as the power input. Based on common audio equipment and product specifications, you can expect:
- アナログ入力: Balanced XLR or TRS inputs for connecting your audio interface or mixer.
- スピーカー出力: Multiple sets of balanced XLR or TRS outputs for connecting up to three pairs of studio monitors.
- 電源入力: Connector for the included power cord.
5. セットアップ
- 配置: Position the SPL 2Control on a stable, flat surface, ensuring adequate ventilation around the unit.
- 電源接続: Connect the provided power cord to the power input on the rear panel of the 2Control and then to a suitable AC power outlet.
- 入力接続: Connect the stereo outputs of your audio interface, mixer, or other audio source to the IN 1 and/or IN 2 inputs on the rear panel using balanced XLR or TRS cables.
- スピーカー接続: Connect your studio monitors to the SP 1, SP 2, and/or SP 3 outputs on the rear panel using balanced XLR or TRS cables. Ensure correct left and right channel connections.
- Headphone Connections: Plug your headphones into the HEADPHONE 1 and/or HEADPHONE 2 jacks on the front panel.
- 初回電源オン: Ensure all volume controls are set to their minimum positions before powering on the unit. Then, connect the power cord to the wall outlet. The POWER LED on the front panel will illuminate.
6. 操作手順
- 入力の選択: どちらかを押してください 1年 or 2年 button to select your desired audio source. The active button will illuminate.
- Selecting Speaker Outputs: を押す SP 1, SP 2、 または SP 3 button to route the audio to the corresponding pair of studio monitors. Only one speaker output can be active at a time.
- マスターボリュームの調整: Slowly turn the large 音量 knob clockwise to increase the listening level for the selected speaker outputs. Turn counter-clockwise to decrease.
- モノラルサミング: を押す 単核症 button to sum the stereo signal to mono. This is useful for checking phase compatibility and mix balance. Press again to return to stereo.
- 暗くする機能: を押す 暗い button to temporarily reduce the output volume. This is useful for quick conversations or when you need to lower the volume without losing your main volume setting. Press again to restore the original volume.
- ヘッドフォンモニタリング:
- Plug your headphones into the desired headphone jack (HEADPHONE 1 or 2).
- 個人を調整する HEADPHONE VOLUME 1 or 2 knob to set the listening level for your headphones.
- 使用 横送 knob to adjust the stereo image for headphone listening. Turning it clockwise increases the crossfeed, simulating a more natural speaker-like stereo field by blending the left and right channels slightly.
7. メンテナンス
- クリーニング: 本体の外装を清掃する際は、柔らかく乾いた布をご使用ください。液体クリーナーや溶剤は使用しないでください。
- 換気: Ensure that the ventilation slots are kept clear of dust and debris to prevent overheating.
- ストレージ: ユニットを長期間保管する場合は、電源を外して涼しく乾燥した場所に保管してください。
8。 トラブルシューティング
| 問題 | 考えられる原因 | 解決 |
|---|---|---|
| スピーカーから音が出ない。 |
|
|
| ヘッドホンから音が出ません。 |
|
|
| 歪んだ音声。 |
|
|
9. 仕様
| 特徴 | 詳細 |
|---|---|
| モデル名 | 2 Control (also known as 2860) |
| ブランド | SPL |
| スピーカータイプ | モニター |
| 推奨用途 | Control, Volume for Monitors |
| 対応デバイス | Monitors, Speakers |
| サラウンドサウンドチャンネル構成 | 2.0 |
| 色 | 黒 |
| 含まれるコンポーネント | 1 x SPL Control Module |
| 製品寸法(奥行き×幅×高さ) | 8.66インチ x 8.46インチ x 3.15インチ |
| アイテム重量 | 7.06ポンド(約3.2kg) |
| 電源 | コード式電気 |
| 接続技術 | TRS、XLR |
| オーディオ出力モード | ステレオ |
| 取り付けタイプ | 卓上マウント |
| メーカー | Sound Performance Lab |
10. 保証とサポート
The SPL 2Control Monitor Controller comes with a limited warranty. For specific warranty terms, duration, and conditions, please refer to the documentation provided with your purchase or visit the official SPL website. For technical support, service, or inquiries, please contact the manufacturer, Sound Performance Lab, or your authorized dealer.
メーカー: Sound Performance Lab


