導入
Welcome to your new Relaxdays Raised Bed with Greenhouse. This manual provides detailed instructions for the assembly, operation, and maintenance of your garden plant bed. Please read all instructions carefully before use to ensure safe and correct setup and operation.
安全に関する注意事項
- 窒息の危険を防ぐため、小さな部品や梱包材は子供の手の届かないところに保管してください。
- Ensure all screws and fasteners are securely tightened during assembly. Periodically check for tightness.
- Do not climb on or lean heavily on the raised bed or greenhouse structure.
- Place the raised bed on a level and stable surface to prevent tipping.
- Exercise caution when handling metal edges during assembly to avoid cuts. Wearing gloves is recommended.
- The greenhouse cover is designed for plant protection; it is not intended for human or animal shelter.
パッケージ内容
組み立てを始める前に、下記のすべての部品が揃っていて損傷がないことをご確認ください。部品が不足または損傷している場合は、カスタマーサポートまでご連絡ください。
- Raised bed panels and corner pieces
- Greenhouse frame components
- Greenhouse plastic cover
- 取り付け金具(ネジ、ナット、ワッシャー)
- 組み立て説明書(このマニュアル)

Image: Individual components of the raised bed frame before assembly.
組み立て手順
正しく組み立てるために、以下の手順を慎重に実行してください。特定の手順では2人で作業することをお勧めします。
Step 1: Assemble the Raised Bed Frame
- Unpack all metal panels and corner pieces.
- Connect the side panels to the corner pieces using the provided screws and nuts. Ensure all connections are firm.
- Continue connecting panels until the rectangular raised bed frame is complete. Do not overtighten screws initially, allow for minor adjustments.
- Once all panels are connected, tighten all screws securely.
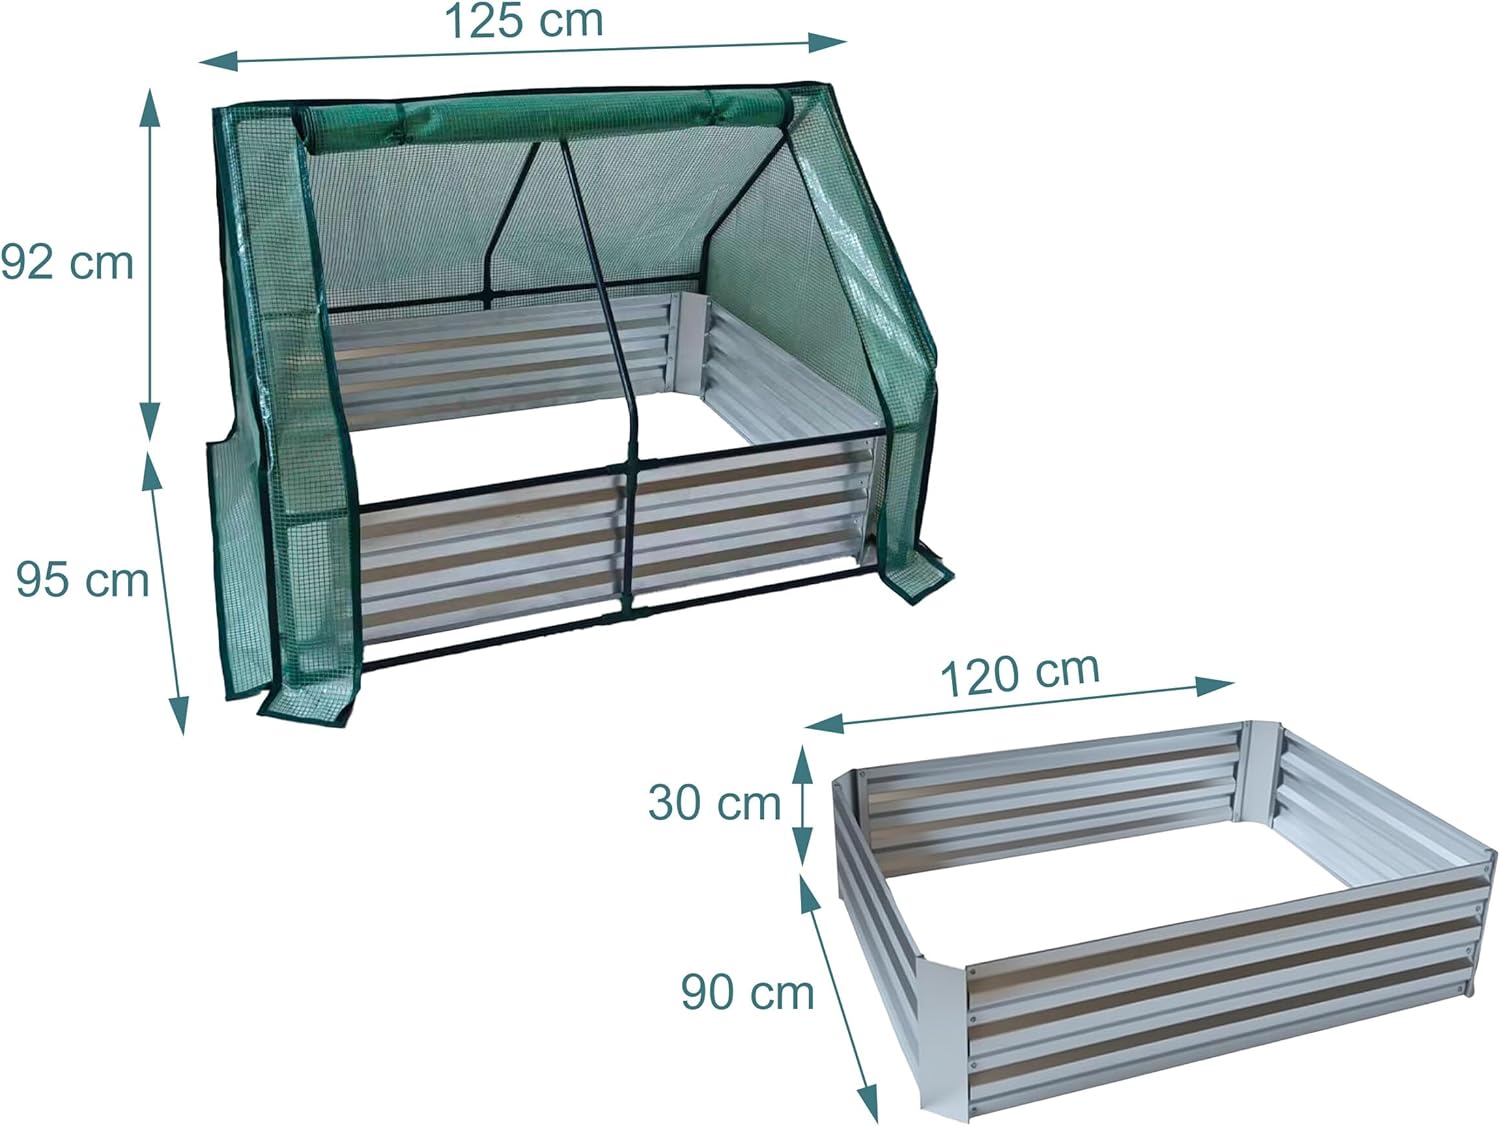
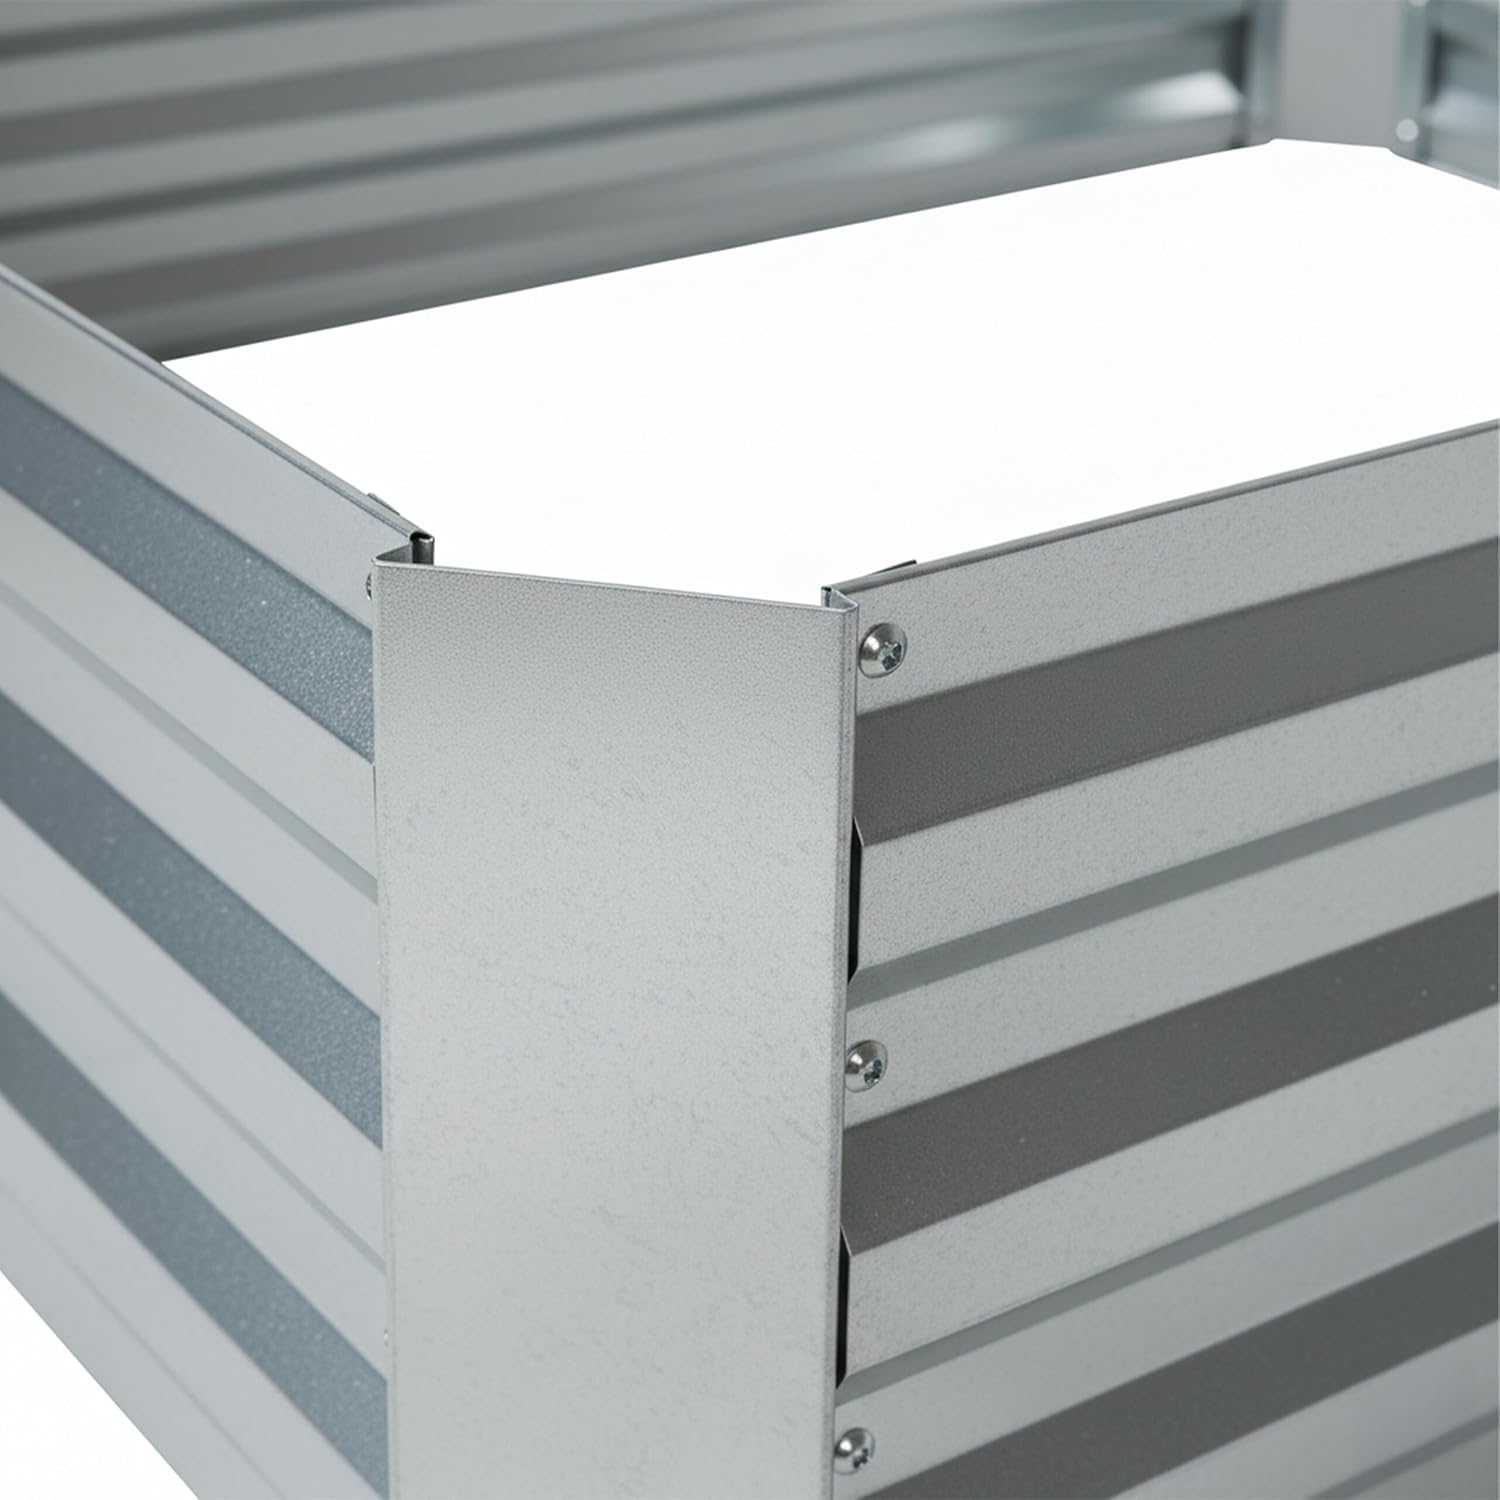
Image: Detail of how the metal panels connect at the corner of the raised bed.
Step 2: Attach the Greenhouse Structure
- Assemble the metal frame for the greenhouse cover according to the diagram in your package.
- Position the assembled greenhouse frame over the raised bed.
- Secure the greenhouse frame to the raised bed using the designated attachment points and hardware.
Step 3: Install the Greenhouse Cover
- Carefully drape the plastic greenhouse cover over the assembled greenhouse frame.
- Ensure the cover fits snugly and is properly aligned.
- Secure the cover to the frame using any integrated ties, clips, or fasteners to prevent it from being dislodged by wind.

Image: The fully assembled raised bed with greenhouse, ready for planting.
画像: クローズアップ view of the durable mesh material used for the greenhouse cover.
操作手順
植付
Fill the raised bed with appropriate soil mix for your chosen plants. The design without a base facilitates water drainage and allows direct contact with the ground, which can be beneficial for certain root systems. Plant your desired flowers, herbs, or vegetables, ensuring adequate spacing.
換気と温度制御
The greenhouse cover creates optimal growing conditions by retaining heat and humidity. On warm days, partially or fully open the greenhouse cover to provide ventilation and prevent overheating. Close the cover during cooler temperatures or at night to protect plants from cold and pests.
水やり
Water plants as needed, considering the increased humidity within the greenhouse. The cover can be easily lifted or rolled up to facilitate watering.

Image: A user watering plants inside the raised bed, demonstrating easy access with the greenhouse cover.
メンテナンス
- クリーニング: Periodically clean the greenhouse cover with mild soap and water to ensure maximum light penetration. Rinse thoroughly.
- 検査: Regularly inspect the metal frame for any signs of rust or damage. Check all screws for tightness and re-tighten if necessary.
- 冬の保管: In areas with harsh winters, consider disassembling the greenhouse cover and storing it indoors to prolong its lifespan. The raised bed frame can typically remain outdoors.
- 害虫駆除: While the greenhouse offers some protection, regularly check plants for pests and address any infestations promptly.
トラブルシューティング
| 問題 | 考えられる原因 | 解決 |
|---|---|---|
| Greenhouse cover not fitting properly | Incorrect assembly of the frame; cover not aligned. | Review assembly instructions for the greenhouse frame. Adjust cover alignment. |
| Water pooling in the raised bed | Soil compaction; poor drainage. | Ensure the soil mix allows for good drainage. The raised bed is designed without a base to prevent waterlogging. |
| Plants wilting or showing signs of stress | Lack of ventilation; too much heat; insufficient water. | Open the greenhouse cover for ventilation on warm days. Check soil moisture and water as needed. |
| Raised bed feels unstable | Screws are loose; uneven ground. | Tighten all assembly screws. Ensure the raised bed is placed on a firm, level surface. |
仕様
| 特徴 | 詳細 |
|---|---|
| モデル番号 | 10051787_55 |
| Total Dimensions (H x W x D) | Approx. 92 x 125 x 95 cm (36.22"H x 49.21"W x 37.4"D) |
| Raised Bed Dimensions (H x W x D) | 約30 x 120 x 90 cm |
| 材料 | 70% Galvanized Iron, 30% Plastic |
| 色 | 銀 |
| 取り付けタイプ | 立っている |
| アイテム重量 | 8.24キログラム |
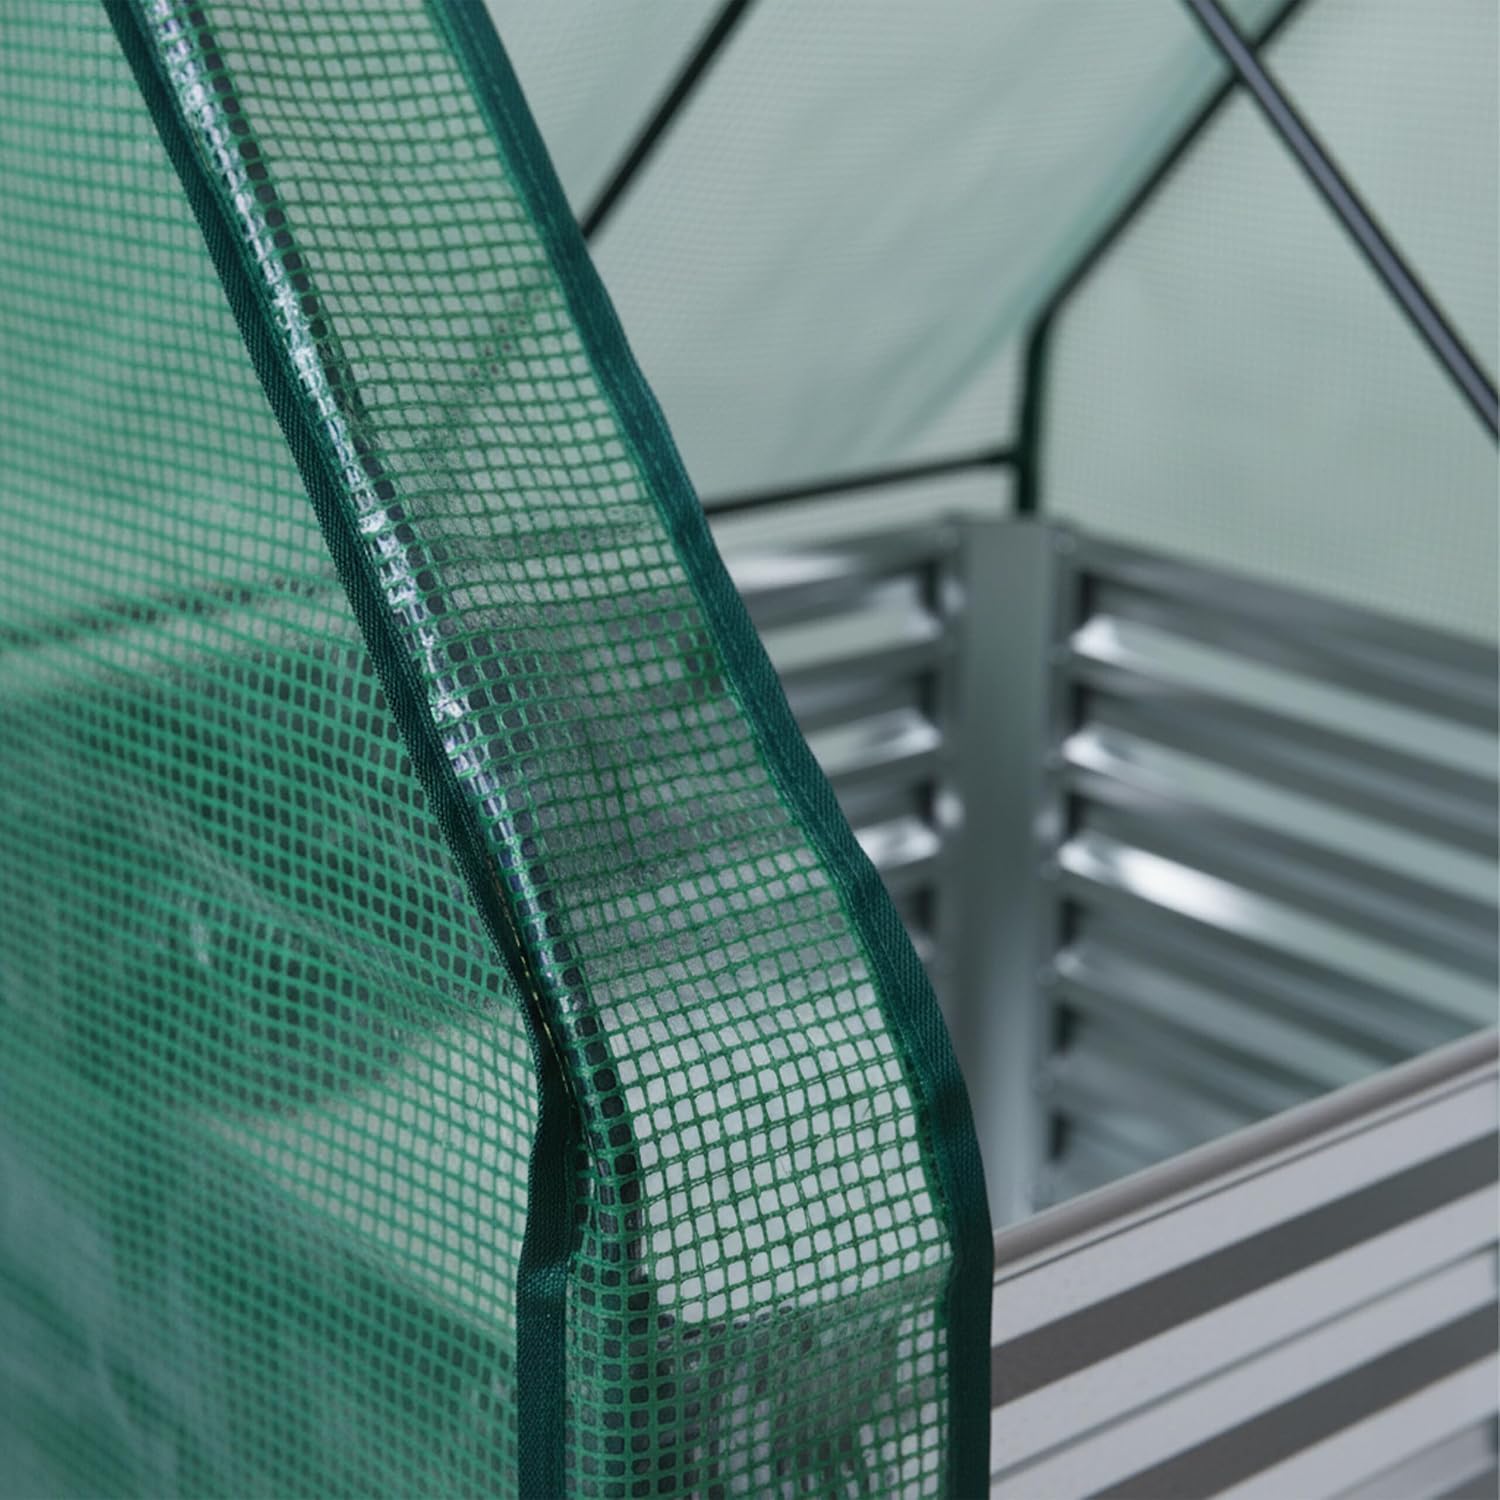
Image: Dimensional diagram illustrating the height, width, and depth of the raised bed and greenhouse.
保証とサポート
This product is manufactured to high-quality standards. For any questions regarding assembly, operation, or if you encounter any issues, please refer to the retailer's return policy or contact the manufacturer's customer support channels. Please retain your proof of purchase for warranty claims, if applicable.