
1. はじめに
This manual provides comprehensive instructions for the installation, operation, and maintenance of your GLEDOPTO ESP32 WLED Digital LED Controller. This advanced controller is designed to manage addressable LED strips, offering dynamic lighting effects, sound reactivity, and smart home integration. Please read this manual carefully before use to ensure proper functionality and safety.

Image 1.1: GLEDOPTO ESP32 WLED Digital LED Controller overview.
2. 安全情報
- 入力ボリュームを確認するtage (DC 5-12-24V) matches your power supply and LED strip requirements. Incorrect voltagデバイスや LED ストリップが損傷する可能性があります。
- Do not exceed the total output current of 15A or 10A per channel. Overloading can cause overheating and damage.
- Install the controller in a dry environment, suitable for indoor use only. Avoid exposure to moisture or extreme temperatures.
- 接続やメンテナンスを行う前に、電源を切ってください。
- お子様の手の届かない場所に保管してください。
3. パッケージ内容
パッケージにすべてのアイテムが含まれていることを確認します。
- 1 x GLEDOPTO ESP32 WLED Digital LED Controller (Model: GL-C-016WL-D)
- 1 x 3cm Trigger (likely a small wire or component for specific functions)
- ユーザーマニュアル x 1
4.製品オーバーview
The GLEDOPTO ESP32 WLED Digital LED Controller is a versatile device for controlling addressable LED strips. Key features include:
- ESP32チップ: High-performance processing and stable Wi-Fi connectivity.
- WLED Integration: Direct control via the WLED application, no gateway required.
- ダイナミックライティング: Over 100 built-in dynamic modes and customizable effects.
- 内蔵マイク: Enables sound-reactive lighting effects.
- USB-C UART Interface: For easy firmware updates.
- 幅広い互換性: Supports various addressable LED strip types (e.g., WS2811, WS2812, SK6812, TM1814, WS2813, WS2815).
- スマートホーム対応: Amazon Alexaと互換性があります。

Image 4.1: Supported Addressable LED Strip Types.
5. セットアップとインストール
5.1 LEDストリップの配線
Follow these steps to connect your addressable LED strip to the controller:
- Identify the data (DAT), ground (GND), and power (V+) wires of your LED strip.
- Locate the quick-connect terminals on the GLEDOPTO controller.
- Open the connector upwards: Gently lift the lever on the terminal block to open the wire entry point.
- ワイヤーを挿入します。 Carefully insert the stripped end (10mm stripping length recommended) of the LED strip wire into the corresponding terminal (V+, GND, Data). Ensure a secure connection.
- 押す: Push the lever back down to secure the wire in place.
- Repeat for all necessary connections (V+, GND, Data).
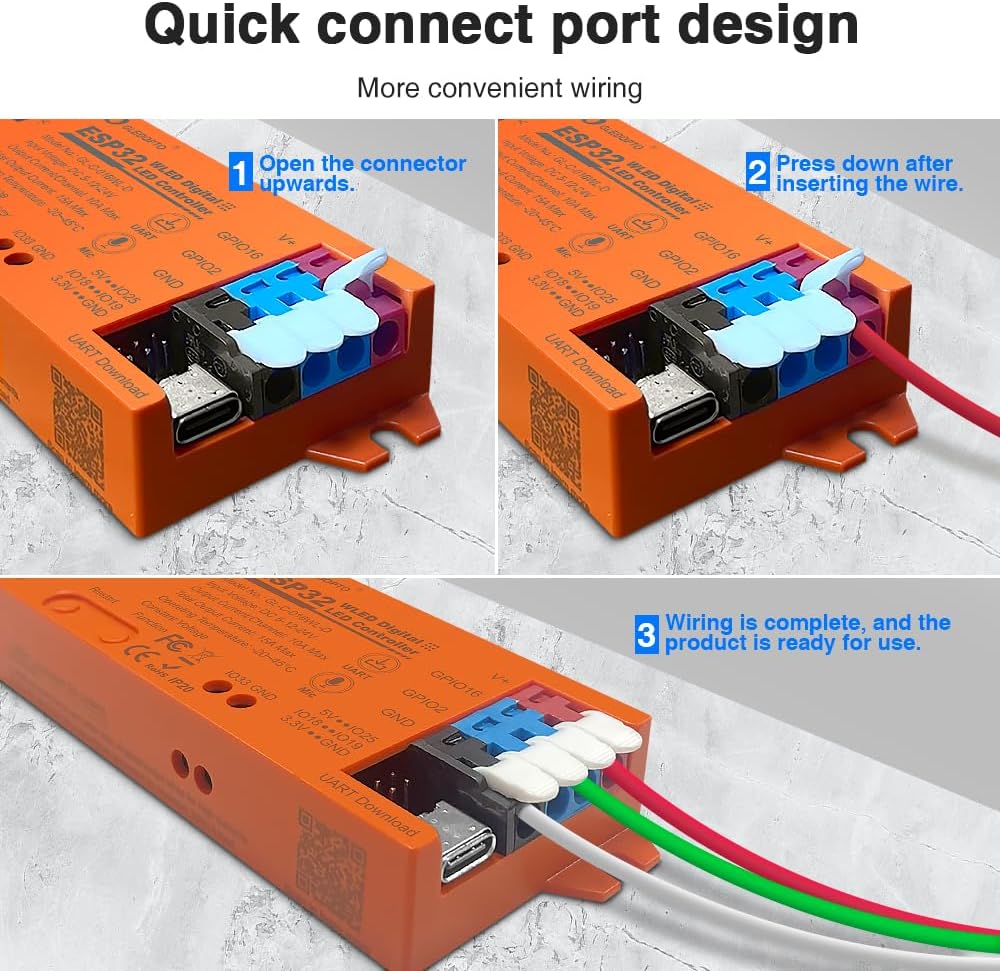
Image 5.1: Quick Connect Port Wiring Guide.
5.2電源接続
Connect a DC 5-12-24V power supply to the controller's input terminals. Ensure the polarity is correct (V+ to V+, GND to GND). The controller supports a total output current of up to 15A, with a maximum of 10A per channel. Select a power supply appropriate for your LED strip's total power consumption.
6. 操作手順
6.1 WLED Application Control
The GLEDOPTO controller integrates seamlessly with the WLED application, allowing for intuitive control via Wi-Fi. No additional gateway is required.
- Download WLED App: 検索する "WLED" in your smartphone's app store and install it.
- Connect to Controller's Wi-Fi: Power on the controller. On your smartphone, go to Wi-Fi settings and connect to the Wi-Fi network broadcast by the controller (usually named "WLED-AP" followed by some numbers).
- ネットワークを構成します: Open the WLED app. It should detect the controller. Follow the in-app instructions to connect the controller to your home Wi-Fi network.
- 照明の制御: Once connected to your home network, you can use the WLED app to select from over 100 dynamic modes, customize colors, brightness, and create personalized lighting effects.

Image 6.1: WLED App Control Interface.
6.2 マイク機能
The built-in sensitive microphone allows the LED lights to react to ambient sounds, especially music. This creates dynamic lighting effects that synchronize with audio, enhancing your environment.
- To activate sound-reactive modes, select the appropriate effect within the WLED application.
- Ensure the microphone is not obstructed for optimal performance.

Image 6.2: Microphone Function in action.
6.3 Firmware Updates (UART)
The controller features a USB-C UART interface for convenient firmware updates, ensuring your device always has the latest features and improvements.
- Connect the controller to your computer using a USB-C cable.
- Access the UART download function (refer to WLED documentation for specific software and procedures).
- Download the latest firmware (e.g., WLED_x.xx.x_ESP32.bin) and flash it to the controller.

Image 6.3: USB-C Interface for Firmware Updates.

Image 6.4: UART Download via Type-C Port.
6.4 スマートホーム統合
The controller is highly compatible with Amazon Alexa, allowing you to control your lighting with voice commands. Refer to the WLED documentation and Alexa app for setup instructions.
7. 仕様
| 特徴 | 仕様 |
|---|---|
| モデル番号 | GL-C-016WL-D |
| 入力ボリュームtage | DC 5-12-24V |
| 出力電流/チャネル | 最大10A |
| 総出力電流 | 最大15A |
| 動作温度 | -20〜45℃ |
| 通信プロトコル | Wi-Fi |
| 推奨ワイヤタイプ | 0.34-4mm²(22-12AWG) |
| 材料 | 耐火PC |
| 剥ぎ取り長さ | 10mm |
| 正味重量 (N.W.) | 49.3グラム |
| 総重量(GW) | 57.3グラム |
| 寸法 | 108x45x18mm |
| 制御方法 | Application (WLED App), Amazon Alexa |
| Supported LED Strips | WS2811, WS2812, WS2813, SK6812, TM1814, WS2815, etc. |

Image 7.1: GLEDOPTO Controller Product Parameters.
8。 トラブルシューティング
If you encounter issues with your GLEDOPTO ESP32 WLED Digital LED Controller, refer to the following common problems and solutions:
- LEDが点灯しない:
- Check power supply connection and ensure correct voltage (DC 5-12-24V) and polarity.
- Verify LED strip wiring (Data, V+, GND) is correct and secure.
- Ensure the LED strip type selected in the WLED app matches your physical strip.
- Confirm the power supply provides sufficient current for your LED strip length.
- Wi-Fiに接続できません:
- Ensure the controller is powered on and within range of your Wi-Fi router.
- コントローラーを再起動してみてください。
- If connecting to the controller's access point (AP mode), ensure your phone is disconnected from other Wi-Fi networks.
- Verify correct Wi-Fi credentials if connecting to your home network.
- Lights are flickering or behaving erratically:
- 配線接続が緩んでいないか確認してください。
- Ensure the power supply is stable and adequate for the number of LEDs.
- Consider adding a capacitor across the power lines near the LED strip if flickering persists, especially with long strips.
- Verify the data line is not too long or experiencing interference.
- Microphone function not responding:
- Ensure a sound-reactive mode is selected in the WLED app.
- Check that the microphone port on the controller is not obstructed.
- オーディオソースの音量を上げます。
9. メンテナンス
- クリーニング: コントローラーの清掃には、柔らかく乾いた布をご使用ください。液体クリーナーや溶剤は使用しないでください。
- 環境: Keep the controller in a clean, dry, and well-ventilated area. Avoid dusty or humid environments.
- ファームウェア: Regularly check for and install firmware updates via the USB-C UART interface to ensure optimal performance and access to new features.
10. 保証とサポート
GLEDOPTO products are designed for reliability and performance. For warranty information, technical support, or service inquiries, please contact your retailer or visit the official GLEDOPTO website. Please have your model number (GL-C-016WL-D) and purchase information ready when contacting support.