
導入
Thank you for choosing the LIORQUE Wireless Weather Station YGH6208. This device provides accurate indoor and outdoor temperature and humidity readings, weather forecasts, and features a DCF radio-controlled clock with alarm functions. This manual will guide you through the setup, operation, and maintenance of your weather station.
パッケージ内容
- 1 x LIORQUE Wireless Weather Station (Main Unit)
- 1x屋外センサー
- 3 x AAA Batteries (for Main Unit)
- 2 x AAA Batteries (for Outdoor Sensor)
- ユーザーマニュアル (本書) x 1
製品終了view
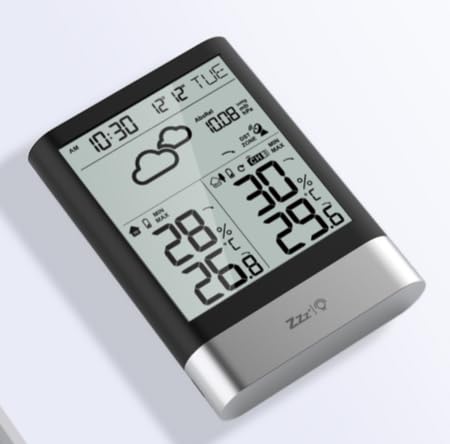
画像1: LIORQUE Wireless Weather Station Main Unit. This image shows the front view of the main display unit, highlighting its LCD screen and compact design.
本体の特徴:
- 4.3-inch LCD screen with backlight
- 室内の温度と湿度の表示
- 屋外の温度と湿度の表示
- 天気予報アイコン
- DCF radio-controlled clock with manual setting option
- Double alarm clock with snooze function
- Calendar and day of the week display (7 languages)
- Max/Min temperature and humidity records
- Air pressure display and weather trend
- 12/24時間表示
屋外センサーの機能:
- Wireless transmission up to 100m (open area)
- 温度と湿度の測定
- Supports hanging or standing placement
- Data updated every 30 seconds
- Supports up to 3 sensors (one included)
設定
1. バッテリーの取り付け
- 屋外センサー: Open the battery compartment cover on the back of the outdoor sensor. Insert 2 x AAA batteries, ensuring correct polarity (+/-). Close the cover.
- 本体: Open the battery compartment cover on the back of the main unit. Insert 3 x AAA batteries, ensuring correct polarity (+/-). Close the cover.
- The main unit will power on and display indoor readings.
2. センサーのペアリング
After installing batteries in both units, the main unit will automatically search for the outdoor sensor. The outdoor temperature and humidity should appear on the main unit's display within a few minutes. If the outdoor readings do not appear:
- Ensure both units are within range (up to 100m in open air).
- Press the "TX" button inside the outdoor sensor's battery compartment to manually send a signal.
- On the main unit, press and hold the "CHANNEL" button to initiate a manual search for the sensor.
3. 初期設定(時間、日付、単位)
The weather station will attempt to synchronize with the DCF radio signal for automatic time setting. This may take several hours, especially in areas with weak signals. You can manually set the time and date if needed.
- 手動時間設定: Press and hold the "MODE" button to enter time setting mode. Use the "UP" and "DOWN" buttons to adjust values and "MODE" to confirm and move to the next setting (e.g., 12/24 hour format, hour, minute, year, month, day, language for day of week).
- 温度単位: 「°C/°F」ボタンを押すと摂氏と華氏を切り替えます。
- 空気圧単位: Press the "BARO" button to cycle through air pressure units (e.g., hPa, inHg).
操作手順
情報を表示
The 4.3-inch LCD screen displays various information:
- 日時: 現在の時刻、日付、曜日。
- 屋内での読書: 現在の室内温度と湿度。
- 屋外での読書: Current outdoor temperature and humidity from the connected sensor.
- 天気予報: 予測される気象状況を示すアイコン (例: 晴れ、曇り、雨)。
- 空気圧: Current atmospheric pressure and trend.
- バックライト: The screen backlight activates with a light touch and returns to normal brightness after 10 seconds to conserve battery.
目覚まし時計機能
The weather station features a double alarm clock with snooze.
- アラームの設定: 「アラーム」ボタンを押すと view Alarm 1. Press "ALARM" again to view Alarm 2. Hold "ALARM" to enter alarm setting mode. Use "UP" and "DOWN" to adjust the hour and minute, and "ALARM" to confirm.
- アラームの有効化/無効化: その間 viewing an alarm, press "UP" to toggle it on or off. An alarm icon will appear when active.
- スヌーズ機能: When an alarm sounds, press any button (except "ALARM OFF") to activate snooze. The alarm will sound again after a set interval. Press "ALARM OFF" to stop the alarm completely.
最大および最小レコード
The weather station records the maximum and minimum indoor/outdoor temperature and humidity values.
- Press the "MAX/MIN" button once to display maximum recorded values.
- Press "MAX/MIN" again to display minimum recorded values.
- Press "MAX/MIN" a third time to return to current readings.
- To clear records, hold the "MAX/MIN" button while viewレコードを作成します。
メンテナンス
- バッテリー交換: ディスプレイに電池残量低下のインジケーターが表示されたら、本体と屋外センサーの両方の電池を交換してください。必ずすべての電池を同時に交換してください。
- クリーニング: ディスプレイと本体の表面を柔らかくて乾いた布で拭いてください。amp 布で拭いてください。研磨剤や溶剤は使用しないでください。
- 屋外センサーの配置: For optimal performance and longevity, install the outdoor sensor in a shaded area, protected from direct sunlight and rain. Ensure it is within the 100m wireless range of the main unit.
トラブルシューティング
| 問題 | 考えられる解決策 |
|---|---|
| 屋外の温度・湿度は表示されません。 |
|
| 時間の表示が正しくありません。 |
|
| ディスプレイが暗いか空白です。 |
|
| 天気予報は不正確なようです。 |
|
仕様
- モデル: YGH6208
- ブランド: リオルク
- 表示タイプ: 液晶
- 電源(本体): 3 x AAA電池(付属)
- 電源(屋外センサー): 2 x AAA電池(付属)
- 無線範囲: 最大100m(オープンエリア)
- 温度精度: ±0.5 °C
- センサー技術: Funk (Wireless)
- 特別な機能: DCF Radio Clock, Alarm, Snooze, Weather Forecast, Max/Min Records, Backlight
- 含まれるコンポーネント: Weather Station Main Unit, Outdoor Sensor
保証とサポート
LIORQUE products are designed for reliability and performance. For warranty information or technical support, please refer to the contact details provided with your purchase or visit the official LIORQUE webサイトでご確認ください。保証請求のために購入証明書を保管してください。