1. はじめに
This manual provides detailed instructions for the installation, operation, maintenance, and troubleshooting of your JOMISE A80 Pro 4K+4K Dash Cam. Please read this manual thoroughly before use to ensure proper functionality and to maximize your device's performance.
The JOMISE A80 Pro is a high-performance dual dash camera system featuring dual 4K recording for both front and rear views, enhanced night vision with STARVIS 2 technology, Ethernet-driven rear camera processing, and lightning-fast WiFi 6 connectivity. It includes a responsive touchscreen, built-in GPS, G-Sensor for incident detection, and supports 24-hour parking mode with up to 1TB storage capacity.
2. 箱の中身
Carefully unpack your JOMISE A80 Pro Dash Cam and ensure all items listed below are present:
- 1 x JOMISE A80 Pro 4K Dash Cam (with 64GB Card)
- カーチャージャー付き1x11.48ft電源ケーブル
- 1 x Bracket built-in GPS
- 1 x 4K In-car Rear Camera
- 1x18.04ftリアカメラケーブル
- 2 x静電ステッカー
- 1 x Mount Tool
- ユーザーマニュアル x 1

Figure 1: JOMISE A80 Pro Package Contents
3. セットアップとインストール
3.1.インストールの準備
- Clean the windshield area where the front dash cam will be mounted. Ensure it is free of dust and grease for optimal adhesive performance.
- Apply an electrostatic sticker to the windshield first, then attach the dash cam mount to the sticker. This allows for easier repositioning and removal without leaving residue.
- Insert the provided 64GB MicroSD card into the front dash cam.
3.2. Front Dash Cam Installation
- Attach the GPS bracket to the main dash cam unit.
- Peel off the protective film from the adhesive on the GPS bracket.
- Mount the front dash cam to the cleaned area on your windshield, ideally behind the rearview 邪魔にならないようにミラーを viewレンズがクリアであることを確認してください view これからの道の。
- Connect the power supply cable to the front dash cam and route it along the windshield edge, down the A-pillar, and to your car's 12V power outlet. Use the provided mount tool to tuck the cable neatly under the trim.

Figure 2: Front Dash Cam Mounted on Windshield
3.3. リアカメラの取り付け
- Connect the rear camera cable to the rear camera unit.
- リアカメラをリアガラスに取り付けて、クリアな視界を確保します。 view of the road behind. The 360° adjustable rear module allows for flexible positioning.
- Route the rear camera cable along the headliner and side pillars to the front dash cam. Carefully tuck the cable under the vehicle's interior trim using the mount tool to keep it hidden and secure. Avoid routing cables over airbags.
- リアカメラのケーブルをフロントダッシュカメラの指定されたポートに接続します。
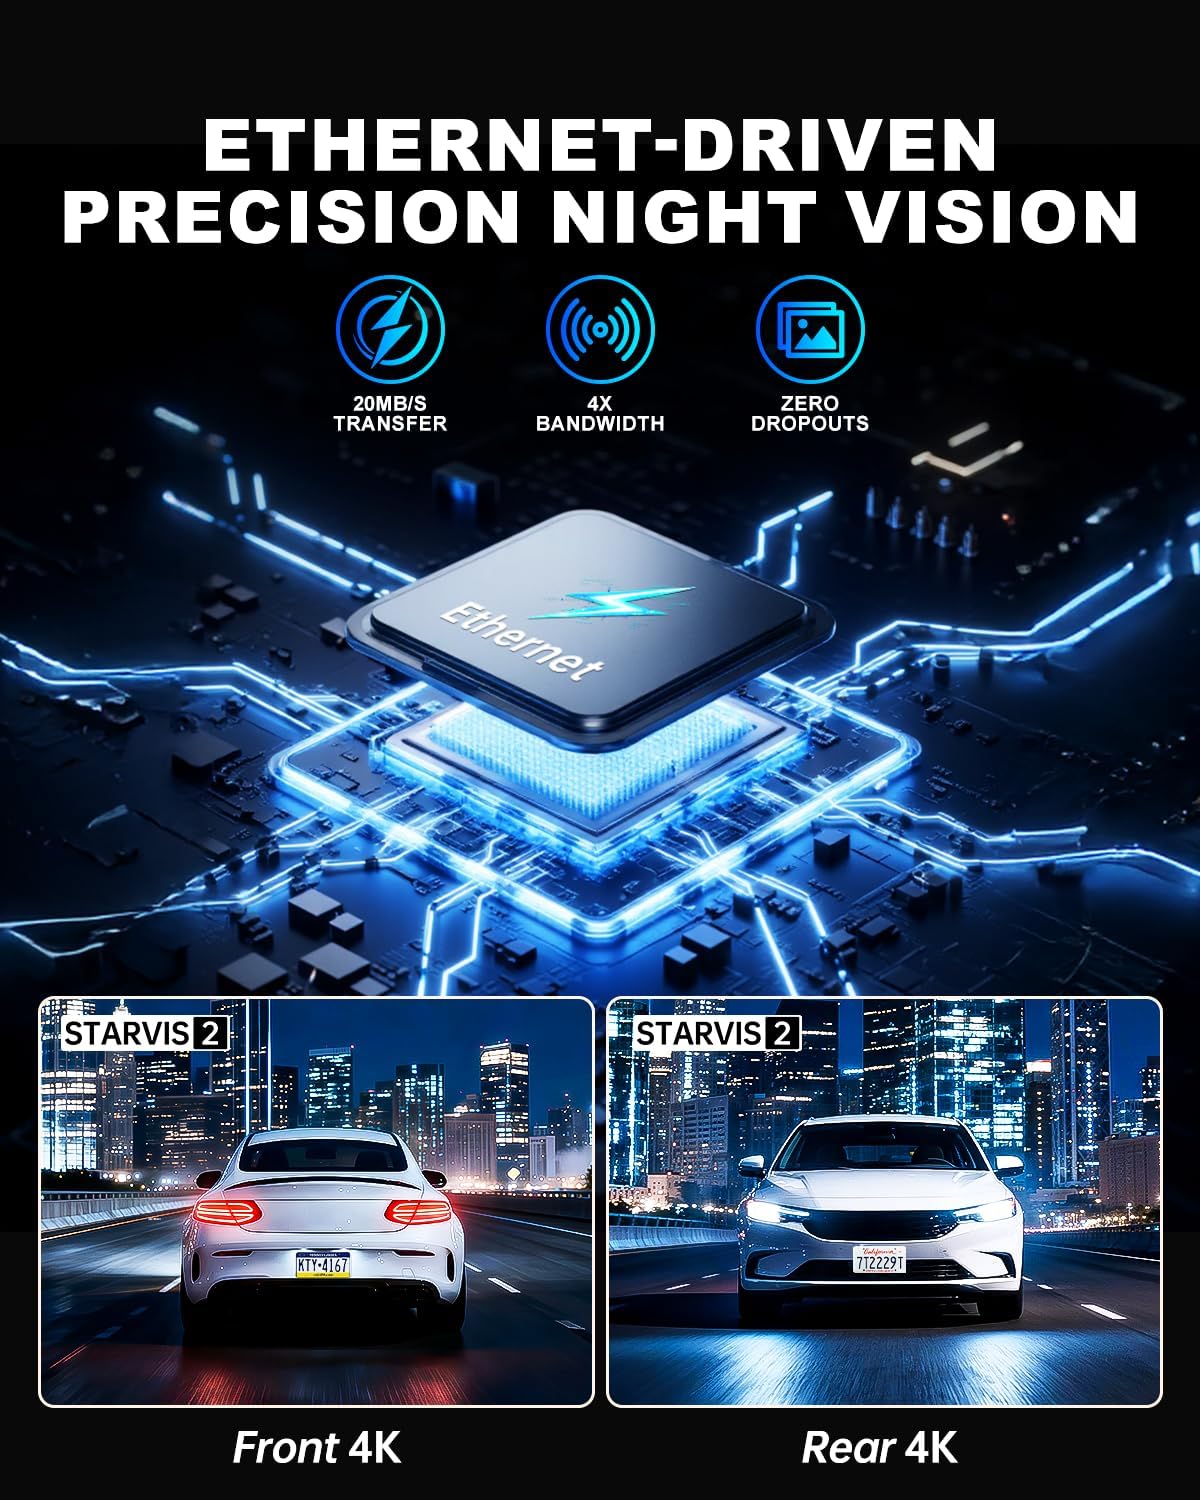
Figure 3: Rear Camera Mounted on Rear Windshield
4. 操作手順
4.1. 電源のオン/オフ
車のイグニッションをオンにすると、ダッシュカムは自動的に電源が入り、録画を開始します。イグニッションをオフにすると、自動的に電源が切れます。
4.2. タッチスクリーン操作
The JOMISE A80 Pro features a responsive touchscreen for intuitive control. Navigate through menus, adjust settings, and review フーtage directly on the device with quick 0.2-second response times.

図4: タッチスクリーンインターフェース
4.3. Mobile App & WiFi 6 Connectivity
Download the official JOMISE mobile app to connect to your dash cam via WiFi 6. This allows for instant live previews, quick downloading of 4K video files (up to 20MB/s), and easy sharing of footagスマートフォンに。
Video 1: A80 Pro WiFi Connection Guide (Official JOMISE-Direct)

Figure 5: Fast WiFi 6 File 移行
5. 主な特徴
5.1. Dual 4K Recording & STARVIS 2 Night Vision
The A80 Pro captures video in stunning 3840×2160P dual 4K resolution for both front and rear cameras. Equipped with STARVIS 2 low-light imaging, it delivers clear, vivid footage in challenging light conditions, including dark roads, rainy nights, and tunnels, ensuring critical details are captured.

Figure 6: Dual 4K and STARVIS 2 Night Vision
5.2. Ethernet Rear Camera Processing
Unlike traditional AHD systems, the A80 Pro utilizes an Ethernet-based system for its rear camera. A dedicated processor in the rear camera handles footage independently, allowing the main processor to focus on front camera imaging. This results in superior 4K image performance for both cameras and improved system responsiveness.

Figure 7: Ethernet Rear Camera Processing
5.3. 24-Hour Parking Mode & G-Sensor
With the optional hardwire kit (sold separately), the A80 Pro provides 24-hour parking monitoring. The built-in G-Sensor detects impacts instantly, automatically locking the video to protect evidence whether your vehicle is driving or parked. Time-lapse recording is also available to compress hours into minutes, saving storage space while maintaining continuous surveillance.
図8: 24時間駐車監視システム
5.4.内蔵GPS
The integrated GPS module accurately tracks your vehicle's route and speed. This data is embedded in your video footage, providing crucial evidence for accident reconstruction or documenting your travels.

Figure 9: Accurate Route & Speed Tracking
5.5. Massive 1TB Storage Capacity
The JOMISE A80 Pro supports MicroSD cards up to 1TB, providing extensive storage for long drives and continuous recording without frequent overwriting. A 64GB card is included to get you started immediately.
Figure 10: 1TB Storage Capacity
6. メンテナンス
6.1. 一般的なケア
- Keep the dash cam lenses clean using a soft, lint-free cloth. Avoid abrasive materials that could scratch the lens.
- Ensure the dash cam is securely mounted to prevent vibrations or detachment during driving.
- デバイスを長時間極端な温度にさらさないでください。
6.2. メモリーカード管理
- Use a Class 10 or higher MicroSD card for smooth 4K recording.
- Regularly format the memory card (e.g., once a month) to prevent recording issues and ensure optimal performance. This can typically be done through the dash cam's settings menu.
7。 トラブルシューティング
7.1. No Power Issues
If your A80 Pro Dash Cam is not powering on, check the following:
- Ensure the power cable is securely connected to both the dash cam and the vehicle's 12V power outlet.
- Verify that the vehicle's 12V power outlet is functioning correctly (e.g., by testing with another device).
- Check the fuse in your vehicle's fuse box if the 12V outlet is not receiving power.
Video 2: Troubleshooting A80 Pro Dash Cam No Power Issues (Official JOMISE-Direct)
7.2. WiFi接続の問題
If you experience difficulty connecting to the dash cam via WiFi:
- Ensure WiFi is enabled on your dash cam through the settings menu.
- スマートフォンとドライブレコーダーの両方を再起動します。
- Verify that you are connecting to the correct WiFi network broadcasted by the dash cam (SSID usually starts with
Ask a question about this manual
Ask about setup, troubleshooting, compatibility, parts, safety, or missing instructions. Manuals+ will review the question and use this page’s manual context to help answer it.