
Prexiso 5-in-1 Stud Finder
PREXISO 5-in-1 Stud Finder with Laser Level & Ultrasound Distance Measure User Manual
Model: 5-in-1 Stud Finder
導入
The PREXISO 5-in-1 Multi-Purpose Detector is a versatile tool designed to assist with various home improvement and construction tasks. It combines the functions of a stud finder, metal detector, AC wire detector, laser level, and ultrasonic distance measurer. This manual provides detailed instructions for safe and effective use of the device.
安全情報
- レーザーの安全性: This product is a Class II laser with an output power less than 1mW. Avoid direct eye exposure to the laser beam.
- 鋭い針: The auxiliary laser marking stud button features sharp needles. Exercise caution when pressing this button to prevent injury. These needles are intended for use on wallpaper and wooden surfaces only. Do not use on stone, metal walls, or low-density plasterboard.
- ACワイヤ検出: Always be aware of the potential presence of live AC wires behind walls. The device will provide an audible and visual warning when AC wires are detected. Take appropriate precautions to avoid electrical hazards.
- 環境要因: Increased moisture on wall surfaces can affect the device's conductivity and may lead to inaccurate readings. Ensure surfaces are dry for optimal performance.
- Ultrasonic Measurement Accuracy: The ultrasonic distance measure function is intended for rough reference only and may not be as accurate as a laser distance measure.
製品終了view
Familiarize yourself with the components of your PREXISO 5-in-1 Multi-Purpose Detector:
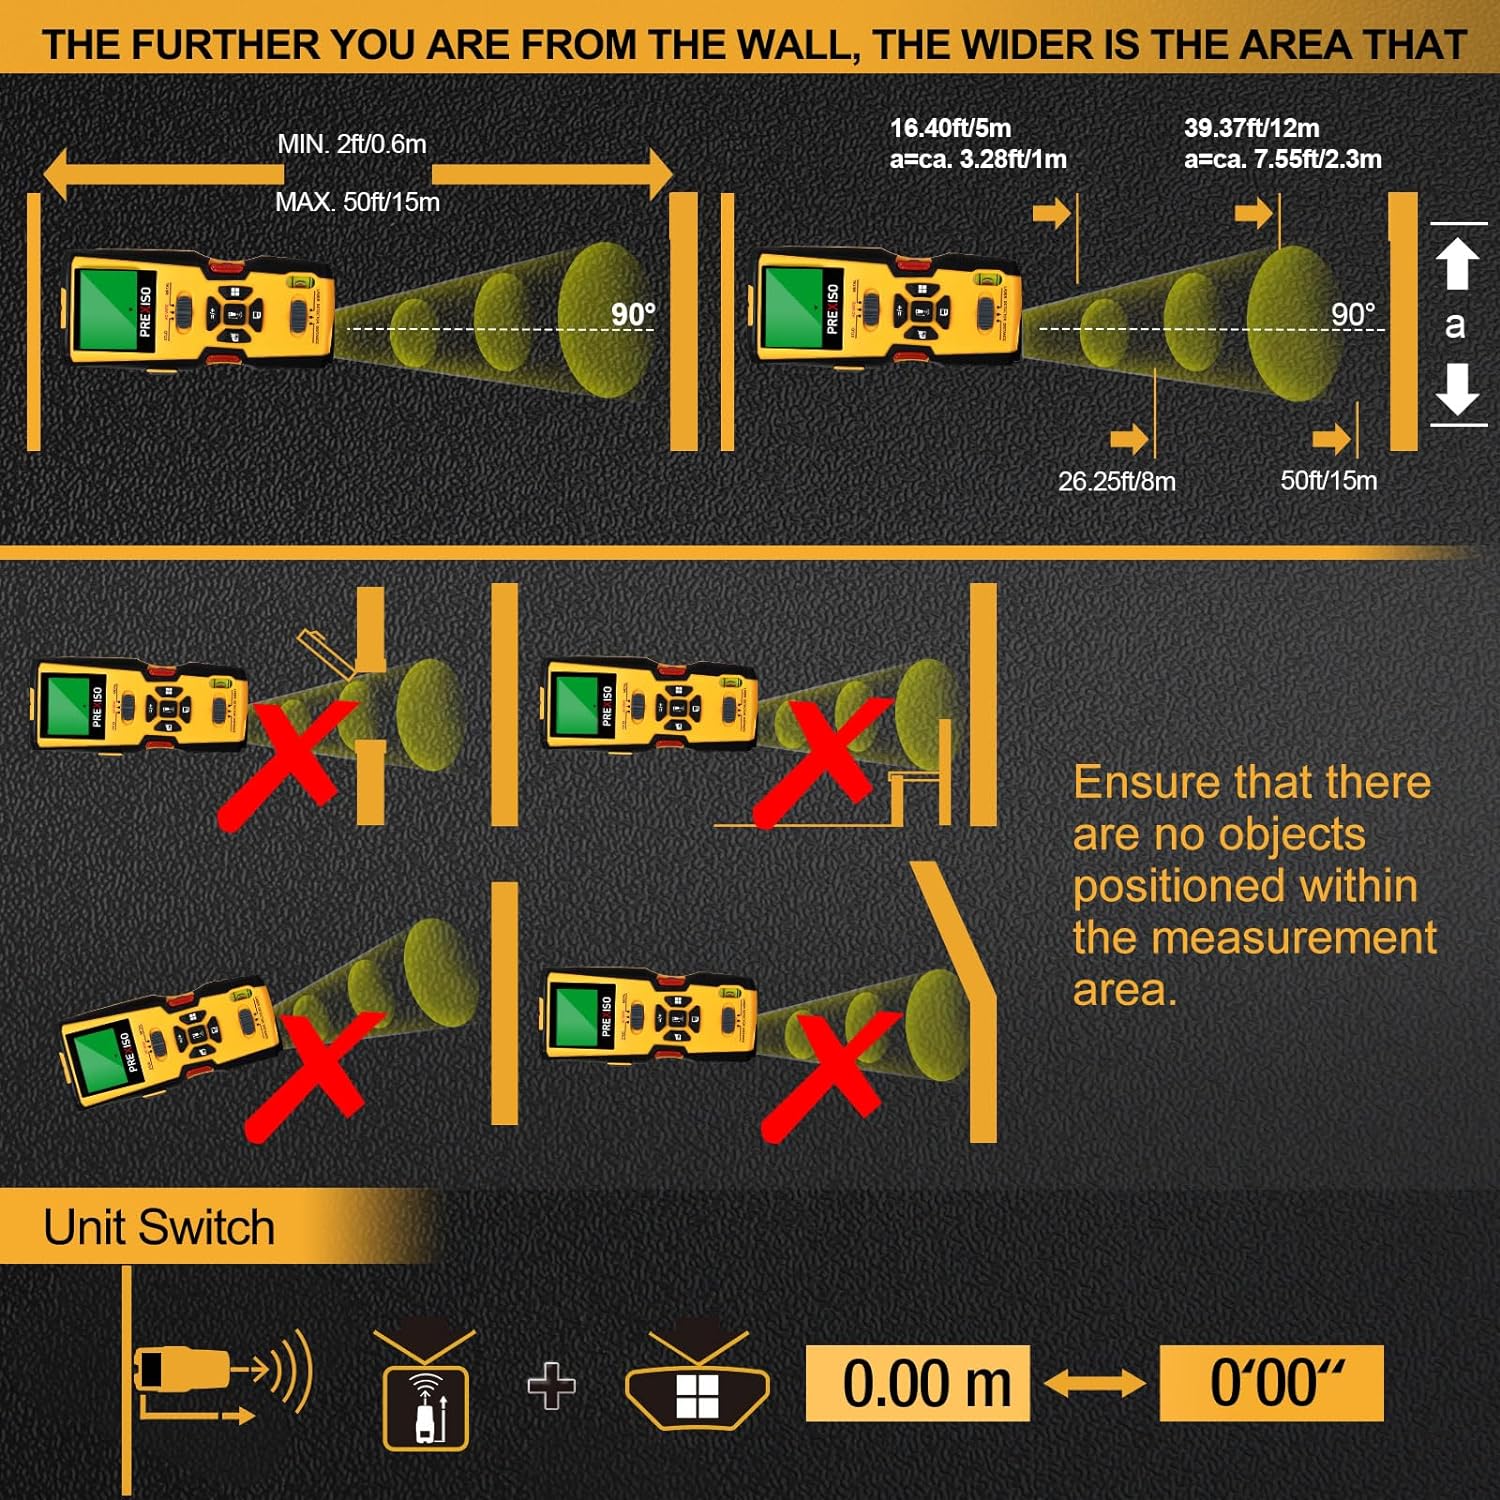
Figure 1: PREXISO 5-in-1 Stud Finder Component Diagram
- LCDディスプレイ: Shows detection results, measurements, and mode indicators.
- 材質スイッチ(スタッド/ACワイヤ/金属): Selects the detection mode.
- 機能スイッチ(レーザー/検出器/距離): Selects the primary function.
- Stud Button: Activates the stud marking needles (use with caution).
- 超音波測定ボタン: For distance, area, volume, memory, and addition calculations.
- 水準器用気泡管: 水平出し用。
- レーザービーム出口: Emits the laser line for marking.
- 超音波送信機/受信機: For ultrasonic distance measurements.
- Contact Pads: Located on the back for detection.
- バッテリーコンパートメント: 9Vバッテリーを収納します。
設定
バッテリーの取り付け
- デバイスの背面にあるバッテリー収納部を見つけます。
- 電池カバーを開きます。
- 正しい極性 (+/-) を確認して、9V 電池を 1 個挿入します。
- 電池カバーをしっかりと閉じてください。
Video: PREXISO 5-in-1 Stud Finder with Laser Level Distance Measure - This video provides a visual overview of the product's features and basic operation, including battery installation and mode selection.
操作手順
1. キャリブレーション
Before each use, especially for stud and metal detection, the device requires automatic calibration for maximum reliability and accuracy.
- スタッドファインダーをオンにします。
- Place the device flat against the wall surface where you intend to scan.
- Press and hold the scan button (usually on the side) until calibration is complete. The display will indicate when it's ready.
- Keep the button pressed down during the entire scanning operation.
2. Stud, Metal, and AC Wire Detection
This device offers three scanning modes to locate concealed objects:

Figure 2: Locating Concealed Objects
- モードの選択: Use the Material Switch to select between STUD, AC WIRE, or METAL mode.
- 調整: Perform calibration as described above.
- スキャン: While holding the scan button, slowly slide the device horizontally across the wall surface.
- 検出: When an object is detected, the LCD screen will display arrows indicating its location, and an audible beep will sound. The center of the object is indicated by a solid dot on the screen.
- マーキング: Use a pencil to mark the detected location.
検出深度:
- Wood Studs: Up to 1 inch (24mm) deep in drywall.
- Metal Objects: Up to 1-1/2 inches (38mm) deep.
- Live AC Wires: Up to 1-3/8 inches (35mm) deep.

Figure 3: 5-in-1 Multi-Purpose Detector Features
3. Laser Marking
The device can project a horizontal laser line for accurate leveling, useful for hanging pictures or shelves.
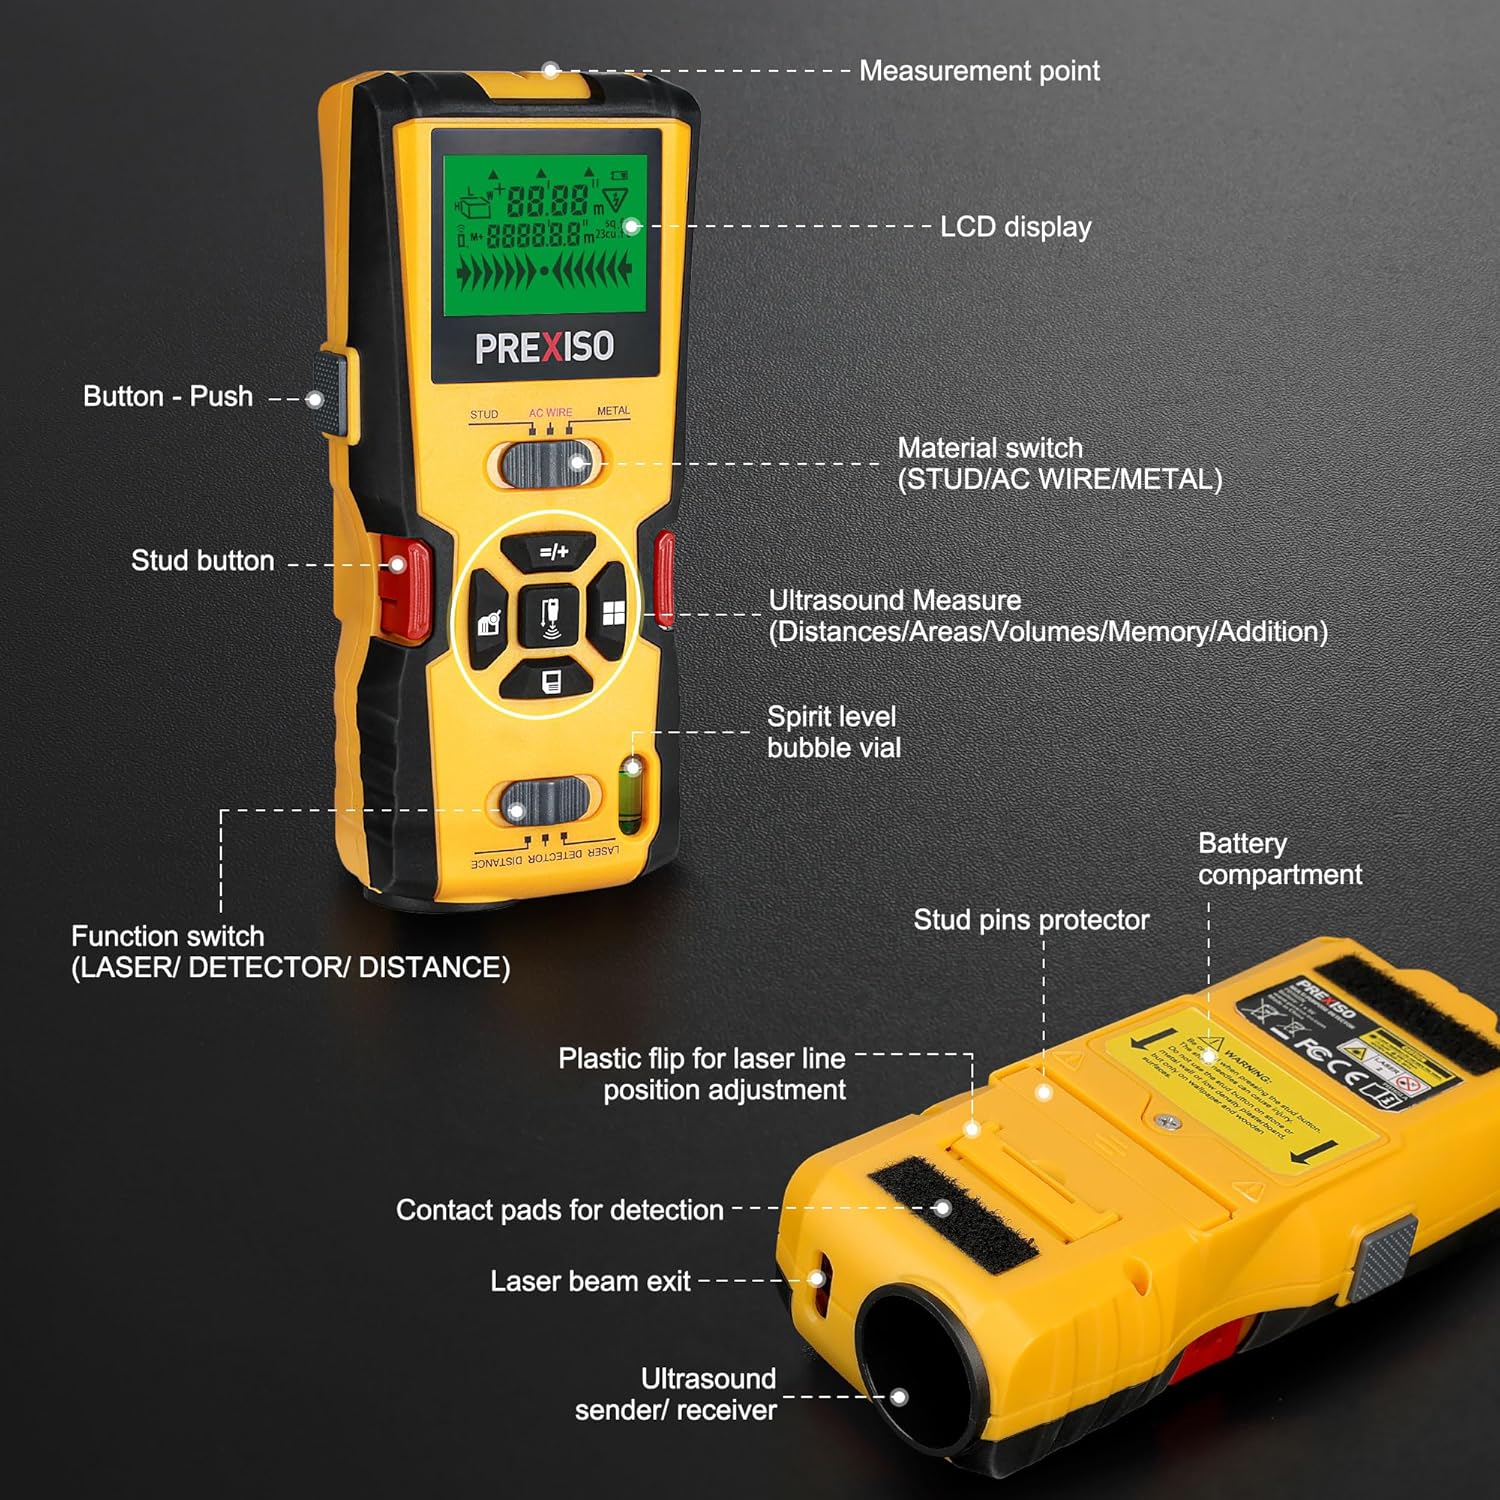
Figure 4: Laser Marking in Use
- モードの選択: Slide the Function Switch to the LASER position.
- 位置デバイス: Place the device against the wall at the desired height. Use the built-in bubble vial to ensure the device is perfectly horizontal.
- レーザーを調整します: If needed, use the plastic flip on the back to adjust the laser line position for uneven walls.
- マーク: The laser line will project across the wall, providing a guide for marking.
Caution: The stud button with needles is for auxiliary laser marking on wallpaper and wooden surfaces only. Do not use on stone or metal walls, or low-density plasterboard. Ensure the stud pins protector is engaged when not using the needles.
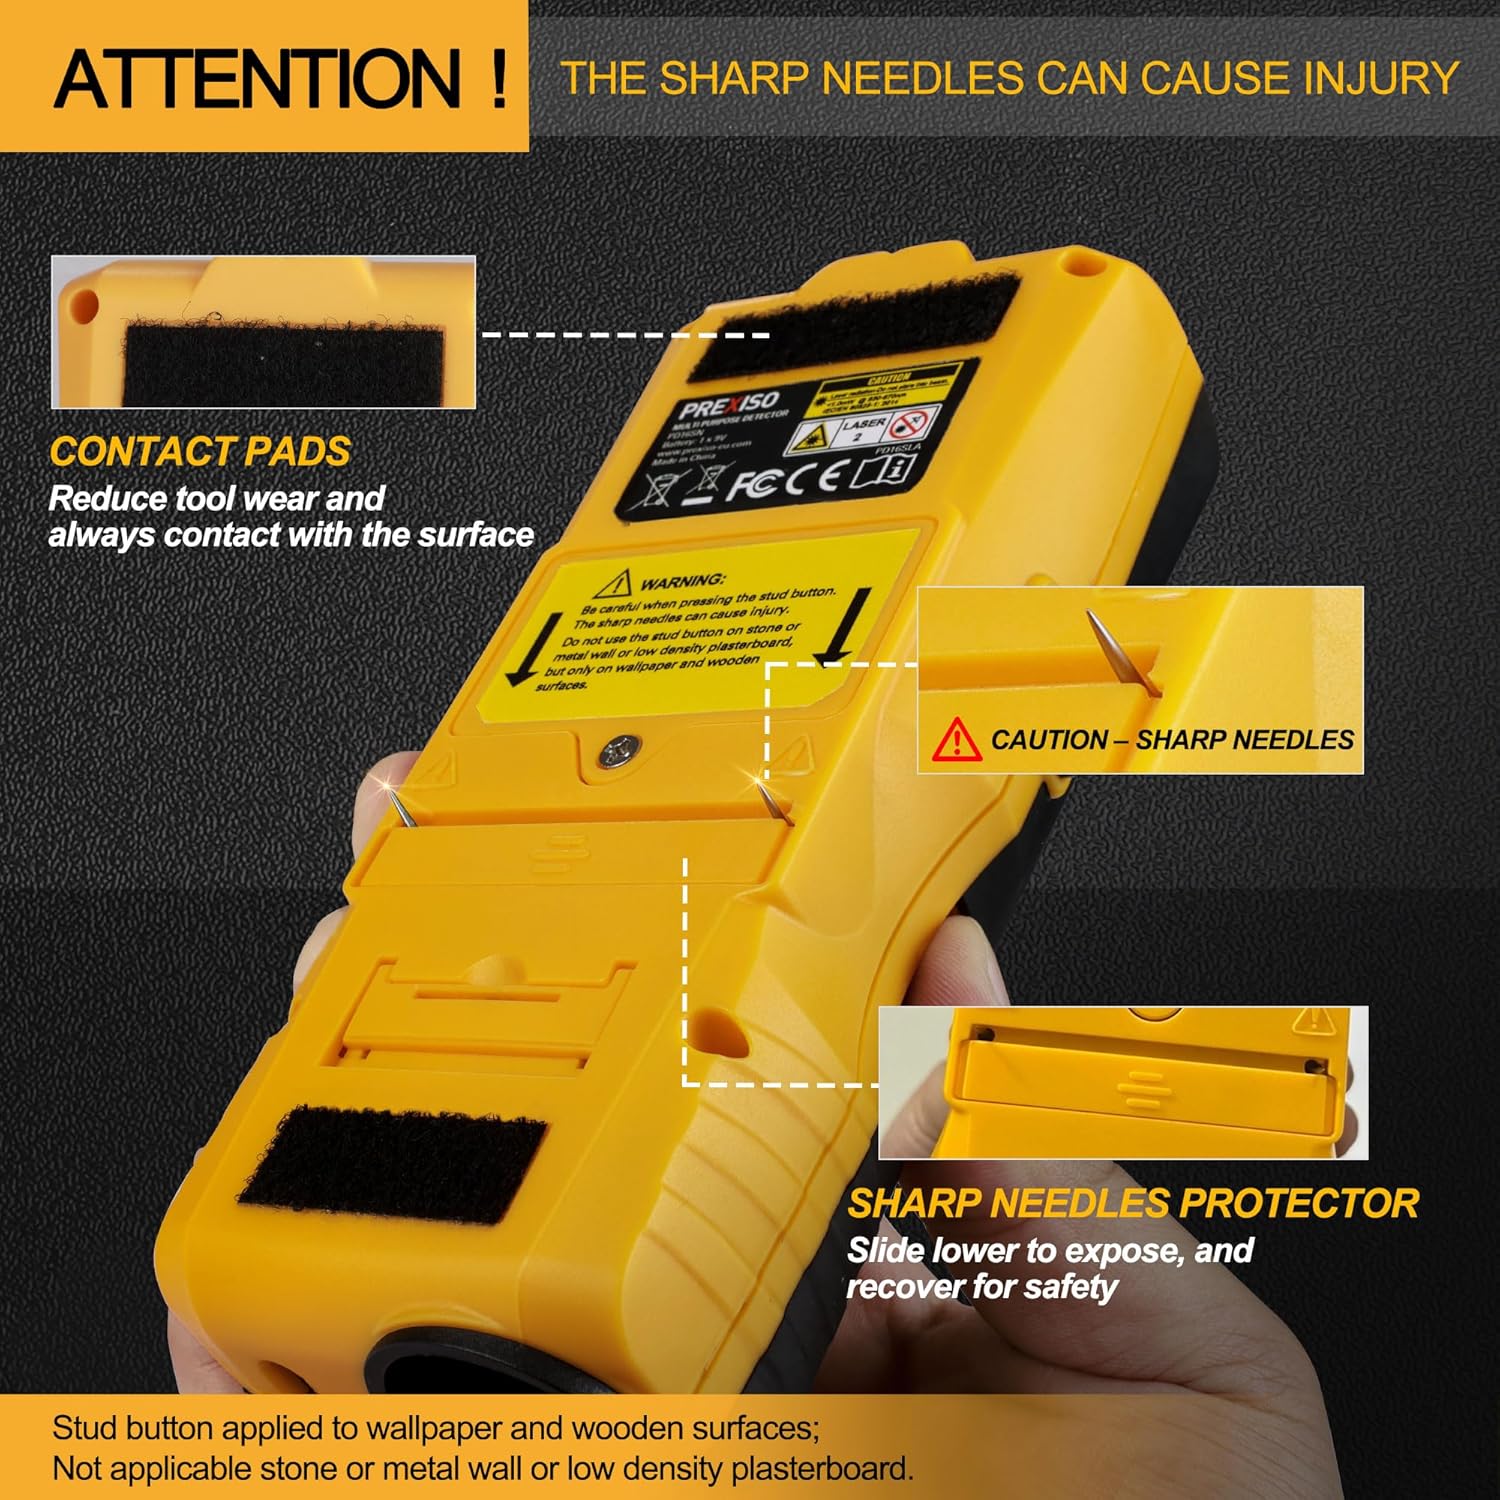
Figure 5: Sharp Needles Warning and Protector
4. Ultrasonic Distance Measurement
This function allows for measuring distances, areas, and volumes using ultrasound.

Figure 6: Ultrasonic Distance Measure Functions
- モードの選択: Slide the Function Switch to the DISTANCE position.
- 距離を測定: Point the ultrasound sender/receiver towards the target surface. Press the measurement button. The distance will be displayed on the LCD.
- 面積/体積測定: Follow the on-screen prompts to take multiple distance measurements to calculate area or volume.
- Addition Measurement: The device supports adding multiple measurements.
- 単位スイッチ: Use the appropriate button to switch between metric (m) and imperial (ft/in) units.
Note: Ensure there are no objects positioned within the measurement area that could obstruct the ultrasonic waves. This function is for rough measurements and may not be as precise as laser distance measurement.
メンテナンス
- デバイスを清潔で乾燥した状態に保ちます。柔らかくて乾いた布で拭いてください。amp 布で拭いてください。研磨剤や溶剤は使用しないでください。
- 長期間使用しない場合は、液漏れを防ぐため、バッテリーを取り外してください。
- Store the device in its protective carrying case in a cool, dry place.
- Regularly check the contact pads for wear and ensure they are clean for accurate detection.
トラブルシューティング
- 不正確な読み取り: Ensure the wall surface is dry. High moisture levels can interfere with electromagnetic fields and cause false readings. Re-calibrate the device on a clear section of the wall.
- 検出なし: Verify that the correct mode (STUD, AC WIRE, or METAL) is selected. Ensure the scan button is continuously pressed during scanning.
- Ultrasonic Measurement Errors: Confirm there are no obstructions between the device and the target surface. The ultrasonic function works best on reflective surfaces.
- Laser Not Visible/Level: Check the battery level. Ensure the device is placed on a stable, level surface or adjusted using the plastic flip for leveling.
仕様
| 特徴 | 仕様 |
|---|---|
| ブランド | プレキシソ |
| モデル番号 | 5-in-1 Stud Finder |
| 色 | 黄色 |
| 電源 | Battery Powered (1x 9V battery required) |
| 材料 | プラスチック |
| アイテム重量 | 13.6オンス |
| パッケージ寸法 | 9.18 x 4.09 x 2.24インチ |
| スタッドスキャン深度 | 最大1インチ |
| 金属スキャン深度 | 最大2.5インチ |
| ACワイヤスキャン深度 | 最大2.5インチ |
| Ultrasonic Distance Measure Range | 50メートルまで |
| レーザークラス | クラスII、< 1mW |
保証とサポート
For warranty information and customer support, please refer to the product packaging or contact PREXISO customer service directly. Keep your purchase receipt as proof of purchase.
Ask a question about this manual
Ask about setup, troubleshooting, compatibility, parts, safety, or missing instructions. Manuals+ will review the question and use this page’s manual context to help answer it.