
1. はじめに
This manual provides essential instructions for the installation, operation, and maintenance of your Aninerel 3000W Hybrid Solar Inverter, model ANJ-3KW-LV-WIFI. This device is designed to convert 24V DC power to 110V AC pure sine wave power, suitable for various off-grid and backup power applications. Please read this manual thoroughly before installation and use to ensure safe and efficient operation.
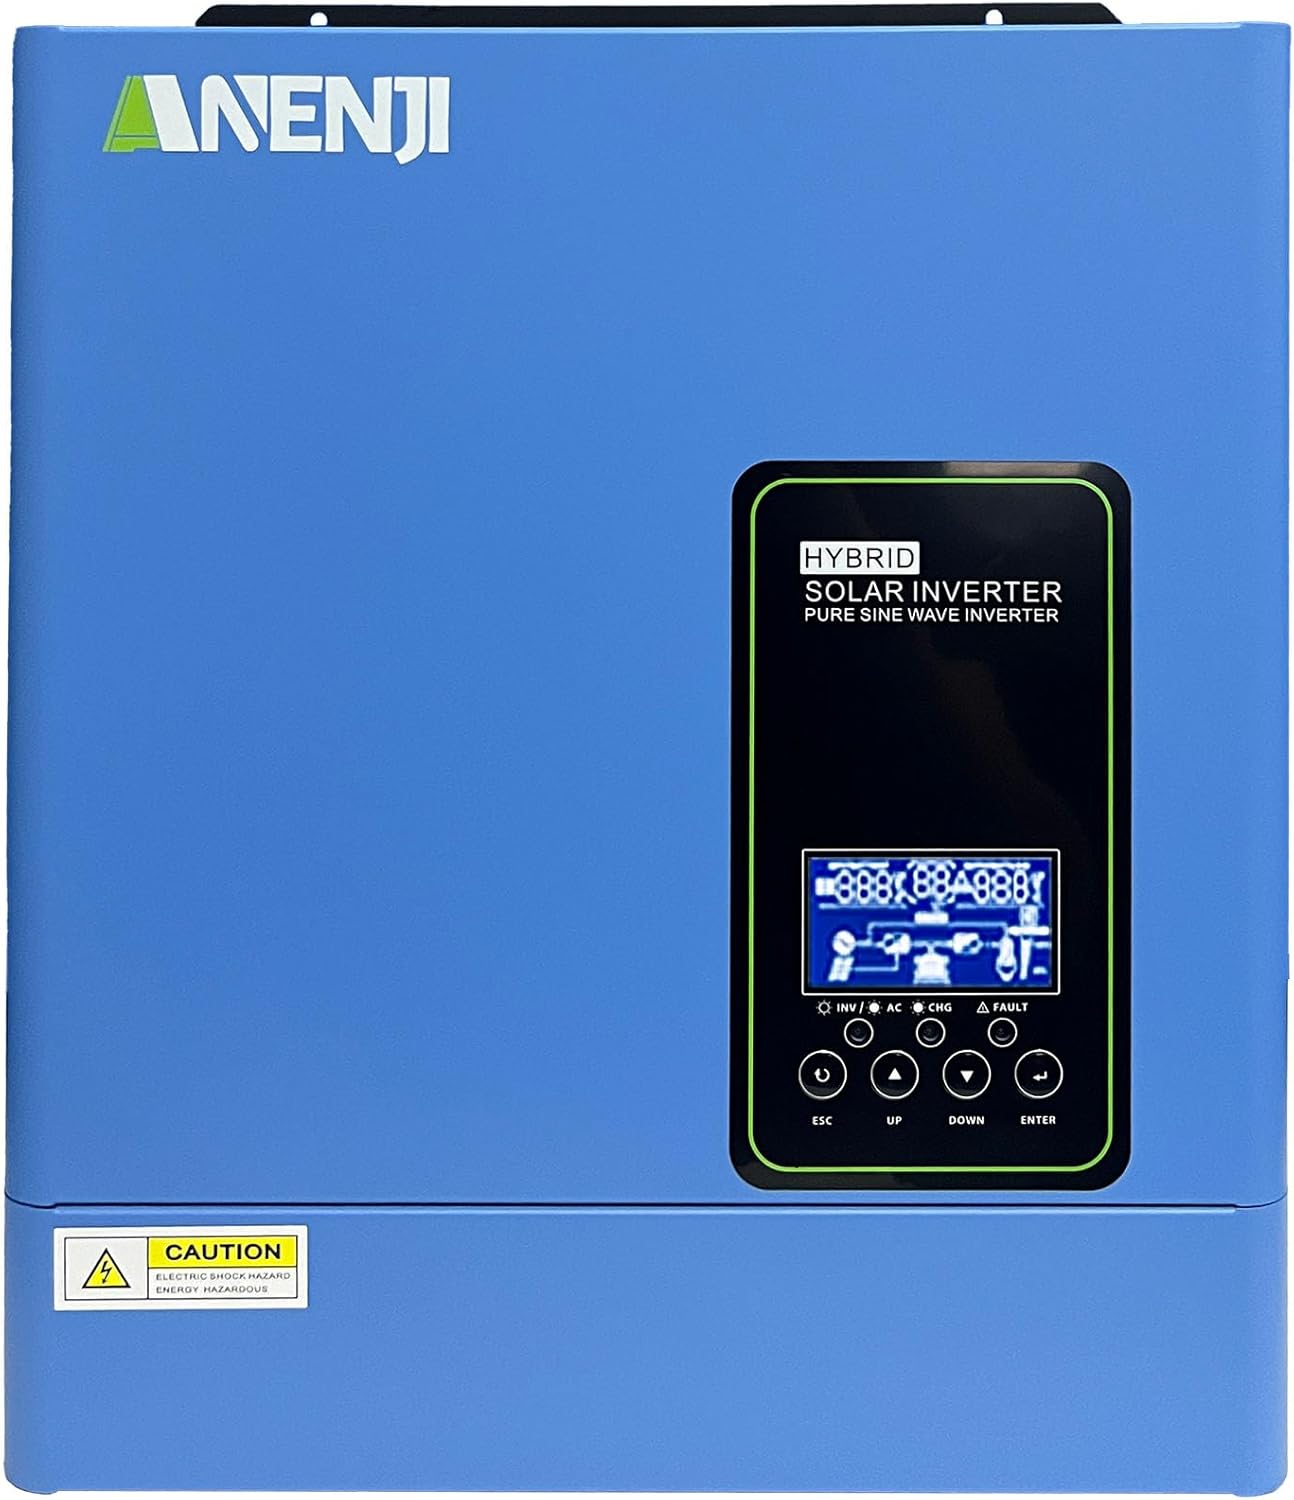
図1.1: 前面 view of the Aninerel 3000W Hybrid Solar Inverter. The inverter features a blue casing with the Aninerel logo and a central LCD display panel with control buttons.
2. 安全に関する注意事項
感電、火災、または怪我のリスクを軽減するために、常に次の安全上の注意事項を守ってください。
- Read all instructions and cautionary markings on the unit and in this manual before installation or operation.
- Do not disassemble the inverter. Refer servicing to qualified personnel. Incorrect reassembly may result in electric shock or fire.
- 感電の危険を減らすために、メンテナンスや清掃を行う前にすべての配線を外してください。
- This inverter is designed for indoor or semi-outdoor use with an IP65 rating. Avoid direct exposure to rain or snow.
- 過熱を防ぐため、インバーターの周囲に適切な換気を確保してください。通気口を塞がないでください。
- 設置時には適切なツールと個人用保護具を使用してください。
- Ensure all wiring connections are tight and secure to prevent loose connections that can cause overheating.
- Do not connect the inverter to a public utility grid without proper authorization and safety measures.
3.製品オーバーview
The Aninerel 3000W Hybrid Solar Inverter integrates a pure sine wave inverter, an MPPT solar charge controller, and a battery charger into one compact unit. It is designed to provide uninterrupted power support.
3.1 主な特徴
- 3000W純正弦波出力: Converts 24V DC to 110V AC, providing stable power for sensitive electronics.
- 統合型100A MPPTソーラー充電コントローラー: Maximizes solar energy harvesting with up to 500VDC PV input.
- Flexible Charging and Output Modes: Offers multiple modes (Solar Only, AC Priority, Hybrid Charging; Mains Priority, PV Priority, Hybrid Output) for diverse power management.
- 幅広いバッテリー互換性: Supports AGM, GEL, Lead-acid, Li-ion, and LiFePO4 24V batteries.
- スマートLCDディスプレイ: Provides real-time monitoring and allows for easy configuration of system settings.
- 内蔵Wi-Fi: Enables remote monitoring of the inverter status (registration required).
- 堅牢な設計: IP65-rated enclosure for durability in various environments, with intelligent cooling.
- 包括的な保護: オーバーボリュームを含むtage、undervoltage, reverse polarity, and short circuit protection.

図3.1: 前面パネルと背面パネルview. This diagram labels the LCD display, indicators, function buttons, RS485 communication port, grounding terminal, battery input, dry contact port, built-in Wi-Fi, AC input, AC output, PV input, and power on/off switch.
3.2 フロントパネルとインジケータ
- LCDディスプレイ: Shows system status, operational data, and configuration settings.
- 充電インジケーター: Illuminates to indicate battery charging status.
- ステータスインジケーター: Provides general operational status of the inverter.
- 障害インジケータ: システムエラーまたは警告を通知するために点灯します。
- 機能ボタン(ESC、上、下、ENTER): LCD 上のメニューを移動したり設定を調整したりするために使用されます。
3.3 リアパネルの接続
- RS485通信ポート: 外部との通信および監視用。
- アース端子 安全接地に必須。
- バッテリー入力: 24V バッテリー バンクに接続します。
- ドライコンタクトポート: 外部制御または信号送信用。
- Built-in Wi-Fi Module: For wireless monitoring.
- AC入力: Connects to grid utility or generator AC power.
- AC出力: 家庭の負荷に接続します。
- PV 入力: Connects to solar panel arrays.
- 電源オン/オフスイッチ: インバータへの主電源を制御します。
4.インストールとセットアップ
Proper installation is crucial for the safe and efficient operation of your hybrid solar inverter. Ensure all connections are made by a qualified electrician and adhere to local electrical codes.
4.1 インバータの取り付け
- 乾燥した、風通しの良い、直射日光や湿気を避けた適切な場所を選んでください。
- Ensure sufficient clearance around the inverter for proper airflow and cooling.
- 適切なファスナーを使用して、インバーターを頑丈な表面に垂直に取り付けます。
4.2配線接続
Follow the wiring diagram carefully. All wiring should be performed with the inverter and all power sources disconnected.
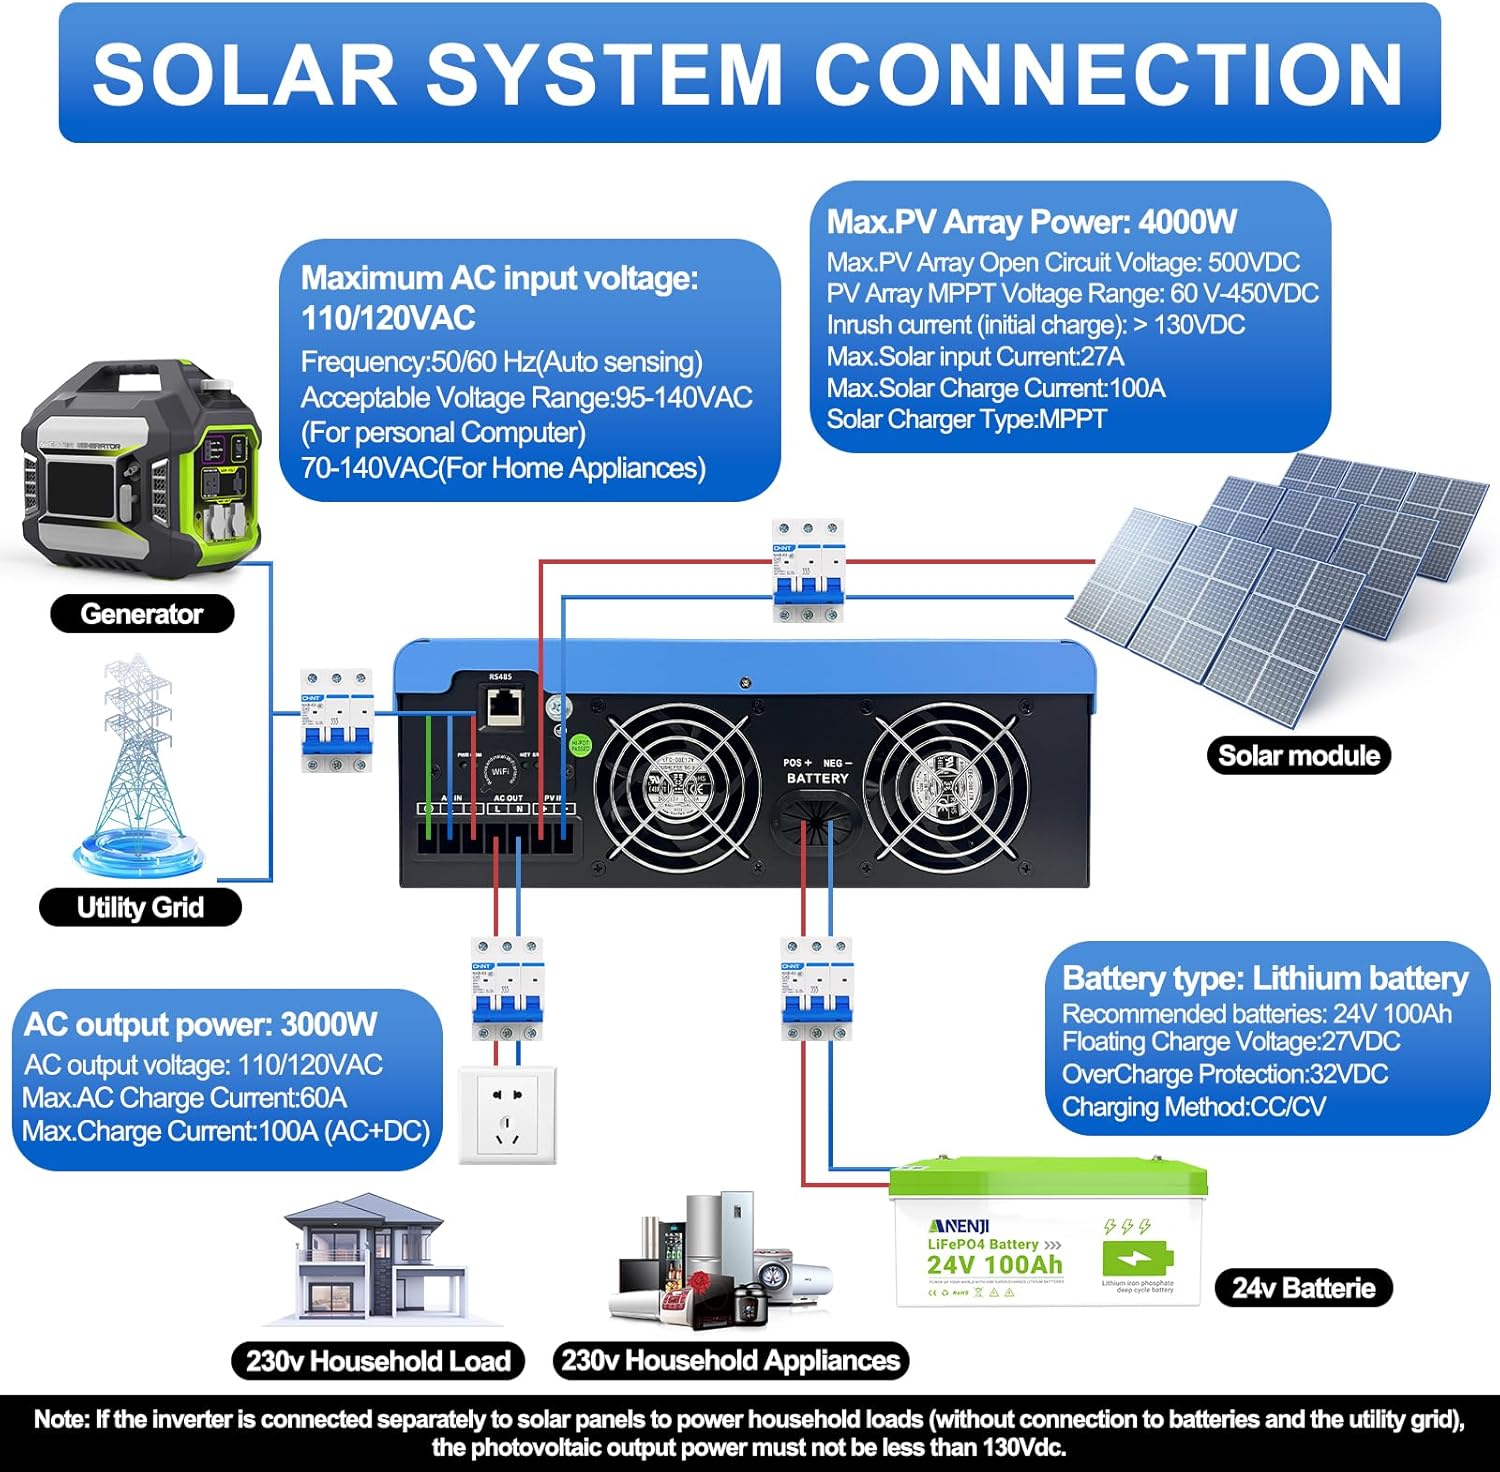
Figure 4.1: Solar System Connection Diagram. This diagram illustrates the connections for solar panels, generator, utility grid, 24V battery, and household loads to the inverter. It shows the PV input, battery input, AC input, and AC output terminals.
4.2.1バッテリー接続
- Connect the 24V battery bank to the battery input terminals on the inverter. Ensure correct polarity (+ to + and - to -).
- Use appropriate cable gauges for the battery connections to handle the expected current.
- The ANJ-3KW-LV-WIFI model supports a 24-volt DC system and is recommended for use with batteries of at least 100 ampere-hours capacity.

Figure 4.2: Inverter Battery Connection. This diagram shows wiring configurations for both 12-volt and 24-volt battery systems, emphasizing correct series/parallel connections for the desired voltage.
4.2.2 PV(ソーラーパネル)接続
- Connect the solar panel array to the PV input terminals. Observe correct polarity.
- Ensure the total open circuit voltage of the PV array does not exceed 500VDC.
- The MPPT voltage range is 60-450VDC. Ensure your PV array voltage falls within this range for optimal charging.
4.2.3 AC入力接続
- Connect the utility grid or generator AC power to the AC input terminals.
- The inverter supports 110/120VAC input with auto-sensing frequency (50/60Hz).
4.2.4 AC出力接続
- Connect your household loads or appliances to the AC output terminals.
- The inverter provides 3000W continuous AC output at 110/120VAC.
4.3 初期電源投入
- After all connections are secure, switch on the battery breaker first.
- Then, switch on the PV array breaker (if applicable).
- Finally, switch on the AC input breaker (if applicable) and the inverter's main power switch.
- Observe the LCD display for initial boot-up and status indicators.
5. 操作
The inverter offers various configurable settings to optimize power management based on your specific needs.
5.1 LCDディスプレイと設定
The LCD display provides real-time information and allows you to configure operational parameters using the function buttons.
- 使用 UP そして 下 メニュー オプションを移動するためのボタン。
- プレス 入力 オプションを選択したり、設定を確定したりします。
- プレス ESC to exit a menu or cancel an action.
5.2 Charging Priority Modes
These settings determine how the battery bank is charged from available power sources.

Figure 5.1: Charger Source Priority. This diagram illustrates three charging priority options: Solar First (solar panels charge first, AC input only if solar is unavailable), Solar and AC Input Simultaneously (both solar and utility charge at the same time), and Solar Only (solar energy is the exclusive charging source).
- ソーラーファースト: Prioritizes solar power for charging. AC input will only charge the battery when solar power is insufficient or unavailable.
- AC Priority (Utility Priority): Prioritizes AC input (utility or generator) for charging. Solar power will supplement or take over if AC input is unavailable.
- 太陽光発電のみ: The inverter will only charge the battery bank from solar power. AC input will not be used for charging.
5.3 Output Priority Modes
These settings determine the power source for your connected loads.

Figure 5.2: Output Source Priority. This diagram shows three output priority options: Solar First (power from solar first, AC input supplements if solar is insufficient), AC First (redirects AC input to power loads, uses solar/batteries when AC is unavailable), and DC Priority (prioritizes solar first, then battery, then AC input only when voltage drops to a programmable value).
- Solar First (PV Priority): Prioritizes solar power to supply loads. If solar power is insufficient, the battery bank will supplement, and then AC input will be used.
- AC First (Mains Priority): Prioritizes AC input (utility or generator) to power loads. If AC input is unavailable, the inverter will switch to battery power.
- DC Priority (Battery Priority): Prioritizes solar power first, then battery power. AC input will only engage when the battery voltage drops below a programmable threshold.
5.4 Wi-Fiモニタリング
The built-in Wi-Fi module allows for remote monitoring of your inverter's performance and status via a dedicated application. Registration may be required to access this feature.

Figure 5.3: Wi-Fi Monitoring. This image depicts a user monitoring the hybrid inverter's status wirelessly via a smartphone application, highlighting the convenience of the built-in Wi-Fi feature.
6. メンテナンス
Regular maintenance helps ensure the longevity and optimal performance of your Aninerel Hybrid Solar Inverter.
- クリーニング: インバーターの外側は定期的に乾いた布で拭いてください。通気口に埃やゴミが詰まっていないことを確認してください。
- 接続: Annually check all electrical connections (battery, PV, AC input/output) for tightness and corrosion. Tighten any loose connections.
- 環境: 設置環境が指定された温度と湿度の範囲内であることを確認してください。
- ファームウェア: メーカーの webパフォーマンスの向上や新機能の追加のためのファームウェア アップデートが利用可能かどうかは、サイトをご覧ください。
7。 トラブルシューティング
このセクションでは、発生する可能性のある一般的な問題の解決策をご紹介します。問題が解決しない場合は、カスタマーサポートにお問い合わせください。
| 問題 | 考えられる原因 | 解決 |
|---|---|---|
| インバータがオンにならない | バッテリーが接続されていないか、バッテリーの残量が少ないtage; Power switch off; Loose wiring. | バッテリーの接続と容量を確認してくださいtage; Ensure power switch is ON; Verify all wiring is secure. |
| AC出力なし | Overload; Short circuit on output; Inverter in fault mode; Output priority setting. | Reduce load; Check for short circuits; Refer to LCD fault codes; Adjust output priority settings. |
| 太陽光でバッテリーが充電されない | 低いPVボリュームtage; Incorrect PV connection; Solar charging disabled; Faulty solar panels. | PVアレイの容量を確認するtage (must be >60VDC); Verify PV polarity; Check charging priority settings; Inspect solar panels. |
| 過熱警告 | Insufficient ventilation; Excessive ambient temperature; Overload. | Ensure clear airflow around inverter; Relocate to cooler area; Reduce connected load. |
| Wi-Fi monitoring not working | No Wi-Fi signal; Incorrect app configuration; Registration issue. | Check Wi-Fi signal strength; Reconfigure app settings; Contact support for registration issues. |
8. 仕様
Technical specifications for the Aninerel 3000W Hybrid Solar Inverter ANJ-3KW-LV-WIFI:
| 特徴 | 仕様 |
|---|---|
| モデル番号 | ANJ-3KW-LV-WIFI |
| 連続出力 | 3000W |
| ピーク出力 | 6000W |
| DC入力ボリュームtage | 24V |
| AC出力Voltage | 110V 交流 |
| 出力波形 | 純粋な正弦波 |
| 最大PV入力電力 | 4000W |
| MPPTコントローラ電流 | 100A |
| 最大。 PV開回路Voltage | 500VDC |
| PVアレイMPPTVoltage範囲 | 60~450VDC |
| 最大AC入力電流 | 60A |
| 出力周波数 | 50/60Hz(自動検知) |
| バッテリーの互換性 | AGM, GEL, Lead-acid, Li-ion, LiFePO4 (24V) |
| 保護等級 | IP65 |
| 製品寸法 | 15 x 6.98 x 18インチ |
| アイテム重量 | 16.5ポンド |
9.保証とサポート
For warranty information, please refer to the warranty card included with your product or visit the official Aninerel website. For technical support, troubleshooting assistance, or service inquiries, please contact Aninerel customer service through their official channels.
Manufacturer: Shenzhen Anenji Energy Technology Co.,Ltd