1. はじめに
Thank you for choosing the EOEOTWO 26" Fat Tire Electric Bike, Model E01. This manual provides essential information for the safe assembly, operation, maintenance, and troubleshooting of your electric bicycle. Please read this manual thoroughly before your first ride and keep it for future reference.
2. 安全ガイドライン
Always prioritize safety when operating your electric bike. Failure to follow these guidelines may result in serious injury or damage to the bicycle.
- Wear a helmet and appropriate safety gear at all times.
- 地元の交通法規をよく理解しておきましょう。
- 毎回使用する前に、ブレーキ、タイヤ、バッテリー、およびすべての留め具をチェックして、乗車前点検を行ってください。
- アルコールや薬物の影響下で乗らないでください。
- 悪天候時や滑りやすい路面での走行は避けてください。
- 乗車する前にバッテリーがしっかりとロックされていることを確認してください。
- Do not modify the electrical system or motor.
3. 組み立てとセットアップ
The EOEOTWO E01 electric bike requires some assembly. Follow these steps carefully. It is recommended to have two people for unboxing and initial assembly.
3.1. 開梱とコンポーネントの識別
Carefully open the packaging box and remove the bicycle. Identify all components and accessories. Refer to the video for visual guidance.

Image: The EOEOTWO 26 inch Fat Tire Electric Bike, Model E01, in yellow, fully assembled.
Video: Detailed assembly instructions for the EOEOTWO Yellow Electric Bike, covering unboxing, component installation, and initial setup.
3.2. ハンドルバーの取り付け
- Loosen the four screws from the bicycle stem.
- Place the handlebar into the stem and adjust the angle of the stem to ensure the handlebar is level.
- 4 本のネジをしっかりと締めてください。
3.3. 前輪の取り付け
- Remove the protective cover from the axle and unscrew the nuts on both sides of the axle.
- Insert the front wheel into the fork, ensuring the screws on both sides of the axle are engaged in the slots.
- Tighten the nuts on both sides of the axle.
3.4.ペダルの取り付け
- 左 (L) ペダルと右 (R) ペダルを識別します。
- Insert the pedals into the corresponding circular slots on the crank arms.
- Secure them with a wrench, ensuring they are tightly fastened.
3.5. Fender and Rear Rack Installation
- Connect the rear fender to its connecting accessories using screws.
- Move the fender above the rear wheel and align the hole at the connection with the hole on the rear frame.
- Thread the screw into the hole at the connection and tighten it with a wrench.
- Repeat similar steps for the front fender, aligning it with the holes on the front frame and headlight, and securing it with screws.
3.6. バッテリーの取り付けと充電
- The key is used to lock and unlock the battery. The battery can be removed after unlocking.
- Plug in the charger to charge the battery. The light turns from green to red, indicating the start of charging.
- After fully charging, place the battery back into the slot and lock it securely.
3.7. Protective Film Removal
Tear off the protective films from the LCD display and gear shifter for clear visibility.
3.8. シート調整
Adjust the seat to the appropriate height for comfortable riding and lock it securely.
4. 操作手順
4.1. 表示終了view
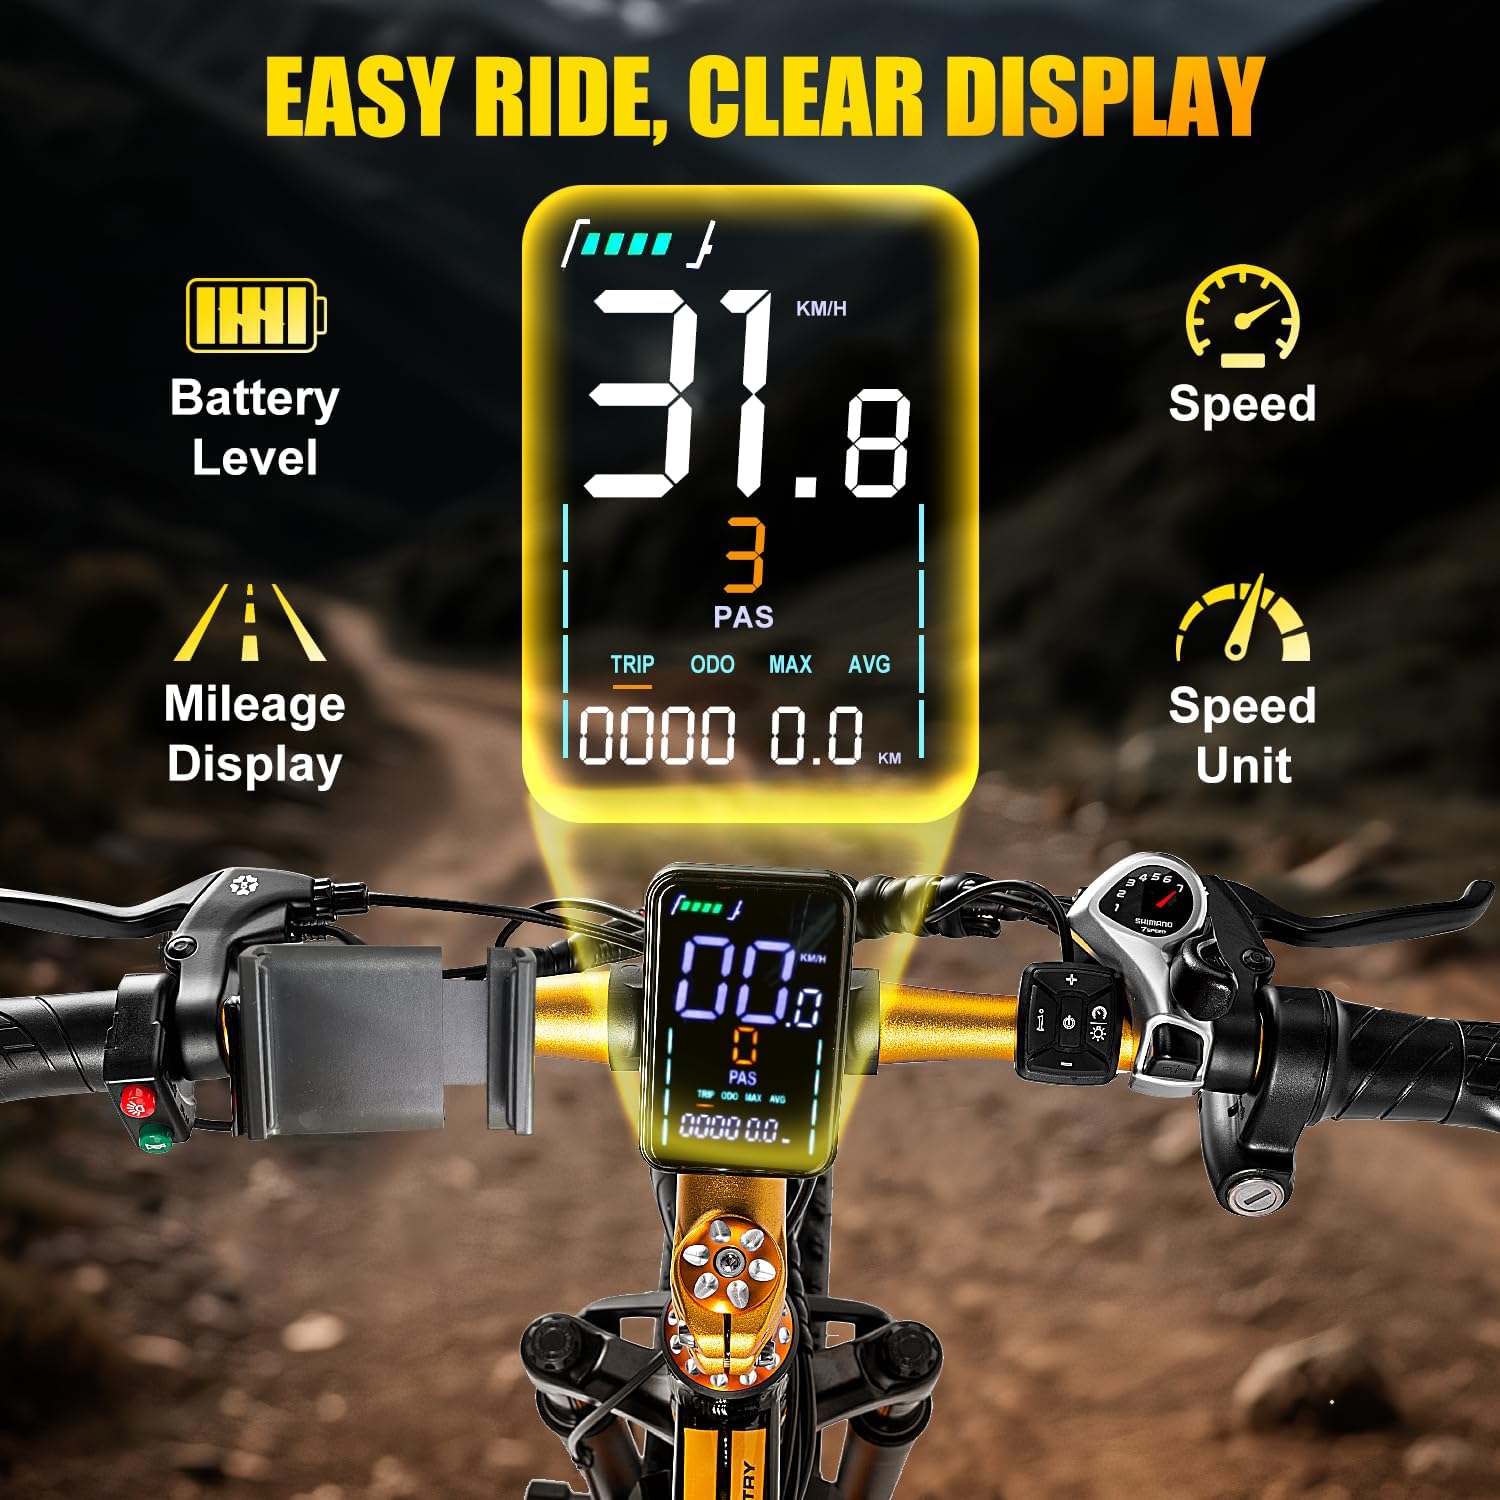
Image: The EOEOTWO E01 LCD display, showing battery level, current speed, pedal assist level, trip mileage, odometer, maximum speed, and average speed.
LCD ディスプレイには、乗車に関するリアルタイムの情報が表示されます。
- バッテリー残量: バッテリー残量を表示します。
- スピード: 現在の走行速度。
- PAS(ペダルアシストシステム)レベル: 現在のモーターアシストのレベルを表示します。
- 旅行: Distance traveled on the current trip.
- ODO: 総走行距離計の読み取り値。
- MAX: 最高速度を達成しました。
- AVG: 平均速度。
4.2. Speed Gears
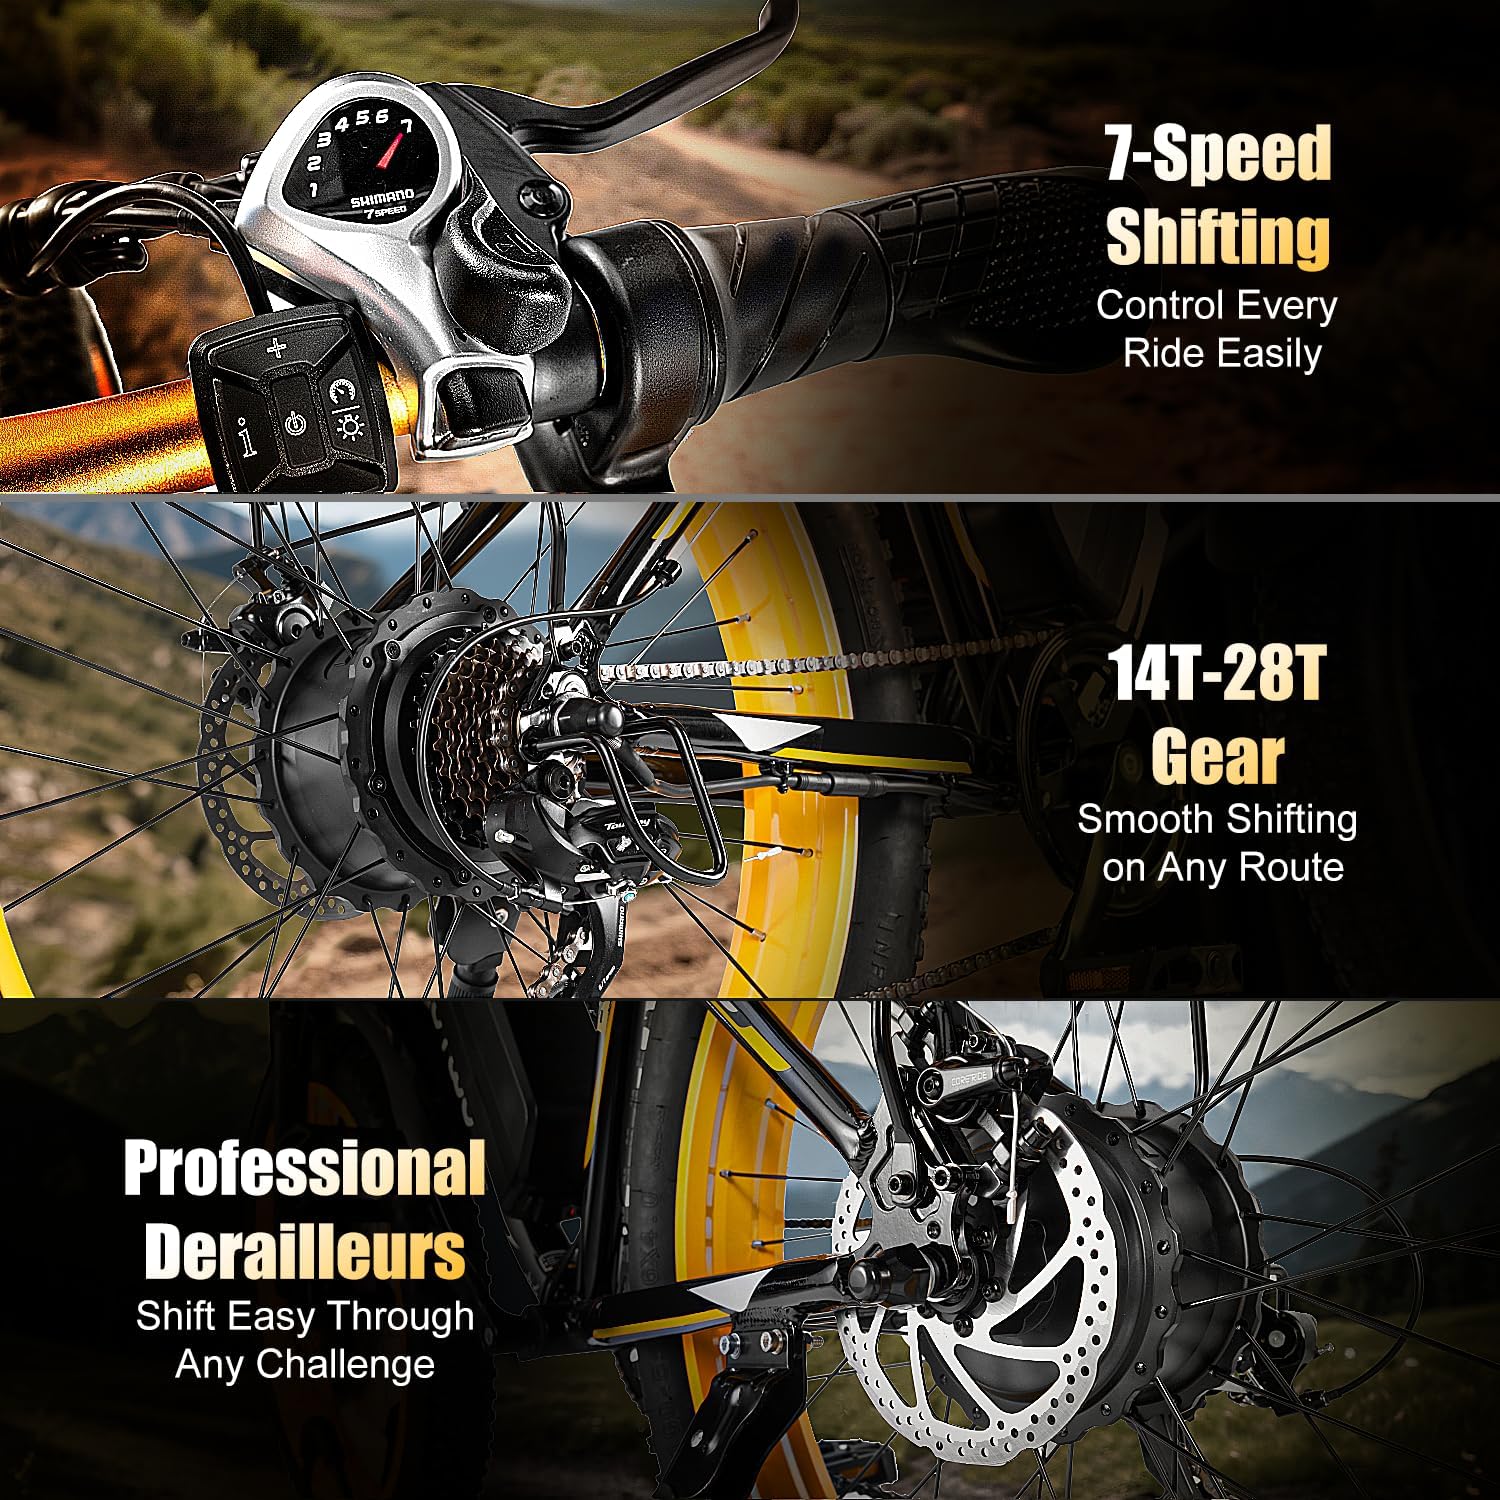
Image: Close-up of the 7-speed gear shifter and the rear derailleur system on the EOEOTWO E01.
The E01 features a 7-speed gear system. Use the gear shifter on the handlebar to change gears according to terrain and desired effort. The plus (+) button increases gears, and the minus (-) button decreases gears.
4.3. ライディングモード
Your EOEOTWO E01 electric bike offers five distinct riding modes:
- スロットルモード: Power is obtained by rotating the throttle without using foot pedals. This mode allows for speeds up to 33 MPH.
- ペダルアシストモード: Provides electric assistance when using the foot pedals. There is no response when simply turning the throttle in this mode. This mode offers assistance up to 30 MPH.
- ノーマルバイクモード: Functions like a regular bicycle, ridden solely with pedals and utilizing the 7-speed gears.
- ブースターモード: Press the button on the right control panel to activate this mode. It allows the ebike to travel at approximately 2 miles/h, making it easy to push uphill or walk alongside.
- クルーズモード: To activate, turn the throttle to the bottom and hold it for about 12 seconds. Release the throttle, and the ebike will maintain that speed.

Image: Visual representation of the five riding modes available on the EOEOTWO E01 electric bike.
Video: A short demonstration of the EOEOTWO Fat Tire Electric Bike in various riding conditions, highlighting its capabilities.
5. メンテナンス
Regular maintenance ensures the longevity and safe operation of your EOEOTWO E01 electric bike.
5.1. バッテリーのお手入れ
- 毎回乗車後にバッテリーを完全に充電してください。
- バッテリーを完全に消耗しないようにしてください。
- Store the battery in a cool, dry place when not in use, and charge it periodically if stored for extended periods.
- 付属の充電器のみを使用してください。
5.2. タイヤのメンテナンス

Image: Close-up of the EOEOTWO E01's fat tires, highlighting their robust design and the dual disc brakes.
- 毎回乗る前にタイヤの空気圧を確認してください。推奨空気圧範囲内(通常はタイヤのサイドウォールに表示されています)を維持してください。
- タイヤに摩耗、切れ目、または埋め込まれた異物がないか点検します。
5.3. ブレーキシステム
- ブレーキレバーの張力と応答性が適切かどうかを定期的に確認してください。
- ブレーキパッドの摩耗を点検し、必要に応じて交換してください。
- Ensure brake cables are free from kinks or damage.
5.4. チェーンとドライブトレイン
- スムーズなギアチェンジを実現し、錆を防ぐために、チェーンを清潔に保ち、潤滑してください。
- Check for any loose or damaged chain links.
5.5.一般的なクリーニング
定期的に電動自転車を掃除しましょうamp 布で拭いてください。高圧の水を電気部品に直接当てないでください。
6。 トラブルシューティング
This section addresses common issues you might encounter with your EOEOTWO E01 electric bike.
| 問題 | 考えられる原因 | 解決 |
|---|---|---|
| モーターに電力が供給されていません | Battery low or not connected; power switch off; loose electrical connection. | Charge battery; ensure battery is locked and power switch is on; check all connections. |
| Motor cuts out during ride | Overheating; low battery; loose connection. | Allow motor to cool; charge battery; check connections. |
| ブレーキが弱いように感じる | 摩耗したブレーキ パッド、緩んだブレーキ ケーブル、油圧システム内の空気 (該当する場合)。 | Inspect and replace brake pads; adjust cable tension; consult a professional for hydraulic systems. |
| ギアがスムーズに変速しない | Dirty or unlubricated chain; misaligned derailleur; damaged shifter cable. | Clean and lubricate chain; adjust derailleur; replace cable if damaged. |
ここに記載されていない問題が発生した場合、または提案された解決策で問題が解決しない場合は、カスタマー サポートにお問い合わせください。
7. 仕様
| 特徴 | 仕様 |
|---|---|
| モデル名 | E01 |
| バイクの種類 | 電動自転車、ファットタイヤ |
| モーター | 1500Wピークモーター |
| 最高速度 | 最高時速34マイル |
| バッテリー | 48V 15Ah 取り外し可能なバッテリー(720ワット時) |
| 最大範囲 | 最大60マイル(ペダルアシスト) |
| ホイールサイズ | 26インチ |
| タイヤ | 26" x 4-inch Fat Tires |
| フレーム素材 | アルミニウム合金 |
| 速度の数 | 7 |
| サスペンションタイプ | フロントサスペンション |
| ブレーキスタイル | ディスクブレーキ |
| 最大重量の推奨 | 390 ポンド |
| アイテム重量 | 30キログラム(約66ポンド) |
| 特集 | Adjustable Handlebars, Front Headlight, Rear Rack, Fenders |
8. 保証
The EOEOTWO 26" Fat Tire Electric Bike Model E01 comes with a 1年間の限定保証. This warranty covers manufacturing defects under normal use. Please retain your proof of purchase for warranty claims. The product meets strict U.S. safety standards.
詳細な保証条件については、製品に付属の保証書を参照するか、カスタマー サポートにお問い合わせください。
9. カスタマーサポート
If you have any questions, require assistance with assembly, operation, maintenance, or troubleshooting, please contact EOEOTWO customer support. You can typically find contact information on the product packaging, the official EOEOTWO webサイト、または小売店を通じてご購入いただけます。
サポートにお問い合わせの際は、モデル番号 (E01) と購入日をご用意ください。