1.製品オーバーview
The Sunster TB10 Diesel Air Heater is a versatile and efficient heating solution designed for various applications including vehicles (cars, RVs, campers, trucks), tents, and homes. This model features advanced Wi-Fi and Bluetooth connectivity for smart control via a dedicated mobile application, alongside a user-friendly LCD control panel. Its integrated toolbox design ensures portability and ease of installation, while optimized combustion technology provides rapid heating and energy efficiency.
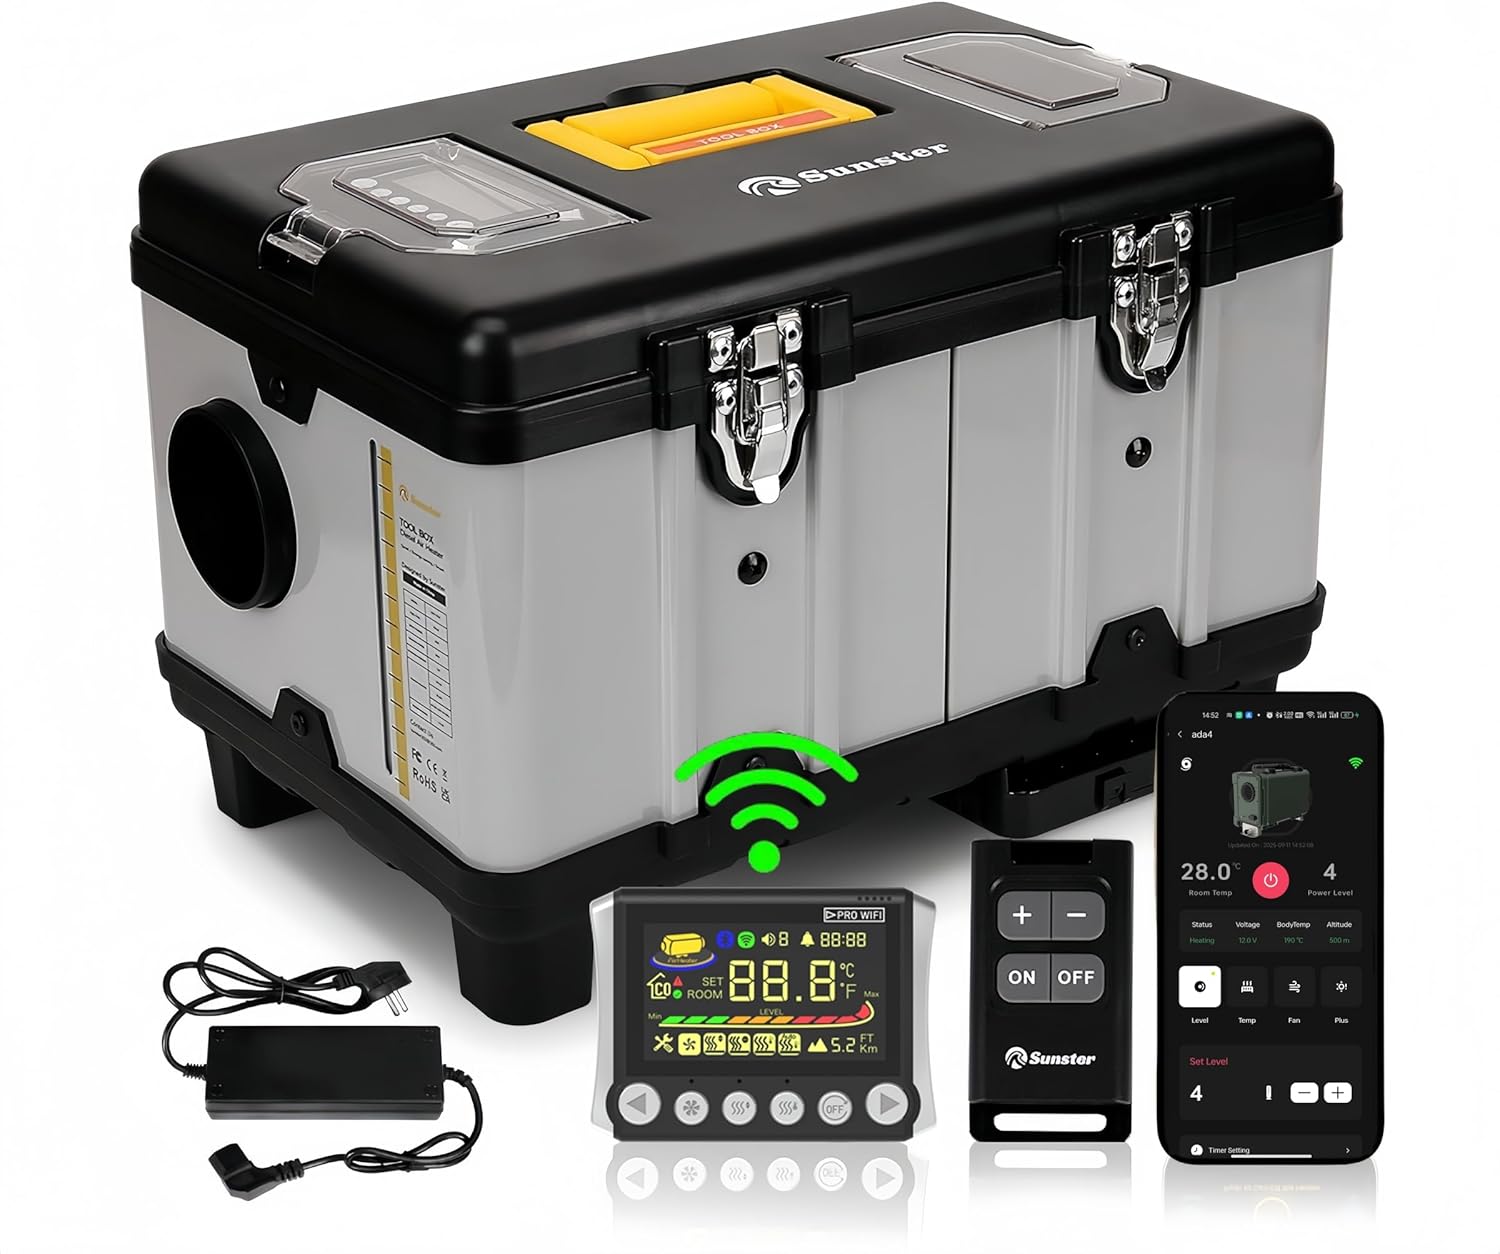
画像1.1: Sunster TB10 Diesel Air Heater and its control accessories.
2. 安全情報
Please read and understand all safety warnings and instructions before operating this product. Failure to follow these instructions may result in electric shock, fire, explosion, or serious injury.
- 一酸化炭素の蓄積を防ぐために、ヒーターを操作するときは適切な換気を行ってください。
- 吸気口や排気口を塞がないでください。
- 可燃性物質をヒーターから安全な距離に保管してください。
- Always use the correct fuel type (diesel) and power supply (12V, 24V, or 110-240V via transformer).
- The heater is equipped with overheat protection (≥ 518 °F/270 °C). Do not bypass or modify safety features.
- お子様やペットの手の届かない場所に保管してください。
- メンテナンスや清掃を行う前に電源を切ってください。

画像2.1: Integrated safety features of the heater.
3. Product Components & Specifications
3.1 箱の中身
- Diesel heater (with LCD control panel)
- リモートスイッチ
- AC power supply (110-240V transformer)
- Installation Accessories (including 4-meter switch extension cable, heat protection sleeve, battery power cord, exhaust pipe, fixture accessories set, 6.9ft air outlet pipe, silencer)

画像3.1: 製品パッケージに含まれるすべてのコンポーネント。
3.2 構造図

画像3.2: Detailed structure diagram of the heater.
3.3 製品仕様
| 仕様 | 詳細 |
|---|---|
| ブランド | サンスター |
| モデル | TB10 Diesel Air Heater WiFi Version (WIFI-TB10) |
| 出力 | 8KW |
| 巻tage互換性 | 12V/24V/110V-240V |
| 燃料の種類 | ディーゼル |
| 燃料タンク容量 | 6リットル(内蔵) |
| 燃費 | 0.16-0.45 liters/hour |
| 暖房エリアのカバー範囲 | 20-25 square meters (approx. 215-270 sq ft) |
| 過熱保護 | ≥ 518 °F/270 °C |
| 制御方法 | LCD Panel, Remote Control, Wi-Fi Smart App, Bluetooth |
| アイテム重量 | 22ポンド |
| パッケージ寸法 | 18.5 x 14.96 x 12.6インチ |
4. セットアップとインストール
The Sunster TB10 Diesel Air Heater is designed for rapid assembly and portability. Follow these guidelines for safe and effective setup.
4.1電源接続
- のために DC12V/24V operation: Connect directly to a vehicle battery (motorhomes, automobiles, boats, trucks, tractors) using the provided battery power cord.
- のために 交流110-240V operation: Use the included AC power supply transformer to plug the heater into a standard power outlet (professional workshop, garage, home).
- Ensure all connections are secure and correct voltageが提供されます。

画像4.1: Multiple power options for the Sunster TB10 heater.
4.2 排気ダクトと空気ダクトの設置
- The intake pipe has a fixed air filter at the bottom, requiring no additional installation.
- Install exhaust pipes on the side of the unit to prevent blockage.
- Utilize the exhaust pipe protective cover for safety.
- Connect the air outlet pipe to direct heated air.

画像4.2: Rapid assembly for exhaust and intake components.
4.3 コントロールパネルの配置
The included 4-meter extension cable allows for mounting the LCD control panel indoors, providing easier access and operation, especially when the main heater unit is placed outside.
5. 操作手順
The Sunster TB10 Diesel Air Heater offers multiple control methods: LCD panel, remote control, Wi-Fi smart app, and Bluetooth. This section details their operation.
5.1 LCD Control Panel Overview

画像5.1: LCD Monitor with button functions.
5.2 リモートコントロールマッチング
To match the remote control with the heater:
- On the LCD panel, long press the [OFF] そして [Right button] simultaneously to enter match mode. The screen will display "Add".
- On the remote control, long press the [Plus button] to enter matching mode.
- The LCD screen will display "Suc" upon successful matching.
- You can now check the switch status and adjust settings (temperature, gear, mode) via the remote.
5.3 Wi-Fi App Connection & Functions
The Sunster app allows remote control of your heater via Wi-Fi. Ensure your phone is connected to a 2.4GHz Wi-Fi network.
- デバイスを追加: In the app, click "Add Device", then select "Wi-Fi" to add. Choose your Wi-Fi network, enter the password, and follow the app's guidelines to put the device into network configuration mode (long press the add button on the LCD panel after power on).
- 制御モード: Once connected, you can control various modes:
- ギアモード: Adjust the power level using plus/minus buttons.
- 温度モード: 希望の温度を設定します。
- 換気モード: Control fan speed.
- タイマー設定 Set timed hours and minutes for automatic turn on/off.
- パラメータ設定: Access "More Settings" in the app to modify:
- Temperature Unit (Fahrenheit/Celsius)
- Altitude Unit (meters/feet)
- Voice Languages (English, Russian, German)
- タイムゾーン
- 温度オフセット
- バックライトレベル
- Start/Stop Temperature Offset
- Wi-Fiのオン/オフ
- 設定をリセット
- デバイスの共有: Share control of the device with others using a share code.
- Ensure Wi-Fi is turned off on the heater (via parameter settings or by switching it on/off on the LCD panel).
- In the app, click "Add Device", then select "Bluetooth" connection.
- Select the Bluetooth name corresponding to your device (e.g., BYD-0509).
- Confirm binding. You can now control the heater via Bluetooth.
- オン/オフ: In shutdown state, press the desired mode button to turn it on. In operation state, press the [OFF] button to turn off the heater.
- 設定の調整: In operation state, press the [Decrease/Increase] buttons to adjust the setting gear or temperature.
- スイッチングモード: を押す [モード] button to cycle through different modes (Gear, Temperature, Ventilation).
- 設定モードに入る: In operation state, long press the [OFF] button for 3 seconds to enter setting mode. Use [Decrease/Increase] buttons to navigate through settings (F0-FF).
- F0: Current Time Setting (Press Ventilation button to set hours, then minutes. Press Ventilation again to confirm.)
- F1: Timing Start Time Setting (Press Ventilation button to set hours, then minutes. Press Ventilation again to confirm.)
- F2: Set the Running Time After Timing Start (Range 00:00-10:00, 30 minutes is 1 unit. 00:00 is unlimited time. Press Ventilation again to confirm.)
- F3: Timing Function On or Off (ON indicates turn-on timing, OF indicates shutdown timing. Press Ventilation again to confirm.)
- F4: Voice Broadcast Language Setting (E=English, G=German, R=Russian, --=Mute. Press Ventilation again to confirm.)
- F5: Ambient Temperature Compensation Setting (Adjustment range: -27°F to +27°F. Press Ventilation again to confirm.)
- F6: Constant Temperature Mode Function Setting (ON=turned on, OF=turned off. Press Ventilation again to confirm.)
- F7: Temperature Unit Switch Setting (Cycle between Fahrenheit and Celsius. Press Ventilation again to confirm.)
- F8: Altitude Unit Switch Setting (Switch between kilometers and thousand feet. Press Ventilation again to confirm.)
- F9: Screen Brightness Adjustment (Adjustment range 0-10. Press Ventilation again to confirm.)
- FA: Network Configuration with Sub Devices
- FB: Ambient Temperature Reading (ON represents sub-device ambient temp, OF represents control panel ambient temp.)
- FC: Temperature Difference for Automatic Startup in Constant Temperature Mode
- FD: Temperature Difference for Automatic Shutdown in Constant Temperature Mode
- FE: Wi-Fi Function On/Off (ON=turn on, OF=turn off. Press Ventilation again to confirm.)
- FF: Wi-Fi Configuration (View Wi-Fi connection, OTA upgrade, unbind from APP, pre-registration, connection status.)
5.4 Bluetooth Operation (without Wi-Fi)
If Wi-Fi is not available, you can operate the heater via Bluetooth:
5.5 Manual Control Panel Functions (2409PW)
The LCD control panel allows direct operation and setting adjustments.
Setting Mode Items (F0-FF):
ビデオ5.1: Detailed operation guide for the 2409PW control panel, including remote matching, app connectivity, and function settings.
6. メンテナンス
Regular maintenance ensures optimal performance and longevity of your Sunster TB10 Diesel Air Heater.
- クリーニング: 定期的にヒーターの外側を柔らかくて乾いた布で掃除してください。amp 布で拭いてください。研磨剤や溶剤は使用しないでください。
- エアフィルター: The fixed air filter at the bottom should be checked and cleaned regularly to ensure proper airflow.
- 排気システム: Inspect the exhaust pipes and protective cover for any damage or blockages. Ensure exhaust gases are safely directed away from enclosed spaces.
- 燃料タンク: Keep the fuel tank clean and free of contaminants. Use only clean diesel fuel.
- ストレージ: When not in use for extended periods, ensure the heater is clean, dry, and stored in a safe location.
7。 トラブルシューティング
ヒーターに問題が発生した場合は、次の一般的なトラブルシューティング手順を参照してください。
- ヒーターが始動しない: Check power connections, fuel level, and ensure the control panel is properly connected and powered.
- 熱出力なし: Verify the selected mode (e.g., not in ventilation mode), check temperature settings, and ensure fuel is flowing.
- Error codes on LCD: Refer to the detailed error code list in the full user manual (accessible via the app under "User Manual" or included physical manual) for specific diagnostics.
- アプリの接続の問題: Ensure your phone's Wi-Fi is 2.4GHz, the heater's Wi-Fi is enabled, and the device is within range. Try re-adding the device or resetting Wi-Fi settings.
- リモコンが応答しない: Check remote battery, ensure it's matched correctly (refer to section 5.2).
8. Firmware Upgrade (OTA)
To ensure your heater has the latest features and improvements, perform Over-The-Air (OTA) firmware upgrades via the mobile app.
- Prepare for Upgrade: First, switch the heater power off. Then, hold down the left and right buttons on the LCD panel simultaneously and connect the power supply. The screen will show "otA". Keep pressing until the last four IDs of the machine appear.
- Initiate Upgrade via App: In the app, navigate to the "Personal Center" interface, then select "Firmware Upgrade".
- Select Version: Find the ID corresponding to your local machine. Select the desired version number to upgrade.
- アップグレードを開始: Click "Update Now". The app will show the update progress. Keep the device close to the phone and avoid operation during the transfer.
- 完了: The screen will show "Suc" and the app will indicate "Update complete" upon successful upgrade.
9. 保証とサポート
For warranty information, technical support, or service inquiries, please refer to the contact details provided with your purchase or visit the official Sunster webサイトでご確認ください。保証請求の際は購入証明として領収書を保管してください。