1. はじめに
This manual provides detailed instructions for the installation, operation, and maintenance of your MakeSkyBlue 60A MPPT Solar Charge Controller V124. This device is designed to efficiently manage power flow from your solar panels to your battery bank, ensuring optimal charging and system protection. Please read this manual thoroughly before installation and use to ensure safe and correct operation.
2. 主な特徴
- 100% MPPT Controller: Features intelligent Maximum Power Point Tracking for high conversion efficiency and greater solar energy harvest. Includes a built-in DSP controller for fast response and stable performance.
- Upgraded Large-Terminal Design: Equipped with larger wiring ports for easier and more secure installation, improving current flow and system stability.
- 幅広いバッテリー互換性: Supports 12V/24V/48V auto-recognition and is compatible with LiFePO₄, AGM, Gel, and Lead-Acid batteries.
- スマートLCDディスプレイ: Easy-to-read backlit screen displays real-time system status, error codes, cumulative power generation, and adjustable parameters.
- インテリジェントバッテリー保護: Built-in safeguards protect against overcharging, overvoltage, short-circuit, and low voltage, extending battery life and ensuring safe operation.
3. 安全情報
- Always connect the battery to the charge controller first, then the solar panels, and finally the load. Disconnect in reverse order.
- Ensure proper ventilation around the controller to prevent overheating. Maintain a minimum spacing of 75mm (3 inches) on all sides for adequate airflow.
- The maximum PV input voltage is 160V. Exceeding this voltage can damage the controller.
- Use appropriate wire gauges for all connections to prevent overheating and ensure efficient power transfer.
- Install the controller in a dry, well-ventilated area, away from flammable materials and direct sunlight.
- コントローラーをご自身で分解したり修理したりしないでください。修理が必要な場合は、資格のある担当者にご相談ください。
4.製品オーバーview
The MakeSkyBlue 60A MPPT Solar Charge Controller V124 is designed for robust performance and ease of use. Below are key visual references for the product and its components.

図4.1: 前面 view of the MakeSkyBlue 60A MPPT Solar Charge Controller V124, showing the LCD display, control buttons, and connection terminals.

Figure 4.2: Close-up of the controller's LCD display, detailing icons for daytime, charging, battery, discharging, load, parameter value, and current reading.
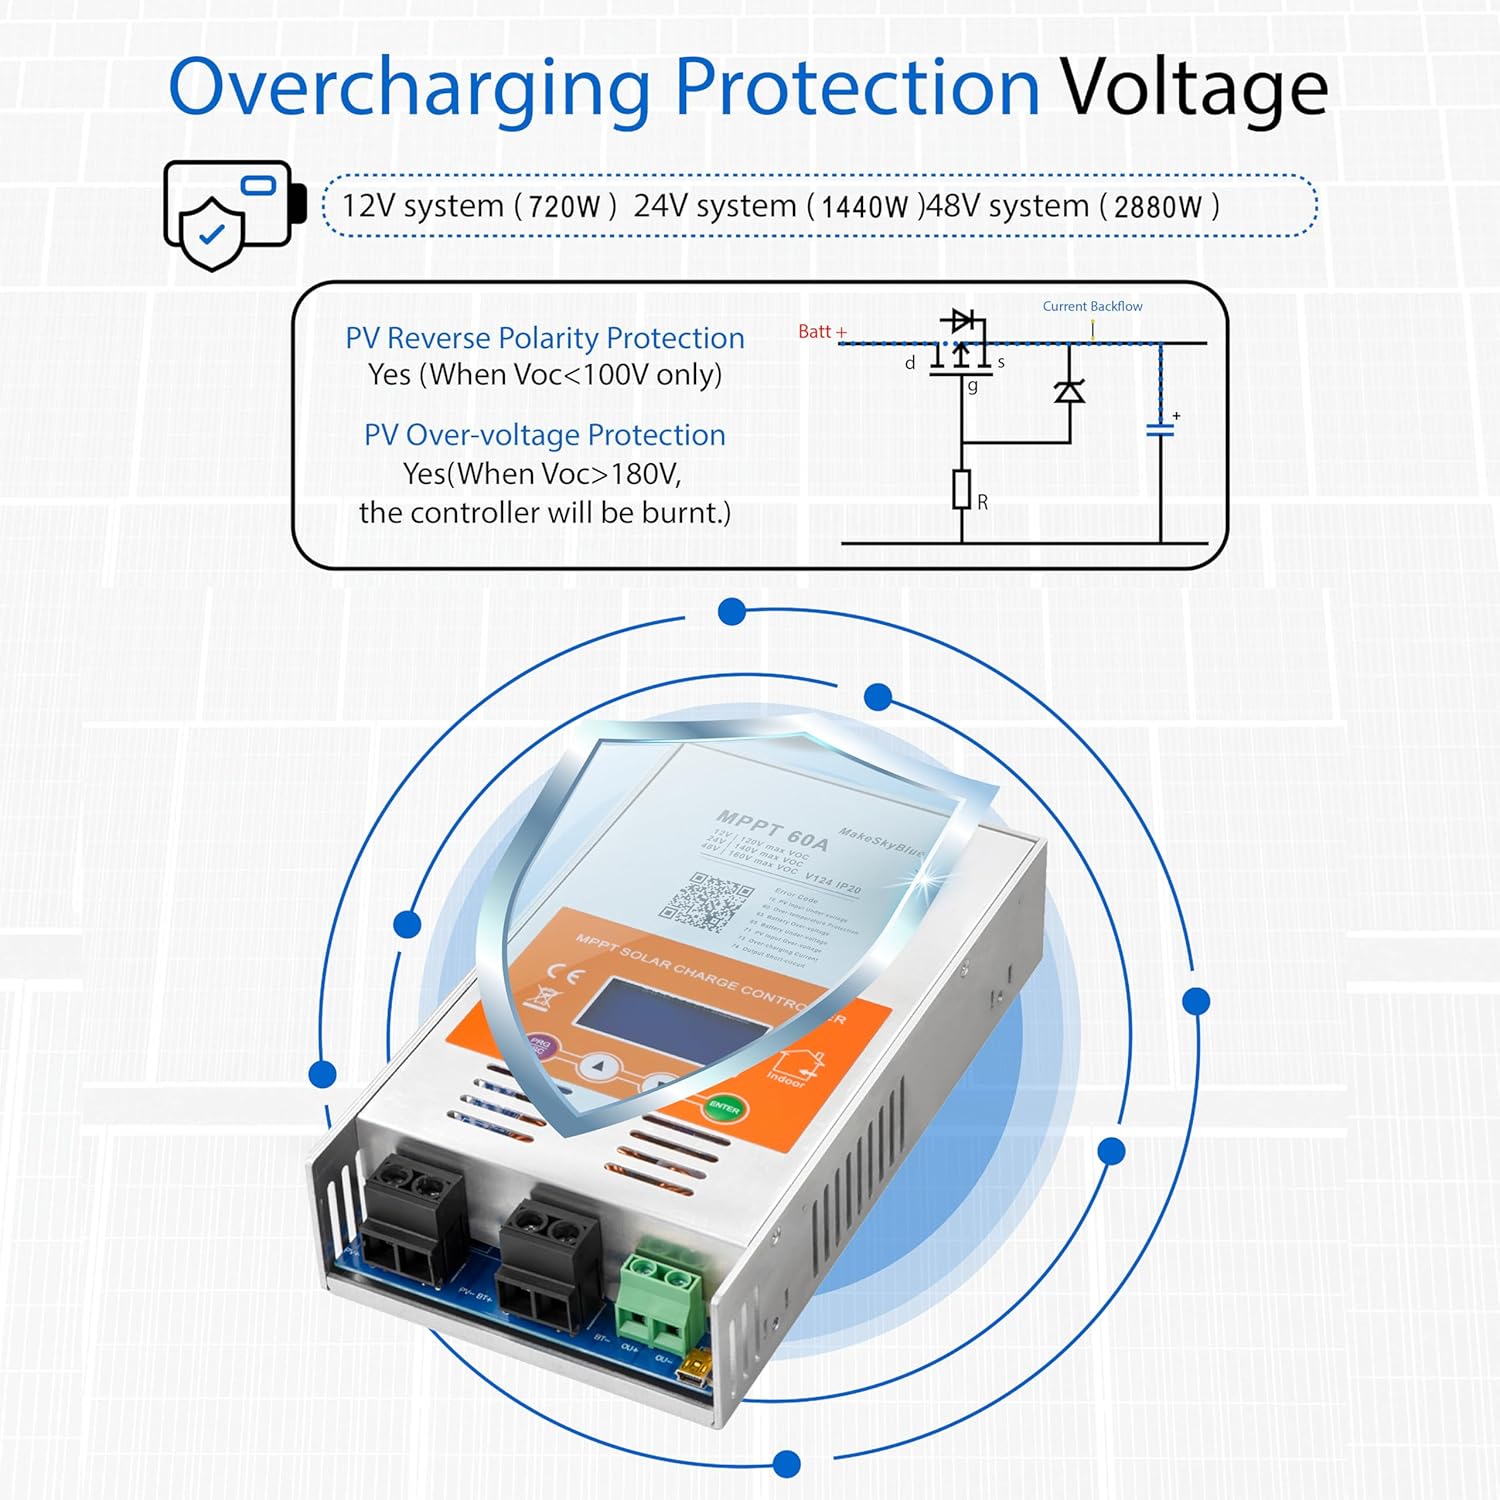
Figure 4.3: Physical dimensions (8.46 x 4.52 x 1.96 inches) and weight (3.08 lbs) of the MakeSkyBlue 60A MPPT Solar Charge Controller V124.
5. セットアップとインストール
MPPT ソーラー充電コントローラーを安全かつ正しく設置するには、次の手順に従ってください。
5.1コントローラーの取り付け
- Choose a dry, well-ventilated location, preferably indoors, away from direct sunlight, high temperatures, and moisture.
- Ensure there is at least 75mm (3 inches) of clear space around all sides of the controller for proper heat dissipation and airflow.
- Mount the controller securely to a wall or stable surface using appropriate screws and mounting brackets.
5.2配線接続
Always connect in the following sequence: Battery → Solar Panels → DC Load. Disconnect in reverse order.

Figure 5.1: Diagram illustrating the connection of the MakeSkyBlue 60A MPPT Solar Charge Controller V124 to a bank of batteries, highlighting the solar input and battery connections.
- バッテリーを接続します。 Connect the positive and negative terminals of your battery bank to the corresponding battery terminals on the charge controller. Ensure correct polarity. The controller will auto-detect the battery voltage(12V / 24V / 48V)。
- ソーラーパネルを接続する: Connect the positive and negative leads from your solar panel array to the PV input terminals on the controller. Ensure correct polarity and that the total PV open-circuit voltageは160Vを超えません。
- DC負荷を接続する(オプション): If using a DC load directly from the controller, connect its positive and negative leads to the load terminals.
5.3 Parallel Operation (If applicable)
For systems requiring multiple controllers in parallel, follow the guidelines provided in the video below. Each controller should be connected to the same battery bank, with individual connections to separate photovoltaic arrays.
Video 5.1: This video demonstrates the installation and configuration of multiple HHJ60-PRO controllers for parallel operation, including mounting and wiring connections to a shared battery bank and separate PV arrays.
5.4 Unboxing and Basic Connections
For a visual guide on unboxing and making basic connections, refer to the following video:
Video 5.2: This video provides a manual overview of the 60A MPPT Solar Charge Controller, demonstrating the unboxing process and basic wiring connections.
6. 操作手順
The controller features a smart LCD display for monitoring and adjusting parameters.
6.1 LCD 表示オーバーview
Figure 6.1: Close-up of the controller's LCD display, detailing icons for daytime, charging, battery, discharging, load, parameter value, and current reading.
The LCD display provides real-time information about your solar system's performance. Use the buttons below the screen to navigate through different display modes and access settings.
6.2パラメータ設定
To adjust parameters such as battery type, charge voltage, and load control modes, press the 'PRG/ESC' button to enter the programming mode. Use the up/down arrows to navigate and 'ENTER' to confirm selections. Refer to the full user manual for a complete list of adjustable parameters and their ranges.
6.3 MPPT Tracking Demonstration
Observe the controller's efficient MPPT tracking and stable power output in the demonstration video below.
Video 6.2: This video demonstrates the MakeSkyBlue controller's super fast tracking, real PV input, and stable output, showcasing its efficient operation.
7. バッテリーの互換性
The MakeSkyBlue 60A MPPT Solar Charge Controller V124 offers wide compatibility with various battery types, automatically recognizing 12V, 24V, and 48V systems.

Figure 7.1: Visual representation of battery types compatible with the controller, including Lithium, Sealed Lead Acid, and Vented Gel batteries.
Supported battery chemistries include:
- LiFePO₄(リン酸鉄リチウム)
- AGM(吸収ガラスマット)
- ゲル
- 鉛蓄電池
8。 トラブルシューティング
The Smart LCD Display can show various error codes to help diagnose issues. Refer to the QR code on the product label or the full user manual for a comprehensive list of error codes and their solutions. Common issues and basic checks include:
- ディスプレイ/電源なし: Check battery connections and ensure they are secure and correctly polarized. Verify battery voltageは動作範囲内です。
- 充電なし: Check solar panel connections and polarity. Ensure sufficient sunlight. Verify PV input voltage is within the controller's specifications (Max 160V).
- Overcharging/Overvoltage: The controller has built-in protection. If this occurs, check battery settings and ensure they match your battery type.
- 高温: Ensure adequate ventilation around the controller. Check for obstructions to airflow. The fan will activate to dissipate heat when necessary.

Figure 8.1: Illustration of the controller's temperature protection, showing fan activation and deactivation temperatures.
9. 仕様
Detailed technical specifications for the MakeSkyBlue 60A MPPT Solar Charge Controller V124.
| 仕様 | 価値 |
|---|---|
| モデル番号 | 60A-V124 |
| 定格充電電流 | 60A |
| システム巻tage | 12V/24V/48V Auto Detection |
| 最大PV入力ボリュームtage | 160V |
| 表示タイプ | 液晶 |
| 製品寸法 | 4.5 x 2 x 8.46インチ |
| アイテム重量 | 3.08 ポンド |
| 材料 | 金属 |
| 色 | オレンジ |
| 電池が必要 | いいえ |
| 含まれるコンポーネント | Solar Charge Controller, Mounting Brackets, User Manual |
10.保証とサポート
Specific warranty information for the MakeSkyBlue 60A MPPT Solar Charge Controller V124 is not provided in this document. For warranty details, technical support, or service inquiries, please contact MakeSkyBlue customer service directly through their official website or the retailer where the product was purchased. Ensure you have your product model number and purchase date available when contacting support.