1. はじめに
This manual provides comprehensive instructions for the installation, operation, and maintenance of your Jansite 6.25-inch Motorcycle CarPlay/Android Auto GPS Navigation System. Please read this manual thoroughly before using the device to ensure proper functionality, optimal performance, and rider safety. Familiarizing yourself with the contents will help you maximize your experience with the product.
2. 安全情報
- 道路安全: Always prioritize your safety and the safety of others on the road. Do not operate the device in a manner that distracts you from riding.
- 安全な取り付け: Ensure the device is securely mounted according to the installation instructions to prevent it from detaching during operation, which could cause injury or damage.
- 電気設備: If you are not confident with electrical wiring, consult a qualified professional for assistance with power connections. Incorrect wiring can lead to damage or electrical hazards.
- 水への露出: The device is IP67 waterproof, offering protection against rain and dust. However, avoid prolonged submersion in water.
- 温度制限: Operate the device within its specified temperature range (-25°C to 60°C) to ensure proper function and longevity.
3. パッケージ内容
パッケージにすべてのアイテムが揃っていることを確認します。
- Jansite 6.25-inch Motorcycle CarPlay/Android Auto Screen
- Mounting Bracket (Handlebar Mount)
- コネクティングロッド
- 電源ケーブル
- ジップタイ
- 取り付けレンチ
- ユーザーマニュアル
4. セットアップとインストール
4.1デバイスの取り付け
The device supports two primary installation methods: Rearview Mirror Bracket and Handlebar Bracket. Choose the method best suited for your motorcycle and preference.
Handlebar Bracket Installation:
- Use the provided wrench to securely install the bracket onto your motorcycle's handlebar. Ensure it is tightened to prevent movement during riding.
- Install the connecting rod onto the handlebar bracket.
- Attach the CarPlay screen to the rod and adjust its position for optimal viewing angle. The bracket allows for 360-degree adjustment.
- Verify that the installation is complete and secure before operating the motorcycle.
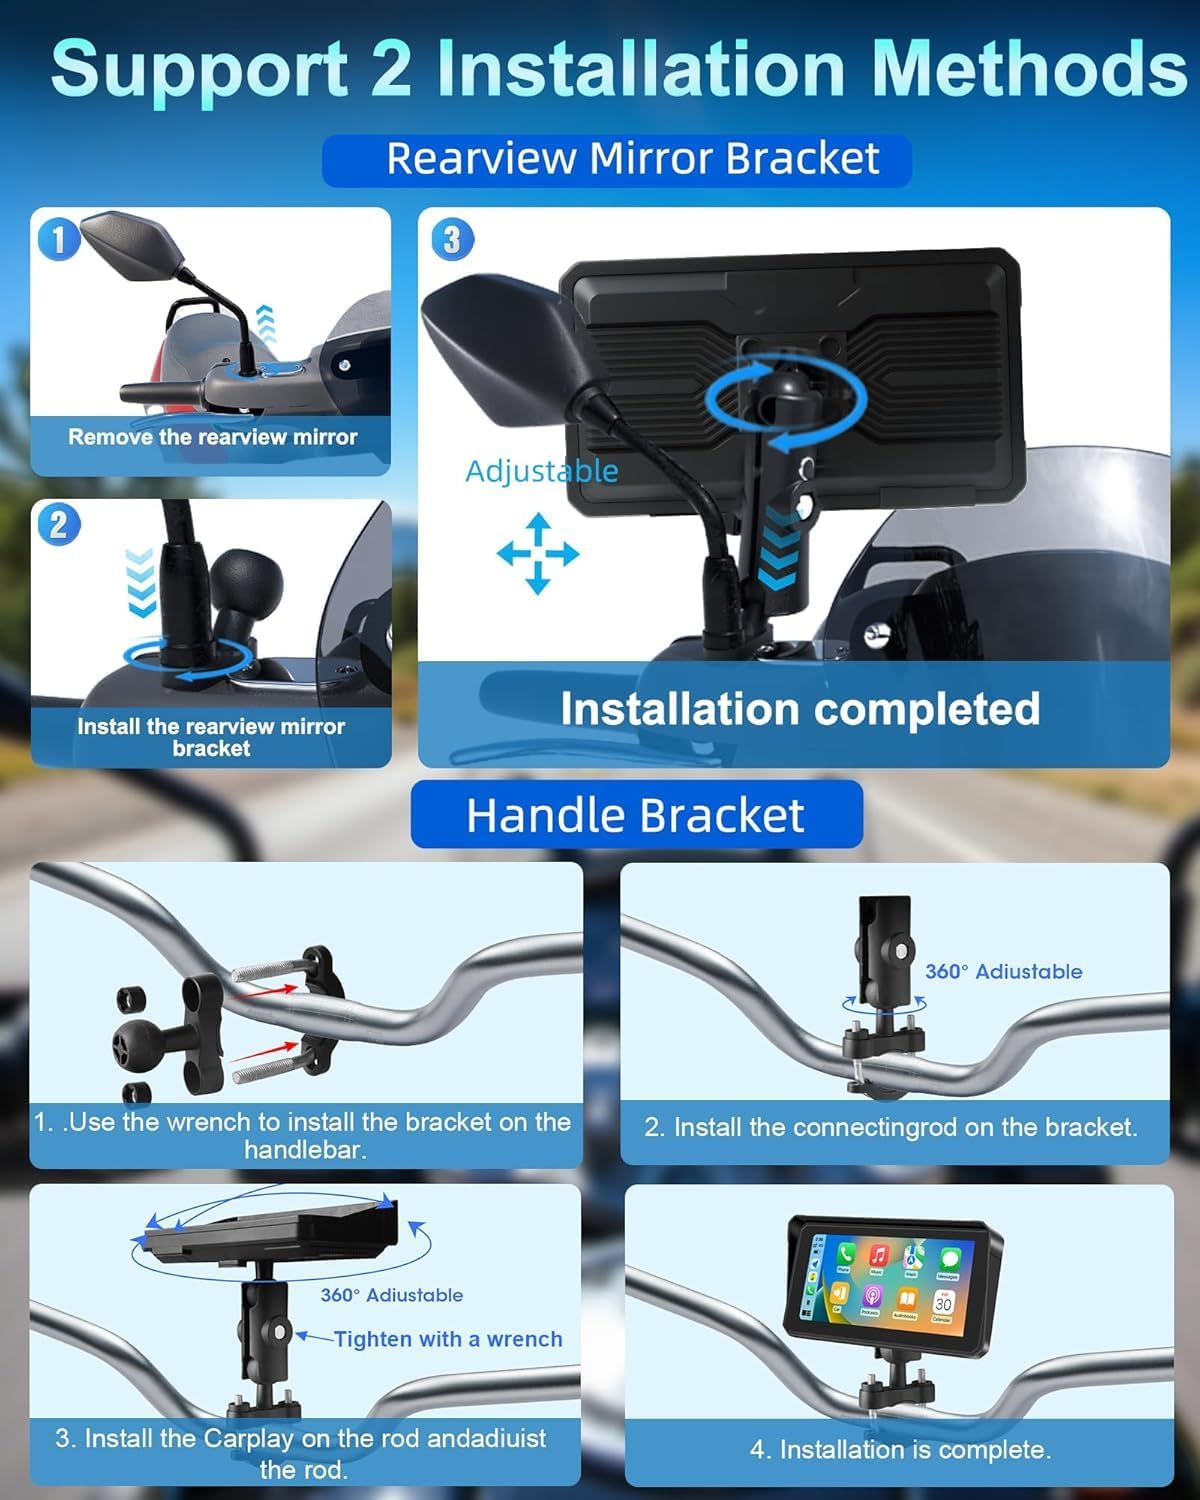
Step-by-step guide for installing the device using either a rearview mirror bracket or a handlebar bracket, showing adjustable components.
後方view Mirror Bracket Installation (if applicable):
- Carefully remove the rearview mirror from its mounting point on your motorcycle.
- リアを取り付けますview mirror bracket in place of the mirror.
- Attach the CarPlay screen to the adjustable arm of the bracket.
- Re-attach the rearview mirror (if applicable) and adjust the screen's position and angle for clear visibility without obstructing your view.
4.2電源接続
- Connect the provided power cable to the designated port on the device.
- Route the power cable safely along your motorcycle's frame, securing it with the included zip ties to prevent interference with moving parts or accidental snagging.
- Connect the other end of the power cable to your motorcycle's 12V power source. For a secure and protected connection, it is highly recommended to use a fuse tap.

Detailed visual steps for handlebar installation, including components like the mounting bracket, power cable, zip ties, and user manual.
5. 操作手順
5.1 電源オン/オフ
The device is designed to power on automatically when your motorcycle's ignition is turned on and power is supplied. To power off the device, simply turn off your motorcycle's ignition.
5.2 ワイヤレスCarPlay/Android Auto接続
- スマートフォンで Bluetooth と Wi-Fi が有効になっていることを確認します。
- デバイスで、CarPlay または Android Auto インターフェースに移動します。
- Follow the on-screen prompts to pair your smartphone. This typically involves selecting your device from a list and confirming a pairing code.
- Once connected, your smartphone's compatible applications will be displayed on the screen, allowing for seamless interaction.

Illustration of the device displaying Apple CarPlay and Android Auto interfaces, demonstrating voice command functionality for navigation and music.
5.3 Bluetooth Connectivity (Helmet/Headset)
The system supports dual Bluetooth connections for enhanced audio experience:
- First, pair your smartphone to the CarPlay screen via Bluetooth. This enables calls and audio streaming from your phone to the device.
- Second, pair your Bluetooth helmet or headset directly to your smartphone. This setup routes audio from the CarPlay screen (via your phone) to your helmet/headset, ensuring clear sound without removing your helmet.

Diagram showing a motorcycle rider with the device, illustrating how a smartphone connects to the device and then to a Bluetooth helmet or headset for audio.
5.4 音声コントロール(Siri/Google アシスタント)
Once connected to Apple CarPlay or Android Auto, you can activate voice control by saying "Hey Siri" or "OK Google," or by tapping the voice assistant icon on the screen. Use voice commands to:
- Initiate navigation to a destination.
- Make or receive phone calls.
- Send or read messages.
- Play specific music or podcasts.
- Check weather conditions.

Depiction of the device on a motorcycle handlebar, showing voice command prompts for Siri and Google Assistant to control navigation, music, and calls.
5.5 Navigation & Music Playback
- ナビゲーション: Access your preferred map applications (e.g., Google Maps, Apple Maps, Waze) through the CarPlay or Android Auto interface. Input destinations via touch or voice command.
- 音楽再生: Control music and audio from your smartphone's compatible applications directly on the device screen.
5.6 Screen Brightness & Display Modes
The device features manual brightness adjustment and an anti-glare design to ensure optimal visibility in various lighting conditions. You can adjust settings as needed:
- デイモード: Provides a bright display for clear visibility under direct sunlight.
- ナイトモード: Reduces screen brightness and glare for comfortable viewing during nighttime riding.

Visual demonstrating the anti-glare screen design with a sun visor for improved visibility in sunlight, and the waterproof touch screen functionality.
6. 機能終了view
- IP67防水・防塵: The device is rated IP67, providing robust protection against dust ingress and immersion in water up to 1 meter for 30 minutes. This ensures reliable operation in various weather conditions, including heavy rain.
- アンチグレア設計: The screen incorporates an optimized sun visor and anti-glare technology to reduce reflections and improve visibility, even in bright sunlight.
- 広い温度耐性: Engineered to operate reliably in extreme temperatures, from -25°C (-13°F) to 60°C (140°F), making it suitable for diverse riding environments.
- 高解像度IPSディスプレイ: A crisp 6.25-inch IPS touch screen with a resolution of 1600x600 ensures clear visuals and detailed map displays.

Image highlighting the IP67 waterproof rating of the device, with visuals depicting its resilience in rain, high temperatures (60°C), and low temperatures (-25°C).
7。 トラブルシューティング
デバイスで問題が発生した場合は、次のトラブルシューティング手順を参照してください。
- デバイスの電源が入らない:
- Check all power cable connections to the device and your motorcycle's power source.
- Ensure the motorcycle's ignition is turned on.
- If a fuse tap was used, verify that the fuse is intact and not blown.
- CarPlay/Android Autoに接続できません:
- Ensure Bluetooth and Wi-Fi are active on your smartphone.
- デバイスとスマートフォンの両方を再起動します。
- On your phone's Bluetooth settings, forget the device and attempt to pair again.
- スマートフォンのオペレーティング システムが最新であることを確認してください。
- ヘルメット/ヘッドセットから音声が出ない:
- Confirm that your Bluetooth helmet or headset is successfully paired to your smartphone.
- Check volume settings on both the device and your smartphone.
- Ensure audio is routed correctly through your smartphone's audio settings.
- Screen glare/poor visibility:
- Adjust screen brightness manually through the device settings.
- Utilize the anti-glare design and sun visor to minimize reflections.
- Switch to night mode if riding in low light conditions for reduced glare.
8. 仕様
| 表示サイズ | 6.25インチ |
| 解決 | 1600x600 |
| 防水等級 | IP67 |
| 接続性 | Wireless Apple CarPlay, Wireless Android Auto, Dual Bluetooth |
| 音声コントロール | Siri、Googleアシスタント |
| 動作温度 | -25°C ~ 60°C (-13°F ~ 140°F) |
| 取り付けタイプ | ハンドルバーマウント、リアview ミラーマウント |
| アイテム重量 | 1.43ポンド |
| パッケージ寸法 | 7 x 5 x 5インチ |
| 車両サービスタイプ | オートバイ |
9. メンテナンス
- クリーニング: Clean the screen and exterior surfaces with a soft, damp 布で拭いてください。研磨剤入りの洗剤、溶剤、または刺激の強い化学薬品は、ディスプレイやコンピューターに損傷を与える可能性があるため、使用しないでください。asing.
- 取り付けチェック: Periodically check all mounting points and screws for tightness. Vibrations from riding can loosen connections over time.
- ケーブル検査: Inspect the power cable and any other connections for signs of wear, fraying, or corrosion. Replace damaged cables immediately.
- ストレージ: When not in use for extended periods, store the device in a dry, temperate environment, away from direct sunlight and extreme temperatures.
10. 保証情報
This Jansite product is covered by a 1年間の限定保証 from the original date of purchase. The warranty covers manufacturing defects in materials and workmanship under normal use.
保証はありません ない カバー:
- 誤用、乱用、事故、または怠慢によって生じた損害。
- Damage resulting from unauthorized modifications or repairs.
- 通常の消耗。
- Damage from improper installation or power connection.
To make a warranty claim, you will need to provide proof of purchase. Please retain your sales receipt or other documentation as evidence of the purchase date.
11. カスタマーサポート
For technical assistance, troubleshooting guidance, or warranty inquiries, please contact Jansite customer support. Refer to the product packaging or the official Jansite website for the most current contact information, including email and phone numbers.
When contacting support, please have your product model number and a detailed description of the issue ready to facilitate a quicker resolution.


