
1. はじめに
This manual provides detailed instructions for the installation, operation, and maintenance of your WALI Quad Monitor Mount, model M004S-P. This mount is designed to support one ultrawide monitor (up to 49 inches) on the top bracket and three standard monitors (up to 27 inches) on the lower arm brackets. It features a robust design for enhanced stability and ergonomic adjustability.

Image 1.1: WALI Quad Monitor Mount M004S-P in a multi-monitor setup.
2 製品の特徴
- モニターの互換性: Supports one ultrawide monitor up to 49 inches (max 44 lbs) on the top bracket and three standard monitors up to 27 inches (max 19.8 lbs each) on the lower brackets. Compatible with VESA 75x75mm and 100x100mm mounting patterns.
- 柔軟な調整:
- Top bracket: +20° to -20° tilt, 180° swivel, 360° rotation.
- Side brackets: +45° to -45° tilt, 180° swivel, 360° rotation.
- Height adjustable along the central pole.
- 耐久性のある構造: Constructed from steel for strength, scratch resistance, and long-term stability.
- 簡単なインストール: Offers C-clamp mounting for desks 0.39" to 3.15" thick, and grommet mounting for desks 0.39" to 1.57" thick. All necessary tools and hardware are included.
- ケーブル管理 Integrated cable management system helps organize and conceal monitor cables for a tidy workspace.

Image 2.1: Monitor compatibility and VESA patterns.

Image 2.2: Adjustment ranges for tilt, swivel, and rotation.
3. パッケージ内容
インストールを開始する前に、すべてのコンポーネントが揃っていることを確認してください。
- 1 x WALI Quad Monitor Desk Mount (Black)
- 1 x Mounting Hardware Kit (includes screws, spacers, and Allen keys)
- ユーザーマニュアル x 1
4. 安全情報
Read all instructions carefully before installation. If you do not understand these instructions or have doubts about the safety of the installation, please contact a qualified installer or customer support.
- 重量容量: Do not exceed the maximum weight capacity of 44 lbs for the top bracket and 19.8 lbs per lower bracket. Exceeding this limit may result in serious injury or product damage.
- モニターサイズ: Ensure your monitors fit within the specified size ranges (up to 49" ultrawide for top, up to 27" for lower).
- VESAの互換性: Confirm your monitors have VESA 75x75mm or 100x100mm mounting holes.
- Desk Stability: Ensure your desk surface is stable and strong enough to support the combined weight of the mount and all attached monitors.
- 適切な取り付け: Install the mount strictly according to the instructions provided. Improper installation can lead to equipment damage or personal injury.
- 可動部品: Be cautious of pinch points when adjusting the monitor arms.
5. セットアップとインストール
The WALI Quad Monitor Mount offers two installation options: C-clamp and Grommet mount. Choose the method suitable for your desk.
5.1 C-Clamp インストール
This method is suitable for desks with a thickness between 0.39 inches and 3.15 inches.
- C-clを取り付けるamp base to the edge of your desk. Ensure the clamp 動かないようにしっかりと締め付けられます。
- メインポールをC-clに挿入しますamp base and secure it with the provided screws.
- Slide the monitor arm assemblies onto the main pole at your desired heights. Tighten the adjustment screws to hold them in place.
- Attach the VESA plates to the back of your monitors using the appropriate screws and spacers from the hardware kit.
- Slide the monitors (with VESA plates attached) onto the monitor arms. Secure them with the locking mechanisms.
5.2 グロメットマウントの取り付け
This method is suitable for desks with a grommet hole and a thickness between 0.39 inches and 1.57 inches.
- If your desk has an existing grommet hole, remove the plastic cover.
- Place the grommet base plate over the hole.
- Insert the main pole through the grommet base plate and the desk hole.
- From underneath the desk, attach the grommet mounting plate and tighten the bolt to secure the pole firmly to the desk.
- Follow steps 3-5 from the C-clamp installation to attach the monitor arms and monitors.
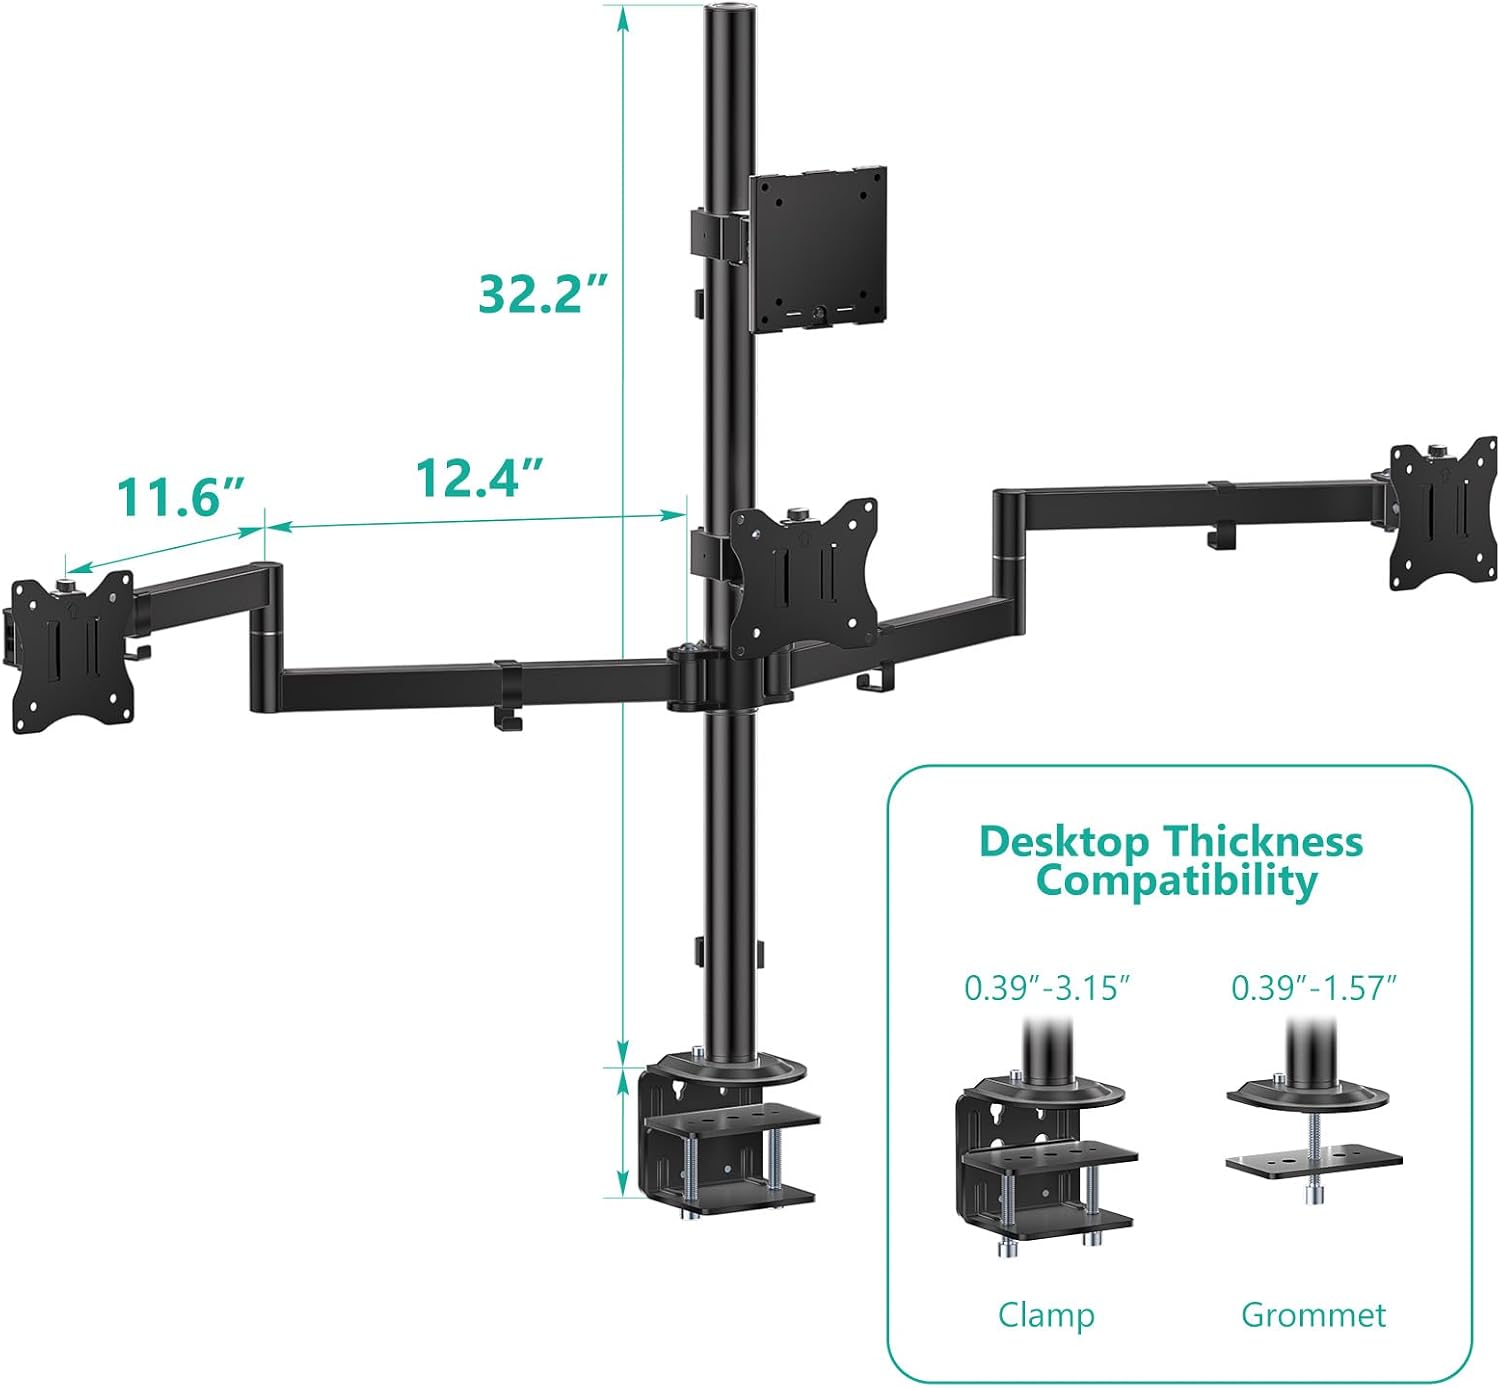
Image 5.1: C-clamp and Grommet mount installation details.

画像5.2: 詳細 view of mounting options.
5.3 ケーブル管理
Utilize the integrated cable clips along the main pole and monitor arms to route and organize your monitor cables. This helps maintain a clean and organized workspace.

Image 5.3: Cable management system.
6. 操作手順
The WALI Quad Monitor Mount allows for various adjustments to achieve an optimal ergonomic viewing の経験。
- 高さ調整: Loosen the collar on the main pole to slide the monitor arm assemblies up or down. Retighten the collar once the desired height is reached.
- 傾き調整: The top bracket can tilt +20° to -20°, and side brackets can tilt +45° to -45°. Use the provided Allen key to adjust the tilt tension if monitors are too loose or too stiff.
- スイベル調整: All brackets offer 180° swivel. Gently rotate the monitor to the desired angle.
- 回転調整: All brackets allow for full 360° rotation, enabling portrait or landscape orientation.
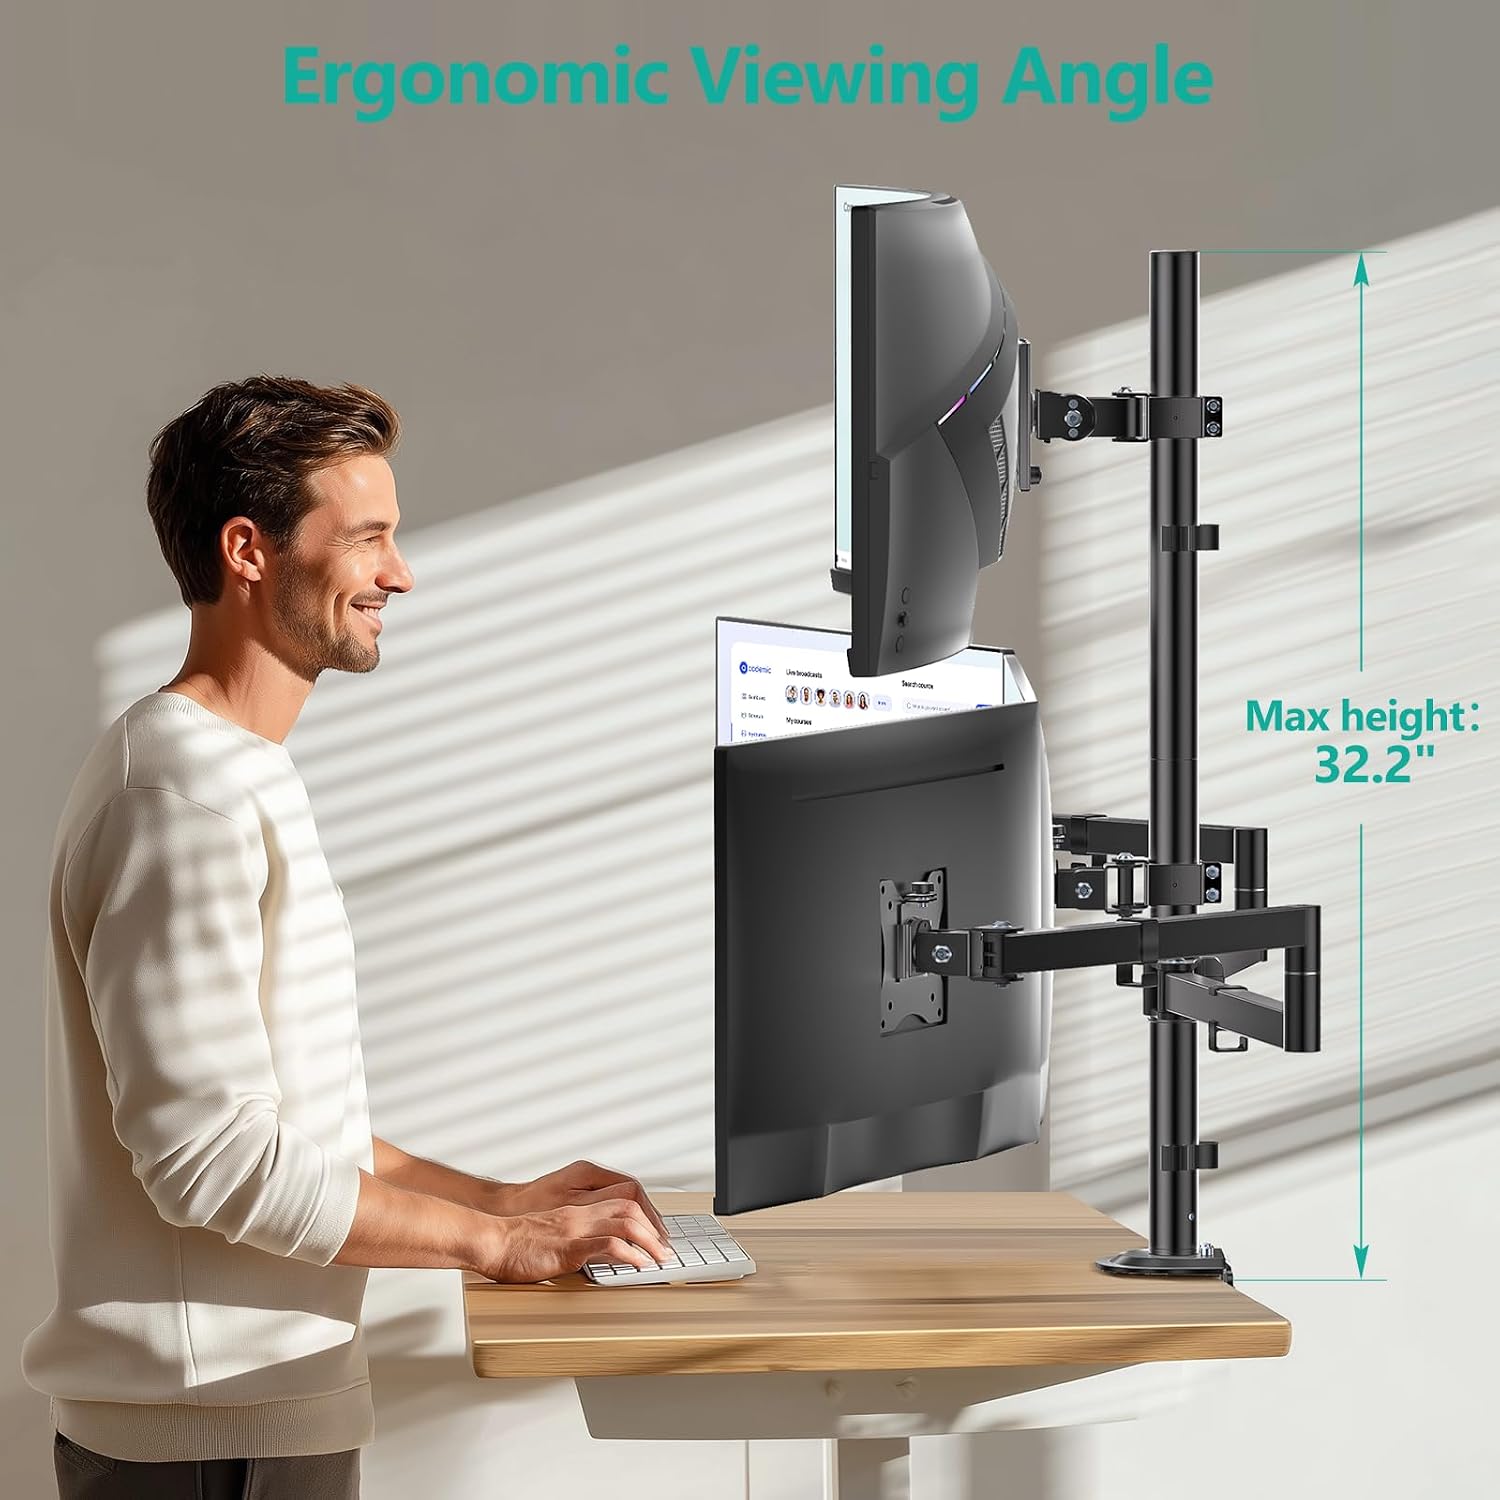
Image 6.1: Ergonomic height adjustment.

Image 6.2: Monitor mount used in sitting and standing positions.
7. メンテナンス
定期的なメンテナンスにより、モニター マウントの寿命が長くなり、安全に動作することが保証されます。
- クリーニング: マウントを柔らかくてdで拭きますamp 布で拭いてください。研磨剤入りの洗剤や溶剤は使用しないでください。
- 定期点検: すべてのネジと接続部がしっかりと締まっているか定期的に点検してください。必要に応じて締め直してください。
- 張力調整: If monitors begin to sag or become difficult to adjust, use the provided Allen keys to adjust the tension screws on the tilt and swivel mechanisms.
8。 トラブルシューティング
| 問題 | 考えられる原因 | 解決 |
|---|---|---|
| Monitor sags or tilts downward. | Tilt mechanism tension is too loose. | Tighten the tilt adjustment screw on the back of the VESA plate using the appropriate Allen key. |
| Monitors are difficult to move or adjust. | 調整ネジがきつすぎます。 | Slightly loosen the tension screws on the relevant joints (tilt, swivel) until movement is smooth. |
| マウントが不安定になったりぐらついたりします。 | C-clamp or grommet mount is not securely tightened; desk surface is not stable. | C-clを確認するamp or grommet bolt is fully tightened. Verify your desk is stable and can support the weight. |
| Monitors do not align perfectly. | Individual arm adjustments needed. | Utilize the tilt, swivel, and height adjustments on each arm to fine-tune monitor alignment. |
9. 仕様
- モデル: M004S-P
- ブランド: ワーリ
- 取り付けタイプ: テーブルトップマウント(C-clamp またはグロメット)
- 材料: 金属
- 色: 黒
- 対応デバイス: モニター
- Maximum Supported Screen Size (Top Bracket): 49 inches (Ultrawide)
- Maximum Supported Screen Size (Lower Brackets): 27インチ(標準)
- Minimum Supported Screen Size: 13インチ
- Max Weight Capacity (Top Bracket): 44ポンド
- Max Weight Capacity (Lower Brackets): 片腕あたり19.8ポンド
- VESAの互換性: 75x75mm、100x100mm
- 移動タイプ: 傾斜、回転、旋回
- Tilt Angle (Top Bracket): +20° から -20°
- Tilt Angle (Side Brackets): +45° から -45°
- スイベル角度: 180°
- 回転: 360°
- C-Clamp デスクの厚さ: 0.39インチから3.15インチ
- グロメットマウントデスクの厚さ: 0.39インチから1.57インチ
- 国際コード: 811278027374

Image 9.1: VESA compatibility and weight limits.
10. 保証とサポート
保証: This WALI product is covered by a 1-Year Manufacturer Warranty.
カスタマーサポート: For any questions, assistance with installation, or troubleshooting, please contact WALI customer support. Experienced and friendly US-based customer support is available to assist 7 days a week. Refer to the product packaging or the official WALI web連絡先の詳細についてはサイト。

