1. はじめに
This manual provides essential information for the safe and efficient installation, operation, and maintenance of your EARU Electric 3-Phase Auto Transfer Switch (ATS) - 440V 63A. Please read this manual thoroughly before installation and operation to ensure proper functionality and to prevent damage or injury.
The ATS is designed to provide uninterrupted power by automatically transferring loads between phases in a three-phase supply system. It features intelligent monitoring and protection against phase failure, over/under voltage, and overcurrent conditions, ensuring the stability and safety of connected equipment.
2. 安全情報
警告:感電の危険があります。設置およびメンテナンスは、必ず資格のある担当者が行ってください。
- Always disconnect power before installing or servicing the ATS.
- すべての配線が地域および国の電気規格に準拠していることを確認してください。
- 正しいボリュームを確認するtagデバイスを接続する前に、電源と電流定格を確認してください。
- デバイスが破損していると思われる場合は操作しないでください。
- 電気機器に子供を近づけないでください。
3.製品オーバーview
The EARU Electric 3-Phase ATS is an intelligent device that continuously monitors your three-phase power supply. It automatically switches single-phase loads to a healthy phase in case of a phase failure or imbalance, ensuring continuous operation of critical equipment.
3.1. パッケージ内容
- 1 x EARU Electric 3-Phase Auto Transfer Switch (ATS)
3.2. Front Panel and Indicators

画像の説明: The front panel of the ATS features a digital display showing voltage for L1, L2, L3 phases and current for L1. Below the display are indicators for Power, Over-voltage (>V), Under-voltage (<V), and Over-current (>I). Control buttons include 'SET' (Menu key), 'Digit+/Up', 'Digit-/Down', and 'Manual ON/OFF' (Power button).
The digital display provides real-time voltage readings for each phase (L1, L2, L3) and the current for L1. Status indicators alert you to the operational state and any detected faults:
- 力: Output indication.
- >V: オーバーボリュームtage表示。
- <V: アンダーボリュームtage表示。
- >私: Over-current indication.
Control buttons allow for parameter settings and manual operation:
- セット: Menu key for accessing settings.
- Digit+/Up: Increases value or navigates up in menus.
- Digit-/Down: Decreases value or navigates down in menus.
- 手動オン/オフ: Power button for manual control.
4. セットアップとインストール
The ATS is designed for standard DIN rail mounting. Ensure sufficient space for ventilation and wiring connections.
4.1.配線図
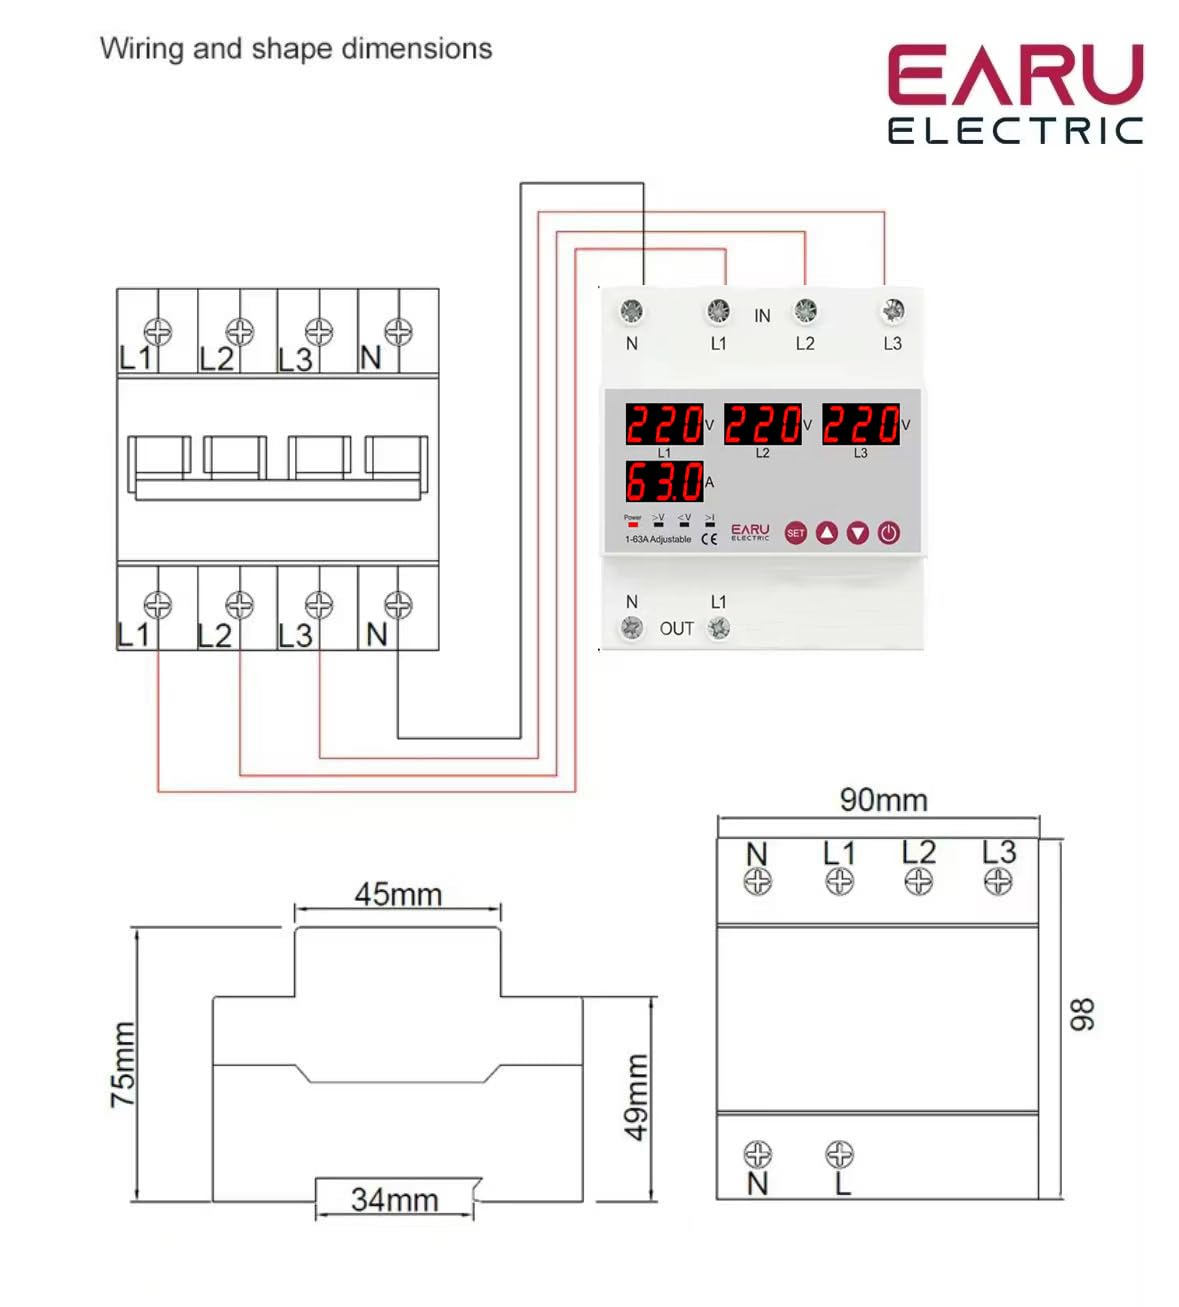
画像の説明: A detailed wiring diagram illustrates the connection points for the ATS. The top terminals are labeled 'IN' with connections for N, L1, L2, L3. The bottom terminals are labeled 'OUT' with connections for N and L1. The diagram shows how to connect the three-phase input to the ATS and how a single-phase load (L1 and N) is connected to the output, with internal connections for phase monitoring and switching.
Follow the wiring diagram carefully. Incorrect wiring can lead to device malfunction or electrical hazards.
- Connect the incoming three-phase power supply (N, L1, L2, L3) to the 'IN' terminals.
- Connect the single-phase load (N, L1) to the 'OUT' terminals. The ATS will manage the phase transfer for the L1 output.
- Ensure all connections are secure and tightened to prevent loose contacts and overheating.
4.2. 初期電源投入
After completing the wiring, restore power to the system. The ATS will power on and begin monitoring the phases. The digital display will show the current voltage readings for each phase. If all phases are stable and within acceptable limits, the ATS will provide power to the output.
5. 操作手順
The ATS operates automatically, but you can adjust its protection parameters to suit your specific requirements.
5.1. ディスプレイとインジケータの理解
The digital display continuously shows the real-time voltage of each phase (L1, L2, L3) and the current on L1. The indicator lights provide quick visual feedback on the device's status and any detected anomalies.
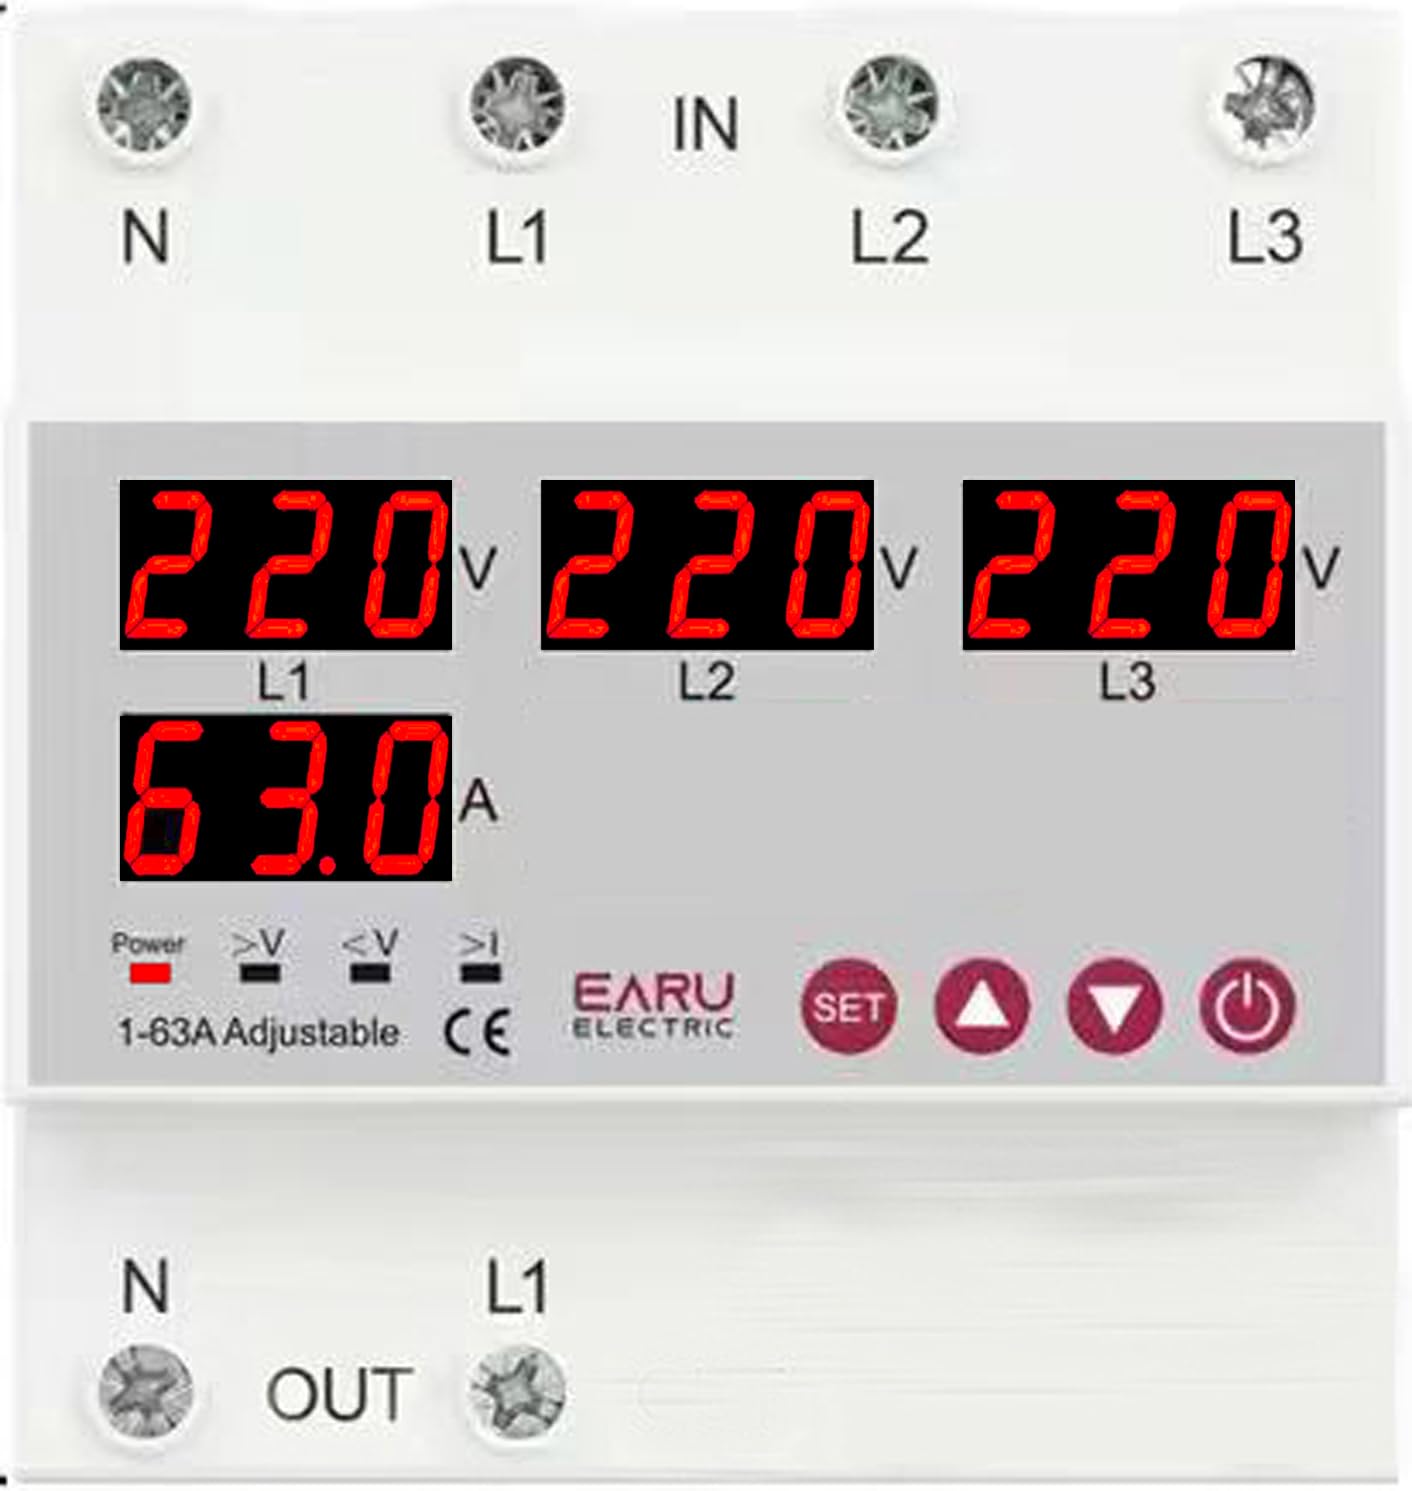
画像の説明: クローズアップ view of the ATS digital display. It shows '220V' for L1, L2, and L3, and '63.0A' for L1 current. Below these readings are small indicator icons for Power, >V (Over-voltage), <V (Under-voltage), and >I (Over-current).
5.2. Adjusting Protection Parameters
Use the 'SET' button to enter the parameter setting mode. Use the 'Digit+/Up' and 'Digit-/Down' buttons to navigate through settings and adjust values. Press 'SET' again to confirm and save changes.
| パラメータ | 設定範囲 | デフォルト設定 |
|---|---|---|
| Over Current Protection Setting Range | 1-63A/100A | 30A |
| Continuous Over Current Protection Times | 0-20 回 | オフ |
| オーバーVoltage Protection Setting Range | 230-300V | 270V |
| オーバーVoltage Protection Recover Setting Range | 225-295V | 265V |
| 巻の下でtage Protection Setting Range | 140-210V | 170V |
| 巻の下でtage Protection Recover Setting Range | 145-215V | 175V |
| 巻tage & Current Protection Recover Delay | 1-500秒 | 30秒 |
5.3. Automatic Phase Transfer
The ATS automatically monitors the three input phases (L1, L2, L3). If a phase failure or significant voltage imbalance (over/under voltage) is detected on the currently supplying phase, the device will automatically transfer the single-phase output load to a healthy, stable phase within the same supply. This process is designed to be seamless and rapid, minimizing power interruption to connected equipment.
5.4. 自動回復
Once the primary phase recovers and stabilizes, the ATS will intelligently switch the load back to the primary source, ensuring optimal power distribution and preventing equipment damage from unstable power. The recovery delay can be configured as per your operational needs.
6. メンテナンス
The EARU Electric ATS is designed for minimal maintenance. However, periodic checks are recommended to ensure optimal performance and longevity.
- クリーニング: デバイスを清潔に保ち、ほこりやゴミを取り除いてください。清掃には乾いた柔らかい布を使用してください。液体クリーナーは使用しないでください。
- 接続チェック: すべての配線接続がしっかりと固定され、腐食がないことを確認するために定期的に点検してください。
- 環境条件: 動作環境が指定された温度と湿度の範囲内であることを確認してください。
7。 トラブルシューティング
If you encounter issues with your ATS, refer to the following common problems and solutions:
| 問題 | 考えられる原因 | 解決 |
|---|---|---|
| 電力出力なし | No input power; all phases unstable; device in fault state. | Check incoming power supply. Verify all phases are stable. Check fault indicators. |
| ">V" or "<V" indicator lit | オーバーボリュームtageまたは不足量tage detected on a phase. | 入力ボリュームを確認してくださいtage stability. The ATS will automatically transfer if another phase is healthy. |
| ">I" indicator lit | Over-current detected on the output. | Reduce load on the output. Check for short circuits in the connected equipment. |
| Device not transferring phases | No healthy alternative phase available; transfer delay setting too long. | Ensure at least one healthy phase is present. Check and adjust the transfer delay settings. |
| デジタル表示が動作しない | No power to the device; internal fault. | Check power supply. If power is present and display is off, contact support. |
For issues not covered here, please contact EARU customer support.
8. 仕様

画像の説明: This image displays the physical dimensions of the ATS (90mm width, 96mm height, 66mm depth) and a table of detailed technical specifications, including current rating, voltage, frequency, and various protection setting ranges.
| 特徴 | 詳細 |
|---|---|
| ブランド | EARU |
| モデル番号 | EARU-1012 |
| 操作モード | オンオフ |
| 現在の評価 | 63 Amps |
| 営業巻tage | 440 Volts (AC 3*220V (N-L1/L2/L3)) |
| 定格周波数 | 50/60Hz |
| 連絡先の種類 | 通常オープン |
| コネクタタイプ | Standard DIN rail 63A |
| 回路タイプ | 4ウェイ |
| 連絡先 | 銅 |
| Over Current Protection Setting Range | 1-63A/100A (Default 30A) |
| Continuous Over Current Protection Times | 0-20 Times (Default OFF) |
| オーバーVoltage Protection Setting Range | 230-300V (Default 270V) |
| オーバーVoltage Protection Recover Setting Range | 225-295V (Default 265V) |
| 巻の下でtage Protection Setting Range | 140-210V (Default 170V) |
| 巻の下でtage Protection Recover Setting Range | 145-215V (Default 175V) |
| 巻tage & Current Protection Recover Delay | 1~500秒(デフォルト30秒) |
| アイテム重量 | 450グラム |
| パッケージ寸法 | 15 x 15 x 15 cm |
| 原産国 | インド |
9. 保証とサポート
9.1. 保証情報
The EARU Electric 3-Phase Auto Transfer Switch (ATS) comes with a 1年間のメーカー保証 ご購入日から1年間有効です。本保証は、通常の使用における材料および製造上の欠陥を対象とします。不適切な取り付け、誤用、事故、または許可されていない改造による損傷は保証の対象外となります。
9.2. カスタマーサポート
For technical assistance, warranty claims, or any questions regarding your EARU Electric ATS, please contact your retailer or the manufacturer directly. Ensure you have your product model number (EARU-1012) and proof of purchase available when contacting support.