1. はじめに
This manual provides essential information for the safe and efficient operation, setup, and maintenance of your ONEVAN Electric Bag Sewing Machine. Please read it thoroughly before using the device to ensure proper function and to prevent injury or damage.
The ONEVAN Electric Bag Sewing Machine is designed for industrial bag closing applications, capable of handling various materials such as fabric, jute, and kraft paper bags. It features a powerful 210W copper motor and a portable, battery-powered design for maximum flexibility.
2. 安全に関する注意事項
Always follow these safety guidelines to reduce the risk of electric shock, fire, or serious injury.
- すべての指示を読む: 使用する前に機械の操作をよく理解しておいてください。
- 作業エリアを清潔に保つ: 雑然としたエリアは事故を招きます。
- 危険な環境を避けてください: dで機械を使用しないでくださいamp 湿気の多い場所には設置しないでください。雨にさらさないでください。
- 子供を近づけないでください: 子供や訓練を受けていない人員に機械を操作させないでください。
- ワークピースを固定する: Ensure the bag or material being sewn is stable to prevent unexpected movement.
- 適切なアクセサリを使用する: 製造元が推奨するアクセサリのみを使用してください。
- 電源を切る: Always disconnect the power source (remove battery) before making adjustments, changing needles, or performing maintenance.
- 誤って始動しないようにする: Ensure the switch is in the OFF position before inserting the battery.
- 適切な服装を着用してください: 可動部分に引っかかる可能性のある、ゆったりとした衣服や宝石類は身につけないでください。
- 目の保護: 飛散する破片から身を守るために、必ず安全メガネを着用してください。
- バッテリーの安全性: Use only the specified charger and batteries. Do not short-circuit, incinerate, or expose batteries to high temperatures.
- Sharp Needle: The needle is sharp. Handle with care to avoid injury.
3 製品の特徴
The ONEVAN Electric Bag Sewing Machine is engineered for high performance and durability.
- 強力なモーター: Equipped with a 210W pure copper motor for efficient and reliable operation.
- High Sewing Speed: Achieves 1800-2600 stitches per minute for rapid bag closing.
- ポータブルデザイン: Lightweight at approximately 3 kg, with a compact ergonomic design for comfortable extended use.
- 電池式: Powered by two 3000mAh lithium batteries, providing 3-4 hours of continuous operation.
- 調整可能なステッチ長さ: Stitch length can be adjusted from 7-11 mm to suit different materials.
- Adjustable Sewing Depth: Sewing depth is adjustable from 0.2-6 mm.
- Maximum Sewing Thickness: Capable of sewing materials up to 8-15 mm thick.
- 自動糸切り: Enhances productivity by automatically cutting the thread after sewing.
- 多用途な素材の互換性: Suitable for various materials including general fabrics, woven bags, paper bags, and leather.

画像: 上view of the ONEVAN Electric Bag Sewing Machine highlighting its power and stitching capabilities.

Image: The machine is suitable for a wide range of materials, including various types of bags and fabrics.
4. セットアップ
4.1。 開梱と検査
Carefully remove all components from the packaging. Inspect the machine for any signs of damage during transit. Ensure all listed accessories are present.
4.2. バッテリーの取り付けと充電
The machine operates on two 3000mAh lithium batteries. Before first use, ensure the batteries are fully charged using the provided charger.
- Insert the charged batteries into the designated battery slots on the machine.
- To charge, connect the charger to a power outlet and then to the battery pack.
- A full charge typically provides 3-4 hours of continuous operation.

Image: The machine is powered by two high-capacity 3000 mAh batteries, ensuring extended operation.
4.3. Thread Installation
Correct thread installation is crucial for proper stitching. Follow these steps carefully:
- Pass the thread through the hole in the top metal guide.
- Pass the thread through the two holes in the white tension button.
- Turn the ring at the back of the machine to lift the needle bar and pass the thread through the guide.
- Pass the thread from the front of the needle hole to the back. Ensure the thread is stretched taut.
- Finally, put the needle bar down and tighten the white tension button.
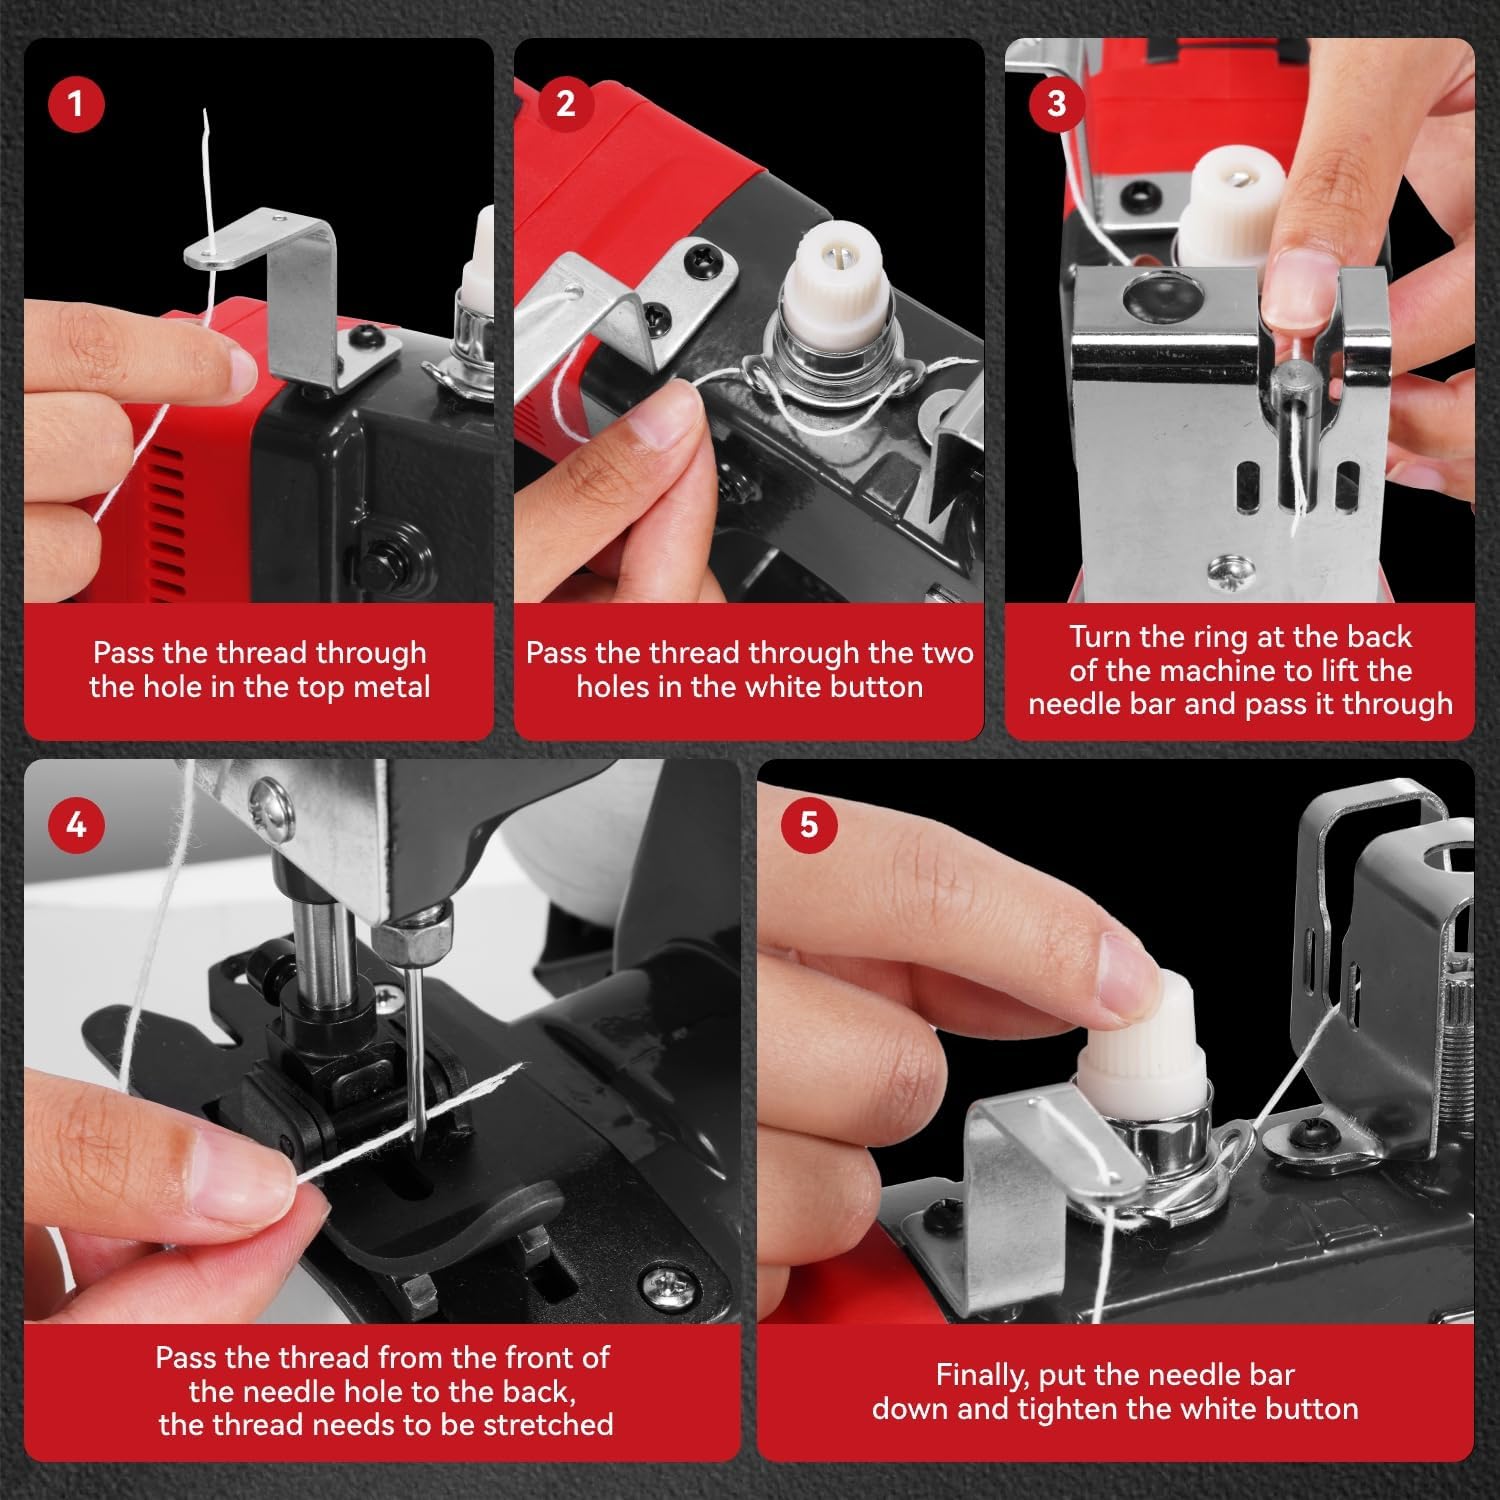
Image: Step-by-step guide for correctly threading the sewing machine.
4.4. Adjusting Suture Pressure and Stitch Spacing
The machine allows for adjustment of suture pressure and stitch spacing to optimize performance for different materials.
- Suture Pressure: Adjust the white knob at the top of the machine to control the pressure on the thread.
- Stitch Spacing (Length): Use the red dial on the side of the machine to adjust the stitch length between 7-11 mm.

Image: Details on how to adjust suture pressure and stitch spacing for optimal sewing results.
5. 操作手順
Once the machine is set up and threaded, you can begin sewing.
- 電源オン: Ensure the battery is inserted and the power switch is in the 'ON' position.
- ポジショニング: Hold the machine firmly with one hand, guiding the material with the other. Position the bag opening under the needle.
- 縫製を開始する: Press the trigger to start the motor and begin sewing. Guide the machine smoothly along the edge of the bag.
- 自動糸切り: At the end of the seam, the machine's automatic thread cutter will engage to trim the thread, improving efficiency.
- 電源を切る: Release the trigger and switch the power to 'OFF' when finished or when pausing operation.

Image: Demonstrates the proper way to hold and operate the sewing machine for bag closing.
5.1. 操作ビデオ
Video: This video demonstrates the general operation of the ONEVAN Electric Bag Sewing Machine, showing how to handle the device and sew various materials.
6. メンテナンス
定期的なメンテナンスにより、ミシンの寿命が長くなり、最適なパフォーマンスが保証されます。
- クリーニング: Regularly clean dust and lint from the needle area, thread path, and motor vents using a soft brush or compressed air. Ensure the battery is removed before cleaning.
- 潤滑: Apply a small amount of sewing machine oil to moving parts as indicated in the diagram (if provided with the physical product) or to areas of friction.
- 針の交換: Replace the needle if it becomes bent, dull, or broken. Always use genuine replacement needles. To replace, loosen the needle clamp ネジを締め、古い針を取り外し、平らな面を後ろに向けて新しい針を挿入し、ネジを締めます。
- バッテリーのケア: Store batteries in a cool, dry place. Do not leave them fully discharged for extended periods.
7。 トラブルシューティング
一般的な問題とその解決策については、このセクションを参照してください。
| 問題 | 考えられる原因 | 解決 |
|---|---|---|
| マシンが起動しない | Battery not inserted correctly or discharged; Power switch off. | Check battery insertion and charge level. Ensure power switch is ON. |
| 糸が頻繁に切れる | 糸通しが間違っている、針が曲がっているか鈍くなっている、糸の張力が強すぎる、糸の品質が悪い。 | Re-thread the machine carefully. Replace needle. Adjust thread tension. Use good quality thread. |
| スキップされたステッチ | Needle bent or incorrect size for material; Incorrect threading; Material not feeding smoothly. | Replace needle with correct type/size. Check threading. Ensure material feeds evenly. |
| 不均一なステッチ | Incorrect stitch length setting; Inconsistent material feeding. | Adjust stitch length. Maintain consistent speed and pressure when guiding material. |
| 機械の詰まり | Excess lint/debris; Thread tangled in mechanism. | Remove battery. Carefully clear any jammed thread or debris. Clean the machine. |
8. 仕様
| 特徴 | 仕様 |
|---|---|
| ブランド | ONEVAN |
| モーター出力 | 210W純銅モーター |
| 電池のタイプ | Lithium-ion (3000mAh x 2) |
| バッテリー駆動時間 | 3~4時間(連続) |
| 縫い速度 | 1800-2600 stitches/minute |
| モーター速度 | 12000-18000rpm |
| 調整可能なステッチ長さ | 7~11mm |
| Adjustable Sewing Depth | 0.2~6mm |
| Max Sewing Thickness | 8~15mm |
| 重さ | 約3kg |
| 寸法(長さ×幅×高さ) | 30 x 10 x 20 cm |
| 材料 | アクリロニトリルブタジエンスチレン(ABS) |
| 色 | 赤 |
9. 保証とサポート
保証情報やテクニカルサポートについては、ご購入時に付属の説明書をご参照いただくか、販売元に直接お問い合わせください。保証請求の際に必要となるため、購入証明書を保管してください。