
1. はじめに
The Raddy VP7 Wireless Weather Station provides comprehensive weather monitoring for your home and surroundings. This manual details the setup, operation, and maintenance of your device, ensuring accurate and reliable weather data.
2. 箱の中身
すべてのコンポーネントを慎重に開梱し、次のアイテムが揃っていることを確認します。
- 取扱説明書
- 屋外センサ
- 風見鶏
- ソーラーパネル
- 屋内ディスプレイコンソール
3 製品の特徴
- 7.4インチカラーディスプレイ: Provides detailed weather information including indoor/outdoor temperature and humidity, precipitation, 12-hour weather forecasts, atomic clock, RCC calendar, wind direction and speed, dew point, felt temperature, atmospheric pressure, and daily maximum/minimum temperatures.
- High-Precision Outdoor Sensors: Includes a rain funnel, wind vane, speed sensor, thermo-hygrometer with anti-radiation shield, and a solar panel. Designed for accurate data with a communication range of up to 100 meters and resistance to harsh weather.
- カスタマイズ可能なアラート: Configure alerts for maximum/minimum temperature and humidity, wind speed, and precipitation. Features two alarms for weekdays and weekends.
- Scalable Monitoring: Connect up to three additional Raddy R5 remote sensors to monitor up to five different areas (e.g., baby's room, garden, living room, kitchen).
4. セットアップ
4.1 屋外センサーの設置
Proper placement of the outdoor sensor is crucial for accurate readings. Choose an open location, free from obstructions, that allows for accurate wind, rain, and temperature measurements.
- Assemble the wind cups and wind vane onto the sensor unit.
- Mount the sensor using the provided hardware. Ensure it is level using a spirit level for accurate rain and wind measurements.
- Insert 3 AA batteries (not included) into the outdoor sensor's battery compartment.

Image: The Raddy VP7 outdoor sensor showing its main components: Wind Cups, Rain Funnel, Thermo-Hygrometer Radiation Shield, Solar Panel, and Wind Vane.

Image: Various mounting options for the outdoor sensor, including top, side, and pole mounting, along with a detailed view of the sensor's battery compartment and reset button.
4.2 屋内ディスプレイコンソールのセットアップ
- Place the indoor display console in a central location within range of the outdoor sensor (up to 100 meters).
- Connect the power adapter to the console and a power outlet. Alternatively, insert 3 AA batteries (not included) for backup power. Note that continuous backlight requires AC power.
- The console will automatically search for the outdoor sensor and synchronize data. This may take a few minutes.

Image: Illustration showing the wireless data transmission between the indoor display console and the outdoor sensor, highlighting the 330ft (100m) range.
5. 操作手順
5.1ディスプレイオーバーview
The 7.4-inch color display presents various weather parameters. Familiarize yourself with the layout:
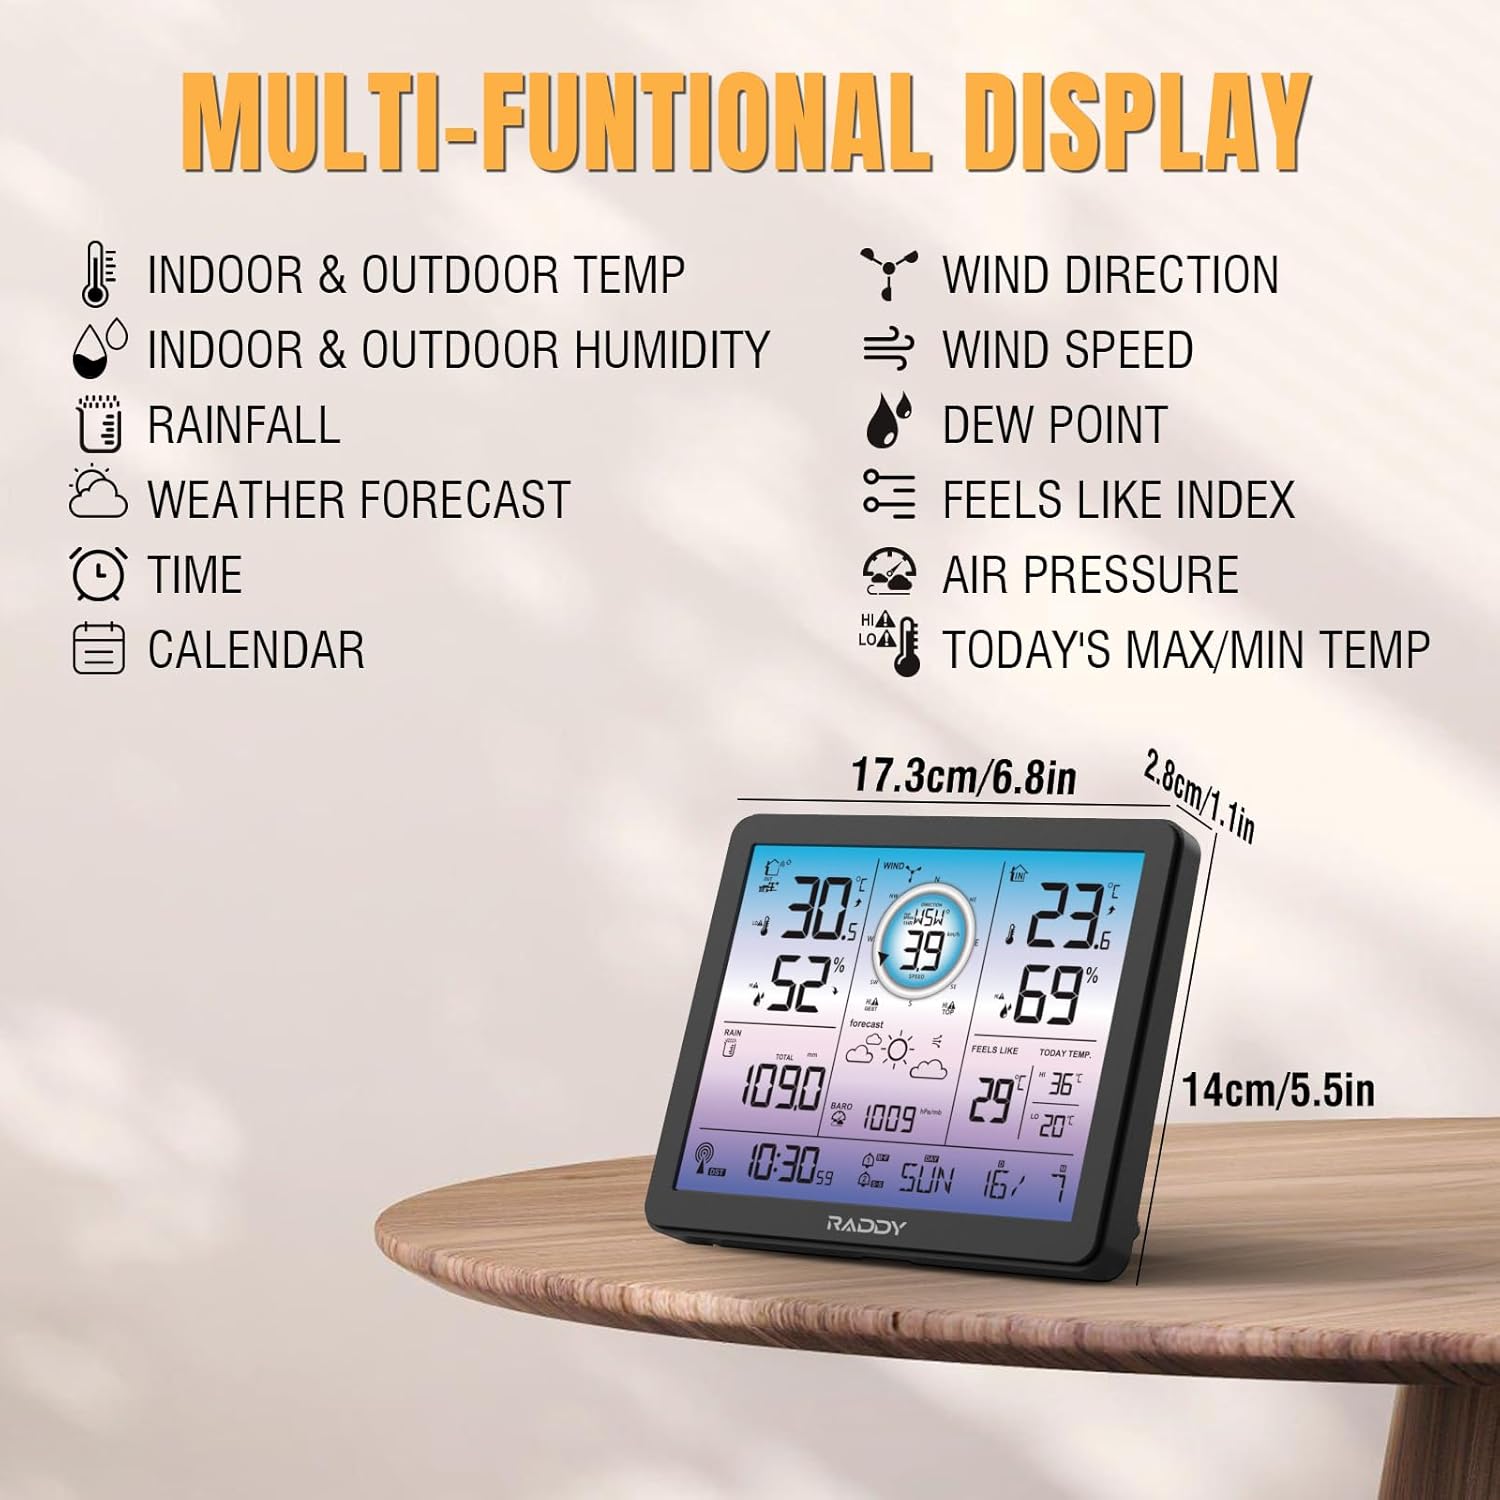
Image: The Raddy VP7 indoor display console showing its multi-functional display with various weather data points and dimensions.
- 左上: Indoor & Outdoor Temperature, Indoor & Outdoor Humidity
- 右上: Wind Direction, Wind Speed, Dew Point, Feels Like Index
- 真ん中: Rainfall, Weather Forecast, Air Pressure
- 底: Time, Calendar, Today's Max/Min Temperature
5.2 時刻と日付の設定
The Raddy VP7 features an atomic clock with DCF functionality for automatic time synchronization. If manual adjustment is needed:
- 「SET」ボタンを押して時間設定モードに入ります。
- Use the '+' and '-' buttons to adjust values.
- Press 'SET' again to confirm and move to the next setting (e.g., year, month, day).

Image: The Raddy VP7 display console highlighting the atomic clock with DCF feature for precise timekeeping.
5.3 Understanding Weather Data
The display provides real-time and forecasted weather information:
- 温度/湿度: Displays current indoor and outdoor readings.
- 風データ: Shows current wind speed and direction.
- 降雨: Tracks daily, weekly, and monthly precipitation.
- 天気予報: Provides a 12-hour forecast based on barometric pressure changes.
- 大気圧: 現在の大気圧を表示します。
5.4アラート
Set custom alerts for various weather conditions:
- Press the 'ALERT' button to cycle through alert settings (temperature, humidity, wind, rain).
- Use '+' and '-' to set desired high/low thresholds.
- Press 'ALERT' again to activate or deactivate the alert.
5.5 バックライトの調整
The display features 4 adjustable backlight levels (LV0 to LV3) for optimal visibility in different lighting conditions.

画像: Four examples of the Raddy VP7 display showing different backlight levels from LV0 (off) to LV3 (brightest).
6. メンテナンス
- クリーニング: ディスプレイコンソールと屋外センサーを柔らかくて乾いた布で拭いてください。amp 布で拭いてください。研磨剤や溶剤は使用しないでください。
- バッテリー交換: Replace batteries in both the outdoor sensor and indoor console when the low battery indicator appears on the display.
- Outdoor Sensor Check: Periodically check the outdoor sensor for debris (leaves, dirt) that might obstruct the rain funnel or wind sensors.
7。 トラブルシューティング
| 問題 | 考えられる原因 | 解決 |
|---|---|---|
| 屋外データは表示されません | Outdoor sensor out of range or low battery. | Relocate sensor closer to console. Replace sensor batteries. |
| 不正確な温度/湿度 | センサーが直射日光や熱源にさらされています。 | Ensure sensor is in a shaded, well-ventilated area. |
| 時刻/日付が正しくありません | DCF signal interference or manual setting error. | Ensure console is away from electronic interference. Manually set time/date if automatic sync fails. |
| 降雨量が記録されない | Rain funnel blocked by debris. | Clear any obstructions from the rain funnel. |
8. 仕様
| 特徴 | 詳細 |
|---|---|
| モデル | VP7 |
| メーカー | ラディ |
| 表示スタイル | デジタルカラーディスプレイ |
| 画面サイズ | 7.4インチ |
| 電源(コンソール) | AC Adapter (included), 3x AA Batteries (not included) |
| 電源(センサー) | 3x AA Batteries (not included), Solar Panel |
| 接続技術 | 無線 |
| ワイヤレス範囲 | 最大100メートル(330フィート) |
| 温度精度 | ±1 °C |
| 含まれるコンポーネント | Instruction Manual, Outdoor Sensor, Wind Vane, Solar Panel, Indoor Display Console |
| 寸法(パッケージ) | 38.1 x 29.7 x 14.8 cm |
| 重量(パッケージ) | 1.7キログラム |
9. 保証とサポート
Raddy provides lifetime technical support for the VP7 Wireless Weather Station. For any questions, issues, or assistance with installation and setup, please contact Raddy customer service. Refer to the product packaging or Raddy's official web連絡先の詳細についてはサイト。