
1. はじめに
This manual provides detailed instructions for the setup, operation, and maintenance of your Generic HY-500B 5MP USB Microscope Camera. Please read this manual thoroughly before using the device to ensure proper function and longevity.
パッケージ内容
- 1 x 5.0MP Microscope Camera
- 1 x USB Line
- 1 x Software DISC
- 1 x 150X C-mount Lens
- 1 x Stand with LED Light
- 電源アダプター x 1
2. 安全情報
デバイスの損傷や怪我を防ぐために、次の安全上の注意事項を守ってください。
- Do not expose the camera or lens to direct sunlight or high temperatures.
- 落としたり、強い衝撃を与えないでください。
- デバイスを水やその他の液体から遠ざけてください。
- 付属の電源アダプターと USB ケーブルのみを使用してください。
- 本装置を分解または改造しないでください。修理は資格のある専門家にご依頼ください。
3. セットアップ
Follow these steps to set up your microscope camera system:
3.1 Assemble the Stand and Camera
- すべてのコンポーネントを箱から開梱します。
- Attach the microscope camera unit to the stand's mounting arm. Ensure it is securely fastened.
- Screw the 150X C-mount lens onto the camera unit.
- Position the LED lights on the stand to illuminate your observation area.

Figure 1: Fully assembled HY-500B microscope camera system.
3.2 Connect to Power and Computer
- Connect the power adapter to the stand's LED lights and plug it into a power outlet.
- Connect the USB line from the microscope camera to an available USB 2.0 port on your computer.

Figure 2: Microscope camera unit connected via USB cable.
3.3 ソフトウェアのインストール
- Insert the provided Software DISC into your computer's optical drive.
- Follow the on-screen instructions to install the microscope camera software. If your computer does not have an optical drive, please contact customer support for alternative software download options.
- Once installed, launch the software. The camera should be automatically detected.
4. 操作手順
This section details how to operate your HY-500B microscope camera for observation and image capture.
4.1 Placing the Specimen
Place the object you wish to observe directly under the microscope lens on the stand's base. Ensure it is stable and well-lit by the LED lights.
4.2 焦点と倍率の調整
- In the software interface, you should see a live feed from the camera.
- Use the focus knob on the stand to adjust the distance between the lens and the specimen until the image appears clear and sharp on your computer screen.
- The 150X C-mount lens provides a fixed magnification. Further digital magnification may be available through the software.
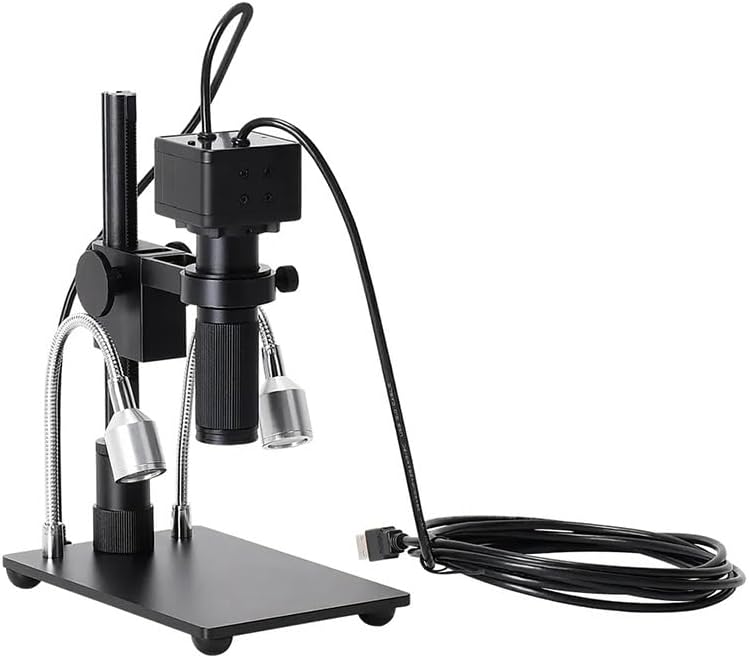
図3: 前面 view of the camera with C-mount lens attached.
4.3 画像とビデオのキャプチャ
Refer to the specific instructions within the installed software for capturing still images and recording video footage. Typically, there are dedicated buttons or menu options for these functions.

図4:内部 view of the 5MP camera sensor.
5. メンテナンス
Proper maintenance ensures the longevity and performance of your microscope camera.
5.1 Cleaning the Lens and Camera
- Use a soft, lint-free cloth to gently wipe the exterior of the camera and stand.
- For the lens, use a specialized lens cleaning solution and a microfiber lens cloth. Avoid touching the lens surface with your fingers.
- 研磨剤入りの洗剤や溶剤は絶対に使用しないでください。
5.2 ストレージ
When not in use, store the microscope camera system in a clean, dry, and dust-free environment. It is recommended to cover the lens to prevent dust accumulation.
6。 トラブルシューティング
If you encounter issues with your HY-500B microscope camera, refer to the following common problems and solutions:
| 問題 | 考えられる原因 | 解決 |
|---|---|---|
| 画面に画像がありません | USB cable not connected; Software not launched; Camera not selected in software. | Ensure USB cable is securely connected. Launch software. Select the HY-500B camera in the software settings. |
| 画像がぼやけている | Incorrect focus; Dirty lens. | Adjust the focus knob on the stand. Clean the lens as described in Section 5.1. |
| LEDライトが動作しない | Power adapter not connected; Faulty adapter. | Ensure the power adapter is securely connected and plugged into a working outlet. Test with another outlet if possible. |
| Software not detecting camera | Driver issue; USB port issue. | Reinstall the software and drivers from the DISC. Try a different USB port on your computer. Restart your computer. |
7. 仕様
- モデル: HY-500B
- カメラ解像度: 5.0メガピクセル
- レンズ: 150X C-mount Lens
- 出力インターフェース: USB 2.0 (480Mb/s)
- ワイヤー長さ: 1.5メートル
- スペクトル応答: 400nm~1000nm
- ダイナミックレンジ: 74 dB (Linear), 85 dB (HDR)
- ピクセルサイズ: 2.2μm×2.2μm
- 商品の重量: Approximately 1.76 pounds (800 Grams)
- パッケージ寸法: 1.18 x 0.79 x 0.39 inches (Camera unit only)
- メーカー: ジェネリック
8. 保証とサポート
We are committed to providing high-quality after-sales service. If you have any questions, require assistance, or encounter any issues not covered in this manual, please do not hesitate to contact our customer support. We are available to serve you wholeheartedly.
For support, please refer to the contact information provided with your purchase or visit the manufacturer's official webサイト。