1. はじめに
Thank you for choosing the Elac SUB1015 Powered Subwoofer. This high-performance subwoofer is engineered to deliver powerful and deep bass, enhancing your home audio experience. Featuring a 10-inch polypropylene cone, the SUB1015 handles low frequencies with clarity and precision. This manual provides essential information for proper setup, operation, and maintenance to ensure optimal performance and longevity of your subwoofer.
2. パッケージ内容
パッケージにすべてのアイテムが揃っていることを確認してください:
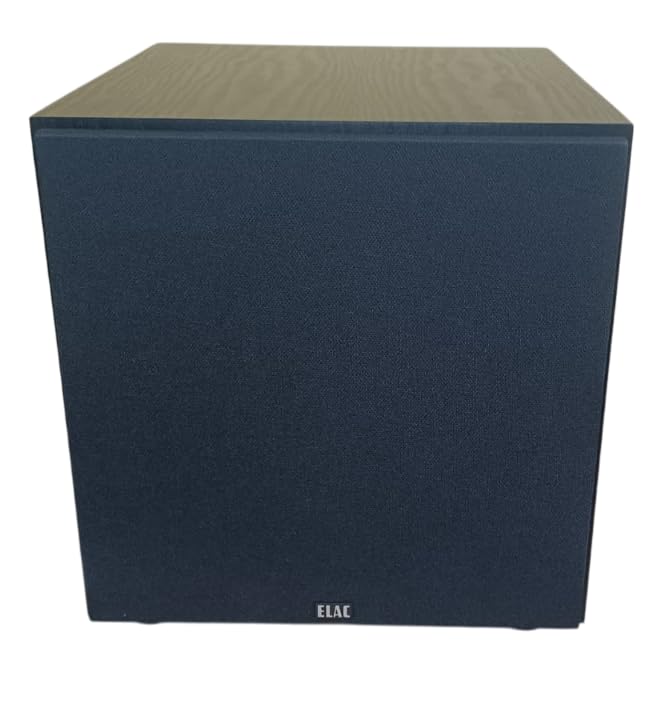
- Elac SUB1015 Powered Subwoofer
- グリル
- AC電源コード
3. セットアップと接続
Proper setup is crucial for achieving the best sound quality from your subwoofer. Follow these steps for installation:
3.1 配置
The placement of your subwoofer significantly impacts its performance. Experiment with different locations in your room to find the optimal spot. Generally, placing the subwoofer in a corner can enhance bass output, but may also lead to boomy sound. Placing it along a wall or near your main speakers can provide a more balanced sound. Ensure there is adequate ventilation around the unit.
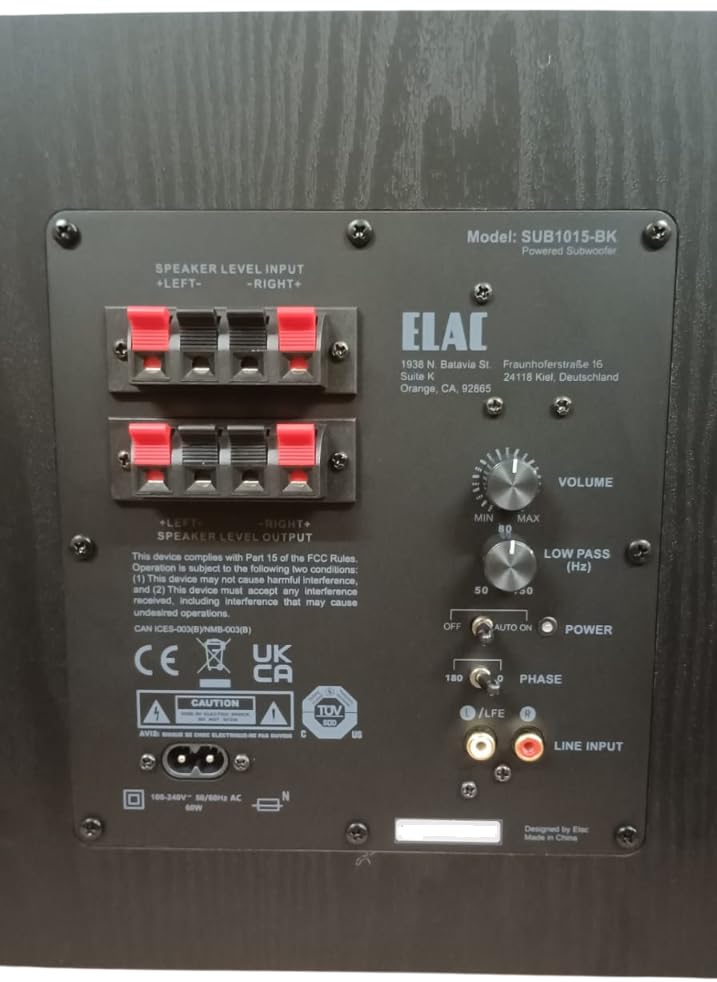
3.2 サブウーファーの接続
The SUB1015 offers both RCA line-level and speaker-level inputs for compatibility with various audio systems.
RCA Line-Level Input (Recommended)
If your AV receiver or pre-amplifier has a dedicated subwoofer output (often labeled LFE, Sub Out, or Pre-Out Sub), use an RCA cable to connect this output to the LINE INPUT (LFE) on the subwoofer's rear panel. This method typically provides the best performance and control.
スピーカーレベルの入力
受信機または amplifier does not have a dedicated subwoofer output, you can connect the subwoofer using the speaker-level inputs. Connect the speaker outputs from your ampへのリファイア スピーカーレベル入力 terminals on the subwoofer. Ensure correct polarity (positive to positive, negative to negative). You can then connect your main speakers to the スピーカーレベル出力 terminals on the subwoofer, or directly to your amplifier if your main speakers are full-range.
3.3電源接続
Once all audio connections are made, connect the supplied AC power cord to the subwoofer's power inlet and then to a suitable wall outlet. The subwoofer is designed for 230 Volts input.
4. 操作手順
After connecting your subwoofer, use the controls on the rear panel to fine-tune its performance.
4.1コントロールオーバーview
- ボリューム: サブウーファー全体の出力レベルを調整します。最初は低い設定から始め、徐々に上げていくことで、低音がメインスピーカーとシームレスに調和するようになります。
- LOW PASS (Hz): Controls the upper frequency limit of the subwoofer. This setting determines where the subwoofer takes over from your main speakers. A common starting point is 80 Hz, but adjust based on your main speakers' low-frequency capabilities.
- 力: このスイッチには 3 つの位置があります。
- OFF: Turns the subwoofer off.
- に: Keeps the subwoofer continuously on.
- 自動: The subwoofer will automatically turn on when an audio signal is detected and enter standby mode after a period of inactivity. This mode consumes less than 0.5W in standby.
- 段階: Adjusts the phase of the subwoofer's output relative to your main speakers. Set to 0° or 180°. Experiment with both settings to find which provides the most coherent and impactful bass in your listening position.
5。 トラブルシューティング
If you encounter issues with your Elac SUB1015 subwoofer, refer to the following common problems and solutions:
- 音が出ない:
- Ensure the power cord is securely connected and the subwoofer is plugged into a live outlet.
- チェックしてください 力 switch position. If set to AUTO, ensure an audio signal is present.
- Verify all audio cables (RCA or speaker-level) are correctly and securely connected.
- 増加 音量 control on the subwoofer.
- Check your receiver/amplifier settings to ensure the subwoofer output is enabled and volume is not muted.
- Weak or Distorted Bass:
- 調整する 音量 control on the subwoofer.
- 調整する LOW PASS (Hz) control. If set too low, you might not hear enough bass.
- 実験してみる 段階 switch (0° or 180°) to see if it improves bass integration.
- Check subwoofer placement. Moving it to a different location, especially closer to a wall or corner, might improve bass response.
- Ensure speaker wires are connected with correct polarity (+ to +, - to -).
- ハミング音またはブザー音:
- サブウーファーを別の電源コンセントに差し込んでみてください。
- すべてのオーディオ ケーブルが適切にシールドされており、電源ケーブルと平行になっていないことを確認します。
- If using RCA connections, try a different RCA cable.
- Disconnect all audio inputs from the subwoofer. If the hum disappears, the issue is likely with the source equipment or cabling.
6. 仕様
Detailed technical specifications for the Elac SUB1015 Powered Subwoofer:
| 特徴 | 仕様 |
|---|---|
| ブランド | エラック |
| モデル番号 | サブ1015-BK |
| スピーカータイプ | パワードサブウーファー |
| Woofer Driver Diameter | 10インチ(ポリプロピレンコーン) |
| Ampリファイアタイプ | クラスD |
| 電力処理能力(RMS/ピーク) | 60W RMS / 120W ピーク |
| 周波数応答 | 36Hz~150Hz |
| 接続技術 | RCA、有線 |
| オーディオ出力モード | 単核症 |
| 入力ボリュームtage | 230ボルト |
| 低待機電力消費 | 0.5W未満 |
| キャビネット仕上げ | ブラックアッシュ |
| 商品の寸法(奥行き x 幅 x 高さ) | 奥行き36.8cm x 幅31cm x 高さ32.5cm |
| アイテム重量 | 9.8キログラム |
| 原産国 | アメリカ合衆国 |
7. メンテナンス
サブウーファーの外観とパフォーマンスを維持するには:
- クリーニング: キャビネットの拭き取りには、柔らかく乾いた布をご使用ください。研磨剤入りの洗剤、ワックス、溶剤の使用は避けてください。
- 配置: サブウーファーは直射日光、熱源、過度の湿気から遠ざけてください。
- 換気: Ensure the rear panel and any vents are not obstructed to allow for proper heat dissipation.
8.製品オーバーview ビデオ
全体像についてはこのビデオをご覧くださいview of the Elac SUB1015 Powered Subwoofer and its key features.
9. 保証とサポート
The Elac SUB1015 Powered Subwoofer comes with a 1年間のメーカー保証.
メーカー情報:
ELACアメリカズ社
1938 N. Batavia St. Suite K
オレンジ、カリフォルニア州 92865
Importer Contact Information (India):
Kripa Electronics (india) Pvt.Ltd
Gala No 4 5 6, Building No. C, Shreeram Complex,
Village Dapoda, Bhiwandi Thane-421032