
1. はじめに
This manual provides detailed instructions for the installation, operation, and maintenance of your DOITOOL Ultrasonic Water Level Sensor Tank Gauge Liquid Level Meter. This device is designed to monitor water levels and temperatures in outdoor tanks from the comfort of your indoor living space, offering a transmission range of up to 100 meters in open fields.
2 製品の特徴
- Indoor temperature display (°C/°F)
- Tank temperature display (°C/°F)
- Water level displayed on a 10-bar graph
- Records minimum and maximum indoor and tank temperatures
- Adjustable tank level alarm modes (high/low)
- Tank empty alert function
- Time display (12/24hr format)
- Time alarm mode
- Tank level updated every 30 seconds or 3 minutes
- 送信範囲:100m(オープンフィールド)
- Tank level/depth measurement range: 0.5m to 15m
- Minimum air gap requirement: 0.5m
- Receiver unit can be wall-mounted or placed on a surface using its stand
3. パッケージ内容
- 1 x Liquid Level Meter Receiver Unit
- 1 x Ultrasonic Transmitter Unit
- ユーザーマニュアル(このドキュメント)
Note: Batteries are not included. The receiver unit typically requires 2x AA batteries, and the transmitter unit requires 6x AAA batteries.
4. 仕様
| 仕様 | 価値 |
|---|---|
| Receiver Unit Dimensions | 長さ4.13インチ x 幅3.66インチ x 高さ0.98インチ (10.5 x 9.3 x 2.5 cm) |
| Receiver Unit Weight | 8オンス |
| 材料 | プラスチック |
| Tank Level/Depth Range | 0.5m~15m |
| Minimum Air Gap | 0.5メートル |
| 伝送距離 | 100m(オープンフィールド) |
| Power (Receiver) | 電池(別売) |
| 電力(送信機) | 電池(別売) |
5. セットアップとインストール
5.1 バッテリーの取り付け
Before installation, insert the required batteries into both the receiver and transmitter units. Ensure correct polarity.

画像: 後方 view of the receiver unit, showing the battery compartment with the cover removed. This is where the receiver unit's batteries are inserted.
5.2 Transmitter Unit Installation
The transmitter unit is installed at the top of your water tank. Follow these guidelines for optimal performance:
- アンテナ: Ensure the antenna is positioned for clear signal transmission.
- Balance Bubble: Use the integrated balance bubble to ensure the transmitter is level for accurate readings.
- 取り付け: Secure the transmitter using screws through the designated bracket.
- センサーの配置: The ultrasonic sensor should have a clear path to the water surface. Ensure there is a minimum air gap of 0.5 meters (H1 height) between the sensor and the maximum water level.
- Tank Opening: The tank opening for the sensor should be at least 20cm in diameter (Ø > 20CM) to prevent interference from tank walls.
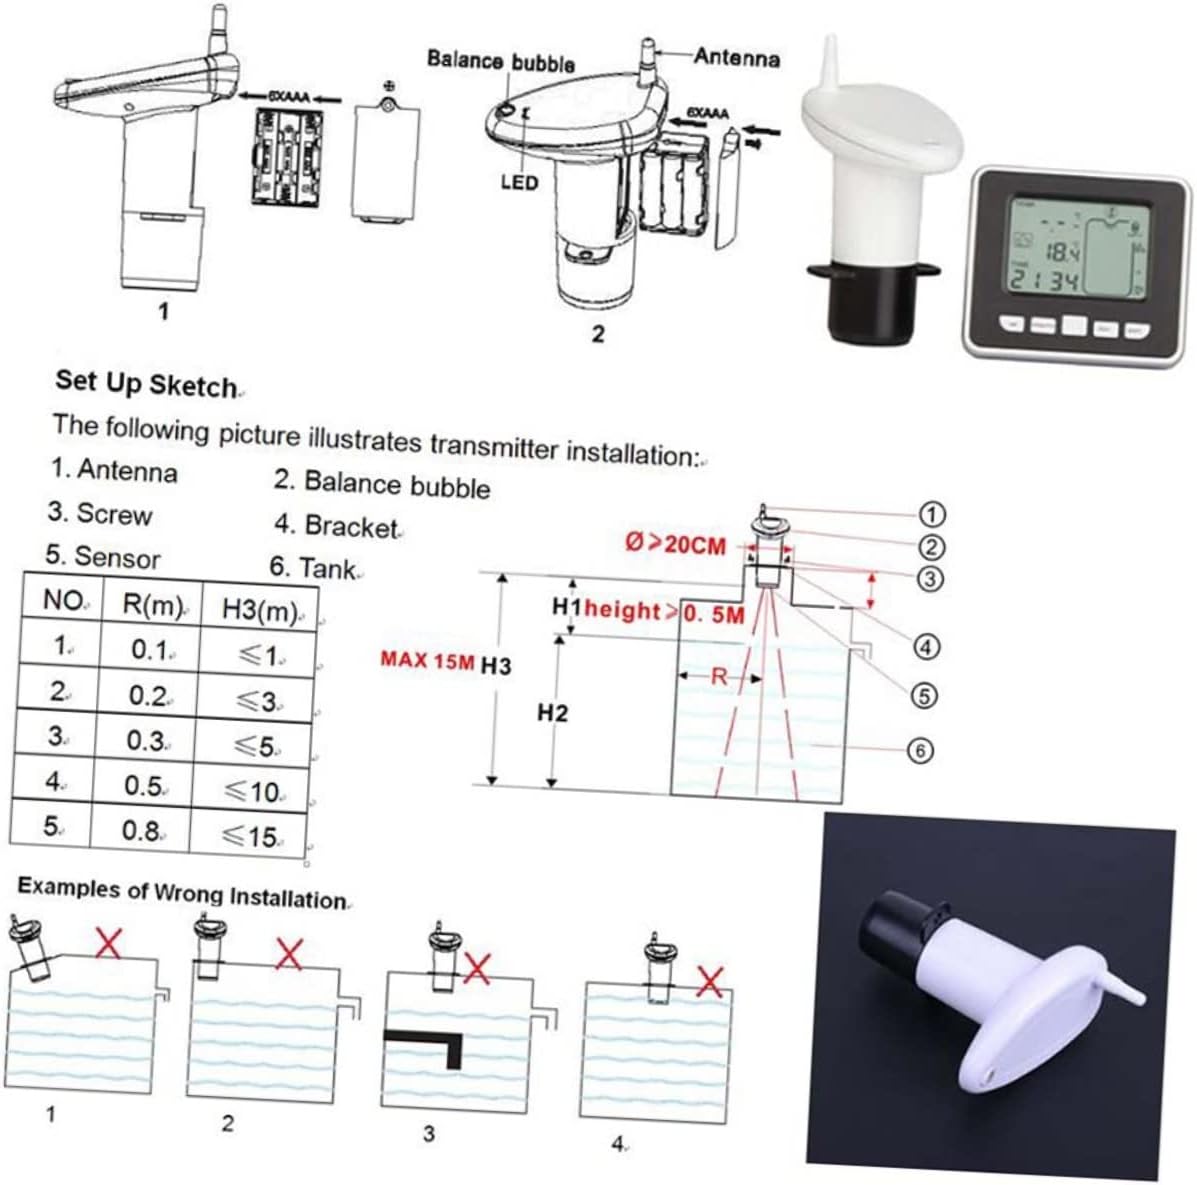
画像: A detailed diagram illustrating the components of the transmitter unit (antenna, balance bubble, sensor), a setup sketch for proper installation on a tank, and visual examples of incorrect installation methods to avoid.
5.3 受信機ユニットの配置
The receiver unit can be placed indoors. It features a stand for desktop use or can be mounted on a wall using the integrated hooks. Position it in a location where the signal from the transmitter is strong and clear.
6. 操作手順
The receiver unit displays various information on its screen, including indoor temperature, tank temperature, water level, and time. It features several buttons for configuration and viewイングデータ。

画像: The front of the receiver unit, showing the digital display and control buttons: 'set', '+/max/min', '-/tank', and 'alarm'.
6.1ディスプレイオーバーview
- T.ANK: Displays the water level in the tank, often represented by a 10-bar graph and a percentage.
- °C /°F: Indicates temperature units.
- 室内温度: Shows the ambient temperature where the receiver is located.
- タンク温度: Shows the temperature of the water in the tank.
- 時間: 現在の時刻を表示します。
6.2 ボタンの機能
- セット: Used to enter settings mode for time, alarms, and units. Press to cycle through settings.
- +/MAX/MIN: 通常モードでは、 を押して view maximum and minimum recorded temperatures. In settings mode, use to increase values.
- -/TANK: In normal mode, press to switch between tank level display units (meters/feet). In settings mode, use to decrease values.
- 警報: Used to set or activate/deactivate various alarms (e.g., high/low water level, empty tank).
6.3 時間とアラームの設定
- を押す セット button to enter time setting mode. Use + or - 時間と分を調整するには、 セット 再度確認します。
- To set water level alarms, press the アラーム ボタン。 つかいます + or - to adjust the high or low water level thresholds. Press アラーム again to confirm and activate.
- An audible alarm will sound when a set condition (e.g., tank empty, high/low level) is met.
7. メンテナンス
- クリーニング: Wipe both units with a soft, dry cloth. Do not use abrasive cleaners or immerse units in water.
- バッテリー交換: Replace batteries in both units when the low battery indicator appears on the receiver display. Ensure to use fresh batteries of the correct type and size.
- Transmitter Check: Periodically check the transmitter unit for any obstructions or debris that might interfere with the ultrasonic sensor's operation. Ensure it remains level.
8。 トラブルシューティング
- 受信機で読み取り不可:
- Check batteries in both units and replace if necessary.
- Ensure both units are within the 100m transmission range and there are no significant obstructions.
- Verify the transmitter is correctly installed and level.
- Inaccurate Water Level:
- Confirm the transmitter is level and the sensor has a clear path to the water.
- Ensure the minimum air gap of 0.5m is maintained.
- Check for debris or buildup on the sensor.
- Temperature Readings Incorrect:
- Ensure the units are not exposed to direct sunlight or extreme heat sources that could affect readings.
9. 安全情報
- ご自身でデバイスの分解や修理を試みないでください。修理は資格のある専門家にご依頼ください。
- デバイスを極端な温度、直射日光、湿気から遠ざけてください。
- 電池は地域の条例に従って廃棄してください。古い電池と新しい電池、または異なる種類の電池を混ぜて使用しないでください。
- このデバイスはおもちゃではありません。 小児の手の届かない場所に保管。
10. 保証とサポート
For warranty information and technical support, please refer to the retailer where you purchased the product or visit the official DOITOOL brand webサイトでご確認ください。保証請求に備えて購入証明書を保管してください。
You can find more information about DOITOOL products at the DOITOOL Store.