KITCHENARM 851011
KITCHENARM 19-in-1 ハンディブレッドマシン ユーザーマニュアル
モデル: 851011
導入
This manual provides comprehensive instructions for the safe and efficient operation, maintenance, and troubleshooting of your KITCHENARM 19-in-1 HANDY Bread Machine, Model 851011. Please read this manual thoroughly before first use and retain it for future reference.

Figure 1: KITCHENARM 19-in-1 HANDY Bread Machine (Model 851011).
パッケージ内容
Verify that all items are present and in good condition upon opening the package. If any items are missing or damaged, contact customer service.
- 1 x KITCHENARM Bread Machine (Model KA8510)
- 1 x User Manual & Recipe Book
- 2 x Kneading Paddles (one for use, one spare)
- 1 x Metal Hook for paddle removal
- 1 x US Three-Prong Plug (integrated)
- 1 x Non-Stick Bread Pan (2LB Vertical Pan)
- 2 x Cup-Spoon Sets (measuring cups and spoons)
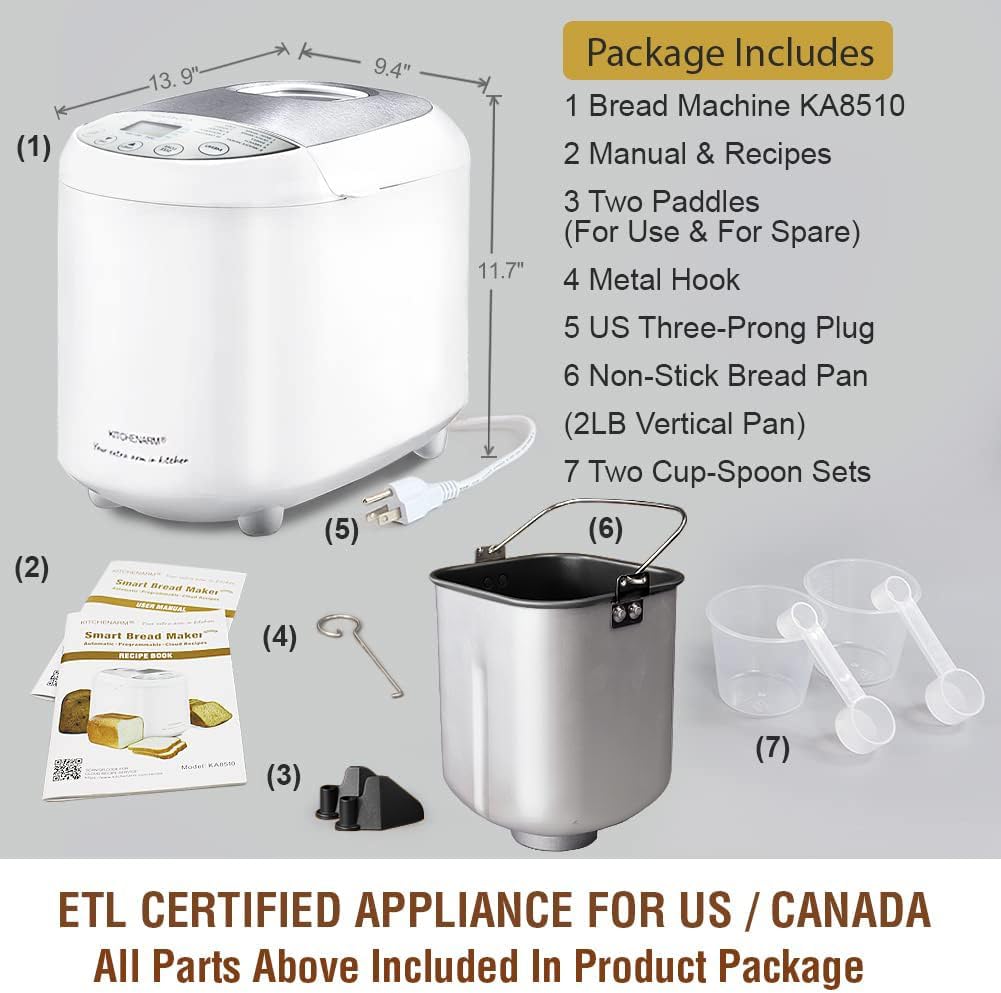
図 2: 付属のアクセサリとコンポーネント。
重要な安全上の注意事項
電気製品を使用するときは、次のような基本的な安全上の注意事項を必ず守ってください。
- すべての指示を読んでください。
- 熱い表面に触れないでください。ハンドルまたはノブを使用してください。
- 感電を防ぐため、コード、プラグ、機器を水やその他の液体に浸さないでください。
- いかなる機器も、子供が使用したり、子供の近くで使用したりする場合には、厳重な監視が必要です。
- 使用していないときや清掃する前には、コンセントからプラグを抜いてください。部品の取り付けや取り外しは、冷めてから行ってください。
- コードやプラグが損傷している機器、または機器が故障したり何らかの損傷を受けたりした後は、機器を使用しないでください。機器を最寄りの認定サービス施設に返却して、検査、修理、または調整を受けてください。
- 機器メーカーが推奨していない付属品を使用すると、けがをする可能性があります。
- 屋外では使用しないでください。
- コードをテーブルやカウンターの端から垂らしたり、熱い表面に触れたりしないでください。
- 高温のガスバーナーや電気バーナーの上や近く、または加熱されたオーブンの中に置かないでください。
- 熱い油やその他の熱い液体が入った器具を移動させるときは、細心の注意を払う必要があります。
- 切断するには、いずれかのコントロールを「オフ」にしてから、プラグを壁のコンセントから抜きます。
- 本来の用途以外には機器を使用しないでください。
- この機器には極性プラグが付いています (片方の刃がもう片方より幅広です)。感電の危険を減らすため、このプラグは極性コンセントに一方向にのみ差し込めるように設計されています。プラグがコンセントに完全に差し込めない場合は、プラグを逆向きに差し込んでください。それでも差し込めない場合は、資格のある電気技師に連絡してください。プラグを改造しないでください。
これらの指示を保存してください。
セットアップと初回使用
Before First Use: Initial Burn-Off
Before using your bread machine for the first time, it is recommended to perform an initial burn-off cycle to eliminate any manufacturing odors or residues. This process takes approximately 10 minutes.
- Remove all packaging materials and accessories from the bread machine.
- Wipe the interior and exterior of the machine with a damp cloth. Ensure the bread pan and kneading paddle are clean and dry.
- Place the empty bread pan with the kneading paddle inserted into the machine. Close the lid.
- Plug the bread machine into a grounded electrical outlet.
- Select a short baking program (e.g., "Bake" or "Home Made" with a short duration if customizable, or simply run an empty cycle for 10 minutes).
- Allow the machine to run for approximately 10 minutes. A slight odor or smoke may be present; this is normal.
- Unplug the machine and allow it to cool completely for at least 2 hours before proceeding with actual bread making.
コンポーネントの識別

Figure 3: Key components of the bread machine.
- 蒸気口: Release steam during baking. Do not block.
- 大きい Viewウィンドウ: Allows observation of the bread-making process.
- ステンレススチール製の蓋: 耐久性があり、お手入れも簡単です。
- LCD ディスプレイ付きコントロール パネル: For program selection, settings, and status display.
- パンパン: Non-stick pan where ingredients are mixed, kneaded, risen, and baked.
- こね棒: Mixes and kneads the dough.
操作手順
基本的なパン作りの手順
Follow these general steps for most bread recipes. Refer to the included recipe book for specific ingredient quantities and program recommendations.
- 混練パドルを挿入します: こね棒をパンパン内部の軸に取り付けます。
- 材料を追加します: Add ingredients to the bread pan in the order specified by your recipe (typically liquids first, then dry ingredients, with yeast added last, often in a small well on top of the flour).
- パンパンを置く: Insert the bread pan into the bread machine, ensuring it clicks securely into place. Close the lid.
- プログラムを選択してください: Plug in the machine. Use the "MENU" button to select the desired program (e.g., Basic White, French, Gluten Free).
- パンのサイズとクラストの色を選択してください: Use the "LOAF SIZE" button to choose 1LB, 1.5LB, or 2LB. Use the "CRUST COLOR" button to select Light, Medium, or Dark.
- 開始サイクル: Press the "START/STOP" button to begin the bread-making cycle. The machine will automatically mix, knead, rise, and bake.
- パンを取り除く: Once the cycle is complete (indicated by a beep), unplug the machine. Carefully remove the hot bread pan using oven mitts. Invert the pan to release the bread onto a wire rack to cool. Use the metal hook to remove the kneading paddle from the loaf if it remains embedded.

Figure 4: Unique 1-Press Bread Making process.
利用可能なプログラム
Your KITCHENARM bread machine features 19 pre-programmed menus, including 12 bread menus and 7 non-bread menus. Each program is optimized for specific recipes.
| いいえ。 | プログラム名 | Description / Typical Use |
|---|---|---|
| 1 | ベーシックホワイト | 白パン、ミックスパン用。 |
| 2 | Express White | Faster cycle for white bread. |
| 3 | 甘い | 糖度の高いパンに。 |
| 4 | フランス語 | For light breads with a crispy crust. |
| 5 | グルテンフリー | Specifically for gluten-free recipes. |
| 6 | 全粒小麦 | 全粒粉パン用。 |
| 7 | Dark Rye | For rye bread recipes. |
| 8 | マルチグレイン | さまざまな穀物を使ったパンに。 |
| 9 | SD Starter | For preparing sourdough starter. |
| 10 | サワードウ | サワードウパンを焼くためのもの。 |
| 11 | 生地 | Prepares dough for manual shaping and baking. |
| 12 | ケト | For low-carb, ketogenic bread recipes. |
| 13 | 速成パン | For quick breads using baking powder/soda. |
| 14 | ケーキ | ケーキを焼くのに。 |
| 15 | ジャム | 自家製ジャム作りに。 |
| 16 | ヨーグルト | For preparing yogurt. |
| 17 | こねる | Only performs kneading cycle. |
| 18 | 焼く | Only performs baking cycle. |
| 19 | Home Made | Customizable program for advanced users. |
The machine supports 3 loaf sizes (1LB, 1.5LB, 2LB) and 3 crust colors (Dark, Medium, Light). It also features a 15-Hour Delay Timer and an ADD-NUTS Alarm for adding ingredients at the appropriate time.

図5:例amples of items that can be prepared with the 19 programs.
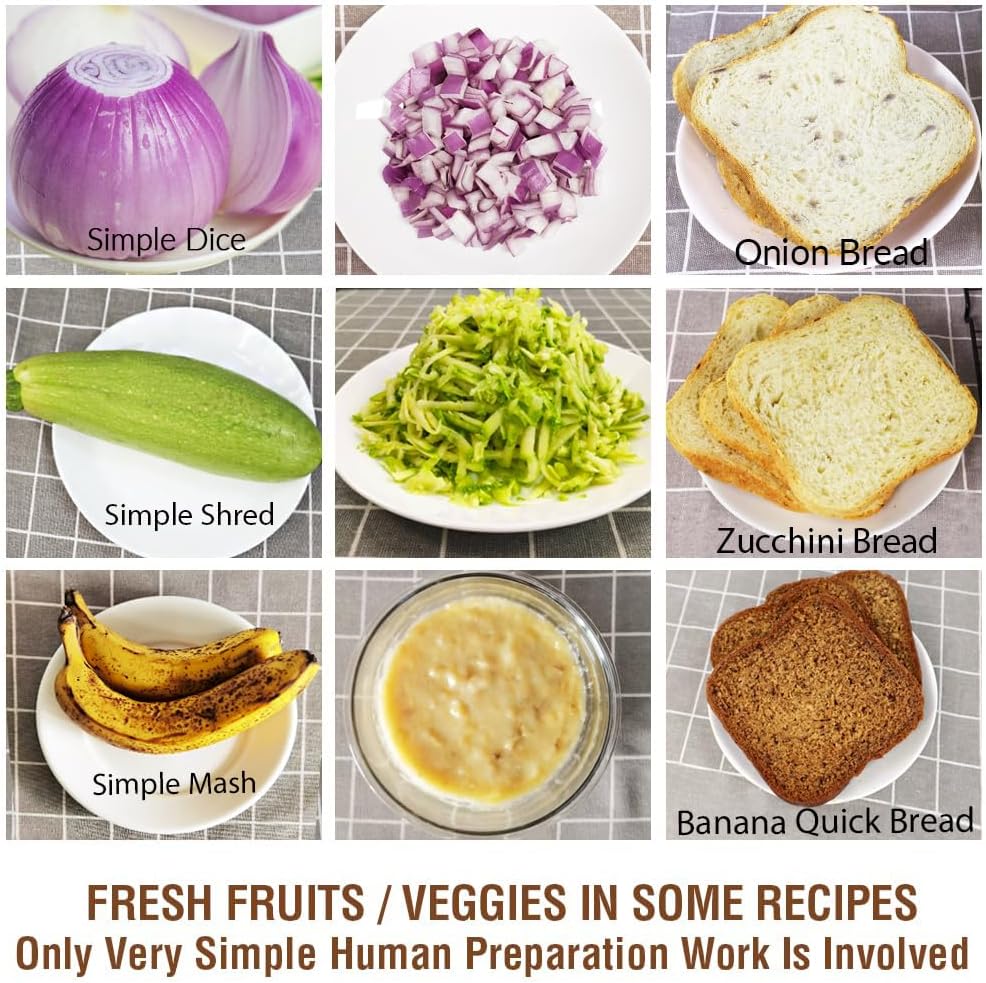
Figure 6: Preparation of fresh fruits and vegetables for recipes.
お手入れとメンテナンス
クリーニング
Proper cleaning ensures the longevity and performance of your bread machine. Always unplug the machine and allow it to cool completely before cleaning.
- パンパンとこね棒: The non-stick bread pan and kneading paddle should be hand washed only with warm, soapy water. Do not use abrasive cleaners or metal scouring pads, as this can damage the non-stick coating. Rinse thoroughly and dry completely.
- 外観: Wipe the exterior body and control panel with a soft, damp 布で拭いてください。本体を水やその他の液体に浸さないでください。
- インテリア: 柔らかくてamp 布でベーキングチャンバーの内側を拭き、パンくずや残留物を取り除きます。
- 蓋: The stainless steel lid can be wiped clean with a damp 布。 viewing window is clear.
ストレージ
Store the bread machine in a cool, dry place when not in use. Ensure all components are clean and dry before storage.
トラブルシューティング
このセクションでは、発生する可能性のある一般的な問題について説明します。ここに記載されていない問題については、カスタマーサービスにお問い合わせください。
| 問題 | 考えられる原因 | 解決 |
|---|---|---|
| パンが膨らまない、または膨らみすぎる。 | Incorrect yeast amount, expired yeast, incorrect water temperature, incorrect flour type, too much or too little liquid. | Ensure yeast is fresh and active. Use correct water temperature (lukewarm for active dry yeast). Measure ingredients precisely, preferably by weight. Refer to recipe book for correct flour type. |
| パンが密度が高すぎたり重すぎたりします。 | Too much flour, too little liquid, old yeast, incorrect program. | Reduce flour slightly or increase liquid. Check yeast freshness. Ensure correct program is selected for the recipe. |
| Bread has a large hole at the bottom. | Kneading paddle left in bread during baking. | Some programs allow for removal of the kneading paddle before the final rise. Consult your recipe book or manual for specific program timings. Use the metal hook to remove the paddle after baking. |
| Machine does not start or respond. | プラグが差し込まれていない、電源が入っていないtage, pan not properly seated, lid not closed. | Ensure the machine is securely plugged into a working outlet. Check circuit breaker. Ensure bread pan is fully inserted and lid is closed. |
| 運転中の大きな音。 | Bread pan not seated correctly, foreign object in pan, machine on uneven surface. | Ensure bread pan is securely locked in place. Check for any foreign objects. Place machine on a stable, flat surface. |
製品仕様
- ブランド: キッチンアーム
- モデル番号: 851011
- 色: White Body - Stainless Steel Lid & Chamber
- 製品寸法(奥行き x 幅 x 高さ): 9.4インチ x 13.9インチ x 11.7インチ
- 商品の重量: 11.97ポンド
- ワットtage: 550ワット
- プログラム数: 19
- パンのサイズ: 1LB, 1.5LB, 2LB
- Crust Colors: ライト、ミディアム、ダーク
- 遅延タイマー: 最大15時間
- 認定: ETL Certified for US / Canada
- メーカー: Kitchenarm LLC
- 製品のお手入れ: Hand Wash Only (for bread pan and paddle)
保証とカスタマーサポート
KITCHENARM is committed to providing high-quality products and excellent customer service.
- 製品保証: This product comes with a 2-YEAR Product Warranty.
- 顧客サービス: LIFETIME Customer Service is provided, including access to Cloud Recipes and Recipe Customization assistance.
- 交換部品: Original replacement parts are available.
For warranty claims, technical support, or to inquire about replacement parts, please contact Kitchenarm LLC customer service through their official channels. Refer to the contact information provided in your product registration or on the official KITCHENARM webサイト。

Figure 7: KITCHENARM commitment to warranty and customer service.
Ask a question about this manual
Ask about setup, troubleshooting, compatibility, parts, safety, or missing instructions. Manuals+ will review the question and use this page’s manual context to help answer it.