
1. はじめに
This manual provides detailed instructions for the installation, operation, and maintenance of your SOGTICPS BL912-60A-02US MPPT Solar Charge Controller. This device is designed to manage power flow from your solar panels to your battery bank, ensuring efficient charging and protecting your batteries from overcharge and over-discharge.
注記: This controller utilizes MPPT technology to detect the maximum charging current, which can increase efficiency by 10%-30% compared to standard controllers. It is important to note that this is a compatible MPPT charge controller with PWM intelligent features, not a "true MPPT" controller with a large transformer coil inside.
主な特徴:
- 自動12V/24Vシステムボリュームtag認識。
- Advanced MPPT (Maximum Power Point Tracking) technology for optimized charging.
- Multi-function LCD display for system status monitoring.
- Dual USB ports (DC 5V 2A output) for charging external devices.
- Comprehensive protection features: over-charging, over-discharging, reverse polarity, short circuit, and open circuit protection.
- Temperature compensation for accurate charging.

図1: フロント view of the SOGTICPS BL912-60A-02US MPPT Solar Charge Controller, showing the LCD display, control buttons, and dual USB ports.
2. セットアップとインストール
ソーラー充電コントローラーを安全かつ効率的に動作させるには、適切な設置が不可欠です。以下の手順を注意深くお守りください。
2.1 接続順序
重要: Always connect components in the following sequence to prevent damage to the controller or other system components.
- バッテリーを接続します。 First, connect the battery to the charge controller. Ensure the battery has sufficient voltage for the controller to recognize the correct battery type (12V or 24V).
- ソーラーパネルを接続します。 Next, connect the solar panel(s) to the charge controller.
- 負荷を接続する(オプション): Finally, connect your DC load to the charge controller's load terminals.
Disassembly Order: When disconnecting, reverse the order: first disconnect the solar panel, then the battery, and finally the load.
2.2 配線図
Refer to the diagrams below for correct wiring connections.

図2: Labeled components of the SOGTICPS BL912-60A-02US controller, indicating LCD display, control buttons (Menu, Page Up, Page Down/Manual), and dual USB ports. Connection terminals for solar panel, battery, and load are also shown.

図3: Basic wiring diagram showing connections from a solar panel to the controller and from the controller to a DC load. Note the positive (+) and negative (-) terminals.
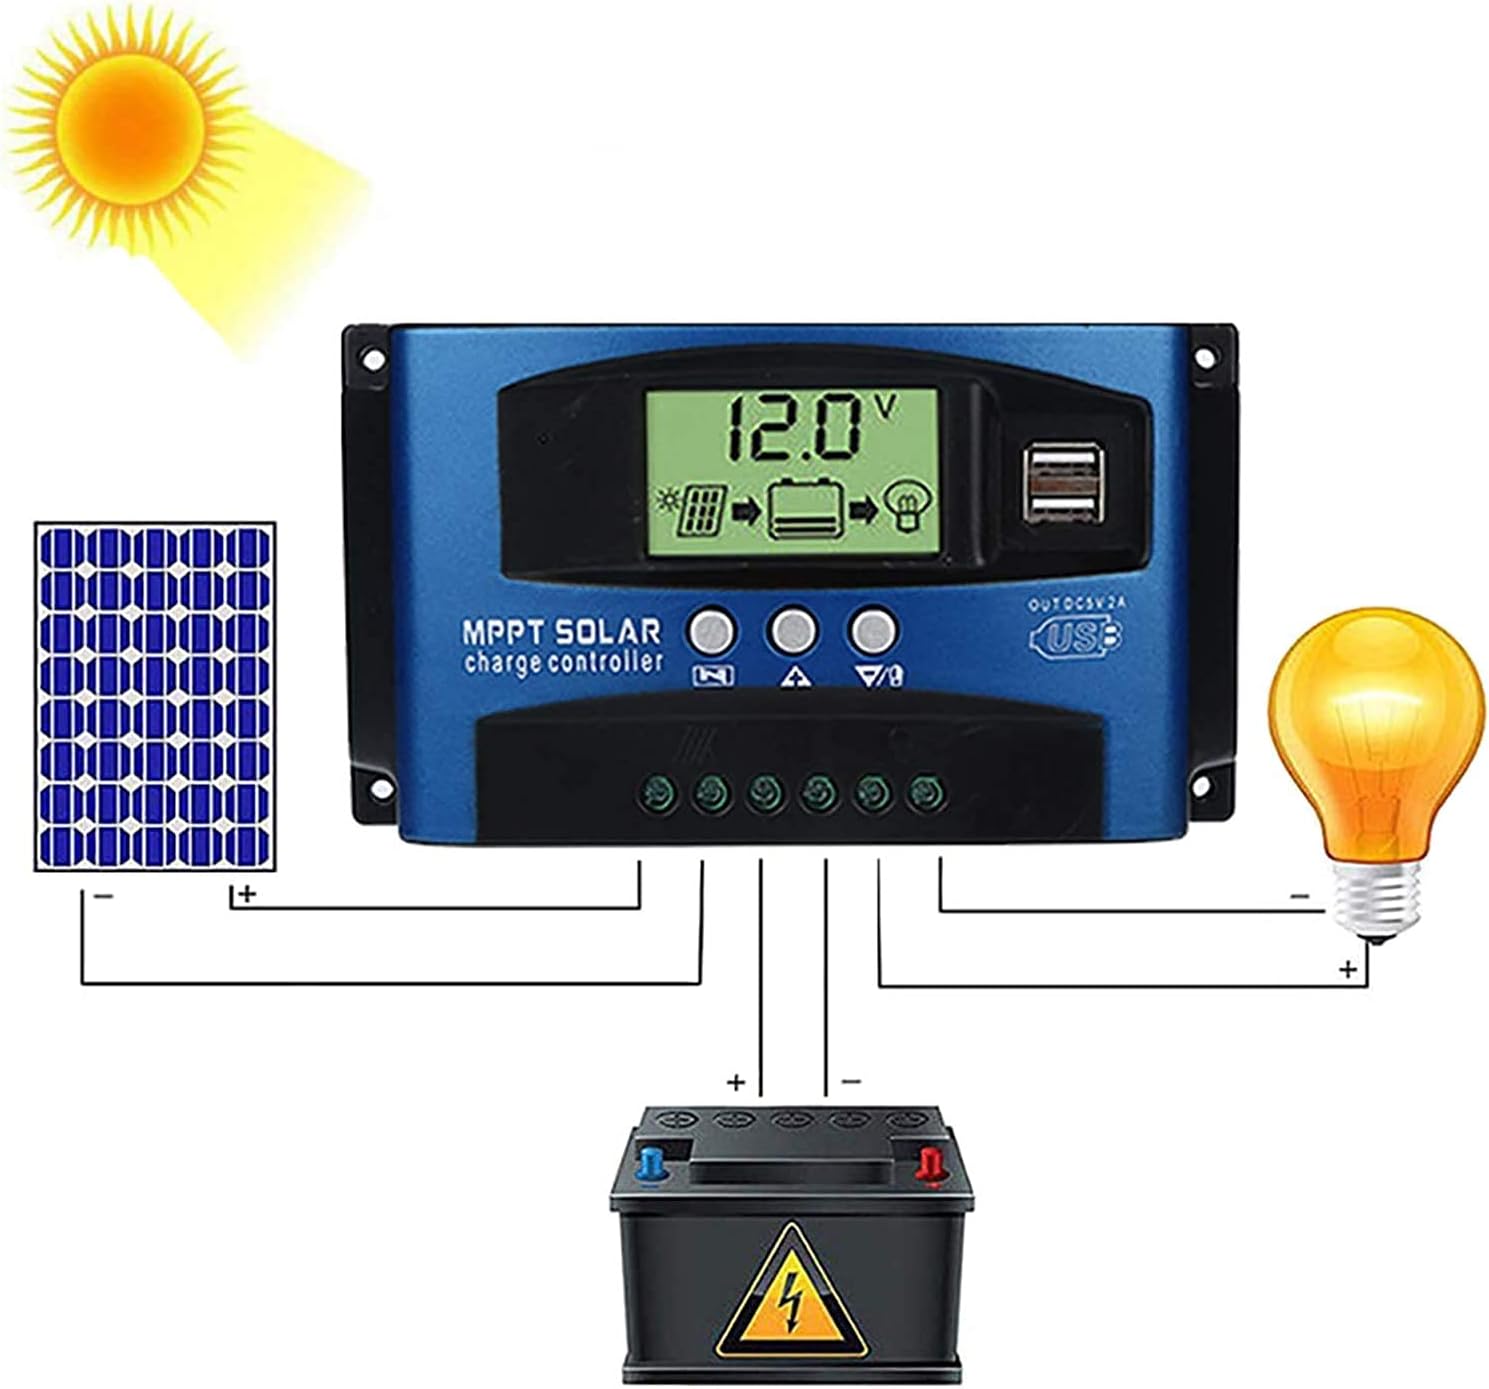
図4: Comprehensive wiring diagram illustrating the connection of a solar panel, the SOGTICPS charge controller, a battery, and a DC load. This diagram shows the correct sequence and polarity for all connections.
2.3 Solar Panel and Battery Voltage互換性
- For a 12V battery system, the working voltage (Voc) of the solar panel should be between 17V and 23V.
- For a 24V battery system, the working voltage (Voc) of the solar panel should be between 36V and 46V.
- ソーラーパネルの容量を確認してくださいtage is within these ranges to prevent damage to the controller.
2.4 インバータ接続
If using an inverter, connect it directly to the battery terminals, not to the load terminals of the charge controller.
3. 操作
3.1 LCDディスプレイとボタン
The LCD display provides real-time information about your system's status. The three buttons below the display are used for navigation and settings adjustment.
- メニューボタン: Press to cycle through display screens and enter/exit settings menus.
- ページアップボタン: 値を増やしたり、メニュー内で上へ移動したりするために使用されます。
- ページダウン/手動ボタン: Used to decrease values, navigate downwards in menus, or manually control the load output.
3.2 Battery Type Recognition
The controller automatically detects 12V or 24V battery systems. Ensure the battery is connected first and has sufficient voltage for proper detection.
3.3 USB出力
The dual USB ports provide a DC 5V 2A output for charging compatible electronic devices.
4. メンテナンス
定期的なメンテナンスにより、ソーラー充電コントローラーの寿命が長くなり、最適なパフォーマンスが確保されます。
- クリーニング: コントローラーは清潔に保ち、ほこりやゴミが付かないようにしてください。清掃には乾いた布をご使用ください。
- 接続: すべての配線接続が安全で腐食がないことを定期的に確認してください。
- 換気: Ensure the controller is installed in a well-ventilated area to prevent overheating.
- 環境条件: Avoid exposing the controller to direct sunlight, rain, or excessive humidity.
5。 トラブルシューティング
このセクションでは、発生する可能性のある一般的な質問と問題について説明します。
- Q: How many watts of solar panels can be connected?
A: For a 12V battery system, the maximum recommended solar panel wattage is 720W. For a 24V battery system, the maximum recommended wattageは1440Wです。
- Q: Does this controller support lithium batteries?
A: Yes, the controller is compatible with both lead-acid and lithium batteries.
- Q: My solar panel is 36V 200W, can I charge a 12V battery?
A: To charge a 12V battery, the solar panel's working voltage (Voc) should be between 17V and 23V. For a 24V battery, the Voc should be between 36V and 46V. If your 36V panel is used with a 12V battery, the voltage is too high and could damage the controller. Ensure your panel's voltage matches the battery system voltag要件。
- Q: Can an inverter be connected to the load side of the controller?
A: No, please connect the inverter directly to the battery terminals, not to the load terminals of the controller.
- Q: Does the controller have a requirement for battery capacity?
A: While there's no strict minimum, it's recommended that the battery capacity corresponds to the solar panel current. For example, if your solar panel current is 5A, a 50AH battery is preferable. Using a very large solar panel with a very small battery can be dangerous.
- Q: The controller is not turning on or displaying anything.
A: まずバッテリーが接続され、十分な容量があることを確認してくださいtage. Check all battery connections for proper polarity and secure contact. If the battery voltage is too low, the controller may not power on.
6. 技術仕様
| 特徴 | 仕様 |
|---|---|
| モデル番号 | BL912-60A-02US |
| ブランド | ソグティプス |
| システム巻tage | 12V / 24V自動 |
| 最大充電電流 | 60A |
| Max Solar Panel Wattage(12V) | 720W |
| Max Solar Panel Wattage(24V) | 1440W |
| Solar Panel Working Voltage(12Vシステム) | 17V-23V (Voc) |
| Solar Panel Working Voltage(24Vシステム) | 36V-46V (Voc) |
| 表示タイプ | 液晶 |
| USB出力 | Dual DC 5V 2A |
| 製品寸法 | 6.69 x 3.94 x 1.97 インチ (17 x 10 x 5 cm) |
| アイテム重量 | 10.6オンス(0.3 kg) |
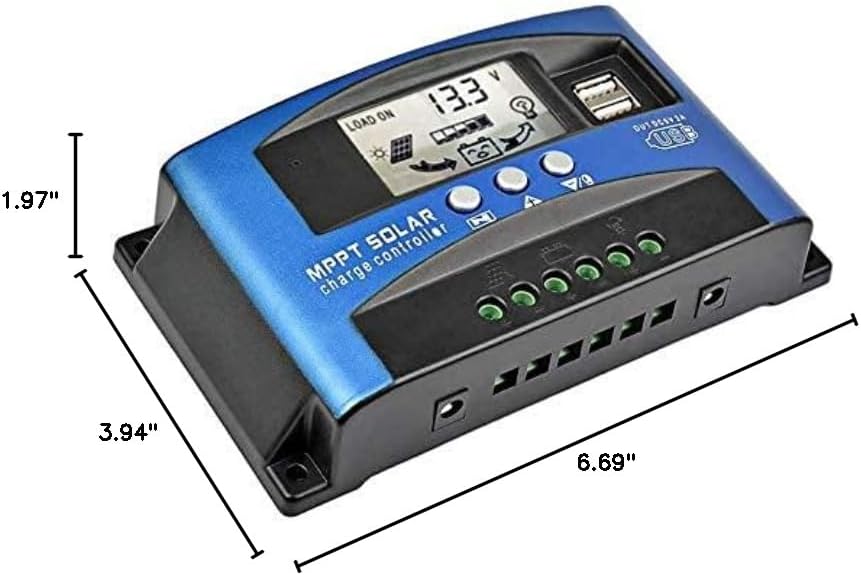
図5: Dimensional drawing of the SOGTICPS BL912-60A-02US solar charge controller, showing its length (6.69"), width (3.94"), and height (1.97").

図6: Examples of typical applications for the solar charge controller, including residential solar systems, garden lighting, street lighting, and integration with wind power systems.
7. 保証とサポート
7.1 保証情報
This SOGTICPS product comes with a 30日間返金保証 そして 12ヶ月保証 for quality-related issues. Please retain your proof of purchase for warranty claims.
7.2 カスタマーサポート
For any questions, technical assistance, or warranty claims, please contact SOGTICPS customer support. Our professional technicians are available to assist you.
Contact information is typically found on the product packaging or the seller's official webサイト。