導入
This manual provides detailed instructions for the installation, operation, and maintenance of your GIGABYTE B860M GAMING X WIFI6E Motherboard. Please read this manual thoroughly before installing or using the product to ensure correct operation and to prevent damage.
The GIGABYTE B860M GAMING X WIFI6E Motherboard is designed to support Intel Core Ultra Series CPUs, featuring a robust power delivery system, DDR5 memory support, and advanced connectivity options including PCIe 5.0, M.2, 2.5GbE LAN, WIFI 6E, and USB 4.
セットアップガイド
1。 開梱と検査
Carefully remove the motherboard from its packaging. Inspect for any signs of damage during transit. Ensure all accessories listed in the package contents are present.
- GIGABYTE B860M GAMING X WIFI6E Motherboard
- SATAケーブル
- Wi-Fiアンテナ
- ユーザーマニュアル(このドキュメント)
- ドライバーCD/USB(付属している場合)
2. マザーボードレイアウト終了view
マザーボード上の主要なコンポーネントとコネクタについて理解しておいてください。
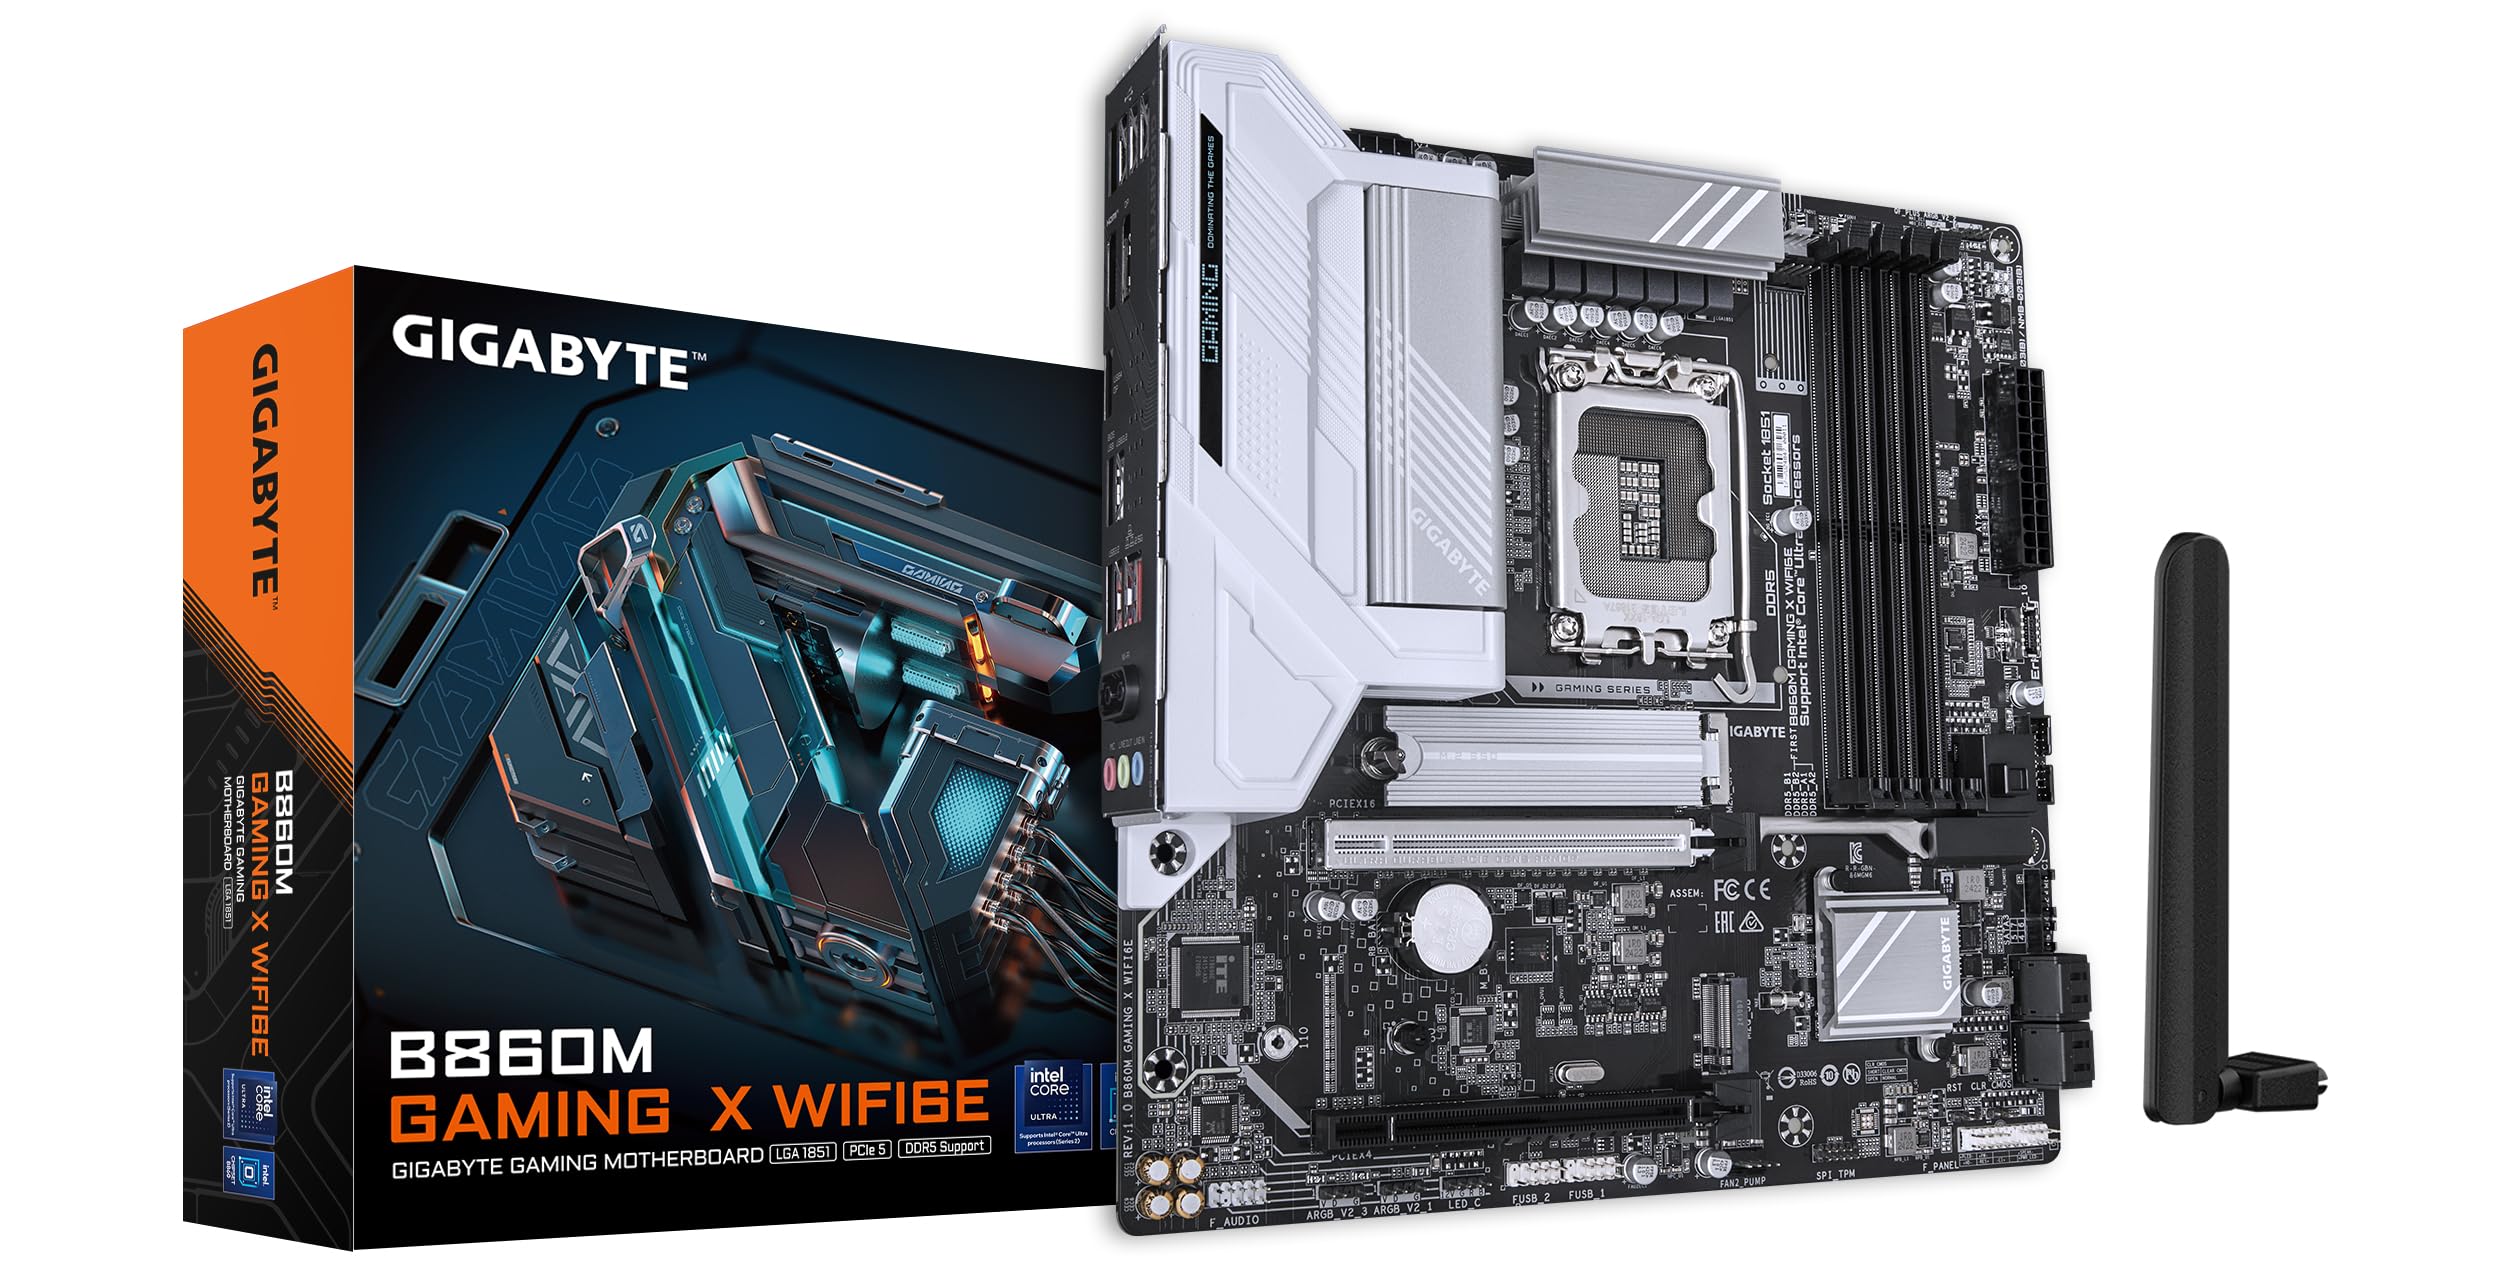
画像: トップダウン view of the GIGABYTE B860M GAMING X WIFI6E Motherboard, highlighting the CPU socket, DDR5 DIMM slots, PCIe slots, and M.2 slots.

画像: 斜め view of the GIGABYTE B860M GAMING X WIFI6E Motherboard, showing the heatsinks and overall board design.
3. CPUの取り付け(LGA 1851)
- CPUソケットレバーを開きます。
- CPU をソケットに合わせ、CPU の三角形のマークがソケットのマークと一致していることを確認します。
- 無理に力を入れずに、CPU をソケットにゆっくりと差し込みます。
- ソケットレバーを閉じてCPUを固定します。
4. メモリ(DDR5)の取り付け
- DIMM スロットの両端のクリップを開きます。
- メモリ モジュールをスロットに合わせて、モジュールの切り込みがスロットのキーと一致していることを確認します。
- クリップがカチッと音がするまで、メモリ モジュールの両端をしっかりと押し下げます。
- For dual-channel operation, install modules in the recommended slots (refer to motherboard diagram for specific slots).
5. ストレージデバイスのインストール(M.2 SSD)
- マザーボード上の M.2 スロットを見つけます。
- M.2 ヒートシンクとスタンドオフ ネジを取り外します。
- M.2 SSD を斜めにしてスロットに挿入します。
- Push down the SSD and secure it with the stand-off screw.
- Reattach the M.2 heatsink for thermal protection.
6. グラフィックカード(PCIe 5.0)の取り付け
- PCIe 5.0 x16 スロットのラッチを開きます。
- Align your graphics card with the slot and press down firmly until it is fully seated and the latch closes.
- グラフィック カードをネジで PC ケースに固定します。
7. 周辺機器と電源の接続
Connect the 24-pin ATX power connector and the 8-pin CPU power connector from your power supply to the motherboard. Connect front panel headers (power button, reset, USB, audio) according to the motherboard manual diagram. Install the Wi-Fi antenna to the rear I/O panel.

Image: Rear I/O panel of the GIGABYTE B860M GAMING X WIFI6E Motherboard, showing USB ports, HDMI, DisplayPort, 2.5GbE LAN, Wi-Fi antenna connectors, and audio jacks.
操作手順
1. 最初の起動とBIOSセットアップ
システムを組み立てたら、電源を入れます。 削除 起動中にキーを押すと、BIOS/UEFIセットアップユーティリティが起動します。ここで、起動順序、システム時刻、その他の詳細設定を構成できます。
2. ドライバーのインストール
Once the operating system is installed, install the necessary drivers for the motherboard components (chipset, LAN, Wi-Fi, audio, etc.). These can be found on the included driver disk/USB or downloaded from the official GIGABYTE webサイト。
3. Wi-Fi 6E Connectivity
Ensure the Wi-Fi antenna is securely connected. In your operating system's network settings, select the appropriate Wi-Fi 6E network and enter the password to connect.
4. Qフラッシュプラス
The Q-Flash Plus feature allows you to update the BIOS without installing a CPU, memory, or graphics card. Download the latest BIOS file ギガバイトから website, rename it as instructed, and save it to a USB flash drive. Insert the USB drive into the designated Q-Flash Plus USB port on the rear I/O panel and press the Q-Flash Plus button.
メンテナンス
1. BIOSアップデート
定期的にGIGABYTEをチェックしてください website for the latest BIOS updates. BIOS updates can improve system stability, performance, and add support for new hardware. Follow the instructions provided by GIGABYTE carefully when performing a BIOS update.
2. ドライバーの更新
Keep your motherboard drivers updated to ensure optimal performance and compatibility. Download drivers only from the official GIGABYTE support page.
3. 清掃
マザーボードとコンポーネントの埃は、定期的に圧縮空気で除去してください。清掃前に必ずシステムの電源を切り、電源プラグを抜いてください。液体や研磨剤の使用は避けてください。
トラブルシューティング
1. システムが電源を入れない
- すべての電源接続 (24 ピン ATX、8 ピン CPU) がしっかりと接続されていることを確認します。
- 電源が正しく機能していることを確認します。
- Ensure the front panel power button header is correctly connected.
2. ディスプレイ出力なし
- Confirm the graphics card is properly seated in the PCIe slot and connected to the power supply (if required).
- Check that the monitor cable is securely connected to both the graphics card and the monitor.
- If using integrated graphics, ensure the monitor is connected to the motherboard's video output (HDMI/DisplayPort).
3. システムの不安定性またはクラッシュ
- Verify that all components (CPU, RAM, GPU) are correctly installed.
- Check for overheating issues; ensure CPU cooler and case fans are working.
- BIOS とすべてのドライバーを最新バージョンに更新します。
- RAM の問題が疑われる場合は、メモリ モジュールを個別にテストします。
4. Wi-Fi接続の問題
- Ensure the Wi-Fi antenna is securely attached to the rear I/O panel.
- Check if Wi-Fi drivers are installed correctly.
- Verify that the Wi-Fi module is enabled in the BIOS.
仕様
| 特徴 | 詳細 |
|---|---|
| モデル名 | B860M GAMING X WIFI6E |
| CPUソケット | 1851 号線 |
| 互換性のあるプロセッサ | Intel Core Ultra Series CPUs |
| チップセット | Intel B860M |
| RAMメモリ技術 | DDR5, Dual Channel (4 x DIMMs) |
| 最大メモリクロック速度 | Up to 6400MHz (OC) |
| PCIeスロット | 1x PCIe 5.0 x16, 1x PCIe 4.0 |
| M.2 スロット | Multiple M.2 slots with Thermal Protection |
| 無線LAN | 2.5GbE LAN |
| ワイヤレス接続 | Realtek 2x2 Wi-Fi 6E |
| USBポート | USB 4.0 Type-C, USB 3.2 Gen 2 Type-C, various USB 3.2/2.0 |
| VRM | Hybrid Digital 8+1+2+2 Phase 60A DrMOS |
| 寸法 | 9.61 x 9.61 x 1.38インチ |
| アイテム重量 | 2.65ポンド |
保証とサポート
GIGABYTE motherboards come with a limited warranty. Please refer to the official GIGABYTE website or your product packaging for specific warranty terms and conditions applicable to your region.
テクニカルサポート、ドライバのダウンロード、BIOSアップデート、および製品に関する詳細情報については、GIGABYTEの公式サポートサイトをご覧ください。 webサイト:
https://www.gigabyte.com/support
When contacting support, please have your motherboard model name (B860M GAMING X WIFI6E) and serial number ready.