1. はじめに
This manual provides detailed instructions for the installation, configuration, and operation of the GIGABYTE B860 Gaming X WIFI6E Motherboard. Designed to support Intel Core Ultra Processors (Series 2) with an LGA 1851 socket, this ATX motherboard features DDR5 memory support, multiple M.2 slots, PCIe 5.0 connectivity, USB-C, WIFI6E, and 2.5GbE LAN. Adherence to these instructions will ensure proper setup and optimal performance of your system.
2. 安全情報
- コンポーネントの取り付けまたは取り外しを行う前に、必ず電源コードをコンセントから抜いてください。
- コンポーネントを取り扱う前に、静電気防止リストストラップを着用するか、接地された金属物に頻繁に触れて静電気を放電してください。
- 敏感な部分に触れないように、コンポーネントの端を持って取り扱ってください。
- 過熱を防ぐために、PC ケース内の換気が適切であることを確認してください。
- マザーボードを湿気や極端な温度から遠ざけてください。
3. パッケージ内容
パッケージ内のすべての品目が揃っていることを確認してください。不足または破損している品目がある場合は、販売店にご連絡ください。
- GIGABYTE B860 Gaming X WIFI6E Motherboard
- ユーザーマニュアル / クイックインストールガイド
- SATAデータケーブル
- Wi-Fiアンテナ
- M.2 ネジとスタンドオフ
- ドライバーCD/USB(またはダウンロード手順)
4. マザーボードのレイアウト
インストールする前に、マザーボード上のさまざまなコンポーネントとコネクタについて理解しておいてください。
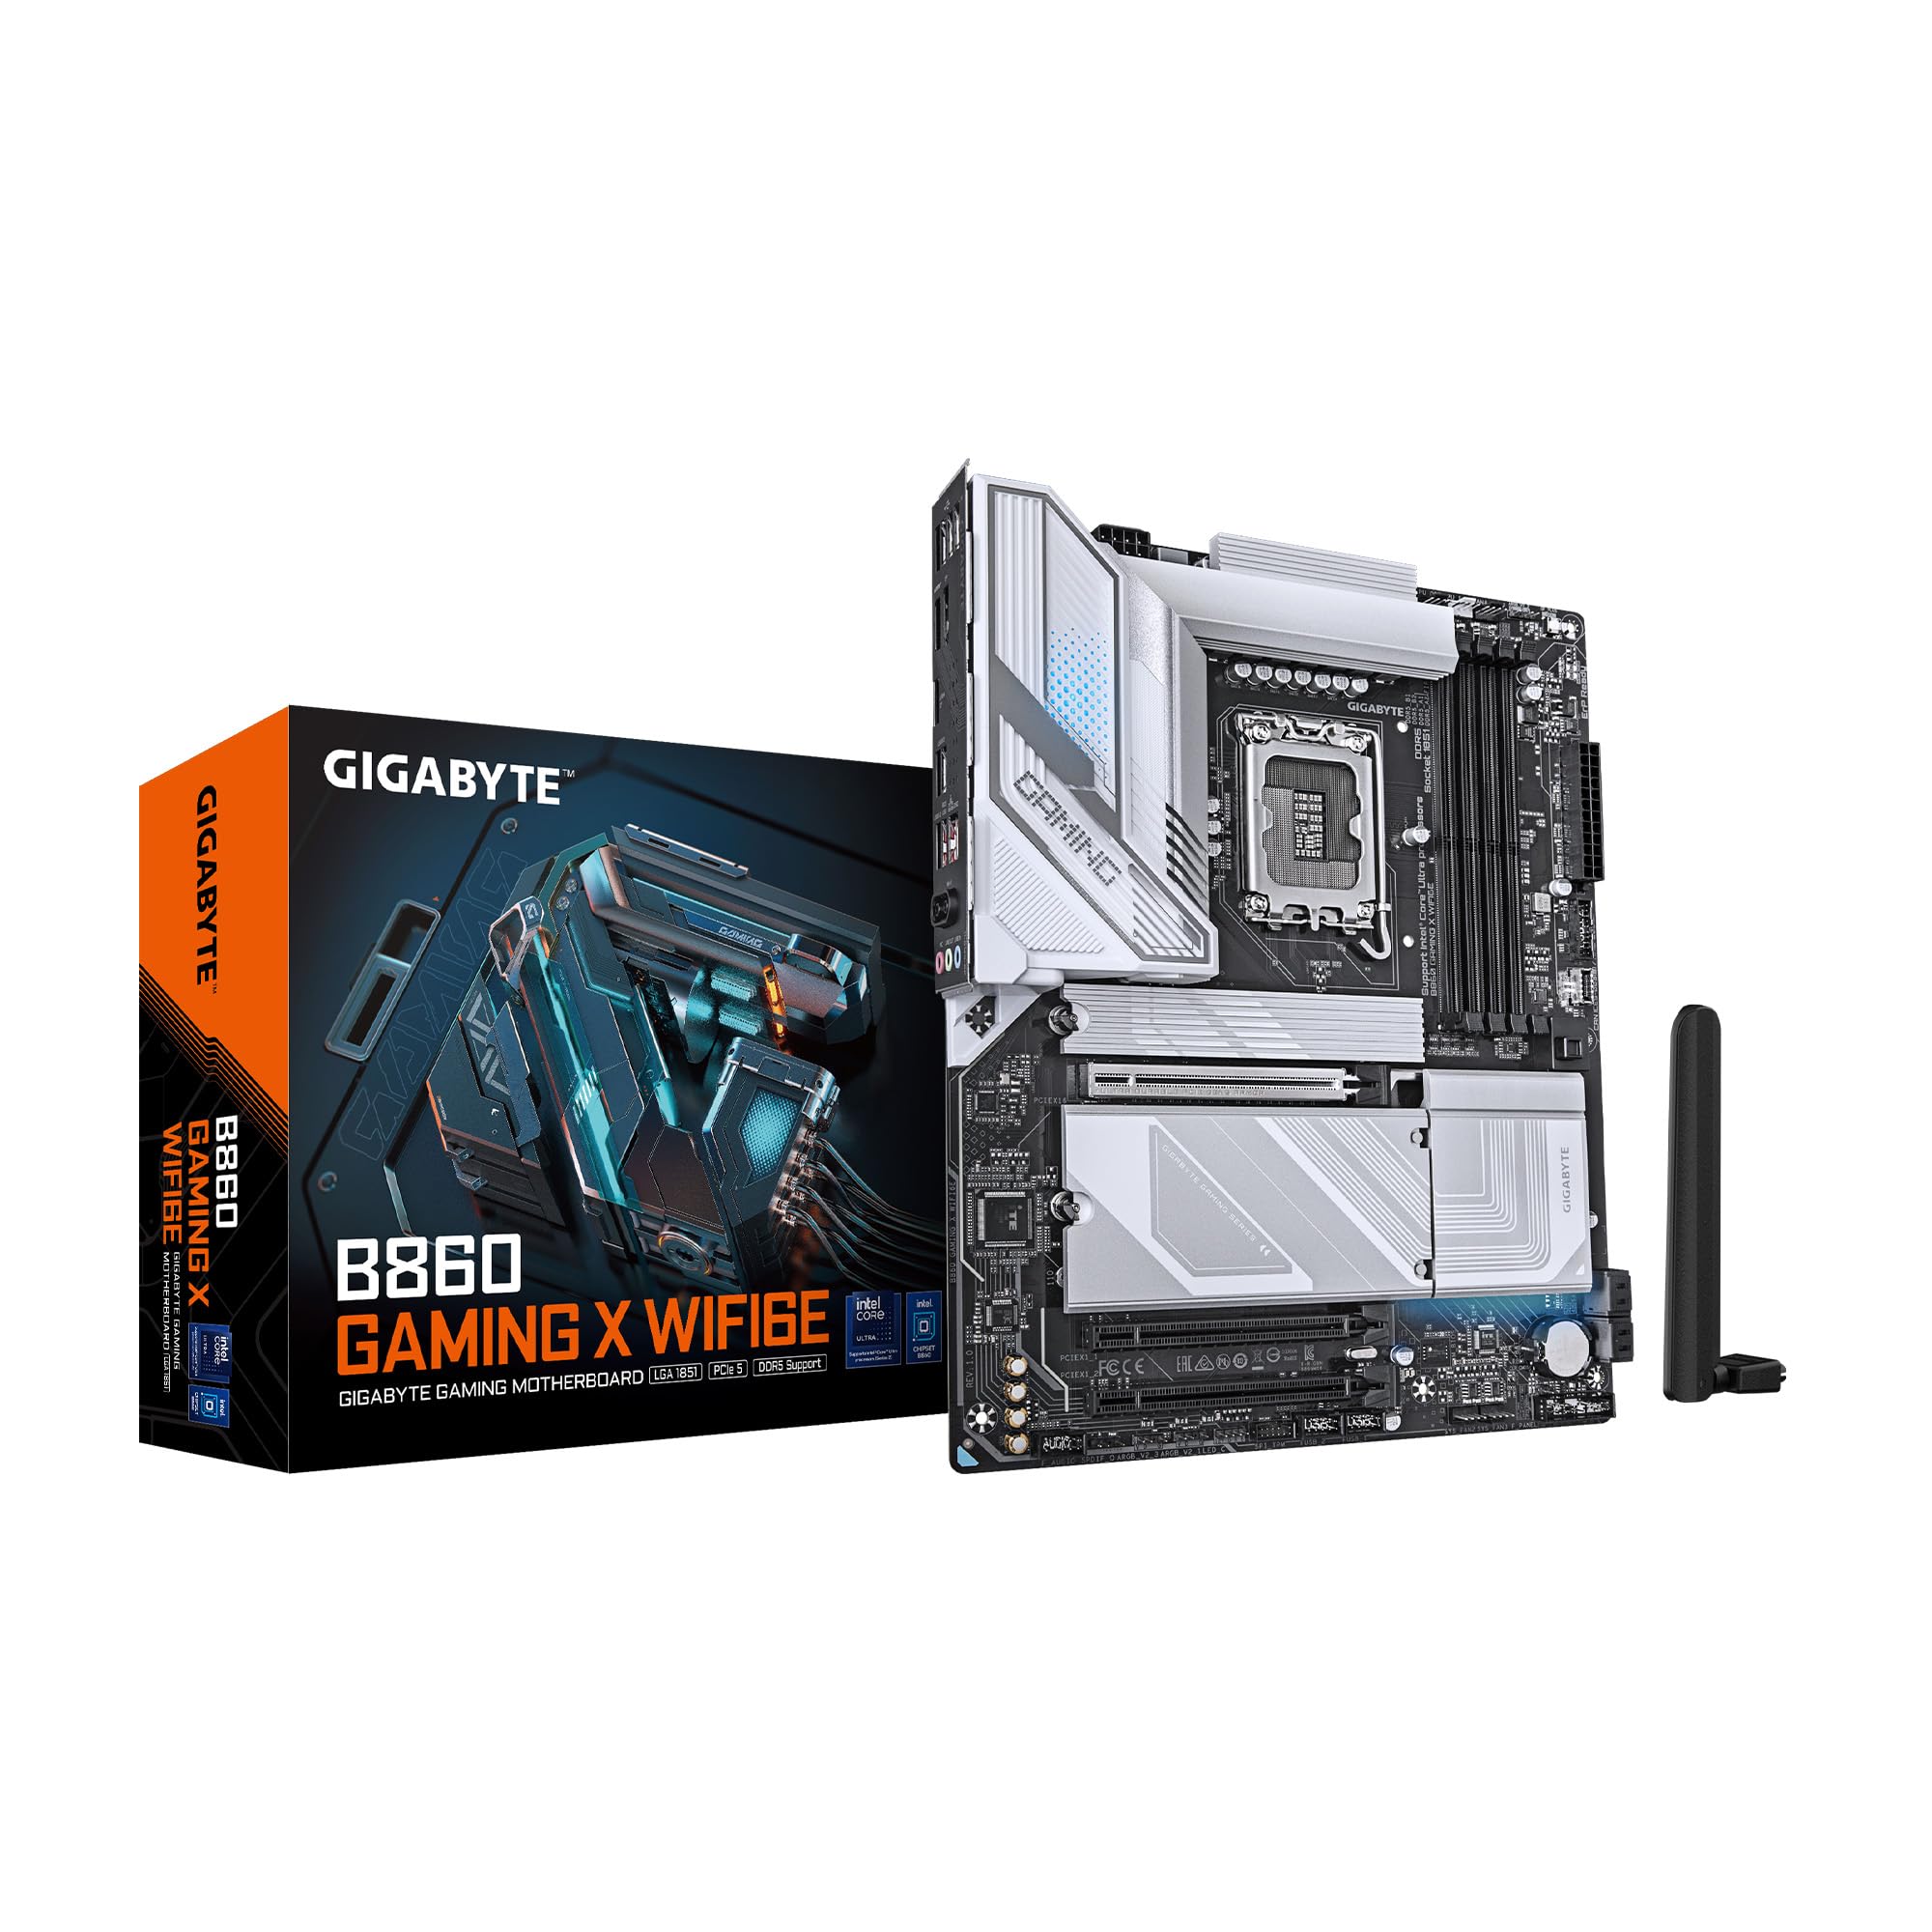
図4.1: トップダウン view of the GIGABYTE B860 Gaming X WIFI6E Motherboard, showing the CPU socket, DDR5 DIMM slots, PCIe slots, and M.2 slots with heatsinks.

図4.2: 角度付き view of the GIGABYTE B860 Gaming X WIFI6E Motherboard, highlighting the VRM heatsinks, I/O shroud, and overall board design.
4.1 背面I/Oパネルview
背面の I/O パネルには、外部デバイスを接続するためのさまざまなポートがあります。

Figure 4.3: Rear I/O panel featuring USB ports, HDMI, DisplayPort, 2.5GbE LAN, Wi-Fi antenna connectors, and audio jacks.
- USB ポート: Various USB 2.0, USB 3.2 Gen1, USB 3.2 Gen2, and USB4 Type-C ports for peripheral connectivity.
- ビデオ出力: HDMI and DisplayPort for integrated graphics output.
- LANポート: 2.5 Gigabit Ethernet for high-speed wired network connections.
- Wi-Fi アンテナコネクタ: For attaching the included Wi-Fi antenna.
- オーディオジャック: スピーカー、ヘッドフォン、マイクを接続します。
- BIOS Flash Button: CPU または RAM がインストールされていない状態で BIOS を更新します。
5.インストールガイド
5.1 CPUの取り付け
- CPUソケットレバーを開き、保護カバーを取り外します。
- CPU をソケットに慎重に位置合わせし、CPU の三角形のマークがソケットのマークと一致していることを確認します。
- 無理に力を入れずに、CPU をソケットにゆっくりと差し込みます。
- ソケットレバーを閉じてCPUを固定します。
5.2 メモリ(RAM)のインストール
- DDR5 DIMM スロットの両端のクリップを開きます。
- Align the notch on the DDR5 memory module with the key on the DIMM slot.
- クリップがカチッと音がするまで、メモリ モジュールをスロットにしっかりと挿入します。
- デュアル チャネル操作の場合は、一致する色のスロット (例: A2 と B2) にモジュールをインストールします。
5.3 Storage (M.2 SSDs, SATA Drives) Installation
- M.2 SSD: Remove the M.2 Thermal Guard. Insert the M.2 SSD into the slot at an angle, then push it down and secure it with the EZ-Latch mechanism or screw. Reattach the Thermal Guard.
- SATAドライブ: Connect one end of the SATA data cable to a SATA port on the motherboard and the other end to your SATA storage device. Connect a SATA power cable from your power supply to the device.
5.4 拡張カード(PCIe)の取り付け
- Align your PCIe expansion card (e.g., graphics card) with the desired PCIe slot.
- カードが正しく装着され、保持クリップがロックされるまでしっかりと押し下げます。
- カードをネジでシャーシに固定します。
5.5 電源接続
- 電源装置の 24 ピン ATX メイン電源コネクタをマザーボードに接続します。
- 8 ピン (または 4+4 ピン) ATX 12V CPU 電源コネクタをマザーボードに接続します。
5.6 フロントパネルの接続
Connect the cables from your PC case's front panel (power button, reset button, USB ports, audio jacks, LED indicators) to the corresponding headers on the motherboard. Refer to the motherboard diagram for exact header locations.
6. 最初の起動とBIOSセットアップ
6.1 初回電源投入
すべてのコンポーネントを組み立てたら、モニター、キーボード、マウスを接続します。システムの電源を入れます。GIGABYTEのスプラッシュスクリーンが表示されます。
6.2 BIOS/UEFIへのアクセス
起動プロセス中に、 削除 キーを押してBIOS/UEFIセットアップユーティリティを起動します。ここでシステム設定、起動順序の設定、ハードウェアステータスの監視が行えます。
6.3 Basic BIOS Settings
- 起動順序: Set the primary boot device (e.g., M.2 SSD with OS).
- 日時: Adjust system date and time.
- ファンコントロール: Configure fan speeds for optimal cooling and noise levels.
- XMP プロfile: DDR5 メモリを定格速度で動作させるには、XMP を有効にします。
7. ドライバーとソフトウェアのインストール
For optimal system performance and stability, install the latest drivers and utilities for your motherboard.
- チップセットドライバー: CPU と他のコンポーネント間の適切な通信に不可欠です。
- LAN ドライバー: For the 2.5GbE wired network connection.
- Wi-Fi/Bluetooth ドライバー: ワイヤレス接続用。
- オーディオドライバー: サウンド機能用。
- ユーティリティソフトウェア: GIGABYTE provides various utilities for system monitoring, RGB control, and BIOS updates.
Drivers can be found on the included CD/USB or downloaded from the official GIGABYTE webサイト。
8. メンテナンス
8.1 BIOS アップデート
定期的にGIGABYTEをチェックしてください website for the latest BIOS versions. BIOS updates can improve system stability, compatibility, and performance. Follow the instructions provided by GIGABYTE for safe BIOS flashing.
8.2 ドライバーの更新
新しいソフトウェアやハードウェアとの互換性を確保し、パフォーマンスの向上やバグ修正の恩恵を受けるために、ドライバーを最新の状態に保ってください。
8.3 クリーニング
Periodically clean your PC to prevent dust buildup, which can lead to overheating. Use compressed air to clear dust from heatsinks, fans, and other components. Ensure the system is powered off and unplugged before cleaning.
9。 トラブルシューティング
- 電源なし: すべての電源接続(24ピンATX、8ピンCPU、GPU電源)を確認してください。電源がオンになっていることを確認してください。
- 表示なし: モニターの接続と入力ソースを確認してください。グラフィックカードとRAMモジュールを装着し直してください。RAMスティックを1枚だけ使って起動してみてください。
- システムの起動に失敗する: Check for POST (Power-On Self-Test) error codes or beeps. Reseat all components. Clear CMOS by removing the battery or using the clear CMOS jumper.
- コンポーネントが検出されません: Ensure the component is properly seated and connected. Check BIOS settings to confirm it is enabled. Update drivers.
- 過熱: Ensure CPU cooler is properly installed. Check fan connections and fan speeds in BIOS. Clean dust from heatsinks and fans.
10. 仕様
| 特徴 | 仕様 |
|---|---|
| ブランド | ギガバイト |
| シリーズ | B860 ゲーミングX WIFI6E |
| 商品型番 | B860 ゲーミングX WIFI6E |
| CPUソケット | インテルLGA1851 |
| 互換性のあるプロセッサ | Intel Ultra Core Series 2 |
| RAMメモリ技術 | DDR5 |
| RAMスロット | 4 枚の DIMM |
| メモリ速度 | 5600 MHz |
| チップセットタイプ | インテル B860 |
| PCIeスロット | PCIe 5.0 (for graphics card) |
| M.2 スロット | 3x M.2スロット |
| USB接続 | USB-C and other USB ports |
| 無線LAN | 2.5GbE LAN |
| ワイヤレス接続 | WIFI6E |
| 電力設計 | 12+1+2+1, 50A PPAK VRM |
| サーマル | MOSFET Heatsink, M.2 Thermal Guard |
| フォームファクター | ATTX |
| 製品寸法 | 12 x 9.6 x 1インチ |
| アイテム重量 | 4.2ポンド |
| プラットフォーム | ウィンドウズ11 |
11. 保証情報
GIGABYTE motherboards typically come with a limited manufacturer's warranty. The specific terms and duration of the warranty may vary by region and retailer. Please retain your proof of purchase for warranty claims. For detailed warranty information, refer to the official GIGABYTE webサイトをご覧いただくか、ご購入店にお問い合わせください。
12. テクニカルサポート
If you encounter issues that cannot be resolved using this manual or the troubleshooting section, please contact GIGABYTE technical support.
- GIGABYTE公式 Webサイト: ギガバイト
- サポートセクションを参照してください website for FAQs, driver downloads, and contact information for your region.