1. はじめに
This manual provides detailed instructions for the safe and effective operation, setup, and maintenance of your ONEVAN 16 Lines Laser Level. This device features a 4x360° 4D green beam, self-leveling capabilities, and remote control for various leveling and alignment tasks. Please read this manual thoroughly before using the product to ensure proper function and safety.
2. パッケージ内容
以下にリストされているすべてのアイテムがパッケージに含まれていることを確認してください。
- 1 x Laser Level Unit
- リモコン x 1
- 2 x Lithium Batteries (1200mAh each)
- 1 x Rotating Base
- 1 xウォールブラケット
- 1 x Lifting Platform
- 充電器 x 1
- 1 xアダプタ
- 1 x Canvas Bag

Image 2.1: The ONEVAN 16 Lines Laser Level shown with all its accessories, including the main unit, remote control, batteries, various mounting bases, charger, and canvas bag.
3 製品の特徴
- 4x360°レーザーライン: Projects two 360° horizontal lines and two 360° vertical lines, providing comprehensive coverage for floor, wall, and ceiling applications. This allows for a complete square layout visualization.
- セルフレベリングモード: Automatically levels within a tilt angle of ±3°. If the tilt exceeds this range, the device will emit an audible alarm to indicate it is out of level.
- 手動モード: For projecting laser lines at any desired angle, activate manual mode by holding the "OUTDOOR" button for 3 seconds. The self-leveling function is deactivated in this mode.
- リモートコントロール: Allows convenient selection of laser lines without needing to directly interact with the unit, enhancing operational flexibility.
- 耐久性: Features an IP54 waterproof and dustproof rating, ensuring reliable performance in various working conditions.
- High Visibility Green Beam: Utilizes advanced diode technology for a green laser beam that is approximately four times brighter than red beams, improving visibility and accuracy. The working range is up to 82 feet (25 meters).
- 電源: Comes with two rechargeable 1200mAh lithium batteries for extended use.
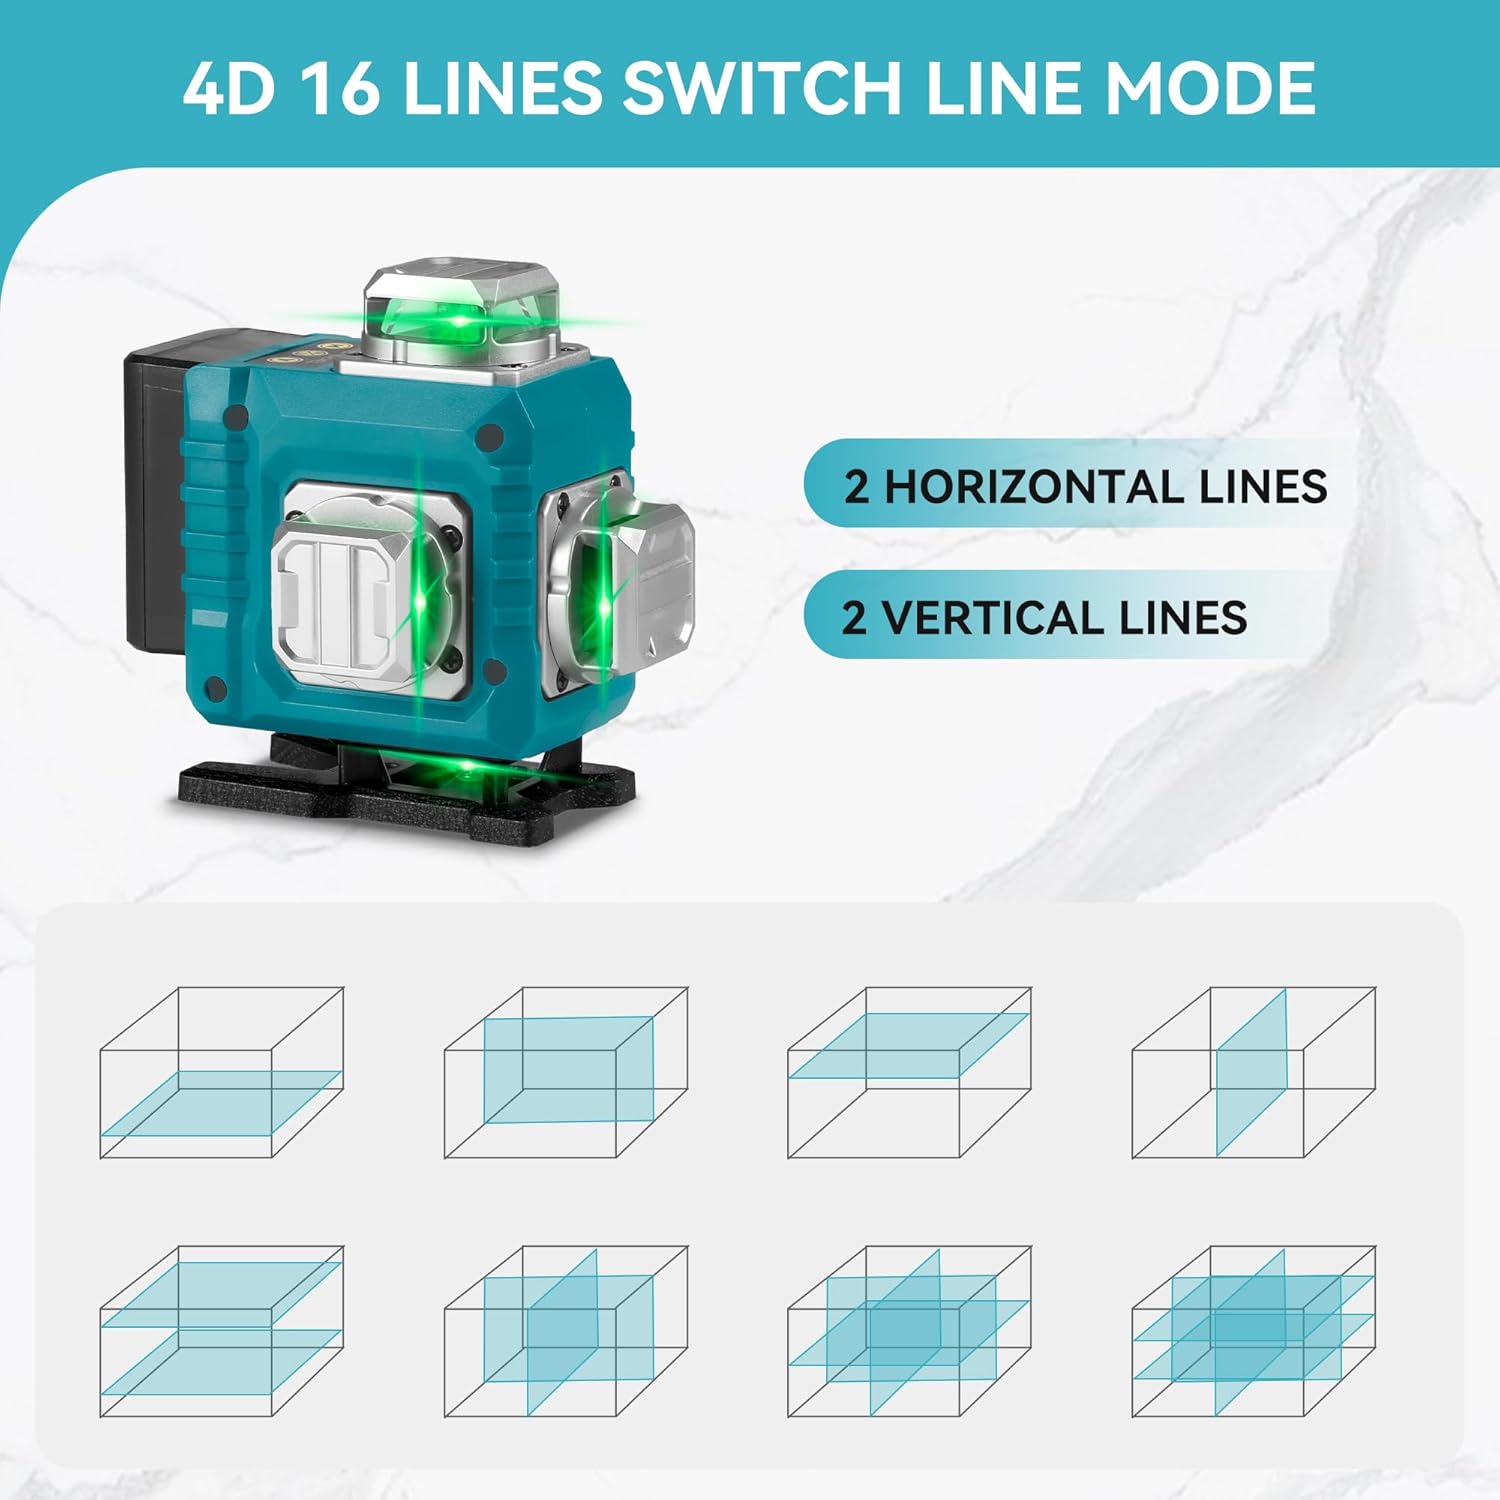
Image 3.1: Illustration of the 4D 16-line laser level, demonstrating how two horizontal and two vertical 360-degree laser lines provide full room coverage and various projection modes.
4. 安全に関する注意事項
WARNING: This product contains a Class II laser. Avoid direct eye exposure to the laser beam. Staring into the beam can cause eye injury.
- レーザービームを直接見ないでください。
- 人や動物にレーザー光線を向けないでください。
- Do not operate the laser level in explosive atmospheres or near flammable materials.
- デバイスを子供の手の届かない場所に保管してください。
- 付属の充電器と電池のみを使用してください。
- Do not attempt to modify or disassemble the laser level. This will void the warranty and may result in hazardous laser exposure.
- 誤って動かないように、操作する前にデバイスが安定していることを確認してください。
5. セットアップ
- バッテリーの取り付け: Open the battery compartment and insert the two provided lithium batteries, ensuring correct polarity. Close the compartment securely.
- 充電: Connect the charger to the laser level and plug it into a power outlet. The charging indicator will show the battery status. Ensure batteries are fully charged before first use.
- 取り付けオプション:
- 回転ベース: Attach the laser level to the rotating base for precise 360° rotation on a flat surface.
- Lifting Platform: Use the lifting platform to adjust the height of the laser level for various applications.
- 壁掛けブラケット: Secure the wall bracket to a vertical surface and attach the laser level for wall-mounted operations.
- 配置: Place the laser level on a stable, level surface or mount it securely using the appropriate accessory. For self-leveling mode, ensure the surface is within the ±3° tilt range.
6. 操作手順
- 電源オン/オフ:
- To power on, slide the pendulum lock switch to the unlocked position. The laser level will automatically enter self-leveling mode.
- 電源を切るには、振り子ロックスイッチをロックの位置にスライドします。
- セルフレベリングモード:
When the pendulum lock switch is in the unlocked position, the laser level will automatically self-level. If the device is tilted beyond ±3°, it will emit an audible alarm and the laser lines will flash, indicating it is out of level. Adjust the position of the laser level until it is within the self-leveling range.
- Manual Mode (Lock Mode):
- To activate manual mode, ensure the pendulum lock switch is in the locked position. Then, press and hold the "OUTDOOR" button on the control panel for 3 seconds. The laser lines will turn on, allowing you to project lines at any angle without self-leveling.
- This mode is ideal for tasks requiring angled lines, such as installing handrails or decorative patterns.
- To exit manual mode, press the "OUTDOOR" button again or slide the pendulum lock switch to the unlocked position.
- 行の選択:
- Use the buttons on the control panel or the remote control to cycle through different laser line combinations (e.g., horizontal lines only, vertical lines only, all lines).
- Typically, a button marked "H" controls horizontal lines, and a button marked "V" controls vertical lines.
- リモコン操作:
The remote control allows you to switch between laser lines and modes from a distance. Ensure the remote control has working batteries and is pointed towards the laser level for effective communication.

Image 6.1: Demonstrates the laser level in use for both self-leveling applications, such as floor tiling, and manual mode for angled projections, like installing ceiling fixtures.
7. メンテナンス
- クリーニング: 柔らかくてamp cloth to clean the laser level. Do not use abrasive cleaners or solvents. Keep the laser apertures clean and free of dust.
- ストレージ: When not in use, store the laser level in its canvas bag in a dry, cool place, away from direct sunlight and extreme temperatures. Ensure the pendulum lock is engaged before storage to protect the internal components.
- バッテリーのケア: Remove batteries if the device will not be used for an extended period. Recharge batteries regularly to maintain their lifespan, even if not in use.
- 較正: If you suspect the laser level is out of calibration, contact customer support for assistance. Do not attempt to recalibrate the device yourself.
8。 トラブルシューティング
| 問題 | 考えられる原因 | 解決 |
|---|---|---|
| レーザーラインが見えないか暗くなります。 | Low battery; dirty laser aperture; excessive ambient light. | Recharge or replace batteries; clean laser apertures; use in lower light conditions or with a laser receiver (not included). |
| Laser level beeps and lines flash. | Device is out of its self-leveling range (tilted more than ±3°). | Place the laser level on a more level surface or adjust its position until it is within the self-leveling range. |
| リモコンが動作しません。 | Remote control batteries are dead; remote is too far or not pointed correctly. | Replace remote control batteries; ensure remote is within range and pointed towards the laser level. |
| レーザーラインは真っ直ぐでも正確でもありません。 | Device is not properly leveled (in self-leveling mode); device requires calibration. | Ensure the device is within its self-leveling range; if issues persist, contact customer support for calibration assistance. |
9. 仕様
- 保護レベル: IP54(防水・防塵)
- 測定精度: ±1mm/7m
- Automatic Leveling Range: ±3°
- 動作範囲: 約82フィート(25メートル)
- Number of Laser Lines: 16 lines / 4D (2 horizontal, 2 vertical 360° lines)
- バッテリー容量: 1200mAhリチウム電池2個
- リモコン距離: 82フィート(25メートル)
- レーザークラス: クラスII、<1mW出力
- 適当な温度: -10°C ~ 50°C (14°F ~ 122°F)
- 商品の重量: 1.48キロ
- 材料: 金属、プラスチック
10. 保証とサポート
保証情報、テクニカルサポート、またはサービスに関するお問い合わせは、製造元またはご購入店までお問い合わせください。ご購入の証明として、ご購入時のレシートを保管してください。
さらに詳しいサポートが必要な場合は、 ONEVAN Store on Amazon.