1.製品オーバーview
The Fuers H.265+ 8-Channel Security DVR Recorder (Model A1008CH) is a versatile surveillance solution designed for home and business security. This DVR supports various camera types including HD-CVBS, TVI, CVI, XVI, AHD, and IP analog cameras, allowing for flexible system expansion. It features H.265+ video compression for efficient storage and comes with a pre-installed 1TB hard drive for 24/7 recording.
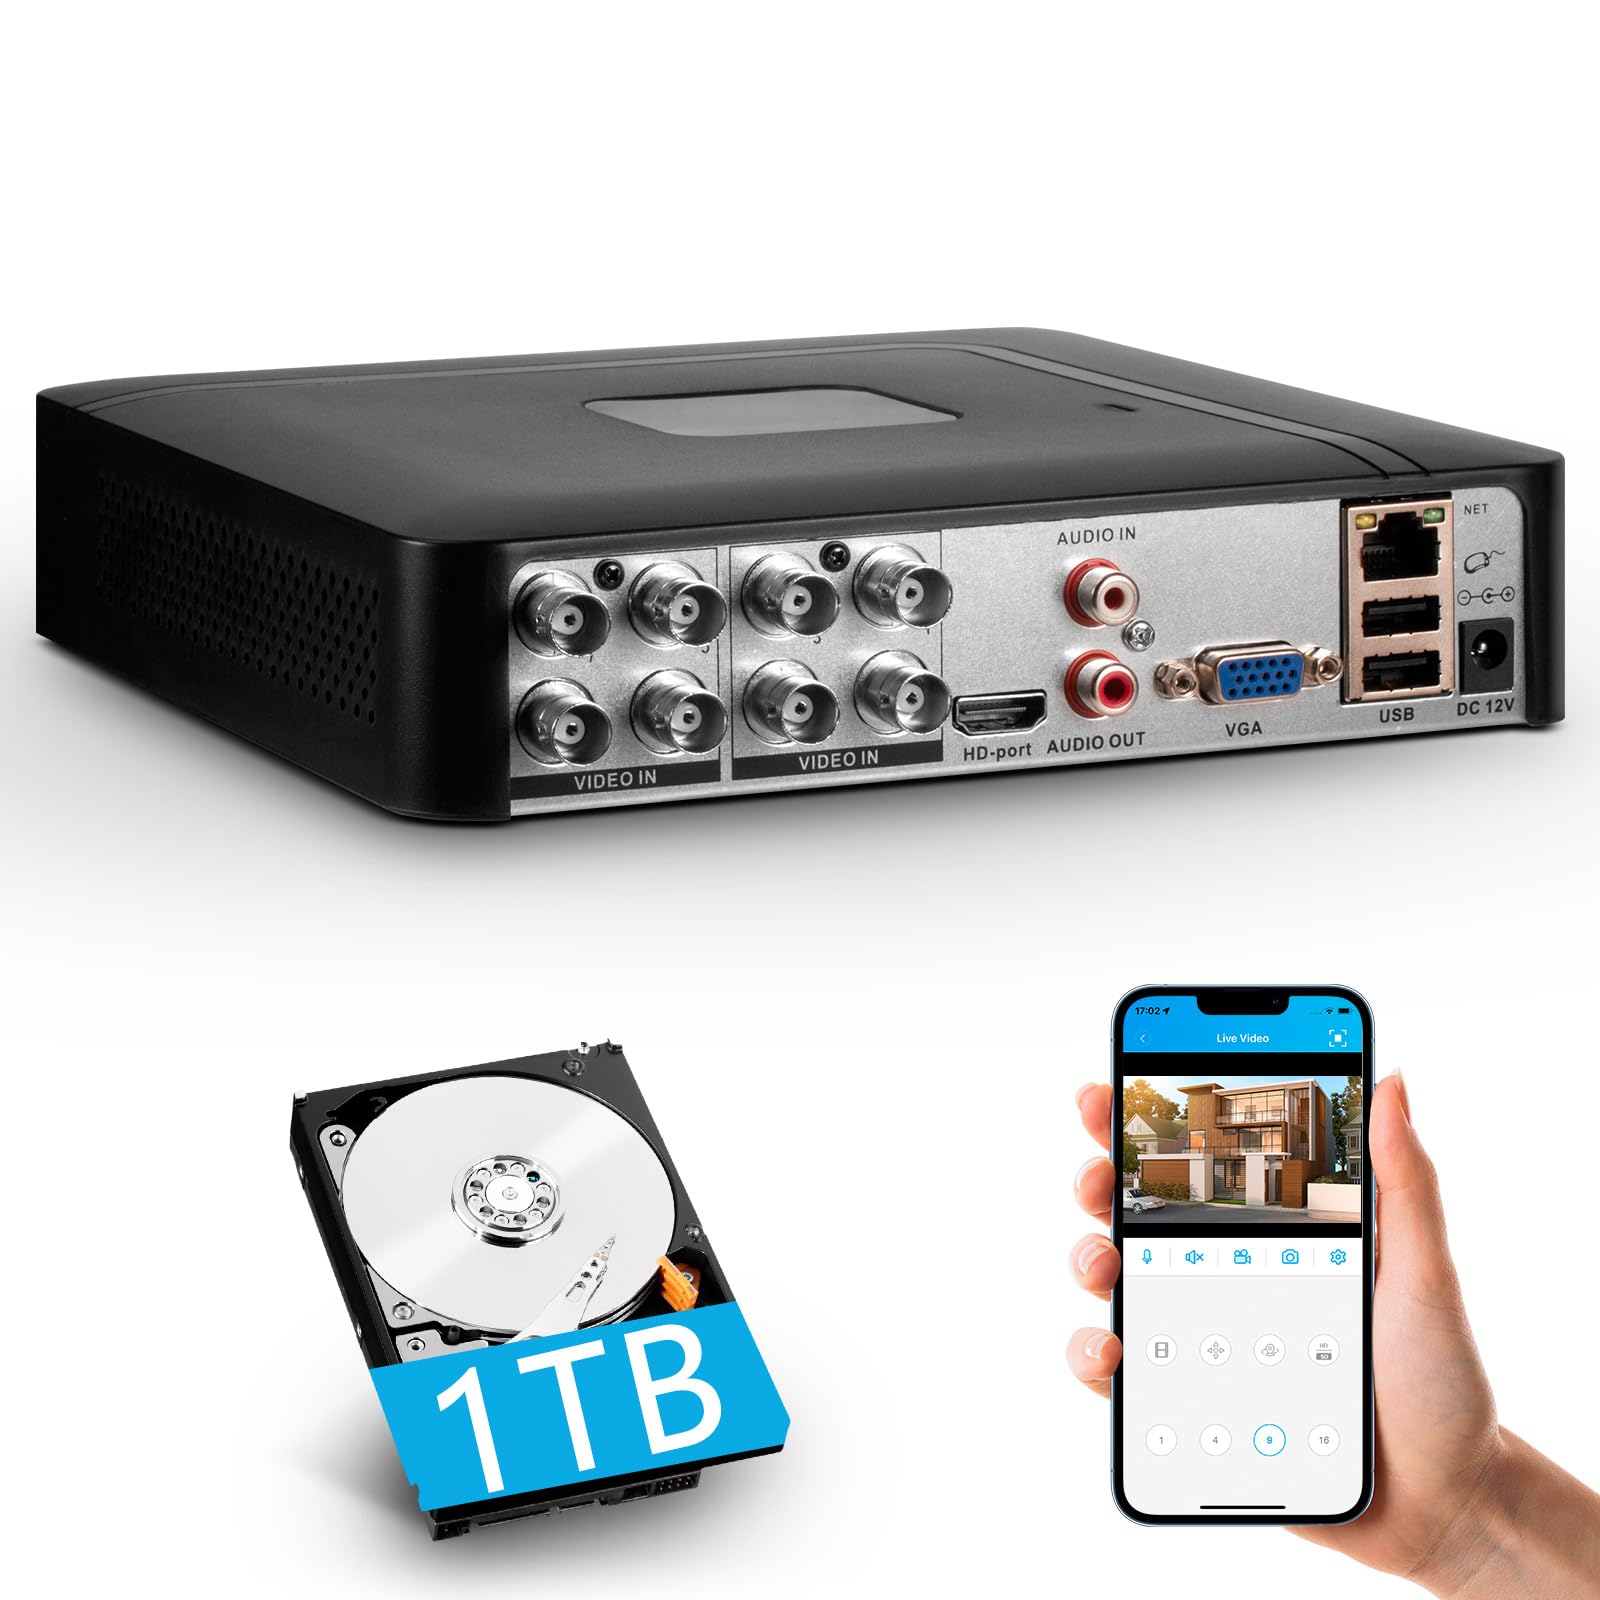
Image 1.1: Fuers H.265+ 8-Channel Security DVR Recorder.
主な特徴:
- 8チャンネルシステム: Supports up to 8 cameras simultaneously, compatible with HD-TVI, CVBS, CVI, XVI, AHD, and IP cameras.
- H.265+ビデオ圧縮: Offers extended recording time and saves up to 50% storage space compared to H.265 systems.
- プリインストールされた1TB HDD: Security-grade hard drive for continuous surveillance recording. Expandable up to 14TB via SATA port.
- リモート アクセス: View and manage your system remotely using the free iCSee App (iOS/Android) or VMS Client (Windows/Mac).
- インテリジェントな動き検出: Receive mobile push notifications for detected motion types, including person and face detection.
- プラグアンドプレイセットアップ: Easy connection with simultaneous VGA/HDMI output.
2. セットアップとインストール
2.1 箱の中身
始める前に、すべてのコンポーネントが揃っていることを確認してください。
- 1x A1008 8CH DVR
- 1x 1TB HDD (Pre-installed on DVR)
- DVR電源アダプター x 1
- USBマウス x 1
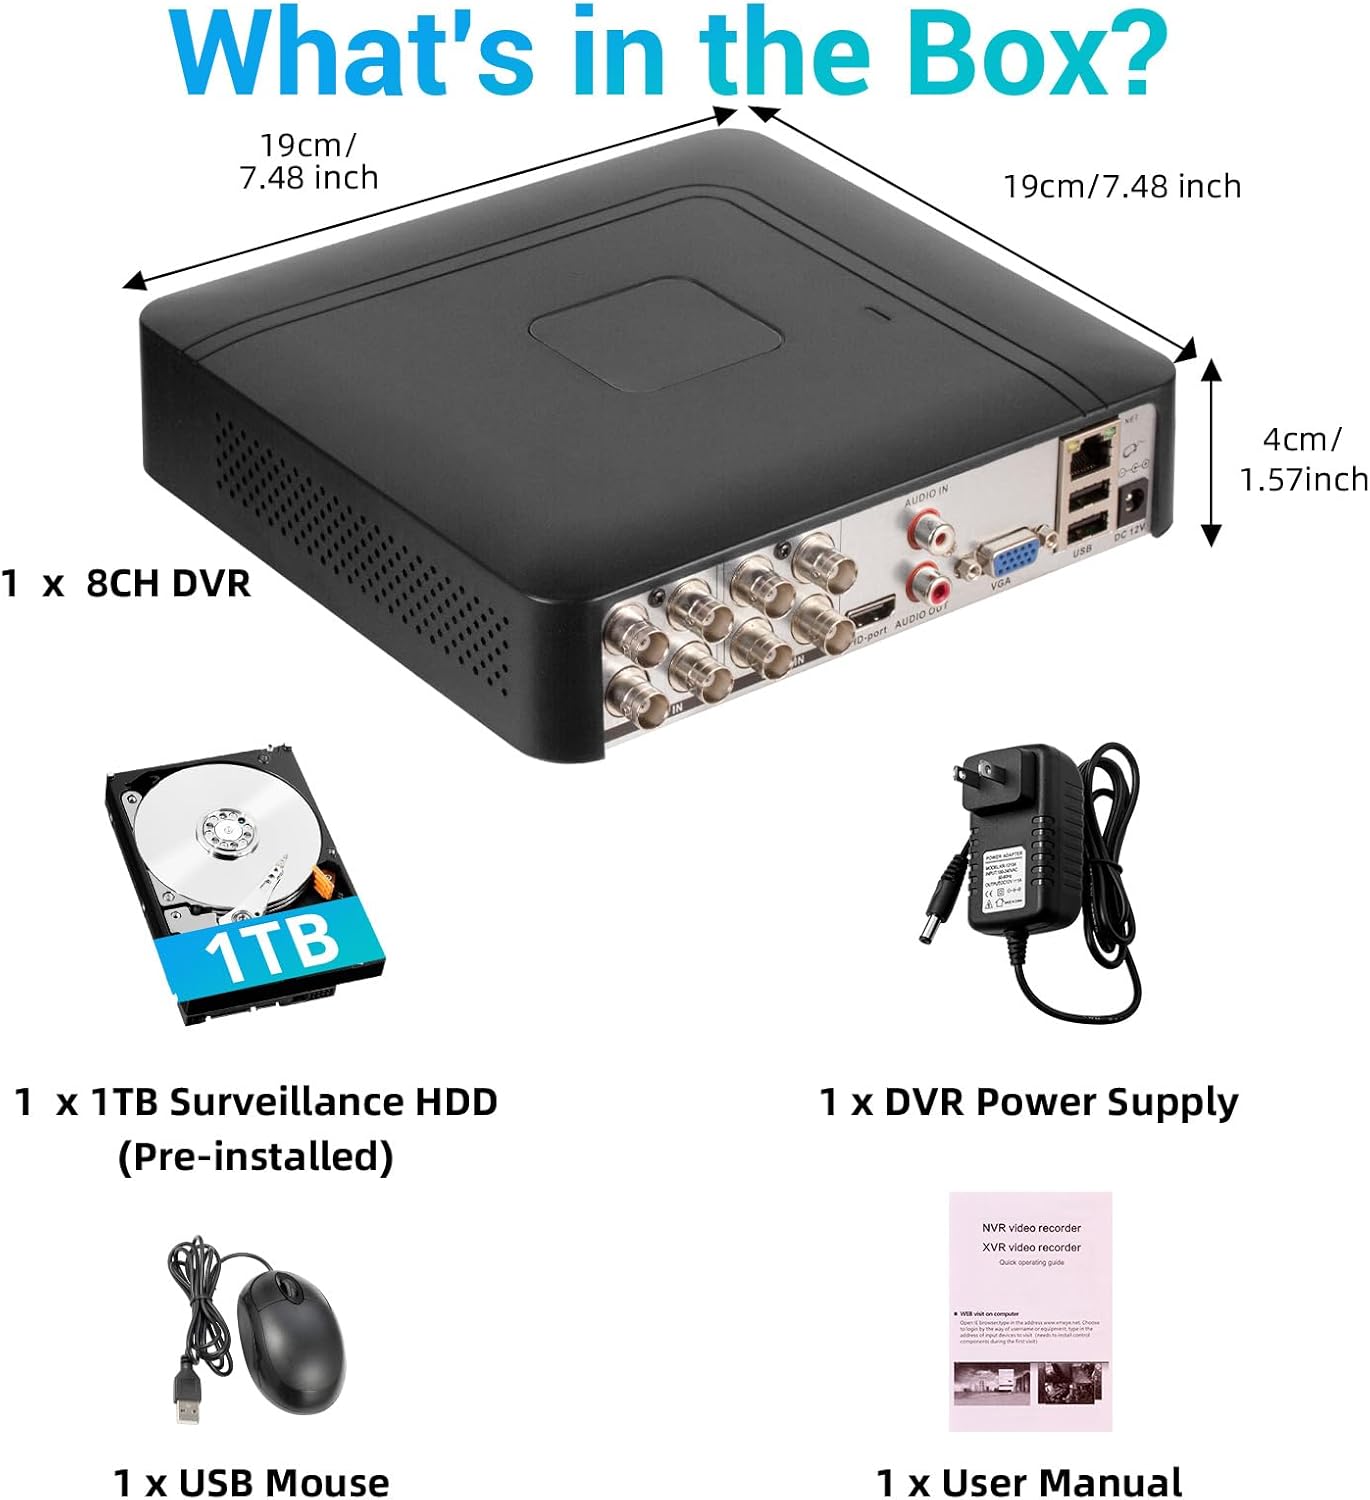
画像 2.1: 製品パッケージの内容。
2.2 Hard Drive Installation (if not pre-installed or for upgrade)
The DVR comes with a pre-installed 1TB HDD. If you need to replace or upgrade the hard drive (up to 14TB), follow these steps:
- Unscrew the bottom cover of the DVR unit.
- 慎重にcを開きますasing.
- Connect the SATA data cable and power cable from the DVR to the new hard drive.
- Secure the hard drive within the casin付属のネジを使用して取り付けます。
- DVRを閉じるasing ネジで固定します。

Image 2.2: Hard drive installation and expansion options.
2.3 Connecting the DVR System
DVR システムを接続するには、次の手順に従ってください。
- カメラを接続する: Connect your security cameras to the 'VIDEO IN' ports on the back of the DVR using BNC cables.
- モニターを接続: HDMI または VGA ポートを使用してモニターを DVR に接続します。
- USBマウスを接続します: 付属の USB マウスを DVR の USB ポートの 1 つに接続します。
- Connect Network (Optional for Remote Access): リモート用 viewing and notifications, connect an Ethernet cable from your router to the 'NET' port on the DVR.
- 電源オン: Connect the DVR power adapter to the 'DC 12V' port and then plug it into a power outlet.

Image 2.3: Connecting cameras and network to the DVR.
2.4 Initial Setup and Channel Type Selection
Upon first power-on, the system may prompt for initial setup. You may need to select the appropriate channel type for your cameras.
- Right-click on the screen to access the Main Menu.
- 移動 システム > デジタル > チャネルタイプ.
- Select the configuration that matches your camera setup:
- First row: Supports 8 XVI, CVBS, AHD, TVI, CVI coaxial cameras.
- Second row: Supports 8 XVI, CVBS, AHD, TVI, CVI coaxial + 4 IP cameras.
- Third row: Supports 16 1080P IP cameras.
- Fourth row: Supports 16 5MP IP cameras.
- クリック OK to apply changes. The system may restart.

Image 2.4: DVR Channel Type selection screen.
3. 操作手順
3.1 ライブ View 録音
Once the DVR is powered on and cameras are connected, you should see the live feed on your connected monitor. The system is configured for 24/7 recording to the pre-installed 1TB hard drive.

画像3.1: ライブ view of multiple camera feeds.
3.2 モバイルアプリ経由のリモートアクセス
To access your DVR remotely, download the free iCSee App (for iOS/Android) or VMS Client (for Windows/Mac).
- Download the iCSee App from your device's app store.
- アプリを開いて、アカウントをお持ちでない場合は登録してください。
- In the DVR's main menu, navigate to 情報 > バージョン to find the DVR's QR code.
- Use the iCSee app to scan the QR code to add your device.
- 追加したら、 view インターネット接続があればどこからでもライブフィード、録画の再生、アラートの受信が可能です。

Image 3.2: Steps for remote access via mobile app.
3.3 録音したFooの再生tage
再するためにview 録画されたビデオ:
- Right-click on the screen to access the Main Menu.
- 選択 記録 > 再生.
- Choose the desired channel(s) and date/time range for playback.
- クリック 再生を開始します に view footage.

Image 3.3: Playback interface with timeline.
3.4 モーション検出アラート
The DVR supports intelligent motion detection, including person and face detection. When motion is detected, you can receive instant mobile push notifications.
- Configure motion detection settings in the DVR's アラーム メニュー。
- Ensure your mobile app is properly linked and notifications are enabled.

Image 3.4: Human and face detection in action.
4. メンテナンス
4.1 ハードドライブ管理
プリインストールされた1TBハードドライブは ample storage. Due to H.265+ compression, storage is optimized. If more storage is needed, you can replace the internal HDD with a larger one (up to 14TB). Regularly check the hard drive status in the DVR's system settings to ensure optimal performance.
4.2一般的なケア
- Keep the DVR in a cool, dry, and well-ventilated area.
- Avoid exposing the unit to direct sunlight, extreme temperatures, or moisture.
- DVRの外装は、柔らかく乾いた布で拭いてください。液体洗剤は使用しないでください。
- すべてのケーブル接続がしっかりと接続されていることを確認してください。
5。 トラブルシューティング
5.1 モニターにビデオ出力がない
- Check if the DVR is powered on and the power adapter is securely connected.
- Verify the HDMI or VGA cable connection between the DVR and the monitor.
- モニターが正しい入力ソース (HDMI/VGA) に設定されていることを確認します。
5.2 カメラが表示されない
- Check all camera power and video cable connections.
- Verify that the camera type (AHD, TVI, CVI, etc.) is compatible with the DVR.
- Ensure the correct channel type is selected in the DVR settings (refer to Section 2.4).
- Test cameras individually if possible to isolate the issue.
5.3 リモートアクセスが機能しない
- Confirm the DVR is connected to the internet via an Ethernet cable.
- ルーターのインターネット接続を確認してください。
- iCSee アプリが最新バージョンに更新されていることを確認してください。
- Verify that the DVR was added correctly to the app by scanning the QR code.
- For some networks, you might need to adjust router settings (e.g., port forwarding), consult your network administrator or ISP.
6. 仕様
| 特徴 | 詳細 |
|---|---|
| ブランド | 燃料 |
| モデル番号 | A1008CH |
| チャンネル数 | 8 |
| 接続技術 | HDMI、USB、VGA |
| 対応デバイス | Desktop, Tablet, Camera, Smartphone |
| 製品寸法 | 長さ7.48インチ x 幅7.48インチ x 高さ1.57インチ |
| メモリストレージ容量 | 1 TB(プリインストール) |
| Hard-Drive Size | 1 TB (Expandable up to 14 TB) |
| メディアフォーマット デジタルビデオ | H.265 + |
| ビデオ入力 | AHD, CVI, HDMI, HDTVI, IP Input, VGA |
| 欧州連合 | 765142240850 |
7. 保証とサポート
7.1製品保証
This Fuers DVR Recorder is covered by a standard manufacturer's warranty. Please refer to the warranty card included with your product or visit the official Fuers web保証条件の詳細については、ウェブサイトをご覧ください。保証請求の際は、購入証明としてレシートを保管してください。
7.2 テクニカルサポート
For technical assistance, troubleshooting, or any questions regarding your Fuers DVR, please contact Fuers customer support. Contact information can typically be found on the product packaging, the official Fuers webサイト、または小売店を通じてご購入いただけます。
オンラインリソース:
- 訪問する Fuers Store on Amazon 製品情報およびアップデートについてはこちらをご覧ください。