1.製品オーバーview
The XFOX Tuya Zigbee Door and Window Sensor is a compact, wireless contact sensor designed to enhance your home's security and smart automation capabilities. It operates by detecting the opening and closing status of doors and windows, providing real-time alerts and enabling integration with your smart home ecosystem.
This sensor requires a Tuya Zigbee hub for operation and is compatible with popular voice assistants such as Amazon Alexa and Google Assistant, allowing for convenient control and status inquiries.

Figure 1.1: XFOX Tuya Zigbee Door and Window Sensor components.
2. 主な特徴
- Wireless Intelligent Connection: Utilizes Tuya Zigbee 3.0 technology for easy integration with a Tuya smart home system via a compatible Zigbee gateway. No complex wiring is required.
- Real-time Alarm Push: Monitors the opening and closing status of doors and windows, sending instant push notifications to your mobile application upon detecting abnormal movement.
- 音声コントロールの互換性: Supports voice commands through Amazon Alexa and Google Assistant for status inquiries and linking with other smart devices to create automated security scenes.
- メンテナンスが簡単: Designed for low power consumption, offering extended battery life with 2x AAA batteries (not included), reducing the frequency of battery replacement.
- Invisible and Slim Design: Features a mini, compact design with dual mounting options (3M adhesive sticker or screws) for discreet installation on doors and windows, preserving home aesthetics.
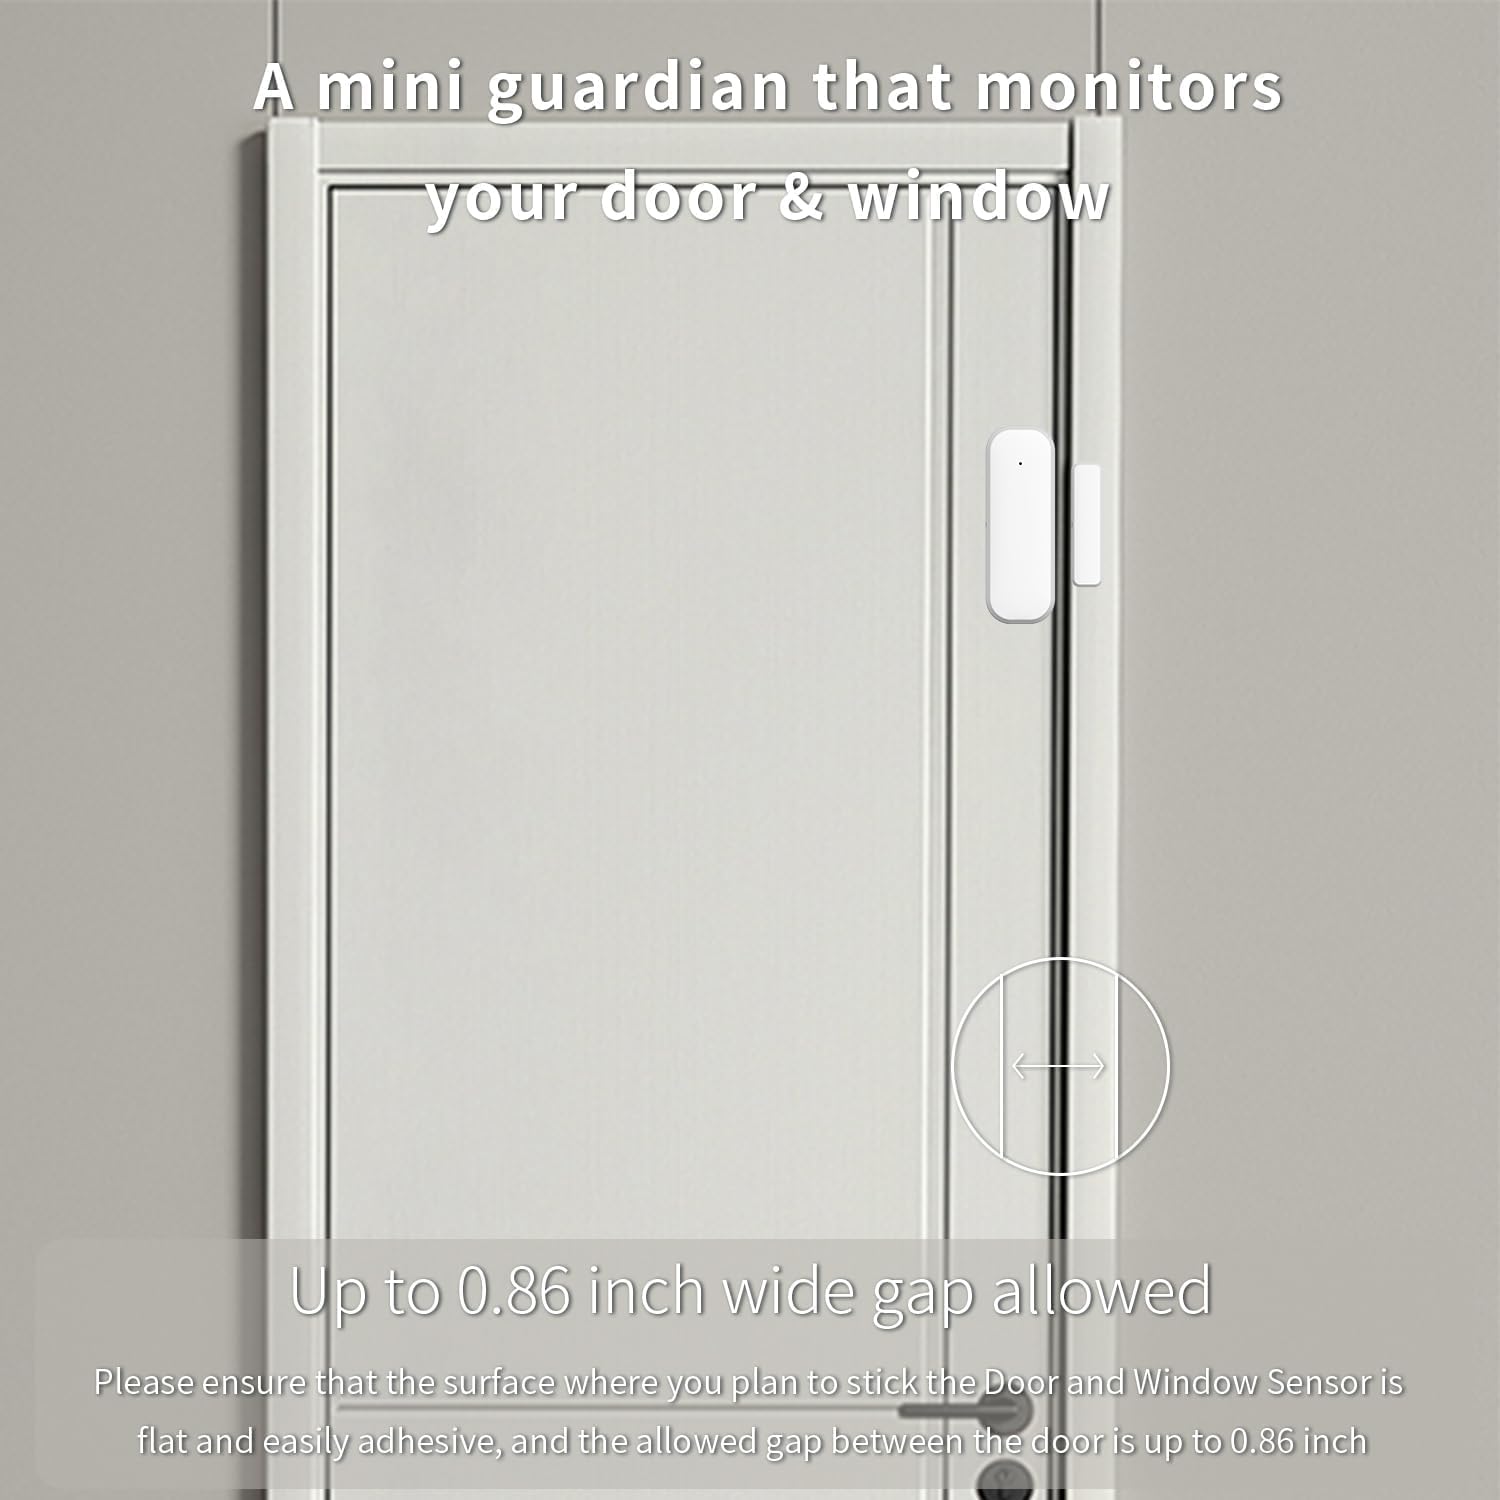
Figure 2.1: The sensor acts as a mini guardian for doors and windows.

図2.2:例amples of sensor placement on drawers, doors, and windows.
3. パッケージ内容
- 1 x XFOX Tuya Zigbee Door/Window Sensor (Main Unit and Magnet)
- ユーザーマニュアル (本書) x 1
- Mounting Accessories (3M adhesive sticker/screws)
Note: 2x AAA batteries are required for operation and are not included in the package. A Tuya Zigbee Hub is also required and sold separately.
4. セットアップとインストール
4.1. バッテリーの取り付け
- メインセンサーユニットの背面カバーをゆっくりとスライドさせて開きます。
- 正しい極性(+/-)を確認して、単4電池2本を挿入します。
- 裏蓋をしっかりと閉めてください。
4.2. Pairing with Tuya Zigbee Hub
Before installation, ensure you have a Tuya Zigbee Hub connected to your network and the Tuya Smart Life application installed on your smartphone.

Figure 4.1: A Tuya Hub is required for sensor operation.
- スマートフォンでTuya Smart Lifeアプリを開きます。
- 「デバイスの追加」セクションに移動します。
- Select "Sensor" and then "Contact Sensor" or similar option.
- Follow the on-screen instructions in the app to put the sensor into pairing mode (usually involves pressing a reset button on the sensor for a few seconds).
- 検出されたら、アプリでデバイスの追加を確認します。
If pairing fails, ensure the sensor is within range of the Zigbee hub and that the hub is properly configured. Refer to your Tuya Zigbee Hub's manual for specific pairing instructions if needed.
4.3. 物理的な設置
The sensor consists of two parts: the main sensor unit and a smaller magnet. These two parts must be installed on the door/window frame and the door/window itself, respectively, with a maximum gap of 0.86 inches (2.2 cm) when closed.
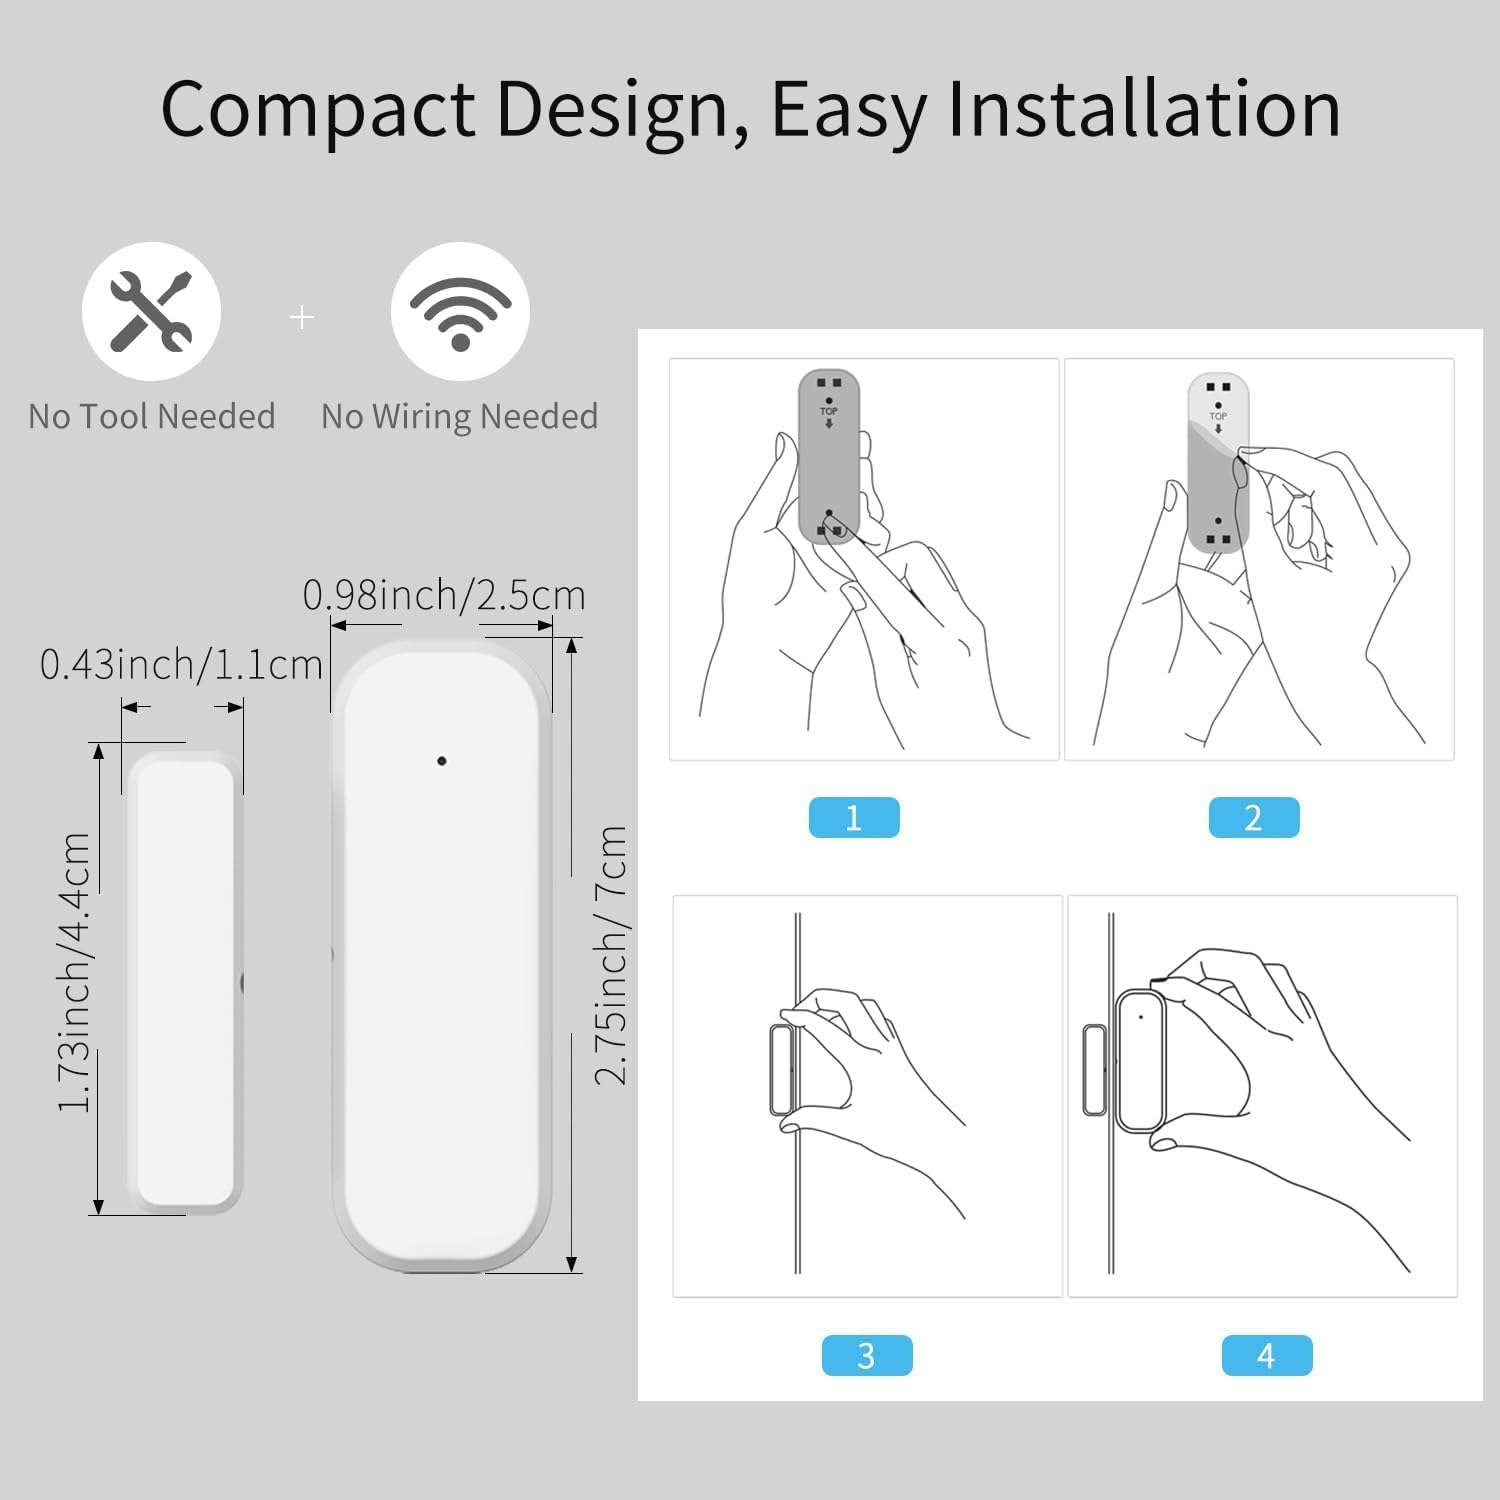
Figure 4.2: Dimensions and installation steps for the sensor.
- 場所を選択してください: Identify a clean, flat surface on your door/window frame and the corresponding moving part where the sensor and magnet can be aligned.
- きれいな表面: 設置面が清潔で乾燥しており、ほこりや油脂がないことを確認してください。
- 本体の取り付け: Peel the backing from the 3M adhesive sticker on the main sensor unit and firmly press it onto the chosen spot on the door/window frame. Alternatively, use screws for a more permanent installation.
- Attach Magnet: Peel the backing from the 3M adhesive sticker on the smaller magnet and firmly press it onto the door/window itself, aligning it with the main sensor unit. Ensure the alignment marks on both parts face each other and the gap is within 0.86 inches when the door/window is closed.
- テスト: Open and close the door/window to verify that the sensor registers the change in status in the Tuya Smart Life app.
Figure 4.3: Proper alignment of the sensor and magnet on a door.
5. 操作手順
5.1. Monitoring Status via App
Once installed and paired, the sensor will continuously monitor the open/closed status of your door or window. You can view the current status and historical records directly within the Tuya Smart Life application.
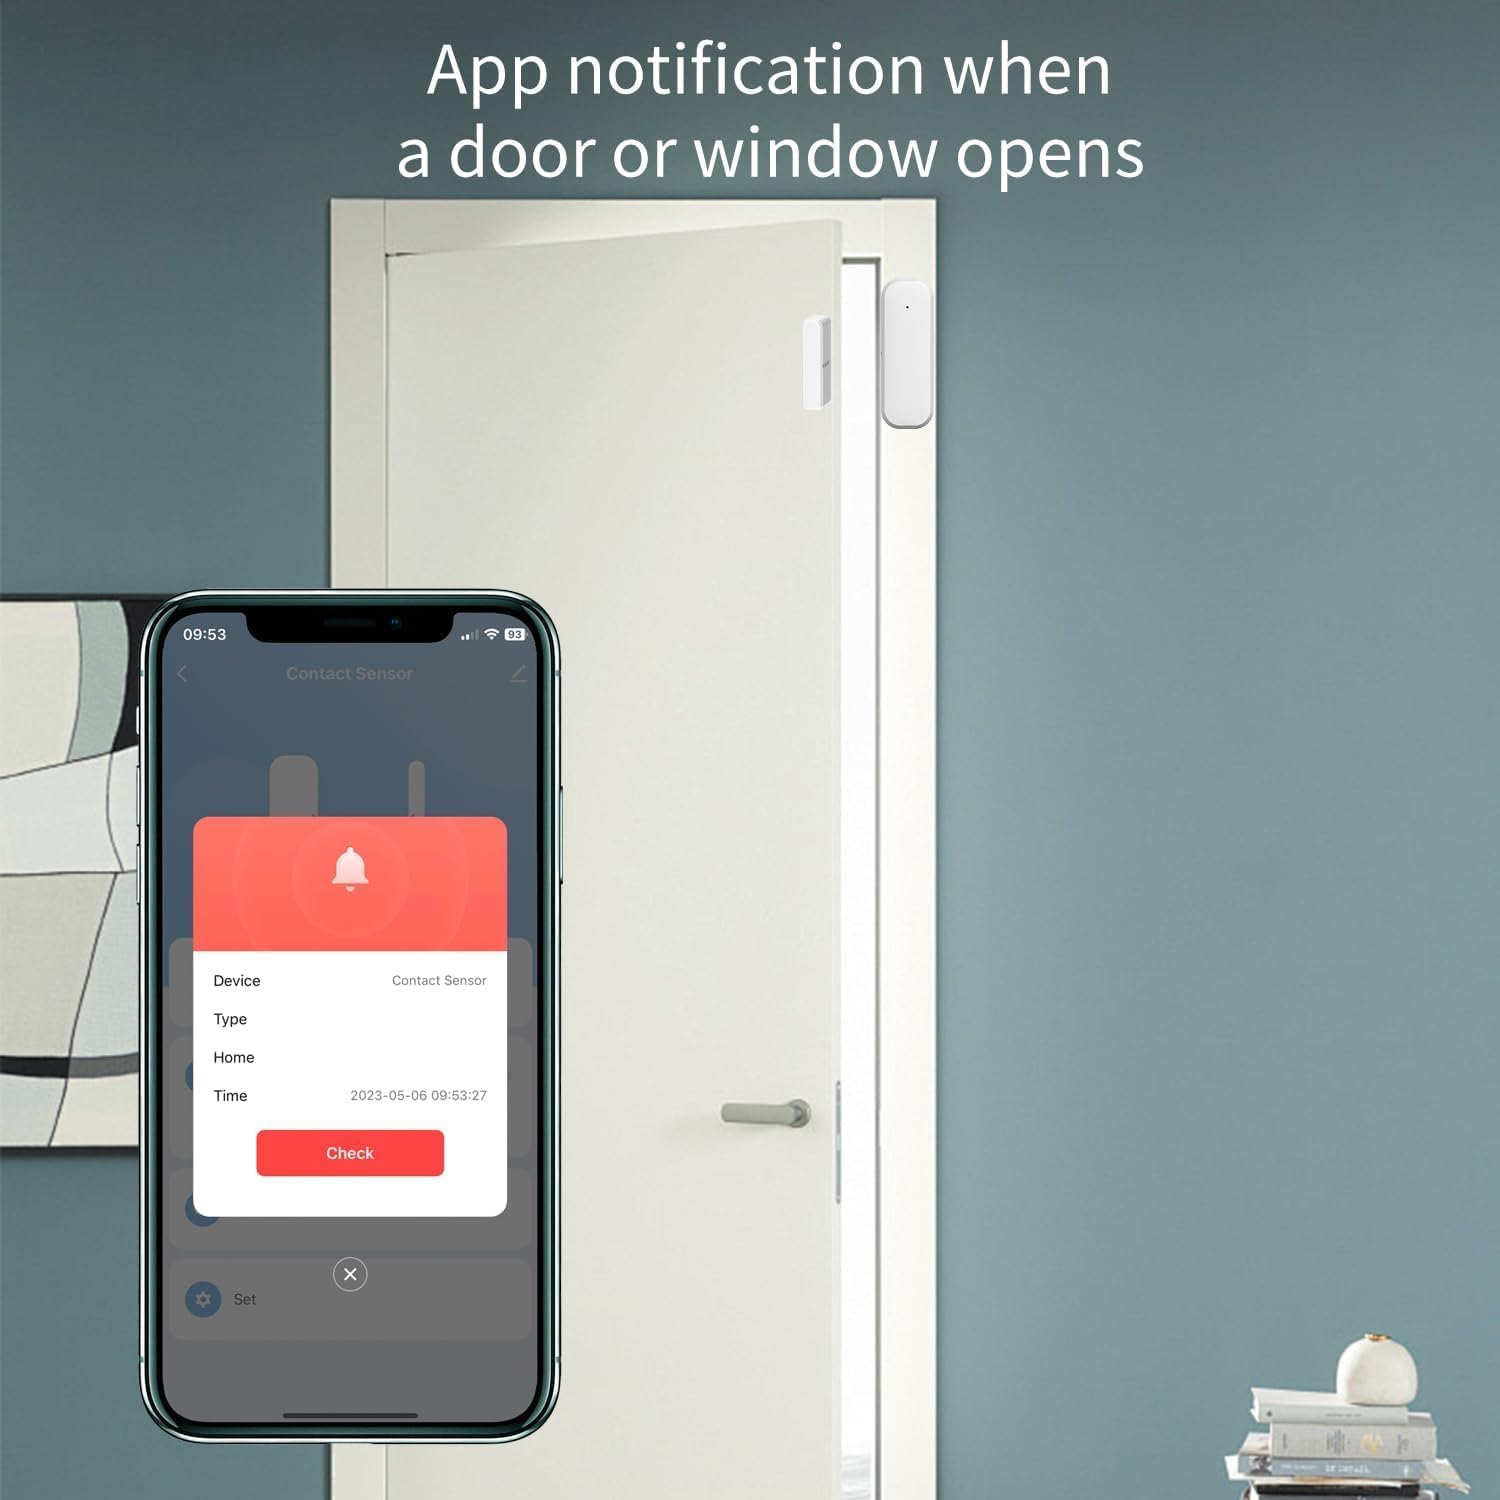
Figure 5.1: App notification when a door or window opens.
- Tuya Smart Life アプリを開きます。
- Select the specific Door/Window Sensor from your device list.
- The app will display the current status (e.g., "Open" or "Closed") and a log of recent activities.
5.2. 通知の受信
Configure push notifications in the Tuya Smart Life app to receive instant alerts on your smartphone whenever the door or window opens or closes unexpectedly.
- In the sensor's settings within the app, enable "Alarm Push" or "Notification Settings".
- Customize notification preferences as desired.
5.3. 音声制御の統合
Integrate the sensor with Amazon Alexa or Google Assistant for hands-free monitoring and automation.

Figure 5.2: Voice control with Google Assistant and Amazon Alexa.
- Ensure your Tuya Smart Life account is linked to your Alexa or Google Home app.
- Discover new devices in your voice assistant app.
- Once discovered, you can ask questions like:
- 「アレクサ、玄関のドアは開いていますか?」
- "Hey Google, what's the status of the living room window?"
- You can also set up routines or automations (e.g., turn on a light when the door opens).
6. メンテナンス
6.1. バッテリーの交換
The sensor is designed for low power consumption, providing long battery life. When the battery level is low, the Tuya Smart Life app may notify you. Replace the batteries promptly to ensure continuous operation.
- メインセンサーユニットの背面カバーを開きます。
- 古い単4電池を取り外します。
- 正しい極性に注意して、新しい AAA アルカリ電池 2 本を挿入します。
- 背面カバーを閉じます。
使用済みバッテリーは、地域の規制に従って廃棄してください。
6.2. 清掃
センサーの外側は柔らかく乾いた布で拭いてください。研磨剤入りの洗剤や溶剤はデバイスを損傷する可能性があるため、使用しないでください。
7。 トラブルシューティング
| 問題 | 考えられる原因 | 解決 |
|---|---|---|
| Sensor not pairing with Tuya Zigbee Hub. |
|
|
| Sensor status not updating in app / Unreliable signal. |
|
|
| 通知を受信しませんでした。 |
|
|
8. 仕様
| 属性 | 価値 |
|---|---|
| モデル番号 | F-SD01Z |
| ブランド | XFOX |
| 接続技術 | ジグビー3.0 |
| 電源 | 電池駆動(単4電池2本、別売) |
| 巻tage | 2 ボルト (DC) |
| 制御方法 | アプリ、リモコン、音声 |
| 取り付けタイプ | ドアマウント |
| センサー技術 | 接触 |
| 外形寸法図(本体) | 2.76 x 0.98 x 0.73 インチ (7 x 2.5 x 1.85 cm) |
| Dimensions (Magnet) | 1.73 x 0.43 x 0.73 インチ (4.4 x 1.1 x 1.85 cm) |
| アイテム重量 | 1.13オンス(約32g) |
| 色 | 白 |
| 対応デバイス | Tuya Zigbee Hub, Alexa, Google Assistant, Smartphone |
| Maximum Installation Gap | 0.86インチ(2.2 cm) |
9. 安全情報
- This device operates on 2 Volts DC. Use only specified battery types.
- デバイスを極端な温度、直射日光、湿気にさらさないでください。
- ご自身でデバイスの分解や修理を試みないでください。修理は資格のある専門家にご依頼ください。
- お子様やペットの手の届かない場所に保管してください。
- Ensure proper battery polarity when inserting batteries. Incorrect insertion can cause damage.
10. 保証とサポート
保証情報およびテクニカルサポートについては、製造元またはご購入店にお問い合わせください。ご購入の証明として、ご購入時のレシートを保管してください。
Manufacturer: FARYLINK
For further assistance, please visit the official XFOX webサイトにアクセスするか、カスタマー サポートにお問い合わせください。