
導入
Thank you for choosing the Milex 2 Burner Gas Braai. This manual provides essential information for the safe assembly, operation, and maintenance of your new gas braai. Please read these instructions thoroughly before use and retain them for future reference.
The Milex 2 Burner Gas Braai features powerful burners for precise heat control, a sleek design, and high-quality materials for durability. It includes convenient features such as a warming rack, automatic ignition, and a gas bottle hook.
重要な安全情報
- 屋外使用のみ: この機器は屋外での使用のみを目的として設計されています。屋内では使用しないでください。
- 換気: Ensure adequate ventilation. Do not operate in an enclosed area.
- ガスボンベ: Store gas cylinders in a well-ventilated area, away from heat sources.
- 可燃性物質: Keep flammable materials, liquids, or aerosols away from the appliance.
- リークテスト: Always perform a leak test on all gas connections before first use and after any gas cylinder change.
- 子供とペット: 高温の器具から子供やペットを遠ざけてください。
- 監督: 使用中は機器を放置しないでください。
- 手順を読む: Always read and follow all instructions in this booklet before operating the appliance.
セットアップと組み立て
Carefully unpack all components and ensure all parts are present before beginning assembly. Refer to the included assembly diagram for detailed steps.
- 本体を組み立てる: Follow the instructions to connect the base and main grill housing.
- サイドシェルフを取り付ける: Secure the side shelves to the main body using the provided hardware. These shelves offer convenient space for utensils and platters.
- ホイールを取り付ける: Attach the wheels to the designated locations on the base for easy mobility.
- Place Cooking Grills and Warming Rack: Position the black matte enamel cast iron cooking grill and the iron wire warming rack inside the braai.
- Connect Gas Regulator and Hose: The braai comes with a ZA regulator and 60cm PVC hose. Connect the hose to the braai's gas inlet and the regulator to your gas bottle. Ensure all connections are tight.
- リークテストを実行します。 Before first use, apply a soapy water solution to all gas connections. Bubbles indicate a leak. Tighten connections or replace parts as necessary. Do not use the braai if a leak is detected.
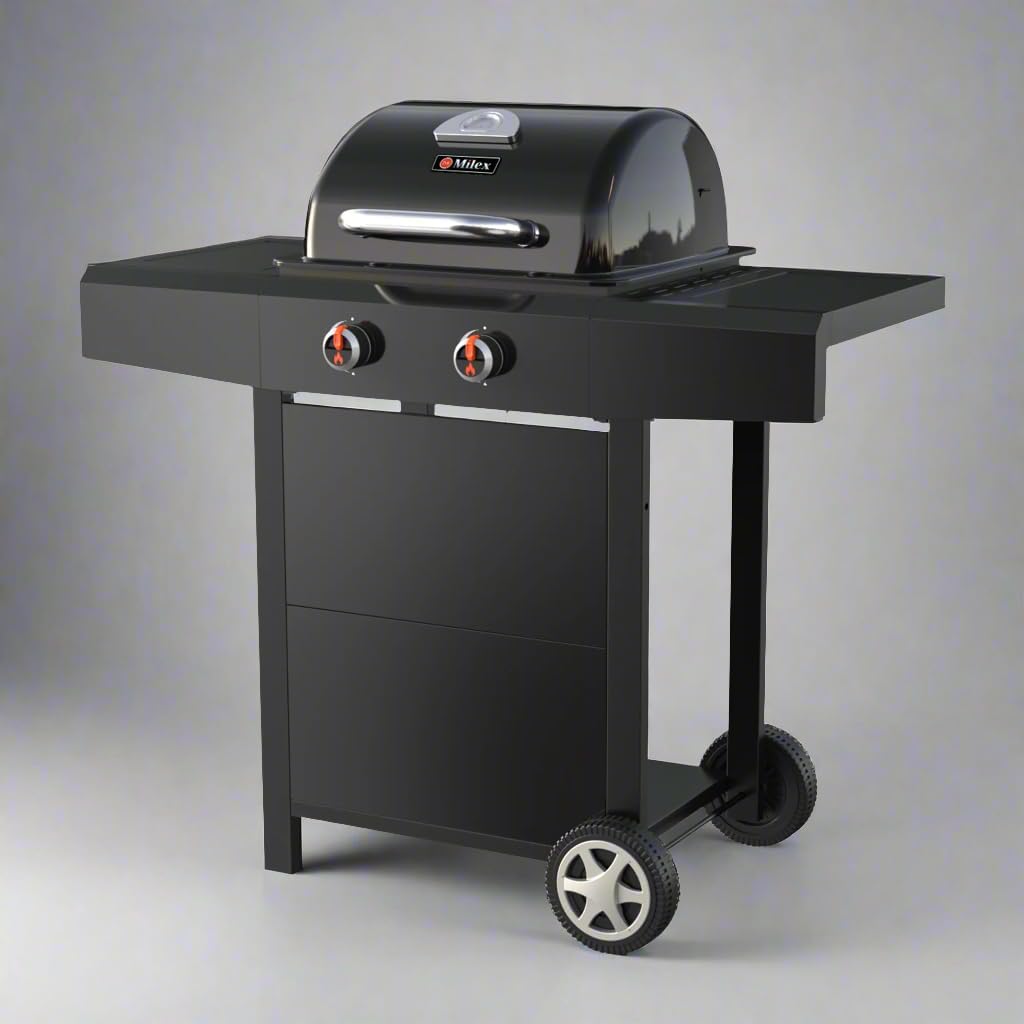
図1: 前面 view of the Milex 2 Burner Gas Braai, illustrating its compact design and side shelves.
操作手順
バーナーの照明:
- 蓋を開ける: Always open the braai lid before lighting.
- ガス供給をオンにする: Ensure the gas bottle valve is fully open.
- Ignite First Burner: Push and turn the control knob for the left burner to the "HIGH" position. Immediately push and hold the ignitor button for 3-5 seconds. You should hear a click and see the burner ignite.
- Ignite Second Burner: Once the left burner is lit, turn its control knob to "HIGH". The right burner will automatically ignite from the flame of the left burner.
- 熱を調節する: Once both burners are lit, adjust the control knobs to your desired heat level (LOW to HIGH).
- イグニッションのトラブルシューティング: If a burner does not light within 5 seconds, turn off the gas supply, wait 5 minutes, and repeat the lighting procedure. If ignition issues persist, refer to the Troubleshooting section.
Cooking with Your Braai:
- 予熱: Close the lid and allow the braai to preheat for 10-15 minutes on medium heat before placing food on the grill.
- 温度制御: Use the control knobs to adjust the flame intensity for different cooking requirements. The integrated thermometer in the hood allows for accurate temperature monitoring.
- 温暖化ラック: Utilize the warming rack to keep cooked food warm or to gently toast buns.
- 均一な調理: The black matte enamel cast iron cooking grill ensures even heat distribution for consistent results.

Figure 2: The Milex 2 Burner Gas Braai in use, demonstrating the cooking surface and side shelves.
製品終了view ビデオ
このビデオでは、view of the Milex 2 Burner Gas Braai, showcasing its design, features, and ease of use, including the push-button ignition and cooking capabilities.
メンテナンスとケア
- グリル焼き網のクリーニング: After each use, once the braai has cooled, clean the black matte enamel cast iron cooking grill. The product care instructions specify "Hand Wash Only" for these components. Use a grill brush to remove food residue.
- 外装清掃: Wipe down the steel hood and front panel with a damp 布と中性洗剤を使用してください。仕上げを傷める可能性のある研磨剤入りの洗剤は使用しないでください。
- バーナーのメンテナンス: Periodically check burner ports for blockages (e.g., from food debris or insects). Clean with a wire brush if necessary.
- ストレージ: When not in use for extended periods, store the braai in a dry, protected area. Disconnect the gas bottle.
トラブルシューティング
| 問題 | 考えられる原因 | 解決 |
|---|---|---|
| バーナーが点灯しない | Gas bottle empty or valve closed; Ignitor not sparking; Blocked burner ports. | Check gas level and open valve; Check ignitor battery (if applicable) or connection; Clean burner ports. |
| 不均一な加熱 | Blocked burner ports; Incorrect gas pressure. | Clean burner ports; Ensure regulator is correctly attached and gas flow is adequate. |
| ガス漏れ検出(石鹸水テスト) | Loose connections; Damaged hose or regulator. | Tighten all gas connections; Replace damaged hose or regulator immediately. Do not use the braai until the leak is fixed. |
製品仕様
- ブランド: ミレックス
- モデル: 2 Burner Gas Braai
- 色: 黒
- 材料: Stainless Steel (Burner, Thermometer, Handle), Steel (Hood & Front Panel), Cast Iron (Cooking Grill), Iron Wire (Warming Rack)
- パッケージ寸法: 79 x 58 x 44 cm
- 商品の重量: 13キロ
- バーナー: 2, #409 Stainless Steel
- 点火: 自動点火
- 含まれるコンポーネント: Gas Braai, ZA Regulator, 60cm PVC Hose
- 推奨用途: Outdoor Home Use
保証とサポート
For warranty information or technical support, please contact Milex customer service. Spare part information is not available or provided directly in this manual. Please refer to the official Milex website or your retailer for further assistance.
You can visit the official Milex store for more products and information: Milex Store on Amazon.co.za